Leaderboard


Popular Content
Showing content with the highest reputation on 02/19/2020 in all areas
-
There is some "wiggle room" for GMLs to interpret certain standards.2 points
-
Hey Brian, I just finished doing the same thing for a guy in our garrison. We did have some extra cover strip material, but other than than we were working with the existing finished armor which was woefully undersized. I cheated in every way I could - I used slightly larger coverstrips on the back than the front The front coverstrips were probably more like 25mm I opened up the front seam and separated the two halves so that they don't butt up to each other. I added a inner coverstrip for reinforcement. The pieces were trimmed too small so I did this to buy a few mm. The front coverstrip isn't quite wide enough to cover the whole raised ridge on the front - this bought me a couple more mm without making the actual coverstrip any bigger. All return edge at the top was removed and sanded smooth. His arms were resized the same way, so the armour looks proportional .2 points
-
Yes, that's right. If you're the same size and proportions as on screen, stick to those. Adjust as required. Brian, I'd recommend bringing your GML in on the discussion to see what they would accept as well.2 points
-
@Sn4k3 "standard" cover strip sizes are: arms - 15mm Thighs and front of shins - 20mm back of shins - 25mm of course, depending on the size of you, your arms, and your legs, these widths can be altered proportionally for your body size. Some people can get away with (or have no choice) to make the coverstrips larger for correct sizing. The key is to keep the relative widths proportional as best you can. Hope that helps.2 points
-
THERMAL DETONATOR PART 1 Now to tackle this part which I find to be most time-consuming due to the fact that the CRL states "no visible seams" and the darn thing comes in 5 pieces.... The first part of the TD build will focus on the top part, while part 2 will focus on the flat plate, and part 3 will focus on how the back plate joins with the back of the abdomen piece. This is the TD after gluing the 2 end caps and 2 halves together. And after applying epoxy putty to the joints: After the putty dried, it was several repetitions of sanding, , priming, more putty, sanding, priming, more putty, sanding, priming.... And the results: End of Part 12 points
-
After years of researching I finally purchased an AP trimmed helmet last year. My Tie Pilot build got in the way and after a year of procrastinating, I decided to purchase the untrimmed armor and get started. I have finished the helmet and will be posting my progress so far in a few posts.I am less confident with the trimming and assembly of the rest of the armor which is why I am starting this build thread. ~Ryan
 1 point
 -
Well this is not something I would have thought that I would need to consider; however, recent experience has caused me to investigate this issue, here is what I have learned. When I started my ROTK build, the only supplier of ROTK gloves that I knew of was Imperial Boots (IB). IB calls these gloves Anthology Trooper Gloves (ATG) and they sell them for $69.90 plus shipping from the Philippines. I just checked their web site and they have reduced the price to $59.90 plus shipping. https://www.imperialboots.com/product/anthology-trooper-glove-shore-trooper/ So I purchased a set of the ATGs along with the T-7 boots for my ROTK build. When I received the gloves I tried them on to test the fit and the wrist immediately separated from the gloves in several areas. Additionally, the side seam separated as well. I assumed that I may have received a bad pair that were not stitched properly and decided to not contact IB about the issue since I had a sewing machine and I did not want to wait for the extended shipping from the Philippines. I re-stitched the gloves and did not give it another thought. I put the gloves on several times since then for application pictures and test fitting of the armor as I built it. My first troop in my ROTK was at DragonCon 2018. This was 4 months after I purchased the gloves. During the 3 hours I wore my kit, I observed that the gloves seams along the thumb had separated. I detailed all of this in my ROTK build here on FISD. https://www.whitearmor.net/forum/topic/44463-11b30b4’s-rotk-build/ In this picture you can see the re-stitched wrist (Yellow Circle), the freying of the elastic wrist from contact with Velcro (Red Cricle) I assume, and the separated seam on the thumb. So after DragonCon I first did a search to see if the gloves that they used for the screen version was a modified off-the-shelf glove. I was unable to discover any existing gloves that match what was used for the movie; however, I did find another manufacturer who sells a ROTK glove. The company is Endor Finders (EF) and they are located in the USA. EF sells a Rogue One Trooper Glove for $55.00 plus shipping. So I ordered a set and received them. https://www.endorfinders.com/costume-accessories/rogue-one-trooper-gloves Shortly after I ordered the glove from EF, I contacted IB about the issues I have had with the ATG gloves. After a few back and forth e-mails, IB sent me a new pair of the ATG gloves. I won’t say it was a painless experience but they did replace the gloves so there is that. I have held off doing this comparison until I received the replacement ATG gloves and now that I have them, it is now time to do this. At first look both gloves look almost identical. Honestly, I expected the gloves from EF to be the exact same as what IB sells. Once I got the EF gloves I quickly noticed the differences. As you can see the cuff on the EF gloves is longer although both gloves are the same size. The EF gloves fit a bit tighter but that is because they are lined on the inside while the IB gloves are not lined. Here is the palm and back of the IB glove. And this is the EF palm and back. A side by side of EF (left) and IB (right) Inside lining of the EF (Left) and no liner on the IB glove (Right). Inside the EF glove. Inside the IB glove. Wrist of the EF glove. Wrist of the IB glove. The EF glove with armor. The IB glove with armor. My observations: 1. The ribbed fabric used by each manufacturer is different. So I looked at some reference pictures from SW celebration. In this picture the glove fabric looks like the grid fabric used by EF. However, in these pictures, the fabric looks more like the ribbed fabric used by IB. So I am at a loss to determine which is correct. I suppose that both could be correct. 2. The wrist on the EF glove is fabric and not elastic. The fabric on the IB glove is elastic. 3. The EF glove is lined and fits like an Isotoner while the IB gloves are unlined and fit like Mechanix gloves. 4. The stitching quality appears to be better in the RF gloves while even the new IB gloves are poorly stitched. 5. The Velcor patches on the back of the EF gloves are opposite (One soft and one hard) while the Velcro patches on the back of the IB gloves are both soft. 6. The leather on both gloves looks to of similar type and quality and screen accurate. Conclusion: The EF glove seems to be a better product and is sold for a few dollars less than the IB glove. I have not trooped the EF glove as of yet, so my opinion may change once I get more experience with them but I doubt it. I hope that some of you find this information helpful. Happy trooping.1 point
-
OP (MV) Post #11 Well folks, it's been a minute since I last posted. Work has been crazy, medical concerns with my infant, and home improvement projects. Now back to armor improvement, or rather, construction. Well, sorta, as you'll see. Perhaps the most significant update is that I received my TK strap system from @TheRascalKing. I figured I would enlist the expertise and service of a seasoned TK veteran and purchase a kit, rather than make my own [mistakes]. The double snap strapping items I received are shown below, but keep in mind that Justin offers several options, so this is simply what I selected. He has kits which contain both more, and less. Throughout the process Justin was great about communicating updates, and unless I were to decide to make my own, if I ever needed another kit I would go straight to him again! If you remember, keep Justin in your thoughts and prayers, as he has been battling cancer. Additionally, not too long ago I received this box in the mail. Yes, it was ABS, but no not my white TK armor. Just another one of my distractions while I wait for my ATA kit to arrive—a 3D printed black ABS Shoretrooper helmet from Christine (Cricket)! She had scaled it too small for her to wear so I thought I'd snag it to get some practice at finishing props and use it as a display (probably at work). Some additional photos may pop up later on this build thread, but I'll try to keep things mostly on-topic for this TK build thread. Speaking of 3D printing and distractions, I sold my drone and purchased a second-hand new-in-box Ender 3 Pro printer to use for some TK props (DLT-19 and E-11s). The cash from my drone sale greatly exceeded the cost of the printer, and I'll be able to cover the cost of my armor with the remainder. Now just to unpack and assemble the printer, choose some PETG and/or ABS filament (once I build an enclosure), and time to start practicing! And not that I need so many E-11s, but I grabbed these two Rubies blasters on eBay for $24 shipped which I will be refinishing with more accurate features, in a manner similar to artimorty (thread) and happytrooper (thread). I figured it never hurts to have backup, and I'm sure my 8-year-old nephews will love "playing" with them too. When I crunched the numbers, the seller I bought them both from only netted $8-9 from the sale once shipping, ebay, and Paypal fees were accounted for. That does not include the up front cost that the seller would have initially purchased them for, so great deal for me—maybe not so much for them. Since I'm apparently a glutton for distractions, and am probably stretching myself thing, I've also begin the initial steps of scratch building a DLT-19. Here are the first components purchased for the build, and I'll likely be starting a dedicated thread in the weapons locker forum. I'm starting on the barrel and muzzle, and will be taking inspiration from the following threads: Astyanax | rl180 | HappyTrooperDotCom Now for a soft goods update. I've already picked out all the soft goods I'll be purchasing for my TK, and the only thing keeping me from pulling the trigger with Darman and Kittle is the money. I think I may ask my wife for some Etsy gift cards for my birthday in several months. I also purchased a super cheap 2-pack of balaclavas on Amazon, but I haven't even opened them to check the quality. I suspect they'll be pretty bad at that price-point, and I'm not even really sure if I'd want to wear one anyway. I also dug out my old black cotton marching band gloves from high school, to potentially wear under centurion-level rubber gloves. Sure, I could purchase some for less than $10 on Amazon, but I thought it would be kinda neat to recycle the ones from my marching band years for use during troop marching. As usual, here is my obligatory non-build Star Wars-related content. One of my young nephews recently had a birthday party which was partially Star Wars themed, and while I expected all the children to receive party favors, I was surprised to get one myself. My sister-in-law must think I'm a kid at heart. She might be right. First is the Leia doll which my baby daughter received (from Galaxy's Edge), followed by my mini lego set. I think I'll display it with my Lego Microfighters. For those of you interested, I've also just posted an update on my HWT build thread, linked below. I've made a bit more progress on that front since there's the backpack, pouches, and T-21 which I have been able to occupy myself with while I wait for my ATA armor to arrive. Until next time, as Stephen A. would say, peace and love.1 point
-
I'm so sorry , that one was a special gift, .1 point
-
That Costa Rica one is on my list of needs if you ever feel like unloading it. Sent from my iPhone using Tapatalk1 point
-
Not making any collection, just received as a gift and bought some of them that really like . and a "V" Buck from Fortnite Video game as well1 point
-
It is more or less the same for everyone. GMLs' job is to verify that applicants' costume meets the standard of the CRL. Some are sticklers more than others. Even if we were to centralize costume approval at the detachment level, unless only a single person is approving costumes, there will be some small variation in what one approver finds acceptable to another.1 point
-
I am not much of a collector so just these 4 (same coins just flipped I only have 1 of each) Think its a full set of 2018 (normal, EIB, staff) and then the 2019 staff coin on the right. The only other coins I have is a pair of these: These are the first coin run my Garrison did that I remember since I joined, there may have been one just before I joined but not 100% on that one.1 point
-
Or just use pop rivets as per original1 point
-
Yes that’s the question and you answered it. Thank you. Sent from my iPhone using Tapatalk1 point
-
The frown is not flush with the surrounding helmet. If that is the question.1 point
-
Take a look to this video. cheers1 point
-
Hi Daniel, as greg has pointed, there is a defined cover Strips size to be Screen Accurate . But in some cases you can exceed a "little" this measures in order to fit better but being still Screen Accurate. arms and forearms - 15mm Thighs and front of shins - 20mm back of shins - 25mm II would recommend when building an armor to look at other's Building Threads , High levels aprovals post, reference Photos and videos. Cheers1 point
-
Thanks! I will be switching those with the Ukswrath Hovi mic speakers once they come in which have the white weathering.1 point
-
Does anyone know what is the maximum size cover strip you can get away with on the back side of the thigh seam?1 point
-
Thanks for the link. This is a cool mod but not sure the guy I am helping can do this. I will pass this on and see what he says. I am near Tokyo and he is in Osaka so we are not close by otherwise I would try and help him with this. really appreciate the help.1 point
-
Hey Jeff, welcome to FISD! I am still really new here and haven't received my first armor yet. (I'm very excited for it!) I ended up buying an AM from Dave's Darkside Depot, a well recommended vendor on the forums. His kits are easy to assemble for newbies and easier to adapt for the larger builds like myself. Or so I've been told. I'm not really in the best place to recommend AM since I haven't even built my first armor yet, but it might be in your interest to look into those kits if you haven't done so already. It's a US vendor as well, and he will be shipping out a large group of armor sets (mine included) soon! My question for you is... have you done your blaster research yet? After I bought my armor, I then realized I needed to do a ton more research for getting my hands on an E-11. Especially since I want to go Centurion status right off the bat.1 point
-
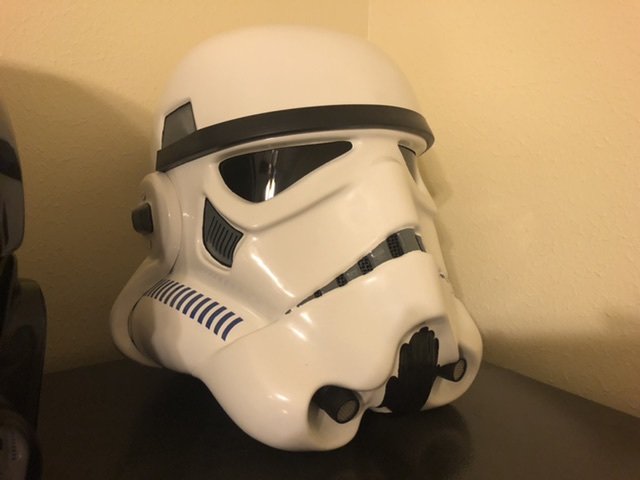
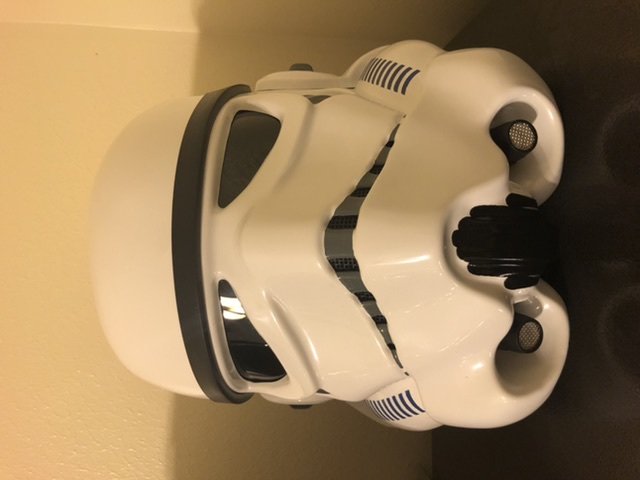
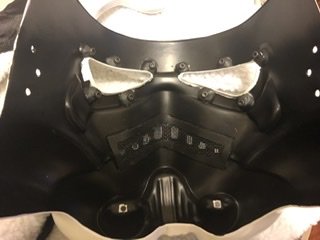
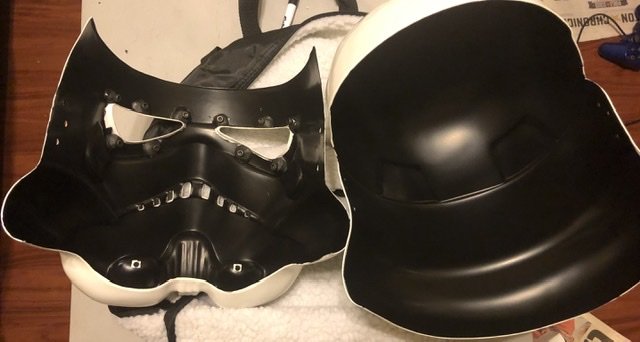
Tube Stripes, frown and tear/trap stripes. One note with the tube stripe stencils. I let the paint dry and the edges were peeling up when I was trying to remove it. I was able to carefully cut the stencil from the paint with an exacto knife. I still had to put tape down and touch up the edges and then clean up with a toothpick and mineral spirits. In hindsight it would be easier to try and peel the stencils while the paint is still wet. Either way I think it turned out ok.1 point
-
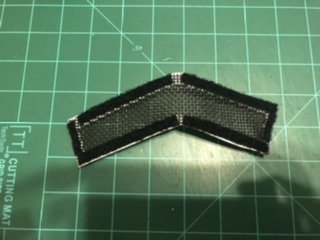
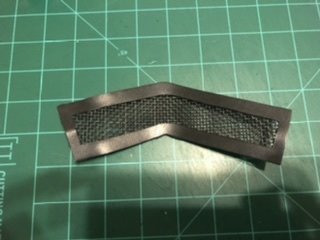
I wanted the frown mesh to look clean but still be removable. Following Spyder’s tutorial I used .030 styrene and created a frame and sprayed it with plastidip. Then I super glued the mesh to the frame and applied Velcro to secure it to the interior.

 1 point
 -
Awesome work on that TD Jasper1 point
-
Nailed it again! Easy work for a man of your skills JT [emoji1305] Sent from my iPhone using Tapatalk Pro1 point
-
I keep the ones that mean the most in a display box on the wall. I have 2 of most of them so that I can show the obverse/reverse of each, but I have a ton more that I just don't have the wall space to display.1 point
-
I have nearly the same collection as you do Glen, have a few others and don't have the Riot Trooper coin though. I have all from this past year except the gold OT EIB, my gold EIB from the last run Wyatt did with the 3D dies (so shiny)... but I don't actually do all that much collecting, most have been gifted to me or were trades with Garrison members.1 point
-
For those having a read through here is a similar thread on the subject1 point
-
1 point
-
I Think this Thread could have a permanent place into the "New Approved Members Section."1 point
-
Hi JEFF and welcome to the FISD!! It looks like you have done your research which is excellent news. For what it’s worth I’m 5’9 and 200 lbs so I’m around your area. The one thing I can assure you is that TM can fit up to a 36inch waist. RS and ATA do not provide much extra room so you may need to shim or you may just have gaps between your AB and Kidney plate. If you are around that size then AP is also another good alternative. And also we have all been in your place before. Many of us are not “handy” and worry about making mistakes or whether or not you can do this. Well I can assure you that you can! Also building your armor comes with many positives. Like if you need to fix something in the future then you won’t have any reservations to do it yourself. Also, you have a great sense of accomplishment at the end. If you have any other questions then don’t hesitate to ask.1 point
-
Update on my projects Approved: 1) TK - ANH Stunt / L2 2) TK - ANH Hero / L3 3) TK - ESB / L3 4) TK - TFU Commander / L3 5) TK - DICE Shocktrooper 6) TD - Sandtrooper 7) TS - Snowtrooper 8) IC - ANH Bridge Crew 9) TI - Reserve Pilot 10) TI - Rogue One TIE Pilot Working on: 1) TX - Inferno Squad Del Meeko / 60% 2) TI - 181th TIE Pilot / 20% 3) TI - 181th TIE Pilot Baron Fel / 20% Planing / on paper: 1) TK - ROTJ (2020 project) 2) CC - Clone Commando (2021 project) Not looking for approval: 1) Rogue Squadron Pilot Baron Fel / 50%1 point
-
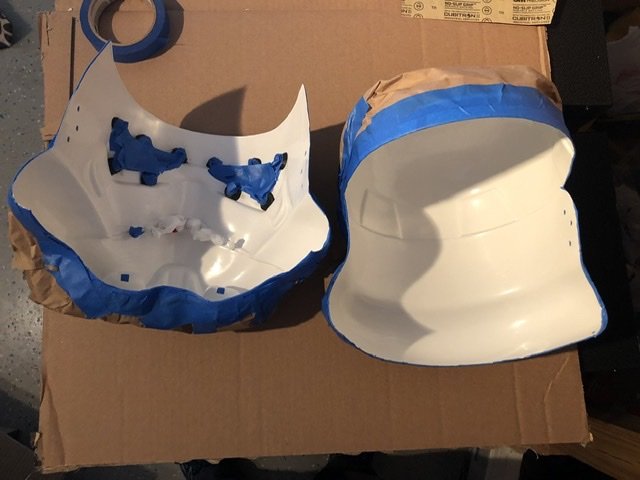
I prepped for spraying the plasti dip by lightly sanding the interior with 400 grit sandpaper. I left the screws in the posts and taped around them since the tape didn’t want to stick to the sugru. I used Scimitar’s plastic bag trick for the teeth.
 1 point
 -
I’ve built both his trimmed and untrimmed kits. He does a great job trimming but having the flexibility to size some pieces exactly how you want them is worth the extra work. Bucket looks great! I have a fairly detailed account of how I trimmed the armour in my sandtrooper build. I can send a link if you can’t find it. Good luck with the build.1 point
-
Looking forwards to seeing the build progress, great idea to purchase untrimmed, a little extra work but it's nice to have some extra material just in case1 point
-
Best update my list: Approved: TK - ANH Stunt L3 TK - ANH Hero L3 TK - ESB L3 TK - Heavy Weapons Trooper TK - TFA L3 TK - TLJ L3 TK - TLJ-E L3 ID - Officer ANH L3, Lt Tanbris L2, Lt Jir L2, Lt Childsen L2, 2nd Lt L2, Lt Com Praji L2, Lt Treidum L2 ID - Warrant ANH L2, ROTJ L3, Maj Hewex L2, Joff L2, Col Dyer L2 DZ - Jawa ANH DZ - Tusken ANH TB - Biker Scout Lancer L2 IC - Crewman ANH L3, ESB L3, ROTJ L3 IC - Mechanical Crew L3 TI - Reserve Pilot IG - Gunner TR - Guard ROTJ IN - Navy Trooper ANH L3, ESB L3, ROTJ L3 IN - Navy Dress Uniform ESB L2, ROTJ L2, Sgt Bean L2 ID - Line Officer - Olive Retired: CT - Clone Trooper No CRL: TX - Sith Trooper1 point
-
This is The Way.1 point
-
Hi Brien, the following link may help. cheers1 point
-
Boots ordered! (Imperial Boots)1 point
-
Many thanks Randy, well hand surgery went better than the surgeon expected so that and with the blessing of the new DL I will be sticking around, sorry everyone1 point
-
Those definitely look like scuba or firefighter scba air cylinders! Wonder where we can get some that are not as heavy... Maybe someone can vac form them1 point