Leaderboard


Popular Content
Showing content with the highest reputation on 01/20/2020 in Posts
-
Noted, and thank you! I just ordered one!3 points
-
Hey Jeremy I didn't go the foam route a a guy in my local garrison resized them for me and they fit a lot better now2 points
-
I didn't mean that, i meant about the gap between the two parts of the left thigh at the bottom ridge, the space between the pieces should be filled with something that match the color of the armor, or paint after dry. But yeah, also that, the sniper knee is going under the thigh piece, that should be fixed too, maybe triming a little from lower part of the shin pieces, maybe trying to move each thigh to outside a little so they maybe can go up just what he need...2 points
-
Hey everyone! Back with an update! Rough trimming continues. Lets start with the chest. Chest Trimmed the sides down to accurate size. For the back/ yoke, I'm going to wait till I glue them together to trim the sides so that it looks like one piece. Also I found the trim line and drew it out in pencil. Shoulder parts Dremeled them out using a cutting wheel, made quick work of those. Abdomen Didn't do much trimming, KB already rough cut the top and bottom edge and I didn't want to trim too much off. I only trimmed the sides. Shins The shins were relatively easy, and they should be easy to put together, as unlike the thighs they already have the curve molded in which is good. Blaster My 3D print of the blaster designed by The5thorseman is basically finished, and my does it look awesome! I'm blown away by the detail, it's just incredible. Forearms Did a little more trimming on the forearms with the cutting wheel, looking close to where I think it should look. And that is pretty much it. On a side note, KB's rough trimming job is ok for the most part, but on a couple of the pieces they are slightly hacked at. Nothing major, but still a slight inconvenience. I'm also trying to make the thread easier to read, note the change in font size. Until next time2 points
-
I asked my GML about the gap and brought up my S-trim and shoulder straps not being held down at the back. I will be getting elastic bands when I can to fix that but have rearranged my S-trim to look like this Sent from my iPhone using Tapatalk2 points
-
Hey Nadas looking good brother. Regarding the Ab/Kidney side gap, according to the CRL there is no measurement requirement at basic however, please check with your garrison's GML as to what they require. The following is all that is required for basic Ab to Kidney. That said L2 and L3 will have tighter requirements. Abdomen Armor The abdomen armor has a button area that matches the color pattern shown (3 blue + 6 gray); buttons are approximately 7/16" (11mm) in diameter. Besides filling in the thigh gaps front (as suggested by Aizenoso) do the same for the rear or trim for mobility. I also suggest you remove any return edge that may help the armor sections sit closer to your body.2 points
-
https://www.whitearmor.net/forum/topic/11538-the-various-types-of-armor-and-where-to-find-them/ This is the best place to go for that advice. The vetted maker post is constantly updated so all are good choices. Keep in mind some are suited to specific body types and versions of trooper armor. All the info is in this thread and although it’s a lot of info I highly suggest you take in as much as possible. Have Fun! Jim TK-508992 points
-
Perhaps it's a bit early to make this topic, though in my mind I feel its good to get things right... before the boxes come! A good use of time, since there's currently a snowstorm. Coming in.... R1 TK Hard Armor kit - ABS Plastic - 850 Armorworks - 2/11/20 Estimated ship R1 TK Helmet kit - Hybrid Urethene / Polyester Resin - Headshot Props - 2/4/20 Estimated ship (Yes I'm aware about them) E-11 prebuild - Aluminum, Resin, Plastic - QuestDesignCanada - 3/28/20 (will need "upgrades" for R1. D-Ring, Counter, Flashlight) R1 TK Gloves - Leather - Endorfinders - 1/24/20 Estimate Arrived 1/23/20! Helmet Lens Plastic -TrooperBay - 1/25/20 Estimate Arrived 1/25/20 Frown Mesh Wiremesh -TrooperBay - 1/25/20 Estimate Arrived 1/25/20 Helmet Brow Rubber -TrooperBay - 1/25/20 Estimate Arrived 1/25/20 Helm S Seal Rubber -TrooperBay - 1/25/20 Estimate Arrived 1/25/20 1P Undersuit Cotton/Lycra -ExtremeRacing - 2/1/20 Estimate On the Todo / Looking into / to Order list: R1 TK Gloves - Leather - Endorfinders Undersuit.... Any recommendations? Neck seal... Contacted GeekyPink with some Qs, their products look great. Balaclava... I own some winter balaclavas, though they're... for winter.... should this be tight fitting or loose? The one I have is tight and a bit thick. Knee Gaskets.. Depends on undersuit. R1 TK boots -Leather -Imperial Boots (Reminder set for 12am Feburary to make an order) TK Belt -Canvas -Imperial Issue [CRL States BELT SHALL BE MADE IN PLASTIC / 2 PART PLASTIC, included with 850 Armorwork kit.] Helmet Lens... Trooperbay or Amazon/Ebay for dark green face-shields lens. Harness... Possibly GeekyPink or just wear black suspenders. Paints - Full automotive Primers, Flat, Gloss, paints. (Local) Gonna touch base with my father on this, as he's a current Car Salesman, former Mechanic and Bodyshop worker. Strap/ Hookups.. Elastic straps with snap buttons Teeth mesh... Easy to find in local stores. Same goes for the Hovi Mix Tips (Hovi Tip Covers still needed) Brow trim... Rubber bar from local stores.. Anyone have reference on how much the brow protrudes? ABS plastic... Hoping to use the 'scrap' from the Armor kit for details like the Tube stripe blue indents. Aswell as re-enforcement if needed. If not, then Buying a sheet off of amazon. Most of the small stuff here, like glue and buying more clamps Travel container... Looking into it. Local Garrison suggests 50 gallon Husky 37 inch wheeled container. Purchased! Helmet lining... Home made using foam and leather Onboard mic... Possibly iComm from TK6294. Hide it underneath all the clothing / chestplate. Helmet AC... Something I plan to look into later. I've never really had an overheat issue with my head in previous costumes with thermal wear. (regular clothes + insulated bodysuit + biker pads). Concerning fogged up lens, usually id coat them with a AntiFog agent / Ceramic spray. Lasts a few hours, though temporary. M300A Mini Scout Light.... would this work? https://www.ebay.com/itm/Element-Airsoft-M300A-Mini-Scout-Flashlight-Black-180-Lumens-EX-191-/141610520007 E-Web Heavy Repeating Blaster... out of the price range Anything I'm missing? My workshop and dremel have been ready. Also worth noting I've been in contact with my local garrison, have been very welcoming and eager to help if needed! Goal: Complete before July 2020. 5 months of building. Acceptance into 501st eventually leading to Level 3.1 point
-
I prefer the overlap look, I used enough overlap for a piece of Velcro to run along. Coming along nicely1 point
-
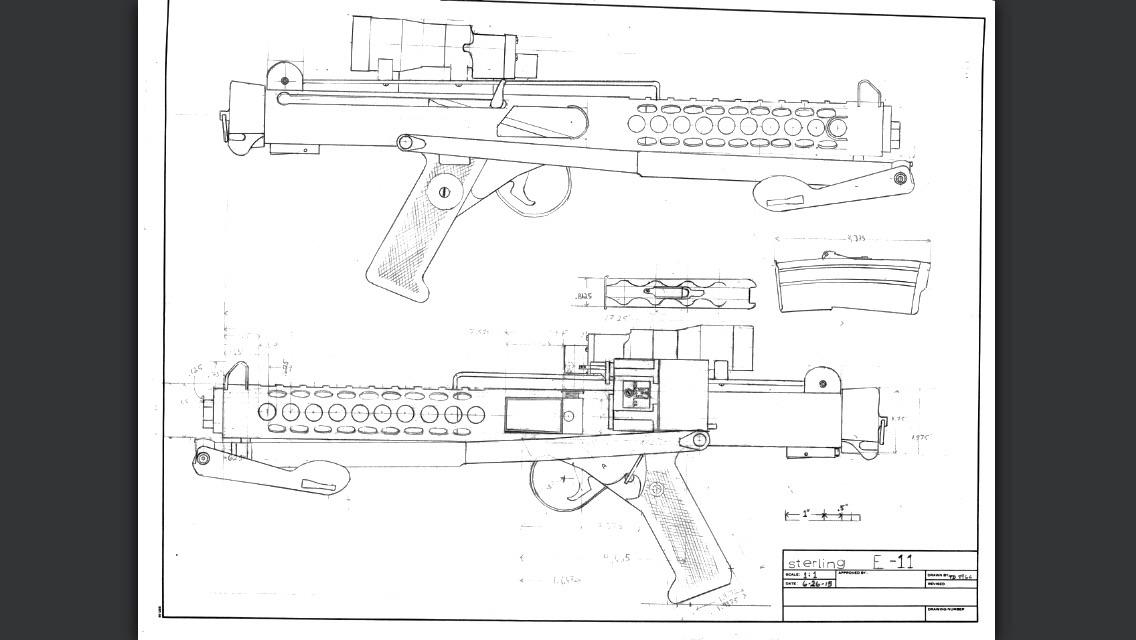
I made these drawings taking measurements from an actual British Sterling. The measurements are 1:1 if printed out to where the 1" in the bottom right corner measures an actual inch. If your interested, I can email the printable PDF of this file.
 1 point
 -
I didn’t even know that overlap was allowed, will it affect approval at any level?1 point
-
Thank you for all the feedback, I feel like my shins and thighs sit nice on me they don't clip with the cod or butt plate and my shins don't touch expect the sniper knee which I have pushed out and planning to add some foam/sponge to the back of my thighs so it stops it coming under the thigh. it also does not bite me much when moving so I can walk for hours.1 point
-
Welcome to the FISD Sent from my SM-G960F using Tapatalk1 point
-
Ah, thanks Glen. I’ll try the same next time and see if I get the same result. :-)1 point
-
I edited your post and used the share links, appears to work for me, perhaps as I'm using computer!1 point
-
Hello and welcome aboard1 point
-
Got my TK and got my approval yesterday1 point
-
Hello and welcome aboard!1 point
-
Hey everyone! I think I'm almost ready to glue the shins, just a little more sanding. Are they looking ok?1 point
-
Welcome to FISD!1 point
-
It looks (to me at least) that the chest and back have been trimmed down for someone who is much shorter since the return edges at the bottoms appear to have been removed completely (like they were for Luke). Unless you are over 6 foot there ideally should be a smaller gap between the bottom of the bucket and the scoop at the top of the chest piece. same with the top of the back plate. Do you have padding in the top of the bucket? It looks like removing it would solve that issue and allow it to ride lower. Sometimes extending the chest/back strapping will allow it to drop a bit more in the back, but your shoulder bridges are pretty short as it is. I find it kind of odd that the rest of the armor actually fits pretty well. You have a few other issues that can be fairly straightforward to fix. I hate to say it, but whoever built this armor mismatched the calves. The outside pieces have been glued together (right leg) and the inside pieces are on the left leg. This accounts for the difference in size. The rear cover strip on the right one is also on the wrong side, and the opening should be on the inside, just as the left one is. The holster strap is the Hero type, and has 4 fasteners instead of 2 as required for Stunt. There is a rivet in the sniper knee plate on the ridge as seen in ROTJ armor. Don't get discouraged, James. You have some work to do, and you may even have to replace the chest and back, but we will help out whenever we can, so hang in there.1 point
-
Welcome aboard.1 point
-
It's just my opinion, but I would hold off on reducing the calves for now. You may want to reduce the angle of the thigh ammo pack a bit, but the spacing between the bottom of the thighs and the top of the calf looks ideal to me.1 point
-
Got my handguards from Joseph today, they are really nice! I hope they will stick as I'm getting low on E6000, will post pictures when they are dried.1 point
-
Looking good. If your gonna trim the shins start off with small amounts. 100 small cuts is better then one big cut too much Sent from my iPhone using Tapatalk1 point
-
I agree with the feedback provided by others. Elastic at the back of the straps are not required at basic. Definitely watch out for that knee to make sure you don't crack it!1 point
-
Looks good for basic. I'm not sure what the problem was with the S-trim - that is an upper level requirement anyways. If you can't move your thigh pieces up, you could always try a bit of padding to keep the sniper knee from getting under the thigh. A little padding at the back of the thigh and a little padding at the front of the shin in the knee area might help. Good luck!1 point
-
Very nice work.1 point
-
Hi Glen, I was trying to embed the link (as it looks nicer, lol). Sharing the plain text to the link works fine. :-)1 point
-
1 point
-
Looking good.1 point
-
Welcome to FISD Edgar. Search is the clue to take the best desicion. Feel free to ask whatever you need before you pay a cent. Good luck and we are here to help you make your dream of being a Imperial Stormtrooper come true. Cheers1 point
-
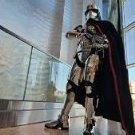
HotToys just released some photos of their upcoming 1/6 scale figure. Facebook post1 point
-
Thank you! I’ll post some close ups once it’s done printing1 point
-
Thanks! For the blaster, I have a 3D printer so I’m printing it myself. Some pieces are not there as they’re still being printed1 point
-
Making speedy progress mate - great job! I trust the blaster is a quick test build with the smaller detailed pieces and end cap missing? Making sure whoever sent it didn’t forget pieces! Sadly happens all too often. Sent from my iPhone using Tapatalk Pro1 point
-
If you elect to go with the more accurate sew in Velcro the cover is actually two layers thick and the inner layer (unseen) is what the Velcro is sewn to. Just more info for your decision1 point
-
Here is a replica holster by Gino who had access to a complete original ANH suit to cast, and it's a perfect example to show. I might be able to show the details on screen used armour but I don;t have a dead on shot like this. Notice how the mounting straps are on the front of the holster? There are two ways the straps were mounted to the belt but the way they were attached to the holster are the same. Let me explain. It's my belief that the holsters were originally made using loops to hang the holster from the belt - just as they did in ESB. But for whatever reason they changed their mind and decided to rivet the holster directly to the belt, so the loops were cut. The cuts were made either to the front of the strap, leaving a small black tab commonly seen on the front of the holster and the tan colour of the inside of the strap showing going under the belt, and some were cut at the back of the strap so you see black straps attached to front of the holster (as in the photo above) and the tabs would be on the back of the holster. This is why you will see some troopers with black straps and tan straps, but the main retaining straps and the shape of the holsters were always the same as far as I have seen during my research over the years. So, while it's acceptable to have the straps mounted from the front of the holster, the way Darman has done it shouldn't have the tab on the front but on the backside of the holster and the straps should be black with the tan to the inside.1 point
-
Hope these new ones help! Let me know if you need anything else!1 point
-
Got a few more hours in over the past days. Belt and thermal det are finished. Have been reading about cover strips and the different widths. Started work on the right arm. Lots of trial fits with masking tape and have glued up.1 point
-
Thanks for that! I was just confused! I'll be updating the pictures in a little bit! Just got done taking them!1 point
-
Ideally, the above requested photos should have been posted in your EI submission as well. There are no close-up images of the front of the helmet, and the side views could be a little closer. Since Centurion is the top level of approval, it's important for us to see all the details possible on both the bucket, the armor and how it fits. As mentioned in your EI approval under Centurion Requirements, "More photos may be requested in the future that allow us to make better decisions on possible adjustment". For Level 3, re-using the same photos from your Level 2 submission is fine for certain items, but we normally ask that all new pics be taken, especially for those areas that required changes/alterations. Having the person taking your pics fill the frame instead of taking them from a distance will help immensely! You put a lot of work into this build, Katie, and those future Capt. Phasmas will be looking to your approvals as a benchmark, so we want to make sure everything looks great!1 point
-
Hello and welcome!1 point
-
Hello and welcome to FISD. A lot of help you can get on this forum, do not hesitate to ask. Have fun here.1 point
-
Welcome to the FISD! Good Luck Future Trooper!1 point
-
Welcome to the FISD! As Sha Sha mentioned, WTF kits can be scaled up and down. I have a lot of mileage on one of the WTF ANH Stunts and it's held up great. PM me if you have any questions.1 point
-
Welcome to FISD. Good luck with your project !!1 point
-
Welcome aboard the great FISD! Sent from my iPhone using Tapatalk Pro1 point
-
Welcome to the FISD! By finding Cricket's builds you are certainly off to a great start. Start a build thread anytime. Finding particular info on this site can be challenging sometimes (there is so much) so don't be afraid to ask questions. We are here to help. Good luck!1 point
-
Thanks all, pulled the trigger on a pre trimmed AP kit, ordered boots ( since I cannot locate mine as well as my darn blaster which I know I didnt sell!) and all my soft parts! Super excited!1 point