Leaderboard


Popular Content
Showing content with the highest reputation on 09/18/2019 in all areas
-
I use webbing everywhere that needs to maintain alignment. Too many droopy shoulder bells and misaligned armor sections troopers running around because of elastic IMHO lol. I do use elastic on the right side of my ab and bicep to forearm for accuracy and more flexibility but that's it. After 5 years of building multiple armor I don't have any cracking and very seldom do I pop a snap, especially using quality snaps. Keep up the good work Brad2 points
-
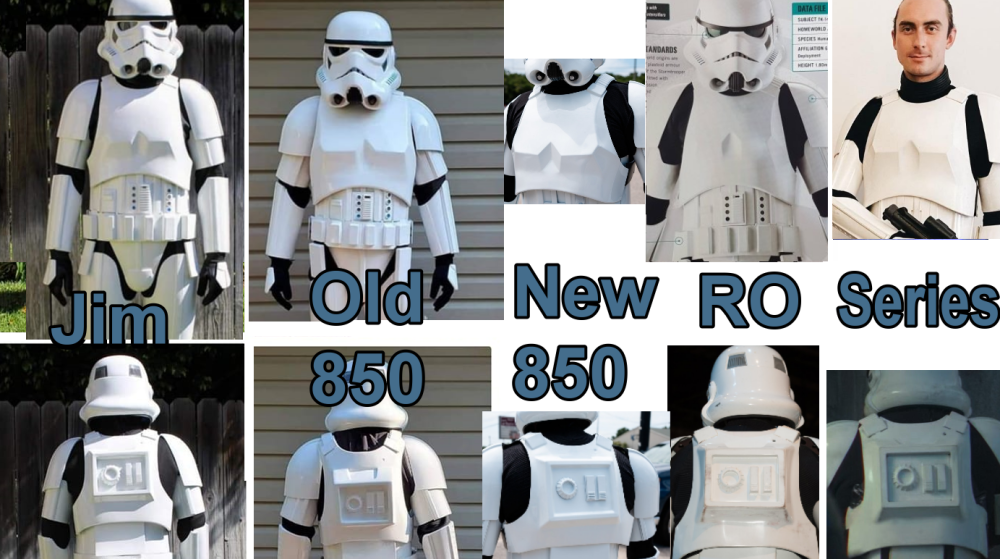
Rogue One TK Sources (updated 8-10-2020) Since I keep seeing these questions popping up from time to time, I figured I would make this simple for everyone. I do not have experience with some of these sources so if any of you do please chime in. Further, I am not pushing or supporting any of these sources, I am just providing you all the list and what they provide, and you choose who and what you want to go with. Lastly, If I do have experience with a specific source, I will note that and my overall experience with them. I am not pushing any sources, rather supplying you a list to work from if you are having a hard time finding stuff. Please feel free to add to this or provide "creative" comments. ROTK Sources Jimmiroquai Armor, Helmet, Under Suit [email protected] Jim was the first source for ROTK armor and is considered very accurate. The armor is flexible fiberglass and requires painting. I have a full set or armor, helmet, and under suit from Jim and I like everything. 850 Armor Works Armor, Helmet, Under Suit https://850armorworks.com/ 850 AW is offering vacuum formed ROTK armor. They produce this armor in ABS and it looks accurate from the pictures I have seen. They also offer a resin helmet and undersuit now. Helmet Nico Henderson Helmet 3D print files https://www.facebook.com/nico.heath Etsy Nicolai DesertFareCosplay https://www.etsy.com/au/listing/784808040/rogue-one-stormtroopersolo-mimban Nico designs extremely accurate helmets, his Shoretrooper helmet is considered the most accurate available and now he has designed a ROTK helmet that is extremely accurate and all the greebles are separate so you can print and paint them before attaching them. You will need to message him on FB. I have his ROTK helmet files and find them to be outstanding. Suggested print orientations https://www.whitearmor.net/forum/topic/53519-recommended-printing-positions-for-nicos-tk-helmet/ Updated files TKModder421 https://www.whitearmor.net/forum/topic/53406-modifying-the-nico-helmet/ OxProps https://www.thingiverse.com/thing:4227844 Lenses Green Rogue One TK lenses to fit the Nico Henderson helmet Mr Paul's Shoretrooper Build https://www.facebook.com/totalgrunt Armor akira-yuming Armor 3D print files https://www.cgtrader.com/3d-print-models/art/other/star-wars-rogue-one-tk-first-imperial-stormtrooper-armor ( Build thread Jason @BigJasoni build thread https://www.whitearmor.net/forum/topic/49826-the-bigjasonis-rotk-3d-print-build-thread/ Updated 3D files Jason @BigJasoni updated kidney plate https://www.whitearmor.net/forum/topic/52974-rogue-one-new-generation-eib-centurion-kidney-plate/ Jason @BigJasoni updated belt boxes https://drive.google.com/drive/folders/19k-95YPTsiBJzHGIumsGLYQjQlx_S0p4 Jeff @11b30b4 updated ab greebles https://www.thingiverse.com/thing:3973969 Jeff @11b30b4 updated handplates https://www.thingiverse.com/thing:3910278 (issue with sides of model) Ox Props hand plates https://www.thingiverse.com/thing:3750366 Shoulder Strap 3D files printed in TPU https://www.whitearmor.net/forum/topic/57810-rogue-one-tk-shoulder-straps/ Hasbro Black Series Helmet Amazon and others Very nice helmet that will require significant alteration to be 501st approved. I have one and I am planning on altering it for use with my 850 AW armor. Build threads updating Jeff @11b30b4 updating Black Series helmet https://www.whitearmor.net/forum/topic/48054-11b30b4-tutorial-rotk-black-series-helmet-mod/ Colin @OddViking327 updating Black Series helmet https://www.whitearmor.net/forum/topic/52589-modifying-a-black-series-helmet-for-accuracy/ Updating Colin @OddViking327 vent/traps updated 3D files https://www.thingiverse.com/thing:5455582 Please Note HeadShotProps is temporarily suspended as a recommended vendor, until they are back to normal and gain positive feedback from our members. HeadShotProps Armor, Helmet https://www.etsy.com/listing/830810037/rogue-one-stormtrooper-armor-kit?ref=shop_home_feat_4 The armor is vacuum formed and looks very similar to 850AW, although the TD looks better in the pics than the 850AW TD. The helmet looks to be a nice pull, this helmet is roto cast with greebles Soft Goods Other than the previously noted sources many of the soft goods are available from these sources: Dark Side Closet Under Suit https://www.facebook.com/TheDarkSideCloset/ I have messaged them for pricing and shipping, and they are very responsive. Geeky Pink’s Gaskets Under Suit https://www.facebook.com/GeekyPinksPhantasticGaskets/ You will need to message here and provide specifications. Keep Trooping RO Boots, Gloves, Strapping https://keeptrooping.com/ I have a set of boots and gloves from IB. I love the boots, the gloves are not the highest quality. Endor Finders RO Gloves https://www.endorfinders.com/ I have a set of gloves from EF and I love them. Katarra8 RO Pauldrons https://www.etsy.com/listing/150178963/classic-star-wars-stormtrooper-shoulder?ref=shop_home_feat_3&frs=1 I have a RO Orange Pauldron from Katarra8 and I love it. Veeds Pauldrons RO Pauldrons https://www.facebook.com/pages/category/Product-Service/Veeds-Pauldrons-305552456469495/ I do not have any of Veeds’ Pauldrons but he is highly reviewed and respected. Sheev's Emporium RO Undersuit and Gaskets https://www.facebook.com/sheevsemporium I do not have any of Sheev's goods but I do know they have been very active in the Shoretrooper community and the quality seems to nearly screen accurate. Crow Props RO Boots https://crowprops.bigcartel.com/product/fo-r1-tk E-11s Bryan @trooper96 3D print files https://www.printables.com/model/155855-st-sterling-l2a1-aeg-and-rogue-one-e-11-conversion Sterling conversion https://www.printables.com/model/168104-rogue-one-e-11-conversion-kit-for-sterling-smg-mk4 Hyperfirm Weaponry (HFx Productions) GOING OUT OF BUSINESS, NOT TAKING ANY NEW ORDERS RO E-11 https://www.facebook.com/HFx-Productions-1669859386576227/ I have a B-Grade RO E-11 from Hyperfirm and love it. Praetorian Blasters RO E-11 https://www.facebook.com/BlasterMaker/ I do not own a PB RO E-11 but it looks awesome. S&T Full Metal Airsoft Sterling E-11 RO E-11 https://www.evike.com/products/61969/ While most of the E-11s used in RO were made using the S&T Full Metal airsoft Sterling, this E-11 is not very accurate for RO. The scope, counter, and power cylinders are all wrong and there is not a light rail or tactical light. DoopyDoo’s RO E-11 parts https://www.doopydoos.com/star-wars-props-31-c.asp It has been noted that some of the E-11s used in RO were equipped with a DoopyDoo cast of the M.H.R. Co. M38 Telescope from Sherman M4 Tank (1943 version with wide front foot). War Machine RO E-11 parts http://www.warmachinepaintball.com/online-store-replicas/ If you are looking to make a full “all metal” RO E-11, look no further. War Machine makes everything you would ever need. Bulldog Props RO E-11 parts https://www.facebook.com/BulldogPropsJapan/ Brian makes resin casts of the M.H.R. Co. M38 Telescope from Sherman M4 Tank (1943 version with wide front foot) that are completely accurate and disassemble-able. I own one and love it. I have done a full review of it on FISD. Shear Tech RO E-11, Rubber RO Handguards https://www.facebook.com/sheartech/ I am not real familiar with these guys but the E-11 looks nice and the rubber hand guards are nice as well. Picatinny Rail ROTK / FOTK E-11/F11D Picatinny Rail - (evike.com) - Link (purchase) E-11/F-11D Picatinny Rail - (justloseph63) - Link (purchase) E-11/F-11D Picatinny Rail - (m416gelblaster) - Link (purchase) F-11D Picatinny Rail - (themaninthesuitcase) - Link 3D files E-11 Picatinny Rail - (TK14082) -Link Part of Rogue One 3D files While there are a lot more sources out there this is a fairly good list for anyone to work from. I did not include sources like static burst communication kits or urethane rubber shoulder straps sources, but they are out there and if you are looking for that stuff you should be able to find them. I hope this helps those of you who are looking to embark on your ROTK journey. Rough comparison Chest / Back
 1 point
 -
I was in Wal-Mart and found out that they started carrying Scout Trooper boots All they need are a few modifications here and there. ]1 point
-
After being asked a gazillion times about how I built my magnetic shin closures, I've finally compiled everything from my TK build and put it all in one post! Let me begin by stating that I followed the tutorial here for the most part when building these magnetic shins. However, I deviated from it in order to make the closures super strong by using a magnet-to-magnet closure rather than the magnet-to-steel method outlined in the tutorial. I have worn the magnetic shins I made for my RS Props TK out on over a dozen troops, and I have never had them come apart on me. I've only had to reglue magnets twice on these shins over a two-year period: a single magnet came off after being handled a lot (opened and closed dozens and dozens of times at an armor party by those who were trying to figure out how they work), and regluing a single magnet after trooping underwater for a few hours (well, not exactly underwater, but it was a parade where it rained for HOURS and I had to walk in the rain the entire time- for hours I tell you! My boots took days to dry out!). The small amount of maintenance I've had to do on these over 2 years of trooping is quite minimal. Once you get this mod on your kit, I swear you'll never go back to anything less than a magnetic closure on your shins. STEP 1: There are many steps necessary to build magnetic shins, so I begin with making a critical component for them: ABS buttons. The buttons are necessary to hold one half of the magnet assembly in place on the inside of the shin. I'm using 12mm x 3mm n50 magnets. You'll need a total of 20 magnets for the shins (10 on each shin). I strongly suggest buying more than 20, though. I've found that they can easily break, and you'll want backups on hand! You can find them in bulk- and cheap!- on eBay. First, I begin by making a template with a hole in it that is slightly larger than the magnets I will be using. I trace the magnet on a sheet of ABS. Here's what it looks like when done. Yeah, I know my hole isn't perfectly round. It's not terribly important for it to be perfect. I used two magnets to make each button. One on top to help me see where my hole template needed to go, and one underneath to form the button shape. Heat up one section of the ABS sheet using a heat gun on LOW until it gets slightly warpy. You can even leave the magnets attached to the ABS while you heat it up. Once the plastic is soft, quickly press it onto a flat surface, pressing the hole template around the exposed magnet. This is what it looks like on the top and underneath when you're done. And here's how it looks from the side so you can see how the magnets attach to the plastic. See how the bottom magnet sits flush in the new ABS button? I spent about forty minutes repeating the process until I ended up with 10 buttons. I will cut down and shape the buttons to fit each shin later. There will be five buttons installed on each shin. Still lots of work to do, but it's a pretty good start! STEP 2: Another step necessary for how I make my magnetic shin closures is to make sure that the backs of the shins meet up as perfectly as possible. This is to avoid any unnecessary strain on the magnets. This was acheived by some gentle shaping via a hot water bath. Before putting the shins in the water, since I don't have any cover strips installed on the outsides, I reinforce the closure with blue tape. The e6000 gets really soft when subjected to boiling water, and I don't want to weaken the join in the front. Blue tape holds up nicely for this application! Here's a before and after of my shins so you can see how the backs line up a bit better. I will be doing some further fine tuning on the lengths at the bottom later as I move along in my fitting. STEP 3: This stage involves making and securing the "holes" part of the closures for the magnets. I begin by cutting out two 3/4" x 12" strips of ABS. You should have this when you're done. Next make a lengthwise mark in the center of each strip to help keep your holes lined up in the middle. Then mark 3/4" in from each end. That will be the center point for the magnets on the end. I like using magnets with holes in the middle for this, so I can easily find the 'crosshairs'. Trace the magnet. I like to use extra magnets underneath to help keep it secure while I trace. Next, find and mark the center of the strip. It should be at the 6" point. From there, measure 2 5/8" from the center mark on either side. Mark and trace your magnets. When you're done, your plastic strips should look something like this: Next, I used my drill press and a step bit to drill out the holes. It went really quickly! When you're done, you should have two strips with holes in them that can easily fit the magnets. The next part is where people tend to get confused, so I took this photo to show what goes where. The "hole" strip will be glued to the inside half of the shin on the inside. It sounds kind of confusing, but it's not all that bad. Remember that the "hole" strip will be hidden! I begin with my left shin. I mark the center of each hole to assist when I line up the edge of the shin. Next, I test fit the strip on the shin to verify placement, clamping on both ends. Then I apply e6000 to the area of the strip that will be in contact with the shin, clamp and add magnets. This is what it looks like when glued together: Here's the right shin after gluing, but before I added the magnets. Here are both shins as the e6000 cures. I'll be allowing a few days for this to cure, which will give me ample time to get my ABS buttons ready for installation. STEP 4: Once the glue had cured on the hole strips inside the shins, I removed the magnets and clamps. With a light behind the shins, you can see how the hole strips are mounted, hidden inside. Using that light as my guide, I traced the approximate location of the holes with a pencil. This helps me to get a good idea of where my holes are going to be drilled. Yep. I'm going to make some Swiss cheese of my shins. Using a small Dremel sanding band, I carefully cut a notch out, just large enough for a magnet to fit through. Here's what it looks like at this stage when the shins are closed. I'm just focusing on drilling out the holes on the inside edge, following the holes of the hole strip that was glued in. I'm not ready to drill the outer half of the shins yet. Next to clean up my buttons that will hold my magnets. I rough trimmed them all to start. Then cleaned up the corners with a Dremel. I don't want anything poking at my legs! *Important!* If you want to make sure your magnets stay stuck on your shins, you must use e6000! CA glue will not keep the magnets stuck to the buttons; they will fail. I have heard this from several troopers when I have been contacted about their magnets not holding up. I repeat, use e6000 for this next step! I applied a liberal amount of e6000 to the inside of each button, then put the magnet inside to get all cozy. Make sure that you've got the polarity of all the magnets in the same orientation before gluing! Wipe away any excess glue from the top. To make sure that the magnets are firmly mounted in the buttons, I use the magnet intended on going on the opposite side of the shin to clamp it. In the pic below, you can see how I've got all the matched magnet buttons and magnets together as they cure. Back to the shins now. I like this ridge (where the pencil is pointing) to line up at the tops. For me, it makes the closure in the back look much cleaner if this is lined up. I tape it off there to make sure that the opposite side doesn't shift while I'm making my marks for completing the holes. I have an OttLite that fits nicely inside the shin to provide a clear light so I can make outlines for where I'm going to drill out the rest of the holes. Holes were already present on the left side in the photo below. I made sure that I drilled out the holes very conservatively as I went. I used an extra magnet to make sure that the hole was just the correct size for it to fit through. Now time to attach the outer cover strip! I use a 25mm cover strip on my shins for this. I taped off the edge of the inside half to keep any glue from transferring over. Then making sure that the cover strip was straight, I clamped the heck out of it. Praying to the TK gods that it doesn't shift!!!! Now time to wait for everything to cure really, really well. I am going to give these 3-4 days to fully cure just to be on the safe side! STEP 5: One shin is complete, with the outer rear 25mm cover strip glued into place. Woo! Here's a look from the inside, before magnets are installed. Be sure to clean up all excess glue from the inside edges in order to have a clean closure when you're done. If there's extra glue in there, it may not close correctly. I've tucked the outside cover strip to the inside so you can see how the magnets on the "cover strip" half are glued on. No magnets yet. I add a dab of e6000 to the magnet (be sure to check the polarization of the magnet before gluing!!!), and set it so that it fits inside the semi circle and on the outer cover strip. Like this: I wiped away the excess glue from the magnets and then positioned the inner "hole strip" over the magnets to ensure everything is lined up correctly as it dries. I tape the tops and bottoms of the shin to ensure it doesn't shift around during this stage. I'm not completely happy with how the inside cover strip is cooperating here. It sits flat on the top and bottom, but it pulls away in the middle a bit off to the right. I will have to heat bend this before installing the magnets onto the "hole strip". :/ Ideally, the inside cover strip should be sitting completely against the outside part of the shin, and it doesn't want to do that right now. This additional stress could cause the magnets to fail. It's annoying, but I'll need to address this before proceeding any further. Gah! Using the magnet buttons I created earlier, I clamp the magnets into place while the glue cures. Once the glue has fully cured, I'll reshape that inner strip to prepare it for the final magnet button installation. STEP 6: Now that the e6000 has had lots and lots of time to cure, it's time to attach the other halves of the magnets. Make sure that the halves are super clean and free of extra dried glue. It will prevent the shins from closing well. You can do this by touch. Rub all of it off where you feel it. Once everything is cleaned off, close the "hole" half over the "magnet" half. Your shin should be closing correctly at this point. The "holes" should lock around the magnets and prevent the shin from opening at all, even without the additional magnets at this point. If the "hole" strip is not fully engaged over the magnets, you won't have a very strong bond between the magnets to keep the shin locked. Easy part next! Apply e6000 around the prepared ABS button. No need to go crazy with the stuff. You don't want it oozing all around in there. And stick it on! This part goes really quickly. For additional strength, I add some extra magnets on top. Check those clean closures! Left shin. Right shin. I will open these up in a few hours just to make sure that there isn't any extra e6000 that has spilled out and might lock those shins closed where I don't want them locked. Now to allow several days to dry, and these shins will be good to go! Here's a short video so you can see them in action. Have you tried this on your own shins? Loved it? Hated it? Made a few mods of your own to improve this method? Comment below and let me know! Cheers- Cricket TK-104011 point
-
Nice work trooper, a couple of additional things. Your ab/belt/cod area appears on an angle you may want to straighten Ab plate snap shouldn't be painted white Helmet brow is normally higher for Stunt versions, the Hero has lower brow. Shoulder straps not sitting central on back plate strap areas Forearms need to rotate so cover strips match biceps Large gap on strapping to drop boxes, only need a few mm's, also drop boxes need to align with end of the plastic belt section. Ideally the tube strips should fall from the top at the front Thigh ammo strip should use cap rivets and also positioned @ 10mm in from end (top/side) Large ab plate has been over trimmed, small plate could have some more trimming, button paint is also a little large Good luck with approval1 point
-
Nice share Justin, why aren't you an attache yet?1 point
-
I have a resin E-11 and I'm very happy with it. I wish I had to talent to craft an E-11. Hats off to those who can. That is amazing! I have had a couple of requests to hold it, which of course I refuse. I simply state it is against Imperial Regulations. In one case I believe he would have run with it. That is a foot chase I would not win in armor!1 point
-
Great to be trooping with you Nik!1 point
-
Hi Matthew! Thanks for your application - we'll be with you soon. And thank you as always to @TKSpartan for making our jobs easier.1 point
-
Lol, sorry for the late reply. Cooling bracket in the fem helmet, yes it should. The voice changing is done through the iComm sold with my kits or separately, and the chatter system is a an add on item for secondary audio loops.1 point
-
Ah yes! Thank you. A bit of expansion, and links: I use this for a basic, budget fan set up: amazon.com/gp/product/B0775ZM4DW - Fans (if specific product not in stock, basically you want "DC Cooling Blower Fan 5015S 5V 0.1-0.3A 50x15mm" amazon.com/gp/product/B07BXBS93X/ - Battery pack with on/off switch (9v Battery Holder or 9v battery case WITH SWITCH) amazon.com/AmazonBasics-Everyday-Alkaline-Batteries-8-Pack/dp/B00MH4QM1S/ - 9v batteries on the cheap (Amazon Basics are great batteries in general). Unfortunately, the rechargeable 9Vs don't have the juice to work for us. I tried them, and they didn't even last a whole troop, and weren't as strong even at the start. (I also heard after I bought them but before I tried them the same thing from another member). Cut off the white end cap on the fan wires, and expose some of the wiring from the casing. Solder the red wire from the battery box to the red wire of the fan, repeat with the black wires. Test with a battery. Repeat for second fan. Use velcro to attach fans and battery packs into the helmet in desired location. This will work with really any helmet set up, provided you have space to mount them. They are pretty compact, but some buckets are quite tight on everyone (still trying to figure out where to mount them in my Shadow Scout helmet...) This is the same concept you would use to attach it to a USB connector for a USB power bank, in place of the battery box. I personally could never make rechargeable anything work, so I ditched them all for 9V batteries, and haven't had any issues since. That said, I know a whole lot of guys and Mandos who use USB chargers and love them and never have any issues. I could just be unlucky. This is the blue rechargeable battery: https://www.ebay.com/itm/DC-12V-3000mAh-Rechargeable-Portable-Super-Li-ion-Battery-US-PLUG-Charger/312614180567 They are 12 v, so while they do power the fans for ages, they also are quite loud because they're overpowered for the fans. I found them unreliable and it was incredibly difficult to hear- which it's already hard. And I got called Hard Drive for a while because you could hear the fan buzz outside my helmet. Biggest tip: they must be in the ON position to charge. They're backwards. If the switch isn't ON, then they won't take a charge. So, turn them on before you plug them in to be sure (because once you plug them in the light comes on regardless). I had issues with them taking a charge even when on, etc., and they're mass produced in China- so it's kind of a gamble on how good your individual product will be. Still, like USBs, people swear by them and have used them for years. Maybe I'm just unlucky, again. Aker: I found it was worth it to go for the good one up front, it's lasted for years now and given me no issues. http://store.voicebooster.com/voicebooster-mr1506-aker-10watt-voice-amplifier/ (he also sells them on Amazon- just check both places to see which has a better price/is on sale that day). The 10 watt is plenty- unless you really want the deaf old lady down the street to hear you, too. You ever heard a Jawa yell "Utinni!" with a 12 watt? It's LOUD. I am a huge fan of the iComm, if you can splurge on it: http://store.voicebooster.com/icomm-imperial-communication-system/ Wireless mic: amazon.com/dp/B01HOB5SKE/ - They're constantly changing names, brands, but they're all basically the same, so if the product shows unavailable, just Amazon search for "wireless mic" and you'll find the new incarnation. They're usually about $25 - $30. The wireless mic set up allows you to take your bucket off without any wire encumbrance. I wear my Aker around my neck and it sits at high-chest, right below my collar bone. You could also mount it in your chest if you have room, or I've also seen the back. I'm leery of mounting it in the back because you don't want it to sound like you're talking from behind you. In the general chest area it sounds like it's coming form an internal speaker system and gives it that slightly disembodied effect like the suit is actually wired up and real. I also run TK chatter though an old iPod shuffle, and my Aker. It's also compatible with the wireless and iComm set up.1 point
-
Thank you!1 point
-
Ok, thanks. I'll wear it always.1 point
-
No piece of any costume is "approved" by the 501st, let me just get that out of the way. Nit-picking, I know - but there's a big difference between "Approved" and "Approvable". Approval comes down to the actual trooper - each piece must fit you and and be correct to the rest of the costume and so on. Nothing is automatically approved by default. That being said, the rubber chemical/dishwashing gloves are the correct approvable gloves at higher levels. At lower levels, including basic approval, there's a lot more room for interpretation in the CRL. And after approval, even Centurion, no one is really going to stop you from wearing different gloves as long as they don't take away from the overall look of the costume. The rubber gloves are THE WORST and super hot (especially in CA). I've literally seen guys take them off and pour sweat out of them. Nope. The Nomex flight gloves are a good choice, but I don't much like the look or feel of the leather strip present on most of them, and they're still pretty hot. If I'm gonna go off-CRL, I want the most comfortable and utilitarian gloves I can get. I've been wearing these for the last year or so and love them. They're cheap, don't get very hot, I have great dexterity and can use my cell phone if I need to, and I just have elastic straps holding my handguards on. https://www.amazon.com/gp/product/B06ZZ1J73J/ref=ppx_yo_dt_b_search_asin_title?ie=UTF8&psc=11 point
-
Thank you. It's a labor of love, especially since this will be my troop blaster and I know it will get beat up. I wish Doopy would use tinted black resin but any scuffs and dings will just add to the character of this.1 point
-
Agreed, and this is certainly why the ACD, who only have 8 costumes will pursue it.1 point
-
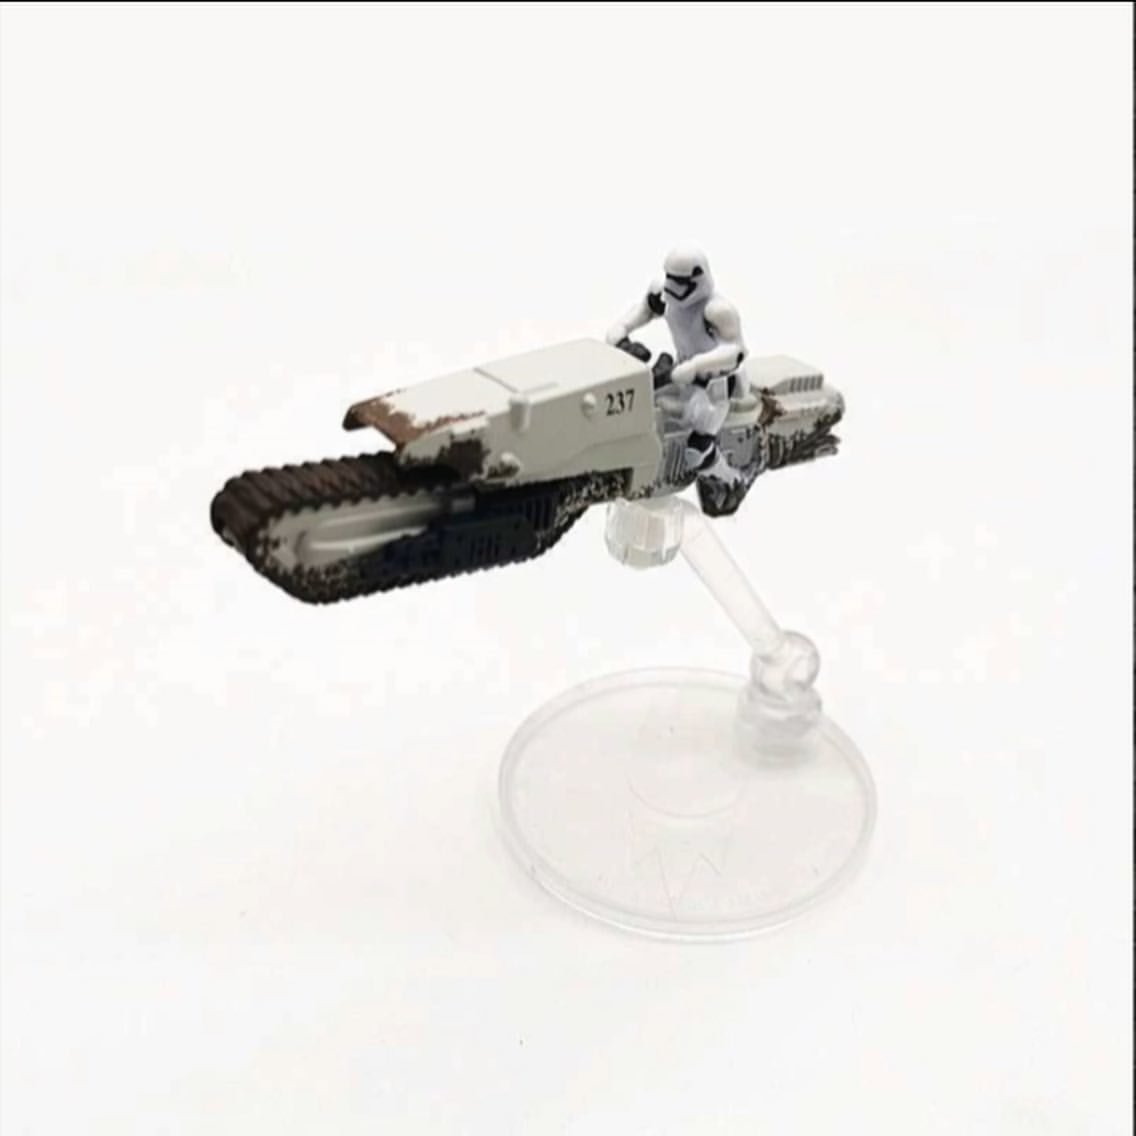
They were certainly built as practical driving vehicles for stunts, and given the logic of the caterpillar track it stands to reason they “should” be land based. Sent from my iPhone using Tapatalk Pro1 point
-
I'd be a little careful about using webbing for any place that's going to need to move around. The inflexibility of the webbing can actually make the snaps pop, or even worse crack your armor due to the lack of stretch. On my own kit the only place I have webbing is the left side ab/kidney. When you start to try your armor on, try moving your arms and legs, giving high fives, bending down etc and see how much your armor needs to move.1 point
-
@sharkbait it was this little blurb, if you've got a longer explanation or thread I love to link it!1 point
-
Excellent feedback, thank you! Yep, you're right - the TD came up 6 7/8", a bit short, and I think I will remake it. Next one will be much better and faster now that I know how to do it. Glad to be making fixes now instead of closer to being finished.1 point
-
Beautiful work! Love the varying shades under the black.1 point
-
One last detail I want to add is bare wires from the Hengstler to the part on the magazine receiver. I'd seen a few pics with wires and thought they looked cool and add a sense of purpose to that part. I applied a bit of solder to a short piece of wire split into a "Y." This holds it together and keeps the wire from fraying. Too much and the wire would not be bendable. A smearing of black paint completes the look. After drilling shallow 1/8" holes in the magazine part, I used a small section from rivet heads to create a place for the wire to epoxy in. This also serves as a "pressure fit" component to allow the wires to be removed from the part should the scope rail need to be disassembled later. A 1/8" hole in the Hengstler provides a permanent connection for the wire. As with the trigger assembly, I used tinted epoxy.1 point
-
Different thighs, shins, knee plates, boots, boot covers, forearms and handplate color is different in some images.1 point
-
A couple of threads which may be of help: https://www.whitearmor.net/forum/topic/37384-anovos-left-shin-and-sniper-plate/ https://www.whitearmor.net/forum/topic/35914-anovos-shins-help/ https://www.whitearmor.net/forum/topic/37350-anovos-shins/ https://www.whitearmor.net/forum/topic/35086-ukswraths-anovos-tk-build-stunt/page/3/?tab=comments#comment-4649871 point
-
We should challenge it I feel. Would be great to have a new Stormtrooper for the last movie in the story arc. My points would be Looks like a FO TK aside from a couple of soft parts. Is predominantly white, shares a similar helmet and upper body armour. The vehicle is not a traditional speeder bike in the fact it looks land bound and jet troopers launch from it or drivers are thrown from it if it crashes. Maybe Pathfinders are already thinking this is a TK not a TB? I haven't checker their forums to see if they have started anything though so if i get some time later today, i shall do some research.1 point
-
I have a feeling we can get to level 21 point
-
Do I spy soft armor shins? Hope this stays here and not Pathfinders, would love a sittable TK.1 point
-
There is an old saying (like over 10 years ago) about post counts. I saw it in someone's sig when I was in my first year in the Legion and got excited to see my title change on MEPD as I jumped from 24 to 25 posts. Man, did that seem a lot! Anyway, the sig was something like: You are not your TE armor You are not your hyperfirm blaster You are not your post count TE along with AP at the time was the most accurate armor you could get. Hyperfirm was light years ahead of the crappy resin blasters many of us started with. And even 100 posts seemed like a lot. It was a piece of excellent advice as some people did - and some continue to do - believe they are "better" because they have better kit, or have been in the Legion longer, or that having a huge post count somehow makes them superior. I've always kept coming back to this as a reminder that in the Legion - especially here on FISD - we are all troopers together and no one is above anyone else. I've seen some people run up their post counts with a lot of "me too" and "welcome" posts, e.g. they seemed to reply to everything, not with anything meaningful but merely to bump up their post count. I'm not saying post counts are bad. For most, a high post count means they've been active here a long time and contributed much to the community. Even 1000 posts is a lot. 1000 is a veteran for sure, right? How about 10,000? Can you count everyone with 10,000 posts on one hand? Likely, it's a decimal of the number of members through the years. Well, if no one has noticed Glen aka @gmrhodes13 has hit 15,000. That's...that's...incredible, and speaks to his passion, dedication, and contributions to this detachment. As only the second person EVER to hit his mark, I think a congratulations is in order. Cheers Glen!1 point
-
Appears FISD may get another version of FOTK after all, tread speeder rider has a few differences from a standard FOTK1 point
-
First Order Driver and Treadspeeder Sent from my iPhone using Tapatalk Pro1 point
-
Thank you for the kind words Paul, I'm just here trying to give back to this community that gave me so much when I started my journey. "troopers helping troopers" it's what we do. I see someone is about to hit 20,000 soon WOW.1 point
-
Time to do a start to finish paint and build..................................1 point
-
1 point
-
--------------1 point
-
I'll just borrow the LCO's1 point
-
So when does the build begin, Glen? I have 50 bucks that says you will have one of these by next year...1 point
-
Mine is a hybrid/mashup. Resin Doopydoos kit, but I replaced the magazine well, folding stock (functioning), trigger guard, entire front end and rear cap with accurate aluminum replicas to keep authentic look high but the weight down. I did use a real Sterling magazine though. The whole thing weighs in at just a little over 2 pounds (about 1 kilo). One thing you will need to consider is that very often on a troop you will be asked "Can I hold your gun"? (Mostly kids). For those that carry Hyperfirms/rubber models this is not a problem, since it really can't be "broken" if they should drop it. However, since mine is mostly a resin build, I decline by saying something along the lines of "The Emperor forbids it" or "It's against regulations".1 point
-
Just bought a pair of Gorilla Gloves last night, learned something neat. I colored the white printing with a sharpie (not necessary because guards cover it, but wanted it less obvious) but after a few minutes, the print lifted off the gloves, all peeled completely off. Sent from my iPhone using Tapatalk1 point
-
I used E6000 to glue my latex plates from JustJoseph and it has worked great.1 point
-
Nomex. Times a thousand. Washable. Designed for long comfortable use.1 point
-
As a suggestion if you are going the rubber glove route, wear some cloth under gloves inside. I get chemical gloves one size too big and wear brown jersey gloves inside. Then when I take them off, I squirt a little glove powder inside my chemical gloves for next use.1 point
-
WOW! NICE WORK!!! Seems like this will go quite well for the armor. What's your plan for the helmet? BTW, nice signature - I had to look three times...WTF?1 point