Leaderboard


Popular Content
Showing content with the highest reputation on 06/26/2018 in all areas
-
Give it a try and contact the resin casters. If they don't want your trigger guards, they could be a nice addition to the Completion Sets for resin blasters...3 points
-
Hi Rat, haven't seen a THG Props blaster before. Some parts look like copied from a DoopyDoo's kit (power cylinders, trigger guard), while others seem to be from different kits (magazine with clip, detailed front sight and extra muzzle). The heavy seam lines and the solid area between folding stock and receiver tube make me wonder, if this blaster was made in a mold for rubber blasters. Is it all solid resin? Guessing you will first sand the seam lines and then fill all air bubble holes with some epoxy?! A colored primer could then help to find the last weak spots. A lot of work, for sure. But you could turn that thing into something. Keeping fingers crossed for this. Good luck.2 points
-
Thanks all! Yes the gaps had me wondering a little, but the screen used helmets were indeed a bit gappy and wonky yeah? I could maybe try to trim some more but i'm not going to touch it yet until i'm sure. I did not assemble it, but if it's OK as is that's great Am I correct in that the teeth could use some more filing? Awesome I already have a TRamp from my TFA TK and I absolutely love it!! Thanks for naming those suppliers, i'll check them out, would indeed save some on shipping and wait time. Thanks for this! Funny thing is I read ukswrath's Anovos guide and ordered all the elastic/webbing/magnets from eBay, 2 minutes later I see your post 75mm black, 50mm white+black, 25mm black, and 20mm white. I started out removing the wrist-end forearm return edges. First cut was hard for the soul but i've already gotten kinda comfortable with it I've learned that if you trim by blade you do it real slow and real careful, almost put a nice deep cut into the armor. Lexan scissors and cleanup with sandpaper was the way to go for me, score/snap for bigger pieces. Also started making some of the coverstrips. I went straight for 15mm and it fits me pretty well (using my TFA undersuit), although i'll probably have to trim a bit off the return edges at the back, was a bit tight. Any thoughts on the buttplate?2 points
-
I totally agree with T-Jay! Sent from my iPhone using Tapatalk2 points
-
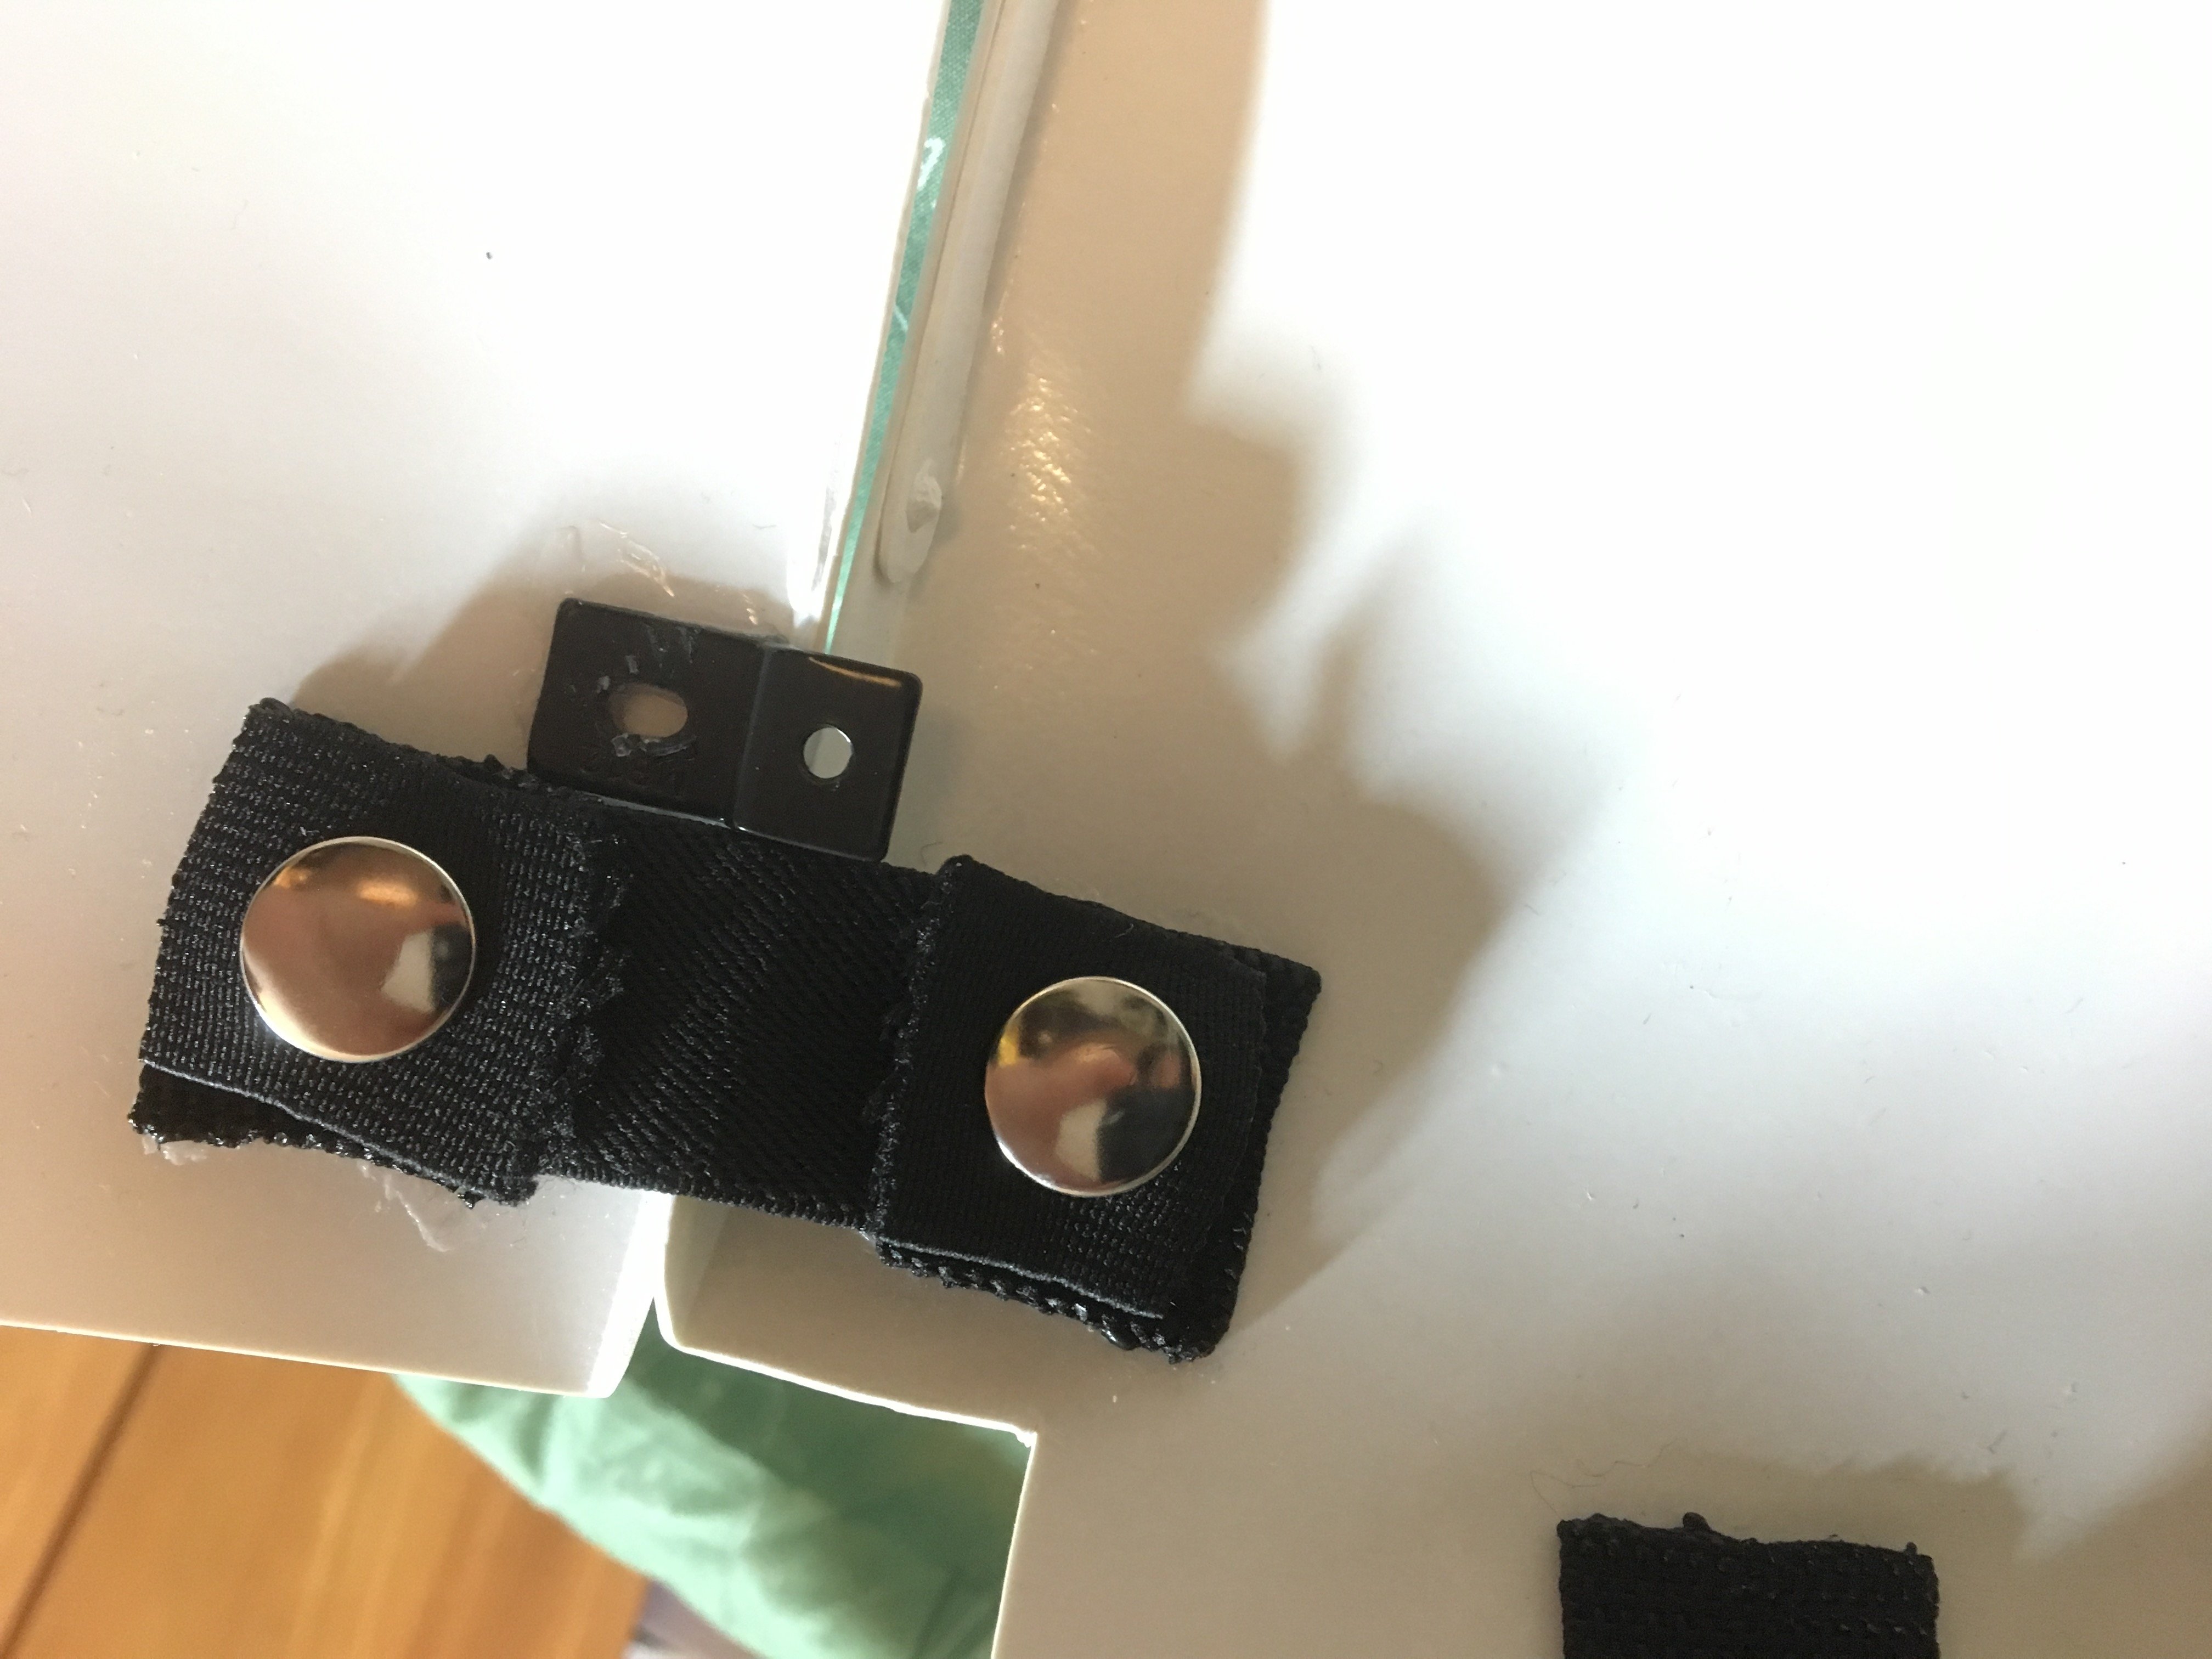
Howdy troopers! I just wanted to share a fix I used for my armor to keep my butt plate from slipping and overlapping the kidney plate. Basically, I went to a hardware store and found these small brackets that ended up being a perfect fit. I glued one on each side of the butt plate close to the elastic; since that's where the tension is coming from that causes them to overlap. The lip of the bracket that sticks out will hit the return edge of the kidney plate and prevents the butt plate from moving rearward any further. During my troop after installing the brackets I had no problems with it slipping free and overlapping. Hopefully this can help fellow troopers struggling with the same issue. Happy trooping!
 1 point
 -
Unlike many here, my first post is not of a big brown box unfortunately. While I got my kit for a decent price (I think), I have been tolerating a 18+ month wait time; however, despite my use of the word "tolerating", I have taken that time to research and prepare. In a way, I am grateful for the wait and don't mind it so much. I actually feel somewhat confident, but I am sure that will dissipate as soon as the box arrives. In the meantime, I started this thread early because I got a headstart on the strapping system I intend to use in my armor as publicized by justjoseph (shout-out to him; great asset on FISD and that's a gross understatement). Even so, I am now waiting on more snaps from Tandy which has caused my wallet to suffer (along with many... many other purchases). Without further adieu, here's what I have so far:1 point
-
Ok, Well we are done, but wanted to post to help anyone else and be able to answer questions. We did a Jimi kit, and painted with spaz stix. We had to size down tremendously as my wife is 5'6" 120lbs. We cut the biceps and thighs in the rear, fit to body, then used a Dremel to cut again for a matched seam. We then used ABS strips inside secured with CA glue, and bondo'd the seams. Forearms we cut and sized with the same method, 2 strips of ABS per. We also trimmed the chest piece from the top and bottom to look more feminine. Pictures will show how the fitting came together over the course of 3 attempts and adjustments. We had Geeky Pink Gaskets, Belts from Belts of the first order, undersuits from stormtrooper undersuits. The cape is from the lovely Jessica. Holsters from Justin Lee. We did a simultaneous build.. FOTK for me and Phasma for the wife. Please ask any and all questions. We could not have finished without the help of this group and the facebook group. We want to share what we learned best we can.1 point
-
It's a lot better than before - I remember a couple years ago when they gave out those coupons for "in stock" items only they were essentially having a 20% off key chain sale.1 point
-
Thanks for the input. I’m gonna pass on these and continue looking around. Probably going to get in on the next wave of imperialboots. Sent from my iPhone using Tapatalk1 point
-
Some items are left at the discretion of GMLs, and one may pass something that another may not. When in doubt about a certain item or is it is not clearly defined in the CRL I always refer to screen used images, that way there is no ambiguity as to what is correct. Some things we do indeed give a "pass" on, like using split rivets instead of cap rivets on the thigh ammo pack, but for the most part it has to be as close to canon as possible for level 3. Another exception is weapons. Resin, scratch build and Hyperfirm for example are perfectly acceptable, as very few of us have access to a real Sterling. However, when a specific item is generally available we ask that it be used. Many Troopers have reached level 3 with fantastic looking home dyed Chelsea style boots, but they need to match the ones seen in the films as closely as possible. Here are 2 pics of screen-used boots as a reference: (Note where the seam is located) As Greg mentioned, the ones in your photo look a bit short. If you are over 5 ft 9 I would probably not recommend them at all for the reason he gave.. your calf armor would be get stuck under them constantly unless you used a Velcro or strap system.1 point
-
I just meant it would depend how it fits the wearer. If the person is tall, and the shins are sitting a bit higher, the top of the boot may pop out - which would be an issue. If the person is short, and the shins are sitting low with no risk of the boot popping out, then all is good. But yes, I believe the CRLs are sometime purposely vague to give us that wiggle room. However, not all GMLs see it the same. At the end of the day, go for as screen accurate as you can.1 point
-
This is what bothers me about the CRL. I believe most stuff is subjective. As with other costumes I have looked into, I have seen stuff rejected due to the measurement of something, be it the height of the boot, or something like that, but the CRL doesn't specifically state what it must be. Honestly the best thing for you to do @REAPERofDAISYS is to get into contact with a GML and ask them, as they are the ones that will have final say.1 point
-
Welcome, Chris. Just by by signing up on this site you’ve made a huge step forward. This place is FULL of people that love Stormtroopers, love to make people smile, and LOVE to help fellow troopers. Key things are; - ask lots of questions (we’re here to help) - do lots of research here on FISD (looking at other builds, approved Centurion* applications, looking at the “gallery” - ask more questions (better to ask than head down the wrong path) - make many new friends whilst being a 501st Stormtrooper Best wishes Dan *to join the 501st we build our costumes to meet certain quality criteria. There are 3 levels; basic, Expert Infantry and Centurion. Centurion means that your armour is a close to screen accurate as possible.1 point
-
This is really more of a suggestion for later, but it looks like your sniper plate might end up wanting to go under your thigh- a very common problem. Mostly it just looks odd in pictures (we notice, patrons don't), and I worry about snapping it off or cracking. Sometimes when you walk it will catch and make you stumble or your gait odd (again, patrons don't notice, but our relative comfort while wearing armor is paramount). Our solution is to bundle up a cheap washcloth (like from the dollar store), wrap it up in white duct tape, and tape it into the front of the shin at the top, to punch it out just that little bit. This doesn't affect approval- it's just a looks thing, and for me at least, it eased my mind with necessary stress on the armor. I can dig up a picture of my fix if you're interested- might make more sense in photos than words.1 point
-
I did my ESB TK build to Centurion with no build experience whatsoever, and as my first 501st costume. Like others have said, there's no way that would have ever been possible without this website, and it's members. While hands-on in person help is fantastic, it can be done with just this website. In addition to the build threads, and what types of armor/where to find them, I highly recommend checking out the EIB and Centurion request threads- especially the approved ones. Even if you don't go for EIB or Centurion, building towards those standards will more likely than not get you in the clear for basic 501st approval, which it itself is of course nothing to scoff at. Biggest advice? Take it slow, try not to look too far ahead in the build, because it can get overwhelming and feel impossible and then nothing will happen. Baby steps. Once you figure out how to size parts to yourself, and how to glue the pieces together, it's a lot of repeating that process for other parts (ie, you size and glue your biceps, now repeat that process for the forearms, thighs, and half of that process for the shins). It's a marathon, not a race, and in the end, you'll be happier and have a better quality suit that will hold up if you take your time. If you run into specific problems, and can't work them out with build, EIB/Centurion threads, or the CRL, ask! We've all likely been in the same boat and can offer advice and photos of our own completed armor, or how we did something. There's many ways to do something, and you just have to find what works best for you. I also recommend starting with simpler parts, and leaving the helmet until last. It will build up your confidence to tackle the harder parts. Best of luck!1 point
-
Thumpy, thanks for the suggestion. Updates, more sanding but also some progress. Here is everything that is ready for masking and painting at this time. Once all the parts are on this table then I will begin building the paint booth. Ok so a small package arrived today and I am so excited. I will be doing a full review of this product in the future but here is a quick down and dirty. I contacted Brian Hall owner of Bulldog Props in Japan through his Bulldog Props Facebook page on May 9th 2018. I was familiar with his products from his post on RPF. I knew Brian made resin cast versions of 1942 M38 scopes used on E-11s in the OT; however, these were not just a cast of the outside of the scope (like DoopyDoo’s). These were a complete reconstruction of the entire scope in resin parts. The scope can be completely assembled and disassembled. If you are seeking a very realistic but low cost (less than $50.00) and extremely light weight option to an actual M38 then I urge you to consider Bulldog Props. Anyway, I contacted Brian on May 9th inquiring about him making a 1943 version like was used in Rogue One. In our conversation Brian pointed out that they used the 1943 resin scope made by DoopyDoos for the film. I found his honesty and candor refreshing and asked him if he could make a version of his 1942 into a 1943. He advised me that he could not alter the 1942 model but he did have a 1943 scope and would be happy to attempt to cast it. Casting these small parts is very tricky give the level of detail in the threads and how the parts fit together. On May 12 Brian began disassembly of his 1943 scope and completed casting on June 17th. He shipped it to me on June 17th and I received it on June 25th. So here is my open box review: The packaging is well protected and professional. Once I removed the outer wrapping and bubble wrap I expected a simple box with the scope inside wrapped in bubble wrap since this was the first cast and not a production item. I was surprised with the presentation. Not only did I get the scope which looks awesome but also two sets of instructions. These were not an extra set of instructions from a 1942 scope but a 1943 specific instruction sheet. Apparently he is all set to produce and sell these 1943 scopes. All the small parts were packaged and protected. Once I unwrapped everything I discovered just how detailed the scope was and how much time and work Bulldog Props put into this. So what to expect from a resin cast scope. The small thin parts (like the locking rings) are brittle and cannot take a lot of force. Brian had notified me that one small ring in particular would not screw in properly but that it would most likely not be needed. Brian even included a few extra rings in case I damaged some in the assembly process. This is obviously one area where actual metal parts win out but it was not the goal of this product and I did not want a metal version of the scope. Regardless, this is the first version of this product and I do not know if Brian will make an attempt to address this issue. Even if he does not, I am very happy with the results. Next, due to the molding and casting process, most of the screw holes need to be drilled out. For this you will need some very small bits (which you can get at harbor freight or in Dremel kits). Lastly, the prism cell is a cast part and does not have any reflectivity, so actually looking through the scope is not possible unless I alter this because the objective lens is not aligned with the eye piece. I will toy around with some mirror vinyl when I have time and see if this works but to be honest I wanted this scope to add a reticle and LEDs and possibly the small micro display made by Trooper Amps. So far the only issue I have found is the two things that Brian told me about before I agreed to purchase the scope. There is a small bubble defect in the Eyepiece Mounting Plate which is an internal part and will not be seen and does not affect the scope in any way. The other issue is the Ocular Lens Retaining Ring not screwing in properly. I will most likely make a sleeve insert that will hold this lens in place and again will not be seen or affect the scope. Overall, I am very impressed and pleased with this product. Yes you can purchase a brass 1942 version and/or an aluminum 1942 version but if you need a 1943 version of the scope for a Rogue One or Solo build the only options I am aware of are DoopyDoos and Bulldog Props. Personally I feel for the price and the detail, you cannot beat this option. I asked Brian to make something new to fit my needs and he achieved this. I appreciate his willingness and professionalism. I will do a more detailed review in the E-11 thread in the coming days. And that is it for this update, thanks for the interest.1 point
-
Hi Chris. I would not have a stormtrooper costume if it wasn't for this site. This was pretty much my only reference. There is a ton of info here to find and read but... and more importantly, there are many fine people here who are willing help you along your way. Choosing armor is a big hurdle to clear right off the bat. Any of the vetted vendors (the link provided above by Thumpy) will provide you with armor that you will be happy with. The only question is your body shape. Some armor is better for bigger guys. The original armor was designed for fit guys about 5'10" and 160 lbs so most kits are designed around these dimensions. But any kit can be modified to accommodate a wide range of heights and weights - so if you are anywhere close to the ideal measurements you will have a pretty easy time putting a kit together. Start reading some of the posts here on this site. The "getting started" section is really important. If you want to be a classic stormtrooper, I would recommend the "A New Hope stunt stormtrooper" or ANH-S TK. This build is the most common and therefore has the most reference material and available supplies. I would also go through a couple of build threads. The first one I went through was ukswrath's Anovos build - he does an incredible job of detailing all the steps. Some details are particular to this kit, but the vast majority of info can be applied to any stormtrooper kit. here is the link: https://www.whitearmor.net/forum/topic/35086-uswraths-anovos-tk-build-stunt/ Don't let the overload of info overwhelm you. Take some time to research. Order a kit. Once you start the process, you will never look back. It is an amazing journey and a kick-a$$ hobby.1 point
-
So what I do know. THG Props is based out of Eugene OR and is cast from a Sterling, I could be wrong here, but is a solid rubber cast. So the blaster itself is a solid mold casting. It's a hard rubber but slightly malleable as there was and is some slight warping but is nothing that can't or won't straighten out on it's own. What I don't know is what the extra pieces cylinders, scope, D-ring mount and extra tip are from or who. They were from a bag of spare parts he had. Some of them may be his own molds and others extras from other kits. This will eventually probably be known as "Frankenblaster". LOL! Those are the known and unknowns to me right now. Yes I will be sending and doing clean up on it and have decided I will need to invest in a carving set for the fine details. I'll probably do a black sandable primer and I already have some two part epoxy putty that will hopefully do the trick. I've also got the materials for the rail and counter mount as well as wire for the power cylinders. I'll most likely get a Doopy counter, unless there's a better option for it.1 point
-
Did some cutting of the chest vents and one of them got a little more than I wanted, so I'm going to have to bondo that small little part. (so small it may not matter, but I'm super picky). Fiberglass itch exists haha. I will be doing some more detail cutting and filing tonight. Found that the thighs and calves are just a little small for me, so I'm going to use some plastic sheets that I will heat and form to the back of the leg pieces. I think 2 inches should do 1/2 an inch on each side for gluing to the armor and then 1 inch in size addition. I will then bondo the exterior so it's smooth and unnoticeable and finally use fiberglass sheets and resin to strengthen the interior if needed. The sheets come in today. I will probably work on those later this week.1 point
-
Looking Good Trooper!1 point
-
Go for it, don't overthink it! Find an armor you like among the many armor makers that offer some and order it! Then, just start a build thread here on the FISD and post you progress. Make some research through this site, talk with us along the way and ask any question you want. You'll see, you'll be so happy in the end!1 point
-
Sure thing, go with the painting! You'll be glad you did it in the end!1 point
-
Thank you guys. I'll definitely post some pictures when I start1 point
-
Elastic might also stretch a little bit over time, depending on the quality of the elastic you'll use - some will stretch more than others. This may result in initial measurements not always remaining exact and changing a bit the fit of the armor. However, like Daniel said, if that happens, you can always change the elastic! Good nylon might be a bit more "strong" over time. It will hold your stuff in place, but will also be a bit less flexible movement-wise than elastic. I think both are good for different situations - depends what you're looking for! ^^1 point
-
Well folks ..... I did it! Magazine housing installed [emoji16] Sterling Machine Gun accuracy calls for the housing to be 9mm (thanks to Tino for the detailed build thread) from the nearest vent hole so I did that. Also got my drill to be perpendicular to the drill position so to get a clean vertical install opposed to an uneven install via the opening from the carved out exposed bolt. I needed to create a hole to do this. I knocked around my ejector port guard some but like I've been preaching since the beginning of this build, no biggie because have green stuff come to the rescue for this and that temporary hole. Two long screws that came with Tino's completion set did the trick. Them being countersunk, used my cone-shaped dremel tool to make the recess. LiPo battery fits snug still. Some minor adjustment needed inside the magazine housing to have the magazine fit properly. Ejector initially didn't install good but after dremeling away some of the head of the offending screw, all is well. But boy o boy, I'm one happy fella to have that magazine housing installed!!! Next up is grip [emoji6] .1 point
-
Those will not pass CRL for a TK. Only option is the 421’s...they are white, no seam Chelsea’s, exactly as they’re supposed to be. if I were you I’d order them in the July wave, and you’ll have them in August some time. They’re gorgeous boots. Order them a size bigger than you wear. Also, do yourself a favour and order their neck seal for a TK while you’re at it. I love mine! So comfortable.1 point
-
Hello Jason! Great looking build and should be an easy pass for basic approval for ANH Stunt. If you are aiming for EIB, why not Centurion as well? It looks like you are already on the right track. One thing I noticed that would need to be changed for lvl 2 is that your gloves will have to be black rubber material chemical gloves. As for the gap on the back, maybe shorten some straps and bring up the kidney, butt, and front ab armor as much as possible. This should hopefully close the gap while keeping your side connections clean and level. I also noticed one of your button plates seem to be flipped the wrong way, with the blue on top instead of the bottom.1 point
-
Brother - this is an epic read, just like the last. Beautiful work! Sent from my iPhone using Tapatalk Pro1 point
-
Oh yeah, I even have a handy dandy tool for this very purpose. I'm just trying to convince myself I don't have to do it for all those holes. Plus, I'm worried about making these holes any weaker or more susceptible to cracking than they already seem to be. I'm sure they will be fine. I'll probably have to add re-enforcement ABS as well. It is too hot today for patience. Time for a beer.1 point
-
Inventoried and helmet cuts. Dremel was fantastic for this. I was fortunate to find no cracks in the armor. Most likely will need to size up the legs and calves so glad I got plastic sheets and Bondo on the way.1 point
-
Thanks for the kudos. People helped me get started with my first TK, now I'm just paying it forward. THT1 point
-
Maybe 2 but it seemed a lot Sent from my iPhone using Tapatalk1 point
-
Thanks for the info. While I'm not expecting to get to Centurion, I'll see how far I can get to the best level of accuracy I can. I think there may be only one TKC in the UK at present, and he's wearing my TKC that I started building then had to sell on due to financial difficulties. So it'd be nice to have another in the UK.1 point
-
Hi Chris and welcome! If indeed you wish to build armor, take a look at the various armor and important considerations involved in choosing at this link: If you don't want to build your own armor, at least, you'll have some minimal knowledge at purchasing stuff that people have made and are willing to sell. https://www.whitearmor.net/forum/forum/41-imperial-commissary-px/ But the only real knowledge that one could possibly gain is when the armor is built by you. If you choose this route, there are lots of folks who will assist you. In my opinion, it's worth the money you'd be spending on any armor made by someone else. Hope this helps.1 point
-
LOL! No worries! I like armour discussions. Feels like I’m always learning something new1 point
-
Hi everybody, The blaster build is coming along just fine - some more updates... Gauging for the correct screw depth for rear sight. Thought necessary to stabilize this way as it will be supporting the scope outfitted with some electronics. Larger bit use to recess the screw head so it's flush against the scope rail at installation. Gauging scope rail fit on rear sight. The 100 sight makes the scope rail ride lower which is great since I will need to run BlastFX wires underneath. Preparing rear sight for screw install processing of creating install hole for rear sight Rear sight with E-6000 applied and secured with zap straps to stabilize for curing. Thanks for including the two zap straps in your Completion Set Tino - they sure came in handy here. End Cap Clip with two support pins and positioned in place for gluing Installing flash guard. Pulling electrical tape to hold it in place worked great! Installing the ejection port guard front sight install. Yeah, I experimented with some grey primer Tonight, my goal is to get the magazine housing installed, wish me luck! I think I just might be able to do it, cheers!1 point
-
And...approved1 point
-
Hey Ryan, awesome choice going with RS Imgur works great for posting pics (direct link)1 point
-
I'm trying my best Paul and Brian - thanks guys1 point
-
Great job! Nice clean build! So...you made our job easier! See you on the field soon Trooper!1 point
-
Thanks Colin! I'll give this a try.1 point
-
That’s the idea! Even then, I have to say, some days of browsing FISD had me thinking, “18 months isn’t enough to absorb this information. Anovos has got to give me more time before BBB day.” Like Joseph said here, I do want to treat it like a marathon instead of a race, but I will admit I’m eager to get started.1 point
-
Devolver, no problem. I wanted to get a list going anyways, so now it is done. Updates… So sanding……………………………………………………… Yep sanding, and here is what this stuff looks like after a 220 sand job. Note the areas where the primer is still on the part. Most of the time this is because I cannot get into those areas very well with the sandpaper. Other times it means that the primer is sitting on a depression on the surface. This is one of the reasons you apply primer, it shows you the faults. So in this case I run my finger over the surface and if I can feel the depression then I will fill it in with glazing putty. If I cannot feel the depression then I don’t worry about it since the surface looked fairly uniform when the primer was applied. In case you are wondering, the white bottle in the picture is the Evercoat brand glazing putty. You can get it online or a local automotive paint supply store like PPG paints. So most of the time I apply the glaze directly to a part that been primed and I can see holes or imperfections. In most of these armor parts, the seam where I adhered two parts together is a major area of concern. Also anywhere the cracks have become a problem needs to be addressed. Even after sanding, I may detect flaws in a part such as the depression areas. I normally circle these areas and when I have enough issues to warrant the mixing of glaze, I mix it and apply it. One lower leg done and one to go. Still waiting to be sanded. And, Das ist alles für heute, thanks for the interest.1 point
-
You could offer some boxes to makers of resin blaster kits (like Phoenix Props or DoopyDoo's) because a trigger guard from resin is either thin and fragile, or thick and inaccurate.1 point
-
Welcome to the FISD! Below, in the next 3 posts, you will find the lists of our Imperial Attachés. These are respected folks who have gone above and beyond the call of duty, and have been selected to welcome you to the world of shiny white armor! They are volunteers whose duties (in part) are to assist you on a local level to achieve your goal of joining the 501st Legion as Imperial Stormtroopers. Not all Garrisons, Squads, or Outposts may have them, in which case you should refer to the one that is closest. If you wish to contact your local Attaché regarding local events, activities, etc., you can PM (personal message) them here by simply clicking on their highlighted screen name, (example: @justjoseph63) Please note that again, these are volunteers, and may not be able to get back to you immediately, but if you have trouble getting in touch with someone, please feel free to contact @Nairy via PM. If you are a 501st approved Trooper who wishes to join the ranks of the Attachés, please get in touch with @Nairy and/or visit http://www.whitearmor.net/forum/topic/15252-fisd-attaché-program/ Each Garrison is shown in ORANGE. Click on it for a direct link to their site. Post 1: United States Post 2: International Garrisons Post 3: Outposts (work in progress) An asterisk ** next to the Area Served means that the Attaché is verified active as of 2026. An asterisk ** next to the Area Served means that the Attaché is verified active as of 2024. An asterisk ** next to the Area Served means that the Attaché is verified active as of 2023. An asterisk ** next to the Area Served means that the Attaché is verified active as of 3/1/19. An asterisk ** next to the Area Served means that the Attaché is verified active as of 6/01/18. Thanks, and again, welcome to the home base of "Troopers helping Troopers"! Location Garrison/Squad Attaché Attaché contact Area served/Armor/Offices held ALABAMA Alabama Garrison Chris @bmth chris Montgomery ANH-S ** Delta Squad Needed -------- ------ ALASKA Alaskan Garrison Needed -------- ------ ARIZONA Dune Sea Garrison Eric @GoofTrooper Phoenix, AZ ANH-S ** ** ** Jundland Wastes Squad Scott @Hesikaya ANH-S ** ** ARKANSAS Diamond Garrison Bryan @Kagamaru Fort Smith, NWA ANH-H ** ** CALIFORNIA Southern California Garrison Orange County Squad Jeff @Oztrooper Orange County, CA ANH-S/ESB, Armorer ** ** ** Justin @TheRascalKing Orange County, CA ANH-S/ANH-H/ESB/HWT/RO/TFA, Armorer, Former DPRO ** ** ** ** Los Angeles Squad Michael @TK6682 Northwest Los Angeles County, CA ANH-S/ESB/TFA/Concept ** ** Ardeshir @equuspolo San Fernando Valley, CA ANH-S/ANH-H/ESB/HWT/TFA/TLJ/TLJ-E ** ** ** Inland Empire Squad Eriberto @TK Cowboy Nuevo, Riverside County, CA ANH-S, Squad Leader ** San Joaquin Squad Adam @Atom661 Bakersfield, CA ANH-S ** ** ** Channel Islands Squad Brian @mikidymac Ventura to Paso Robles, CA ANH-S ** Central CA. Garrison David @tat2trooper Sacramento, CA ANH-S ** ** South Valley Squad Rebecca @sharkbait Fresno, CA ESB ** Northern Mustafar Squad Needed -------- ------ Imperial Graffiti Squad Needed -------- ------ Imperial Sands Garrison Needed -------- San Diego, CA Golden Gate Garrison Tony @ukswrath ANH-S/TFA/HWT, Former DXO, Armorer, FISD Diplomat ** ** ** East Bay Squad Needed -------- ------ North Bay Squad Craig @Batlord77 ANH-S/TFA ** Peninsula Squad Sha Sha @shashachu San Francisco ANH-S, Asst. Squad Leader, Former DO ** ** ** ** South Bay Squad Needed -------- ------ COLORADO Mountain Garrison Needed -------- ------ CONNECTICUT Connecticut Garrison Needed -------- ------ DELAWARE First State Garrison Needed -------- ------ FLORIDA Florida Garrison Tampa Bay Squad Ken @PiettLives Tampa Bay ANH-S, Trooper Academy CO ** ** ** ** Chuck @TK 33773 Tampa Bay ANH-S ** ** Everglades Squad Tarkan @TookBreaker South Florida ANH-S/ESB ** Makaze Squad Mike @msouza Windermere (Orlando) ANH-S ** ** ** ** Parjai Squad Needed -------- ------ Squad 7 Doug @DUGJAX ANH-S, GML ** ** Honorary Attaché Joseph @justjoseph63 Live Oak ANH-S/ANH-H/HWT, Former Attaché Ambassador, DO, XO. DL ** GEORGIA Georgia Garrison Ocmulgee Squad Needed -------- ------ Outlanders Squad Needed -------- ------ Venator Squad Jorge @zv288bot North West Atlanta ANH-S ** ** ** ** Caleb @MaskedVengeance Far Northwest Georgia ANH-S, Former Attaché Ambassador, Current DCoG ** ** ** Coastal Empire Squad Needed -------- ------ Terminus Squad Chris @PhoenixTrooper Atlanta Area ANH-S/TFA/DTH, Armorer ** ** ** Nemesis Squad Christine @Cricket Atlanta Area ANH-S, GML, Squad Leader ** ** ** ** HAWAII Pacific Outpost Needed -------- ------ ILLINOIS Midwest Garrison Dan @KaiserintheHood ANH-S/HWT ** ** INDIANA Bloodfin Garrison Needed -------- ------ Dathomir Squad Northern Darkness Garrison Mark @captsafe66 ANH-S/HWT/TFA/TLJ-E, Former GCO, Current GML, DCoG ** ** IOWA Central Garrison Needed -------- ------ Imperial 80th Squad Ben @Buttons Omaha, NE ANH-S ** ** ** KANSAS 70th Explorers Garrison Needed -------- ------ Firehawk Squad Needed -------- ------ Gateway Squad Needed -------- ------ Great Plains Squad Needed -------- ------ KENTUCKY Bluegrass Garrison Needed -------- ------ Blue Sun Squad Needed -------- ------ Derby City Squad Darin @Darin Ennis Louisville KY ANH-S ** ** Northern Vanguard Squad Needed -------- ------ LOUISIANA Bast Alpha Garrison Shane @Shanester New Orleans ANH-S, XO ** ** MAINE New England Garrison Needed -------- See @DocDan Central Vermont TFA ** ** ** MARYLAND Old Line Garrison Alex @Alikh D.C. / Baltimore ANH-S ** ** ** MASSACHUSETTS New England Garrison Needed -------- See @magni Providence, RI, and Mass. ANH-S/HWT/TKC ** ** ** MICHIGAN Great Lakes Garrison Needed -------- ------ MINNESOTA Central Garrison Needed -------- ------ MISSISSIPPI Rancor Raiders Garrison Needed -------- ------ MISSOURI 70th Explorer's Garrison Needed -------- ------ Garrison 66 Needed -------- ------ MONTANA Timberline Garrison Needed -------- ------ NEBRASKA Central Garrison Needed -------- ------ Imperial 80th Squad Ben @Buttons Omaha, NE ANH-S ** ** ** NEVADA Neon City Garrison Brien @Harbinger Reno, NV ANH-S ** ** ** ** Matt @thechosenhitman Las Vegas, NV ESB ** ** ** ** NEW HAMPSHIRE New England Garrison Needed -------- See @magni Providence, RI, and Mass. ANH-S/HWT/TKC ** ** ** NEW JERSEY N.E. Remnant Garrison Anthony @Redforce Northern New Jersey ANH-S ** ** Eric @Hoda ANH-S/ANH-H/ESB, DPRO ** NEW MEXICO Dewback Ridge Garrison Brandon @elwessbrandon Albuquerque ROTJ ** ** NEW YORK Empire City Garrison Allan @allan1313 East L.I., Queens, Brooklyn, Manhattan ANH-S/ESB/HWT ** ** Steve @starsaber25 East Long Island ANH-S/ANH-H/ESB, GML, DCoG ** ** ** ** Bill @Cybergrunt Central Long Island ANH-S/HWT, GG, MBO ** ** ** John @JBar NYC ANH-S ** ** Hudson Valley Squad Erick @echo327 Hudson Valley ANH-S ** ** Garrison Excelsior Needed -------- ------ Nickel City Squad Needed -------- ------ NORTH CAROLINA Carolina Garrison Shawn @CrookKnight Charleston NC area HWT, Armor & Pack Expert ** ** Crimson Sky Squad Needed -------- ------ Palmetto Guardian Squad Needed -------- ------ Western Overwatch Squad Needed -------- ------ NORTH DAKOTA Central Garrison Needed -------- ------ Imperial 80th Squad Needed -------- ------ OHIO Ohio Garrison Jeff @StrmTRPR85 Columbus, OH ANH-S ** OKLAHOMA Oklahoma Garrison Rachel @Spadille Central Oklahoma ANH-S ** ** OREGON Cloud City Garrison Needed -------- ------ PENNSYLVANIA Garrison Carida Needed -------- ------ StarKiller Garrison Needed -------- ------ PUERTO RICO Puerto Rico Garrison Christian @v7sg San Juan, PR ANH-S/ESB/TFA, GCO ** ** ** ** RHODE ISLAND New England Garrison Randy @magni Providence, RI, and Mass. ANH-S/HWT/TKC ** ** ** SOUTH CAROLINA Carolina Garrison Needed -------- ------ Crimson Sky Squad Needed -------- ------ Palmetto Guardian Squad Needed -------- ------ Western Overwatch Squad Needed -------- ------ SOUTH DAKOTA Central Garrison Needed -------- ------ TENNESSEE Midsouth Garrison Knox Eisley Squad Brian @Tilheyra Knoxville TKS ** ** Mos Nooga Squad Needed -------- See @MaskedVengeance Chattanooga, TN area ANH-S, Former Attaché Ambassador, Current DCoG ** ** Music City Squad Needed -------- ------ Twin Sun Squad Terry @dblcross Memphis ANH-S ** ** TEXAS Star Garrison South Texas Squad Helen @mamaking ANH-S ** ** North Texas Squad Needed -------- ------ West Texas Squad Needed -------- ------ Central Texas Squad Needed -------- ------ Texas Gulf Coast Squad Jose @TK 71627 Edinburg ANH-S, Recruit Liaison ** ** Imperial Rough Rider Squad Needed -------- ------ Desert Inferno Squad Needed -------- ------ UTAH Alpine Garrison Ben @Neb Sgird Provo/Salt Lake City area ANH-S/HWT, Extended PR/GML Team ** Kyle @FN1313 Salt Lake City ANH-S ** ** ** ** VERMONT New England Garrison Green Mountain Squad Daniel @DocDan Central Vermont TFA ** ** ** VIRGINIA Garrison Tyranus Galactic Central Squad James @jsilvius Richmond ANH-S, DMBO, GXO ** ** ** Inferno Squad Needed -------- ------ Serenno Squad Needed -------- ------ Sienar Fleet Squad Needed -------- ------ WASHINGTON Cloud City Garrison D'Angelo @DStep Vancouver, WA ANH-S ** ** Garrison Titan Paul @Daetrin Seattle, WA ANH-S/ANH-H/ESB, FISD Founder ** WASHINGTON D.C. Old Line Garrison Alex @Alikh D.C. / Baltimore ANH-S ** ** ** WEST VIRGINIA Garrison Corellia Needed -------- ------ WISCONSIN Wisconsin Garrison Caleb @dejango Green Bay ANH-S ** WYOMING Mountain Garrison Needed -------- ------1 point
-
If you shape the screen over the flat end of a AA battery they will slide in perfectly. That’s what I did and I have a Walt’s kit (pre, screen included with kit) Jim - TK508991 point
-
I know this is like a month late but I wanted to thank everyone for their feedback. It was super helpful and I'm now a member of the 501st1 point
-
you will need: -mic tips -metal screen material -scissors -superglue (optional) -highlighter or dry erase marker 1. Cut mesh into circle a little bigger than the size of a nickel (this is so it stretches and doesnt fold) 2. Sandwich the mesh between mic tip and upside-down highlighter/marker cap like this 3. Push down slowly and evenly you can see what i did here 4. trim the excess. this is so it goes in evenly and you dont end up mashing it down 5. pull now-bent screen out and flip it over. you can put a bit of glue around the inside, id recommend so it wont fall out. when installing i like to use an exacto knife to evenly push in the screen from the sides do the same with the other one and there you go!1 point