Leaderboard


Popular Content
Showing content with the highest reputation on 03/16/2018 in Posts
-
Hey folks! It has come time to post a build thread for my E-11 build. I promise not to let the thread die like I did my TK build thread (don't worry, I did get approved). This will be my trooping blaster, so while I hope to keep it pretty darn screen accurate, I also won't worry if the doopy kit is a few millimeters off in places. My main sources are the full DoopyDoos resin kit with Tino's completion kit. My buddy, who is currently studying electrical engineering, will be helping me build custom electronics for the blaster. He has the added advantage of still being in school, so he can get electronic components at cost (score one for me). The only experience I have with electronics has been in the music field (guitars, amps, soundboards, etc.), so his expertise will be invaluable. Maybe I'll even get him to register and explain things that I can't hahaha. I will be shamelessly robbing ideas and methods from several of you guys, including (but not limited to) @T-Jay, @themaninthesuitcase, @Xinx, and @skyone While I hope this thread will be helpful for others building their blasters, expect lots of questions from me! Even though I've read several good build threads and endlessly purused the reference library, I'm still feeling overwhelmed! Then again, I felt the same way starting my TK build and it all worked out perfectly. I'll continue updating this first post with my resources list, but here's what we have so far. Note that if I haven't hyperlinked a source, I have no idea where to get the part! Any ideas on that front would be appreciated. I won't be buying electronics until next month, the racing shirts ate up my 501st budget for this month. Basic parts: DoopyDoos full resin kit $55 Tino's completion kit, $65 aluminum rod (to mount LEDS to) Replacement stock cube and front sight, printed from files made by @themaninthesuitcase Black paint Silver paint (for weathering) Gold paint (for weathering) Too much green stuff, $18 Electronics: Basics: Integrated arduino/sound amp board (being built by "The Buddy") Microswitch (for trigger), $1 Rotary switch (comes with TIno's kit) Voltage Regulator Rechargeable 9 volt battery, $22 (pack of 4 and a charger) Lights: 5 RGB LEDS, $3 5 LED drivers, $5 .66" OLED display, $15 Sound: 2 3 watt speakers MP3 reader board, $1.50 Total cost (so far, not counting tools): $152 Tools: Two part epoxy glue Clay carving tools Dremel with plenty of sanding attachments in various sizes3 points
-
Oh heck yea, this would be awesome. Can't tell you how many times I've hovered my mouse over the bars just to see if something new would appear lol. Would that be the definition of insanity? Excellent ideas Here's to old dudes Cheers3 points
-
Does this count?3 points
-
Yes to this! I had never been a part of an online forum before this. I wasn't even on Facebook. Researching and building my first TK was a steep learning curve one its own- navigating a forum for the first time was another learning curve for me. Yeah, I'm old and out of touch - but I'm sure I'm not alone. A pinned thread or post that compiles all this info would be awesome!2 points
-
...and not a bad one. Years ago I also wondered, if it wouldn't make sense to have a thread in the "Getting Started" or "Tech Support" section, that works like a user manual for our FISD. You know, something to explain not only the simple options like Edit, Quote and Multiquote. But also to demonstrate how to correctly mention a member in a text, so that this person is being notified. To inform, that a simple reply to somebody's text, is not a guarantee the person will ever read it (unless using the quote option or the person is already following). And more difficult things like how to quote postings from various threads and reply to that in a different one. How to compress or hide definded rows in a text, that only expand when clicking that area. And what Dan suggested could also be included into this thread. As well as the listing, of how the name above the avatar picture changes, depending on the amount of posts or achievements. And I am sure there would be more things to incorporate, which I haven't thought of right now. Any user should be aware of all the technical options when using this board. Just an idea...2 points
-
My 2 cents worth I am of the opinion, they can do what they like with their armour after they are approved at EI or Centurion what ever level they want to aim for. This is unless we create a CRL specifically for a dirty FO TK as I am not into doing all the work simply to hand something off to the MEPD. If they havnt thought about it and are not working on it, then it should be ours.2 points
-
My initial thought is to simply allow weathering as a note on each item. This is what BSN does for the biker scout, e.g. "Gloss white, semi-gloss, or lightly weathered. "2 points
-
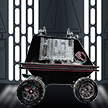
Life keeps conflicting with my Star Wars obsession.Anyway. Power cylinders completed. Got some nice red cord from Spotlight that seemed to match old coated electrical wires. Fuses hot glued in and left some wire so that i can key this thing into the Magazine top.The basic mods are going a little OTT. Thought i would rebuild the sight. I need some plastic and found... a fork. Carved this into my sight fitting and got a small hex screw and a bolt thread for the sight. Cut some aluminium for the sight hood. Textured the top by giving it a sharp crack with a sledgehammer and file for the imprint.2 points
-
The screen used vertical black lines in the Tears and Traps are very clearly recessed. So as long as the bottom of those recesses are black in color I don't see why fabric wouldn't be allowed, at least for basic approval if not higher.2 points
-
I'm sure most of you has seen the image below. These Billgrams have become a bedrock on which many TKs have been built. However this image, and 1 very similar, has a colour on it no longer deemed correct. Rather than carrying on explaining it I've made a new diagram, sorry no catchy name this time, with just the correct colours. The images show the Humbrol colours, but the Testors equivalents are shown too if that's easier to source. All this was built upon Billhags work, so it would be wrong for me not to thank him for it. He's also my GML so he has had a hand in me getting this far in more than just billgrams. I already owe him a pint, so Bill if you see this and the opportunity presents it's self, make that 2. ANH Stormtrooper Paint Colours by Christopher Pearson, on Flickr Click through to flickr to get access to a full resolution version, and feel free to share this if you find it helpful.1 point
-
Good call - done!1 point
-
Not really a run around I have a tracking number just hasn't sent it yet, annoying but has been in communication the whole way. Mimic took a side gig to work on some sets or something1 point
-
Hi all, Is there an open section on the forum where these awards/ribbons are explained? I'm thinking, if a new member signs up and sees ribbons and awards, etc, what would be the easiest way for them to look them up? Giving them something to aspire to and give them confidence in the advise that they are receiving. Perhaps when one hovers over a ribbon or award, a brief description could be displayed? "Centurion - awarded for the highest level of screen accurate armor" for example... Or, clicking on any award takes a person through to a list of what the awards mean. Now, for those awards with writing under them, a member could search the forum. For those ribbons with just colours, what does each one mean to an aspiring Stormtrooper? Whilst they look beautiful, it might be nice to know what that member has achieved. Just a thought. :-)1 point
-
Congrats Eric1 point
-
Hope this helps!1 point
-
Congrats trooper and welcome to Expert Infantry!1 point
-
Hi Ben, glad you are starting a build thread here. Looks like you have done your homework and preparation work, so this will surely become a good blaster. Onto your questions: 1. Black Paint - There was an interesting discussion recently in Suspend's build. Maybe this helps. For me, it sounded complicated as I never had any issues with standard spray cans from the DIY stores. Maybe I just had luck... 2. Rechargeable 9 volt battery - if you search online, you will find plenty of these from 170mAh to 800mAh... Don't worry about that. Just mix a little bit of the blue and yellow stripe until it turns dark green. Make sure to keep your finger tips and tools wet - otherwise it will stick on there. Then you have all the time you need, as the green stuff takes about 24 hours to fully cure (depending on its thickness). If fully hardened, you can sand it like resin. If something goes wrong during your build, green stuff will be your friend. Good luck Ben. Following...1 point
-
Congrats on your EIB!1 point
-
Congratulations trooper1 point
-
Good job! Sent from my iPhone using Tapatalk1 point
-
Well done, Eric. :-) Sent from my iPhone using Tapatalk1 point
-
Oh and sitting in a TK kit is out the window, no such thing. LOL! Sent from my VK815 using Tapatalk1 point
-
Dam I was afraid that would be the case. I already felt like I was pregnant trying to sit down...had my arm on the chair to support me as I leaned back into the chair lol Sent from my iPad using Tapatalk1 point
-
Hey Eric thank you for your EIB application and your patience. Let's go through your application. CRL and EIB Application Requirements: All the required submission photos have been posted, and your armour meets all the necessary requirements for level 2. With that Tony and myself would like to welcome you to Expert Infantry, congratulations trooper Other-Armor Fit/Assembly: In this section we review observations made by your fellow troopers and ourselves. Some observations may lead to suggestions to improve the overall look of your armor. If any suggestion affects any application, it will be listed separately in the above or below sections. Thank you for attending to the side gap, it looks much better. Only some simple fixes to go through so lets start with the Shoulder Bells. These can still come in closer to the plastic bridges, and as seen in the below screen reference image, they can virtually if not be touching them at the tops. It should only take a shortening of the black elastic straps to achieve this and in turn will also make the front of the Bells sit a touch closer to the side of the chest plate. We can also see a dressing issue with your Sniper shin. Just needs a rotation so the cover strips line up from shin to thigh, and just something to be mindful of when kitting up. Reference image Only one thing to mention on the helmet and that is the lower ear screw looks like it could be tightened up so it sits closer to the surface of the ear It does appear to be jutting out quite a bit Next item is simply an accuracy, or nice to have item. The screws used on the Thermal Det, as seen in the below reference image, were a Pan head flat blade type, where currently you have a dome head variety. Like I said, not a deal breaker just another step closer to screen accurate. Reference Image Centurion Suggestions: In this section we prepare you for Centurion. More photos are requested that allow us to make better decisions on possible adjustment etc. If there are any areas of concern they will be discussed here. I must say, based on what we can see, there is no reason for you not to apply for Centurion. Be mindful when dressing that your front cover strips should line up. Shins to thighs and fore arms to Biceps. Providing nothing shows up in the additional photos required for level 3 it should be plain sailing. Congratulations once again and head on out proud of your achievement.1 point
-
Longest build I've done to date! Just trying to get it satisfactory .. yours is so detailed its awesome. I keep looking at yours am like man I have to try that Haha.. yea I think I will be happy with the scope now , only made a few unintentional holes lol I am going to hollow out the mag. Housing .. I need to figure out how to secure the mag in there. Yep from swpropman.. totally should have made a styrene 1 ! Didnt consider that! Ug... Trying to figure out your latch thing you built for the mag housing, but I dunno if will work to hold clip in there. Maybe magnets... Planning to pack the same battery you have in there or even 2 and be able to pop it off when they need recharging. The trigger mech was so easy for install it was going over my head just cuz the lil blastfx trigger didnt fit thru the top haha so dumb, its a nice hair trigger The blastfx builders group has saved me for installing the electronics... Now the spring is driving me nuts Sent from my SM-J700T using Tapatalk1 point
-
I think if the CRL allows weathering in addition to specific language, as Tony points out, photo reference is a must. Otherwise you are bound to get people who go too far and run into approval issues.1 point
-
PERFECT!!!! Mark (AP)1 point
-
Belt is finally finished. I was following the canvas belt tutorial by firebladejedi but i didn't like the look of the raw canvas edge. It took a couple attempts but here is what I did: I took two pieces of elastic and sewed a larger piece of canvas to the top (straight stitch) Then, I sandwiched the elastic side together and tucked in the canvas edge into the middle and used a zigzag stitch to hold everything together. My first attempt came out at 3.5 inches, but the CRL says it should be up to 3.25 inches, so I had to start over. This attempt barely hits 3.25 and is less in a couple places. The belt is unfinished until I can properly fit it to my armor. Next step: hot water bath for kidney, butt and chest pieces. I need the sides to be closer to my body so I can get a more accurate trim. I feel there is too much space between my body and the armor to leave it. I would like a more tailored fit. Sent from my SM-G950U using Tapatalk1 point
-
Work is continuing to progress, but I have been slacking in posting photos. That being said, this might be s long reply! While other parts were setting up, I decided to glue straps on my “trooping” hand guards. Everything laid out and ready to bring strapping. I felt compelled to hide my white closure strip. What better way than son black CF wrap left over from my airplane build! Knee ammo pouch trimming and installation complete. Next up gluing my shoulder straps with e6000. Straps are dry, and now it’s time for shoulder elastic. I decided to use 4 snaps vs gluing to allow for future adjustments. Shoulder Bell and bicep snaps installed. I decided to recruit my wife to help with the sew on snaps for shoulder Bell attachment. This photo catches me up with actual progress. Cheers! Sent from my iPhone using Tapatalk1 point
-
Congratulations! Great build fellow 242-er !! ...hold the door for me, hopefully I'm right behind you on this journey1 point
-
Officially now known as TK75139 Sent from my iPhone using Tapatalk1 point
-
Congratulations trooper1 point
-
Approved!!!! Still have a few tweaks I’m working on but nothing major. Sent from my iPhone using Tapatalk1 point
-
So taking a page from some of our fellow troopers, I have decided to connect the ammo belt to the ab plate via two snaps. Since my armor doesn't rely on being held closed by the belt. This way the belt will be held in perfect placement and not shift as I move. The snaps are a little off level which causes the belt to tilt slightly. I kinda like the way it looks because it doesn't look perfect. It looks like it is separate from the armor. Also, my button plates. Here you can see the three snaps that hold the plastic ammo holder to the fabric belt. The two snaps (marked by red arrows) line up with the snaps on the ab plate. Here are the corresponding snaps on the ab plate. Here I placed tape and the inside to keep the snaps from snagging on the under suit and to minimize any wiggle. I will place something more permanent later.1 point
-
Congratulations!1 point
-
1 point
-
1 point
-
A couple of nice details1 point
-
I think it looks right like you have it. Sent from my iPhone using Tapatalk1 point
-
Hard to tell for sure just by looking at the pics but it looks about right....usually one can separate the right bicep from the left with the thumbprint on the left but yours have that on both so....and the thighs by the notch on the outer left (see pic of screen used suit) and the shins by the inner half having a shorter swoop, conforming to the muscle...but if one goes by the Movie-suits thay had pieces mixed so if your suit doesn`t have those distinct features I mentioned you are good to go with the set up you laid out1 point
-
1 point
-
Thanks Very much!! Im super proud and excited. Next troop i will hold my head high! Yeah hah1 point
-
Great you’re able to preserve imprint details for your scope [emoji106] it’s always a nice touch to keep them for realism- kuddos. How brave you are to hollow so much, nice work! Nice test fit picture of your plastic magazine - looks like from swpropman? Will you shorten the magazine to get it to size or hollow out the magazine housing? The latter task involves thinning allot of the walls so care should be taken during hollow process. Man, you’re progressing fast on grip components - curious to see the trigger housing from shapeways installed Sent from my iPhone using Tapatalk1 point
-
Just moved from West Virginia to Pennsylvania this past year, and as a reward for all the hassle of moving I got this plate. Before that, I belonged to a different franchise.1 point