Leaderboard


Popular Content
Showing content with the highest reputation on 01/05/2018 in all areas
-
THAT was indeed the problem on my build. Very happy to hear it worked for you and looking forward to your next update. By the way, I love the paint chips on the bottom of your folding stock. Looking so real.4 points
-
The opening bolt works like a charm No interference with the electronics.4 points
-
starting to put parts on the sites now,,, the trigger frame and body will be another month or so.. Finishing the bolt assembly and the bayonet lug this month.... i think that will be it... ooo and the scope rail... My hengstler replica and the cast m38 are almost done too3 points
-
Thanks for the complement. I used your technique. On the base coat I used several different shades of silver/gray/rust/black... leaving just specks of paint. Then when I removed the latex I just dabbed black wash in the spot.3 points
-
The sample blazing of the tube is really close to perfect , im making a few slight mods and we should have tons of these in 30 days... Off to the brazing ovens!!!!!2 points
-
Thanks! And feel free to ask any questions. The bumps are part of the ABS shoulder straps. they are glued on to the top of the chest and extend over the shoulders to the back piece where they are just tied down with elastic. They have ridges or bumps on them - the first bump on the front side is supposed to be larger than the others. AP armor also has a big bump on the back side too - gives people more room if they need it. But most can cut it off, plus one of the smaller bumps (for screen accuracy). Pretty much anything below the blue tape on those straps should be cut off.2 points
-
Approximately its this: All goods that arrive from a NON EU country are liable for VAT if they are worth more than £15, and duty if they are over £135. The value of the goods is the value of the goods inclusive of shipping and duty. The value is also converted into £ sterling using what ever the rate that they are using, I don't know how they calculate this, before the VAT and Duty are calculated. Some stuff will be missed, assume it won't be from the US. Also best not to falsify the customs declaration. VAT is currently a flat 20%*. Duty is a scale, but I believe once you cross a threshold the rate applies the whole whole value. There will often then be a handling fee by the delivery company, usually £10 but I've seen as much as £20. Worked example using made up numbers: Goods = $200 Shipping to the UK = $30 Total = $230 At customs this will be converted to £ Value = £169.88 ($230 based on todays rate on xe.com) Duty = £4.25 (2.5% of the total in £, if the value was under £135 it would be 0%) VAT = £34.83 (value + duty @ 20%) Handling Fee = £10 Total = £218.96 The government page on this is: https://www.gov.uk/goods-sent-from-abroad Hope this is helpful, I'm not super experienced in this but I've ordered enough stuff to have a reasonable grasp of the law here. * There are other rates but they won't apply here.2 points
-
So this is something that I'm so very very very happy with. You can see to the left is the cut piece and the right is uncut. I wasn't sure if it was going to work, but in the end I'm so glad i did it. I can't wait to post pictures of the finished legs.2 points
-
Some assembly required. Lol. Paint and assemble WIP2 points
-
Name: Niccolò Badoglio FISD Name: Marshall 501st ID: 41210 Profile page: http://www.501st.com/members/displaymember.php?userID=26808&costumeID=124 Garrison: Italica Garrison Expert Infantry link: Mandatory Info: Armor Maker: Anovos Helmet Maker: Anovos Blaster Type: Doopydoos tube + 3d printed parts and electronics + T-Jay kit Optional: Height: 187 cm Weight: 78 kg Boots Maker: Imperialboots Canvas Belt: TKittel Gloves: rubber (Trooperbay) Hand Plates Type: Flexible white (Trooperbay) Electronics: Aker + IComm + Bluetooth mic // arduino DIY project with RGB led strip and audio for blaster Neck Seal Type: Darman Holster Maker: Anovos Full body front (updated since EIB): Full body back (updated since EIB): Full body right (updated since EIB): Full body left (updated since EIB): Right side detail (updated since EIB): Left side detail: Gloves: Shoulder bridge left back: Shoulder bridge right back: Shoulder bridge front: Thigh ammo pack attachment: Sniper knee: Drop box back: Crotch-butt detail: Wrist detail: Helmet front: Helmet back: Helmet left: Helmet right: Hovi mic detail: Lens color (backlit): S-trim: Blaster left side: Blaster right side: D-ring: Ammo belt: Neckseal: Thermal detonator back with replaced pan-headed screws: Boots: Interior strapping (sorry a couple of straps are missing from the photo): Abdomen detail: Action shot: Many thanks1 point
-
Name: Anthony (Tony) Jobe Height: 5'11" Weight: 185lbs FISD Name: ukswrath Legion ID#: 10116 Profile Page: 501st Profile Garrison: Golden Gate EIB application - Build Information Armor Maker: Anovos Helmet Maker: Anovos Boots: Imperial Boots Gloves: Imperial Boots Electronics: Ukswrath's FOTK Audio Neck Seal: Anovos Blaster: JJ with electronics Build Thread: Anovos TFA TK Hangar updated1 point
-
Thanks for the comments, Magni. I think you're right, I'll just need to wait on Tony and Andy. This shim situation is becoming a frustrating endeavor. I'll keep the sniper idea in mind, though I think the picture makes the overhang worse than it actually is. At the last armor party, I learned to pitch the sniper forward a bit, to ensure my kneecaps aren't sliced open. Great tip! Though as a result of the forward tilt, it makes the lower edge pucker out. Something to tweak before Centurion. In my build log, I went back to the ears a few times. My hugenormous noggin is partially to blame, when I was fitting the cap and back to the face plate, I pitched it so my head would fit. I've seen a couple of EIB WTF passes with thicker ears, so I'm confident it will hold up. Definitely going to trim them way down before Centurion (as well as upgrading my blaster per Tony's input). Sent from my XT1254 using Tapatalk1 point
-
Great job raising the belt. Snaps will help keep that in place. Good job trimming the shims down. I believe the CRL states only one seam with a space no more then 1/2". Yours now have 2. I think Andrew or Tony may ask about that. Your sniper knee looks like it is hanging past on the side in your photo. That could use a trim before it snags and rips off. The ears on your bucket look thick on the bottom from the pictures you have. Besides those few things great job with your build and Good Luck! You'll be Expert before you know it!1 point
-
I'm late to Congratulations! =)1 point
-
Where do we sign up to get one of these E-11's?1 point
-
Yes that`s a good start, Anovos usually leaves alot of return edge so after you installed the brackets (close to the face of the armor) you`ll see how much more you can take of IF you choose to do so, some leave alot and some cut alot - personal preference. Also, many builds reinforce the areas were the brackets go with plastic tabs (borrowed you pic Dana "QuartZ") Yes and if you cut from the inside it`s much easier, check out tk1636 on Youtube - among other builds he does an Anovos build -great source1 point
-
Looks like an easy approval! Good Luck!1 point
-
So a couple critiques. 1. I know it was mentioned, but your shims need to fit seamlessly with your armor to just look like an extension. This will need to be addressed. 2. The front of the belt should be flush and below the abdominal button box. 3. Honorable mention: the TD screws are not Phillips head. They should be a slotted dome screw. (for centurion) 4. The cod rivet should be brass (for centurion) Good Luck with your submission. Good Job!1 point
-
LOL, I already had to convince one wife, I won't try that again.1 point
-
Hmm. This makes me want a FOTK. Such a clean and precise build. Beautiful. You can explain it to my wife, OK?1 point
-
Hello everyone! I would like to announce a change to the ROTJ TK CRL. Under the Centurion requirements in the old CRL it used to state at that: There are no visible snaps, rivets or brads on the crotch tab of the Posterior Armor tab. After a review of screen captures it has been determined that there was indeed a snap on the posterior tab. Upon staff discussion, this has been removed from the Centurion requirements and the snap is now allowed for Centurion. Please feel free to re-familiarize yourself with the ROTJ CRL here: http://databank.501st.com/databank/Costuming:TK_rotj If you have any questions regarding this update please feel free to contact me via PM.1 point
-
Yepp and just to be clear, some use velcro so that the foam can be cleaned/replaced easier, my setup is really high density and dosen`t absorb any moisture, only on the surface and that`s easy to just wipe down after a troop Finally I could give a piece of advise that didn`t involve sending you to the shops If you can that would be better, looks like you can push the plate closer to your body? If so that alone would raise it a bit. Some reference pics to give you an idea My Centrurion app1 point
-
Looking good1 point
-
Thanks Walter, sorry missed your congrats1 point
-
I have one as well. It's quite nice. Solid resin though so don't drop it!1 point
-
Some good information there, Chris. Thanks for the heads-up!1 point
-
Great write up Jesse, many thanks. If anyone wants to know more, please message from my page facebook.com/trooperamp Best, Paul1 point
-
Thanks all for the kind words. Chris, yes it is a Foredom, an old one. :-) It works great but the flexible shaft does take some getting used to. It feels like it's fighting you at times. I spoke with T-Jay and he says the height of the reset button is 6.5 mm in case anyone else needs to know. Back to dremelsville.... Mark1 point
-
1st- awesome work!!! 2nd- Hope it’s okay I hijack your thread for a question. Can I ask about these bump? I read in another post to remove them...but I’m not sure what they are?! Sent from my iPhone using Tapatalk1 point
-
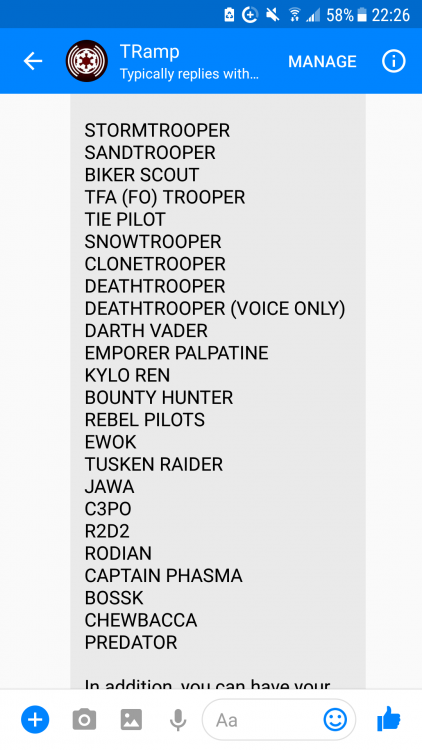
He does have Phasma on the TRamp, I was talking to him recently and these are the different loops that he has.
 1 point
 -
Hey. Just stumbled upon this today. I have this blaster and it is beautiful. No seam lines. Comes flat black. Weathering needed. If you want the spring you will need to make one. The back of the blaster comes open so you can install it. The blaster is resin. For a really long troop it might get tiring after a while but way less so than a HWT rifle. Totally worth the $ IMHO.1 point
-
There is A LOT wrong with the helmet.1 point
-
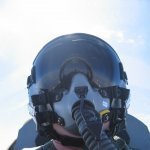
I added elastic strapping to the ab and chest. The pic just shows the snap bases and the clamps I used to hold it all together for measuring. I quickly did this so I could try the torso on. The arms are not attached. Shoulders are sort of taped on. I have no help so I'm doing what I can. The right ab to kidney elastic isn't doing much. I think I lost weight. The pieces are getting pushed overtop of each other. Question: How is the neckline looking? The helmet is not my "real" helmet and it is sitting very high on my oversized head. I really need to replace the elastic strapping I have connecting the back to kidney with nylon - I think. Sent from my iPhone using Tapatalk1 point
-
Hi all, Quick update here - Super excited to have received my BlastFX - Essentially my electronic module that will enable sound, lights and rumble action to my Blaster! I am a proud owner of one as it is compact and meets my every need. Paul is a great guy to deal with and always at the ready to answer any questions you may have. I actually received it a while back but did a terrible blunder; I short circuited the module and likely burnt out the speaker rendering the module without sound. As he provides battery hook-up instructions, I recommend heeding to the direction provided closely. I ended up commissioning him for my battery and switch install as I proved myself a novice blundering the way I did. Paul was very accommodating and got me on my way with a fully operational BlastFX in record speed! Furthermore, it comes standard with a good amount of wiring which comes in handy during the installation stage; I don't forsee any significant challenges when I get to this step. As for my battery source; I chose the recommended Li-Po type and choose out at 3.7 volts. It is recharged via USB charger and attaches / detaches via JST 2 Connector. Mine will take upwards of 2 to 2-1/2 hours to fully charge from zero. As for what I think if it; superb. It's compact, loaded with features, lights are bright enough(red for blaster bolt/ blue for stun), and sound quality is good. The Stun mode is very vivid sounding; likely to give you goosebumps as it gave me. Rifling through options in blaster types and displays gives you control over how you particularly want to operate it - great fun! Oh, there's also a 'soon to run out of ammo' sound and a 'out of ammo' sound as well during operation, which plays to kind of the realism of the whole thing. Oh yeah, and there's a mute operation as well which reveals lights only at trigger pull, which may come in handy based on the scope of a given troop. Apart from a slight electrical hum when the module is turned on, I give it two thumbs up! I did attempt to channel the possible electronic hobbyist in me over the course of three months by doing a ton of research into Arduino Boards / Sound Boards and electrical know-how on experimenting with bread boards etc. but honestly concluded it was too much time/energy/money overhead for me for even to get anything working so I went with the quick and easy route of getting this ready-to-install module and I am not regretting it one bit. Again, given that it's compact and loaded with features, it's one of my treasured components for my e-11 build. TRamp BlastFX enabling light, sound and rumble for install into doopydoos resin e-11 blaster BlastFX main processor (arduino / sound board) with micro SD card at 128 MB. JST 2 battery connector of choice shown Display, LED light, speaker and rumble motor On / Off switch and trigger along with mode button Battery of choice - Li-Po at 3.7 volts 1200 mAh current capacity Operational instructions My test set-up before installation cheers, Jesse Sent from my iPhone using Tapatalk1 point
-
My new spats are FINALLY on their way. I should hopefully be done with those and ready for the next phase next month (next year sounds long lol). Let me know when you want to team up again.1 point
-
Thank you Andrew! And thank you to my fellow 501st and FISD brothers and sisters. On to TLJE Merry Christmas to all.1 point
-
Hi Tony, thank you for your application and welcome to your Centurion review!! CRL and Centurion Application Requirements: All submission photos are present. Your armor displays all the necessary elements to qualify for Centurion, Congratulations!! and welcome to the rank., again lol Other-Armor Fit/Assembly: Excellent job overall on this armour, and an outstanding example for all budding FO TK 's to follow. Nothing more to add. Congratulations brother, continue to make the FISD and Golden Gate Garrison proud!!1 point
-
Looks great Tony! Sly or myself will be with you shortly. While you wait we ask that you change that blue coat hanger to a black one! Thanks!1 point
-
Oops rookie mistake, let's use this one
 1 point
 -
Hey Alright Toni welcome back. Thank you for your Centurion application and thank you for making the last minute adjustments. CRL and Centurion Application Requirements: All required submission photos are present. Thank you for making repairs mentioned during your EIB application. Excellent job on your build trooper . Now that everything is in order Andrew and I are pleased to announce your armor displays all the elements as set out in the Centurion CRL. Congratulations and welcome to Centurion Other-Armor Fit/Assembly: We have nothing to add here. Vader has requested your presents on the Death Star as his newest Centurion.1 point
-
Hi everyone, It’s been many years in the making, but I finally own a life size Imperial Stormtrooper!! I’ll keep my story brief, so, in short, my brother and I always gravitated towards the Stormtroopers when playing with our Star Wars toys as children. Around the early 2000s, I spent time looking online for Stormtrooper armour, however the choices were slim at that time. Then, when I stumbled across starwarshelmets.com, I spotted a sign behind a picture of two TKs for “SDS”. Reading further, Shepperton Design Studios was (at that stage) then regarded as holy grail of TK lids - so I bought one in 2005: ANH stunt number 330. My dream of a full suit of armour then remained dormant for many years - 12 to be exact. My SDS lid had become yellow after all those years - my decision to renovate (full respray) lead me to whitearmor.net and, as they say, the rest is history. So, I’m now a cleared Imperial Stormtrooper with the UKG/501st and hoping to achieve EIB and Centurion status with my RWA armour and modified DoopyDoos E-11. Thanks to the excellent community on here, the UKG and the RWA group, I’ve had a wonderful experience armour and blaster building and thoroughly look forward to making my trooping debut for worthy causes. Best wishes, Dan It’s a pleasure to join you all. :-) Best wishes, Dan :-) Sent from my iPhone using Tapatalk1 point
-
OK, and now for the updates! 1. One thing we did prior to the troop (and glad we did), was to trim down the back of the thighs. This gave us just enough extra room to walk more comfortably and maneuver steps. Highly recommended mod if you need the extra space and it doesn't always require a drastic cut. Here was a side by side to show how much we trimmed off, starting with the right thigh. And here are both thighs trimmed... 2. Next was trimming of the cover strip on the upper forearms to present a smoother and less drastic contour. It did also provide a little more from the comfort perspective as it cut down on some clashing we had with the bicep piece whenever we tried to bend our arms. Here the piece on the left is as it was originally, and the right shows the new contour line. 3. Shin creep. While the use of foam in the shins did help, we finally caved in and went the route of sticking velcro on our shiny new boots. This mod is DEFINITELY worth it. We trooped 4 hours and never once had an issue with our shins moving around. Here's the strip of velcro on the boots... And here is the matching strip inside the bottom of the shins. Note we still kept the foam on the inside of the shin with the sniper knee as that helped keep that piece out further and prevented it from ever catching on the bottom of the thigh. 4. Another update we made was to replace the velcro attachment at the top of the shoulder bells with a snap. My original thought was that with velcro we could adjust the fit more easily, but while that was true, it made for a small wardrobe malfunction late into the troop. Unfortunately, no pictures of that one, but I think you get the idea ;o). 5. Finally, while not necessarily an improvement per se, we went ahead and installed our electronics and it worked out great. We're using TrooperTalk, running on an old iPhone 6 and with the 50Watt Aker speaker in white. I found that where I positioned the speaker was perfect as I could actually stick a finger behind my chest plate easily and adjust the volume knob as needed. I ran the background chatter and it was perfect as it would be going off as folks were standing next to me for pictures and complemented my minimal dialog with them. Well, that's it for now. I am sure more updates will come as we troop more and more, but hope some of these might be helpful to others. I also went ahead and got my submission package together for Expert Infantry, so hopefully that comes through soon, and then it's on to Centurion!1 point
-
We got approved!! Don't know what was more exciting - BBB day or 501 TK email day!!! So psyched for our first troop this Saturday at the Marlins game and grateful for everyone who helped us throughout our journey! I've already started tweaks and adjustments though (pictures to post later), and so begins the never ending saga of armor maintenance and modifications. Obviously, first stop is EIB, then Centurion, but definitely looking into possibly transforming into a HWT. One step at a time though... Long live the Empire!1 point
-
Tonight, my brother came over and we got him suited up and took his submission pics. And of course a couple of action shots...1 point
-
Of course, this wouldn't be a build thread without some submission pictures! I took care of mine tonight and my brother and son are up tomorrow. Enjoy and please feel free to provide feedback and critique. Our goal is Centurion, but we know we have to get to Expert Infantry first. We have all the required elements needed for Centurion, but understand there may need to be some tweaks to the fit of the armor. And of course the action shots...1 point
-
Added "sight"1 point
-
Small taste of where im in the processes right now.1 point
-
some more progress1 point
-
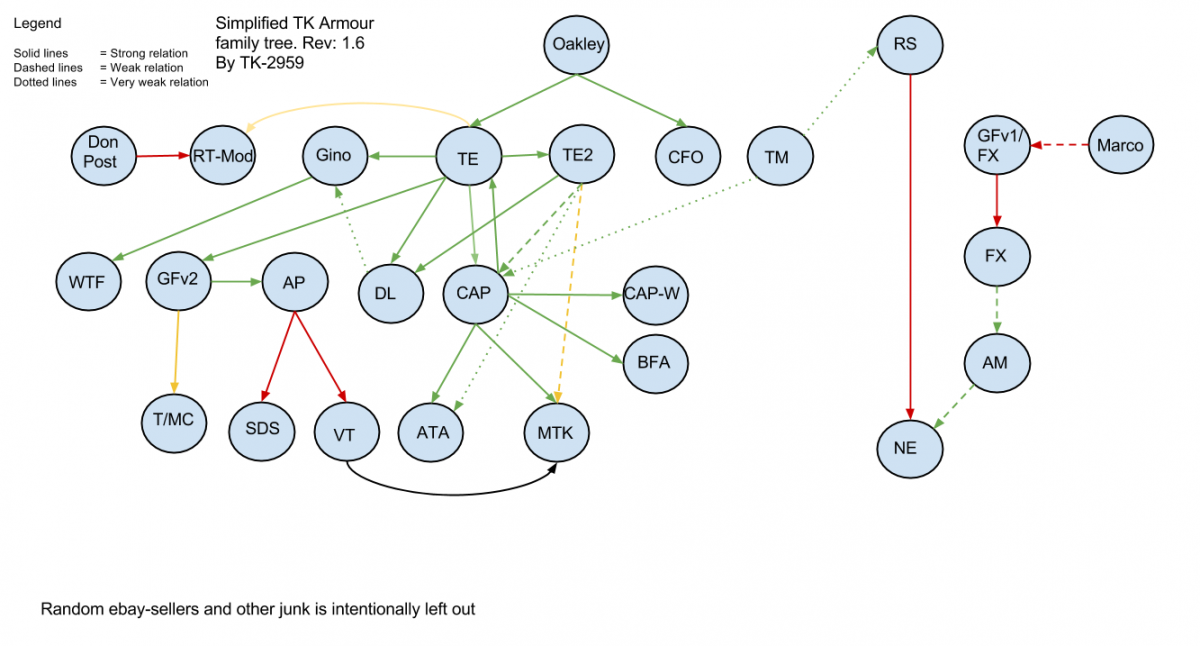
Splitting out the work of me and Steffen (Minuteman) into a new, locked thread to keep out the drama. Original thread: http://www.whitearmor.net/forum/topic/26414-trooper-armor-familiy-tree-an-experiment/ My work: Steffen's work:
 1 point


.thumb.webp.27f7939d37871f319ff836257d4a3668.webp)