Leaderboard


Popular Content
Showing content with the highest reputation on 11/22/2017 in all areas
-
My costume has been cleared, I’m now a really chuffed TK14655 I can not thank you all enough for your help, advice, support and encouragement throughout my build thread and particular thanks to Christine aka Cricket, Frank aka Fragarock and the armourers on the UKG..... you have all enabled a dream to come true A big thanks to all of you [emoji4] Sent from my iPhone using Tapatalk4 points
-
EXCITEMENT ALERT!! ;-) Well, it’s not totally finished, however I fitted the grip tonight. To mask the inner curved parts of the trigger, I decided to try something a little different and used children’s Play-Doh. Amazingly, it worked well. :-) Whilst I didn’t take specific pictures of everything, I fitted the grip to the body with screws and E6000. Trigger fitted and working. Power cylinders weathered - I used a rag and sprayed metallic silver onto the rag and gently dabbed where required. Fitted remaining screws. Attached trigger guard. For this, I used super glue and them filled around the guard with greenstuff. Time will tell how this holds up. I still have a few bits to do, including hand painting/weathering the ejection port. And here’s some pictures. A few finishing touches and we’ll be done. :-) Sent from my iPhone using Tapatalk4 points
-
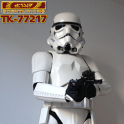
Personal Information Name: Patrick Robertz Height: 180 cm Weight: 78 kg FISD Name: Schmetterhemd Legion ID#: 77217 Profile Page: 501st Profile Page - TK-77217 Garrison: German Garrison / White Shadows Squad Build Information Armor Maker: TM (Troopermaster) (self assembled) Helmet Maker: TM (Troopermaster) (assembled by TM) Blaster Type: E-11 (Doopy-Doo's Full Resin Kit) with T-Jay's help and Completion Set Boots: Imperial Boots Canvas Belt & Holster: TM (Troopermaster) (assembled by TM) Hand Plates: JustJoseph63 Electronics: Aker (not assembled yet) Neck Seal: Darman's Props EIB Link: TK-77217 Requesting ANH Stunt EIB Status (TM) [774] If something is missing, please let me know. Full Body Front: Back: Left : Left Arm Raised: Left Side Detail: Right: Right Arm Raised: Right Side Detail: Armor Details Abdomen Details: Action Shot: Hand Plates: Shoulder Bridge Back: Shoulder Bridge Front: Back/Chest Connection: Thigh Pack Attachment: Knee Plate: Drop Box Back: Cod and Butt Plate Attachment: Interior Strapping: Kidney Plate Notch: Wrist side of forearms: Helmet Details Front: Left Side: Right side: Back: Hovi Tip Details: Lens Color: S-Trim: Blaster Details Left: Right: D-Ring: Accessory Details Neck Seal: Thermal Detonator Back: Thermal Detonator Front: Holster Attachment Front: Holster Attachment Back: Additional Details: Edit: Fixed an issue with linked pictures.3 points
-
The trigger: To activate all the electronics I used a DIY end-switch as trigger. To fit this into the handle of the blaster I used a Dremel to grind the internal of the handle. As the end-switch also functions as a spring, the trigger will automatically jump back and no additional springs are required. To prevent the trigger to fall out of place I grinded a hook at the end of the trigger as can seen below. By using 4 nails the position of the two parts can exactly be defined. 2 nails are used to position the End-switch. 1 Nail is used as a rotation-point of the trigger and the last one defines the window of operation of the trigger (and prevents the trigger to fall out of place. When everything is in, only 4 small nail tips can be seen.2 points
-
The amount of mods you're applying is insane and the results are absolutely fantastic. In all honesty, I respect builds like yours. Mine is simply like a model kit that I assembled and painted. But your build requires so much more craftsmanship. Awesome work brother.2 points
-
Really a beautiful blaster Dan! Very nice and believable weathering, too. Hard to add something now, that has not already been said. For the final touches I kindly suggest to paint the green stuff on the trigger guard and add a light washing to the parts in shiny silver and brass. Just a little bit to dull it down. Anyway, your blaster is another good example of what can be achieved with a standard DoopyDoo's full resin kit - and skill. Not advertising for it, but you started with one of the simplest resin kits available and look what you have turned it into. I really love the result!2 points
-
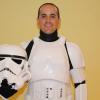
Well I’ve submitted my armour for clearance with the UKG, so hopefully all will go well..... Today I’ve been to the bike show at the NEC in Birmingham...... ok what’s that got to do with TKs I hear you ask..... well comic com was also on so I spent some time there too it was great to meet guys n gals from the UKG .... although I did feel out of my depth.... the people I talked too were so nice, helpful and knowledgable and the TKs knew how to talk to the public.... I was awe struck.... really impressed with the professional way everyone conducted themselves.... yes awe struck and me thinking can I do that’?.... mind you a year ago I didn’t think I could build the armour.... Anyway some pics The RS stand UKG 501st Spent some time talking to the TKs and they all recommended me getting a voice changer for trooping.... actually it was good to talk to them .... it’s much better to hear it from the horses (or should that be TK) mouth .... as they say.... oh and their voice changers were amazing Hope you enjoy the pics Sent from my iPhone using Tapatalk2 points
-
Personal Information Name: Tino Jacobs 501st TK ID: 61276 FISD Name: T-Jay Garrison: German Garrison (White Shadows Squad) Profile Page: 501st Profile TK-61276 Armor Maker: Troopermaster Helmet Maker: Troopermaster Blaster Type: E-11 DoopyDoo's Full Resin Height: 176 cm Weight: 70 kg Boots Maker: TK-Boots Canvas belt: Troopermaster Hand Plates: Sonnenschein Electronics: Aker Voice Amp Neck Seal: Veedox Holster Maker: Troopermaster Link to Armor: Fully finished ANH Stunt TK (1,5mm ABS) from Troopermaster with some modifications Link to Blaster: Full resin E-11 from DoopyDoo's with some modifications Armor Photos Full Body Front – Arms at side Back – Arms at side Left – Arm raised Right – Arm raised Right Side Detail – Arm raised Left Side Detail – Arm raised Armor Details Abdomen Details Action Shot Cod and Butt Plate Attachment Interior Strapping Helmet Details Front Left Side Right Side Back Hovi Tip Detail Lens Color Blaster Details Blaster – Left Blaster – Right Accessory Details Neck Seal Thermal Detonator – Back Thermal Detonator – Front Holster Attachment Inside Holster Attachment Outside Please state if additional information or photos are required. Thank you.1 point
-
I been busy on the bucket. The interior received 3 coats of rubberized spray material. After the interior paint dried, I installed my lenses and painted the frown. I am going with decals for the the rest of the bucket. Finally, I have been working on brackets and hardware for the body armor. I will countersink all of the screw heads and attach elastic loops next. Progress!!
 1 point
 -
Jesse if all goes as planned I will be able to pull back the bolt to observe the chamber. Hopefully.......1 point
-
Great looking armour, Tino. Love the slightly weathered appearance. Nice blaster too. ;-) Sent from my iPhone using Tapatalk1 point
-
The selector As the doopydoos box contains a Selector switch I used this to create a "Mode selector". The handle contains three letters on the side : "A", "R" and "S". This means there a 3 possible modes to select. The angle between the 3 letters based on the location of the Selector switch is approx. 36 degrees. This means when a 10-position rotary switch is used, the defined positions of the switch match the letters on the handle. So I bought a small 10-position rotary switch. When hollowing the Selector switch, the grip of the rotary switch can be put in the Selector. As the rotary switch is originally designed to be switch using a screwdriver the top of the switch contains a slot. I glued a part of a nail into the Selector switch, so the grip of the rotary switch is fixated. To fit the rotary switch in the handle I grinded a square hole in the handle (The depth is approx. half the thickness of the handle). As the rotary switch needs of course wires I draw a hole at the top of the handle to this square.1 point
-
Nice armor trooper!1 point
-
Nice work buddy, TM is the master!!!!! Inviato dal mio iPhone utilizzando Tapatalk1 point
-
1 point
-
These guys got you covered I just want to ad that when sizing the shins it's best to have the shoes on and in my opinion, trying to keep the shin tight around the boot...some experience trouble with the shin sliding up over the boot when doing so but I haven't...and there's ways to fix that if needs be this is how thight mine are.1 point
-
Will be interesting to see this part of the mod Mike. When I add electronics (BlastFX) on my doopydoos build, I will see how to keep the pulling of the charge handle functional. Will you be doing this as well, or even better, have the exposed bolt pull back along with the charge handle?1 point
-
Great work, Stephen. Many congrats on your clearance. :-) Sent from my iPhone using Tapatalk1 point
-
Excellent news Stephen... very well deserved and a great build thread which Ive really enjoyed...All the best mate Sent from my Nexus 7 using Tapatalk1 point
-
Congrats, Stephen! This has truly been a labor of love. Definitely an inspirational thread for all new builders.1 point
-
Congratz time to1 point
-
Awesome. Your kit looks great. Sent from my SM-G935V using Tapatalk1 point
-
First of all the LED's. The MR16 LED-driver contains a PT4115 chip. This chip allows a LED to be dimmed. This used pin is however not connected in the default LED-driver. This way the LED will burn by default. If 0 Volt is applied to this pin the LED will be shut down. If 5 Volt is applied the LED will burn. Each other voltage between 0-5 Volt will dim the LED. As SkyOne already mentioned in his thread, the power supply of this LED-driver needs to be changed. Standard the 2 large pins are used as power-supply and are shielded by Diodes. As the LED-driver needs to be positioned in the Barrel of the blaster these pins needs to be removed. The power-supply can directly be soldered at the printboard so photo below). - Green wire : Dim-function of the PT4115 chip (outside pin of the 3 pins on the left side). -Blue wire : negative voltage (0Volt) -Red wire : positive voltage. As this driver is designed for >8V I used a 9V battery to supply the voltage. The pink and white wires are connected to the LED it self. The LED's I used are the same one as decribed by SkyOne. This is a 3W power RGB-led. As I only use red as color I connected R+ en R-. As I wanted a "walking light" in the barrel I made 5 of these combinations.1 point
-
Yeah, that's certainly true. This is why I want to check with the LMOs. It's kinda like the TKC/ICN and a light saber - you can get it by playing as that character type, but it took some debate as if we should. At least you can get it that way in the game. For R1 we really don't know, and the game may or may not be considered canonical. Here is my guess: 1. We will allow a telescoping baton as we can't say it's *not* one on the movie. 2. We won't add L2/L3 points for it unless in a game or similar we see one with a telescoping rod, or there is a still, or some other evidence. It would be pretty bad to require one at L2/L3 and then one of the 501st members who was in the movie, or knew someone in the movie, found out it wasn't.1 point
-
I have finished up the teeth... and am working on the tube stripes... Cleaning out the fiberglass can be a little messy... And pretty much done... Maybe a little clean-up here and there. I find that when ever I think I have one spot finished, I turn the helmet to tackle the next pot and I see more to clean out. I started fitting the lenses as well. They were hard to cut. I plan on using the T-Nut method, but I find that they are a little too long - the ones I found anyways. I have cut about half of them off and it seems to help the lenses sit more flush. You can see where I am cutting compared to the original T-Nut.1 point
-
Inviato dal mio iPhone utilizzando Tapatalk1 point
-
my baton extends to 26 inches1 point
-
Well done Dan, a great looking blaster! And done in record time too! - I love blaster builds!1 point
-
Congratulations, and way to go, Patrick! Time to get that Centurion submission in Trooper.1 point
-
WOW That was fast. Thank you very much. Great feeling. Centurion Status Request will come soon @ T-Jay: Go Go Go !!!1 point
-
Woohoo, that was a quick one! Congratulations Patrick! Maybe I should finally get my pictures together and do the same...1 point
-
Dan, Have thoroughly enjoyed following your build. Well done mate! Sent from my DH77 using Tapatalk1 point
-
Many thanks, Shaun. I’d recommend the mods if you have the time and patience. :-) Thanks, buddy. You are far too kind. :-) Yeah, I’m really pleased with the variety of finishes too. I mainly followed Tino’s first build for the paint types. :-) Cheers, Stef. That’s very kind, and I look forward to seeing yours progress. :-)1 point
-
Congratulations and welcome to the ranks1 point
-
Hey Patrick thank you for your EI application. CRL and EIB Application Requirements: All submission photos have been posted. Beautiful job on your TM . Andrew and I are very please to announce your armor displays all the necessary elements to qualify for Expert Infantry. Congratulations! Other-Armor Fit/Assembly: In this section we review observations made by your fellow troopers and ourselves. Some observations may lead to suggestions to improve the overall look of your armor. We have nothing to add here. Centurion Suggestions: Because Centurion photos show much more detail than EIB, items pertaining to Centurion might be seen there and not here. We try to point out all we can from what is seen but the final accuracy is the responsibility of the trooper. From what we can see so far you're looking really good for Centurion should you choose to apply. Congrats again.1 point
-
Well done Dan...you've done a cracking job and I've learnt alot from your build...I'm very proud of you lol [emoji3] Sent from my Nexus 7 using Tapatalk1 point
-
Jaw-dropping awesomeness! It looks like cool metal in most parts and the interplay of matt black and gloss black along with conservative amounts of weathering and use of silver has taken your blaster to the next level. Even with a few follow-up touches still needed, VERY impressive Dan. I don't have a trained eye but to me, it looks like the real deal not a resin copy; your attention to detail has truly paid off. I take it, you only have one or two more posts - spoil us with pictures!1 point
-
That’s what I would like to do with a cone shape. Unfortunately I’ve got big legs and bad cutting skills. Lol1 point
-
I emailed TM today asking about ordering a kit. Thanks for the info everybody. Tony, I'll be following your TM build for tips!1 point
-
This is next level stuff. It’s been amazing watching your progress. I’m building my first E-11 soon but doing a basic trooping one. But after that... I’m going to have to do something like yours for display. Not that I think I’d get close!1 point
-
Interesting. This is a great find, and I can see this being changed if the LMO is OK with us taking it from the game. I would think though for maybe L3?1 point
-
Inviato dal mio iPhone utilizzando Tapatalk1 point
-
New information regarding what could be the riot batons in R1. I know it's only a possibility, but I had to share. In the new Battlefront II game in the story mode, it appears there's troopers armed with extended riot batons (they literally look like average batons). Go to 1:12:37 and watch as a troop runs at Leia with a baton. There's another one a few seconds earlier but it's hard to see the baton when he falls. Maybe something like the below examples. I thought in one of the ref images above I saw a little piece sticking out of the bottom. https://www.google.com/url?sa=i&rct=j&q=&esrc=s&source=images&cd=&cad=rja&uact=8&ved=0ahUKEwiA4MvokM_XAhXBfyYKHaQ1CD0QjRwIBw&url=http%3A%2F%2Fwww.9safety.com%2Fwebsite%2Fhtml%2Fproduct%2FEX9000_nylon_riot_expandable_baton_a2108.html&psig=AOvVaw0jvQI5DPYUlM9cV7XroEk6&ust=1511335279354761 https://www.google.com/url?sa=i&rct=j&q=&esrc=s&source=images&cd=&cad=rja&uact=8&ved=0ahUKEwiiur-Aks_XAhWB8CYKHTffCjsQjRwIBw&url=https%3A%2F%2Fwww.selfdefensesuperstore.com%2Fself-defense-products%2Fbatons&psig=AOvVaw3gtyLg-iX7gxDgnr4E2Qnx&ust=1511335470998480 Honestly I'd go with the latter. 3 part basic sections, and straight black with some texture on the striking section. I feel that in battlefront II these batons need closer inspection1 point
-
What ever works right1 point
-
Welcome back and..either way is fine, personally I prefer pic #1 Here´s some RS reference1 point
-
Thanks for the votes of confidence everyone, and for the tip on the S-trim. Here's a better picture. Sent from my Pixel XL using Tapatalk1 point
-
Thank you, Markus!1 point
-
Thank you very much Markus!1 point
-
Today's focus was on cleaning up/upgrading the helmet. First I cleaned up the corners of the teeth, removed the overspray and repainted them. Meanwhile, I spray-painted Joseph's replacement ear screws (with a rather expensive screw-mounting apparatus!), then installed them. I also removed some of the excessive return edge of the eyes and painted the rims of the mic tips white. I'll replace the mesh with the screen-accurate one once that arrives:1 point
-
Thank you Guys, i am very pleased . I will shorten those drop box elastics1 point