

Xinx
-
Posts
48 -
Joined
-
Last visited
1 Follower

About Xinx

Recent Profile Visitors
1,292 profile views


-
Request your Centurion Certificate here:
Xinx replied to justjoseph63's topic in Request Centurion Status
Pawel Oortwijn 11131 Centurion A4 Tony http://www.whitearmor.net/eib/certificates/11131-centurion.png -
TK-11131 requesting ANH Stunt Centurion status [DA props] [415]
Xinx replied to Xinx's topic in Request Centurion Status
Thank you for the approval -
TK-11131 requesting ANH Stunt Centurion status [DA props] [415]
Xinx replied to Xinx's topic in Request Centurion Status
Painted black and weathered D-ring. -
TK-11131 requesting ANH Stunt Centurion status [DA props] [415]
Xinx replied to Xinx's topic in Request Centurion Status
After summarising all mandatory and suggested improvements, I came to the following new pictures: - Hovi mics with white interior. - Adjust black paint Vocoder -Gray paint teeth reduced -Dropbox position -No return edges (There is really no return edge anymore. On some picture's there seems to be one, but that is thinning of the outside of the ABS. I used a dremel to flatten the inside of the cuffs as can seem on the roughness on the inside ) -Hot bending shoulder straps -Pictures of D-ring -Drop of biceps/Adjust shoulder bells/Overall look Hopefully these adjustments are executed according to expectations. -
TK-11131 requesting ANH Stunt Centurion status [DA props] [415]
Xinx replied to Xinx's topic in Request Centurion Status
based on the remarks above, some additional images: Backside of the belt : Adjusted the straps Details of TD screws (pan head style): Details cuff (No return edge): -
General info: Name : Pawel Oortwijn Nickname : Xinx ID : TK-11131 : http://www.501st.com/members/displaymember.php?userID=22551&costumeID=124 Armor : DA props Garrison : Dutch Garrison Armor details: Armor maker : DA props Helmet maker : DA props Blaster type : Doopy doo's : See building thread https://www.whitearmor.net/forum/topic/43424-e-11-doopydoos-with-sound-light-building-thread/?page=2&tab=comments#comment-587264 Holster maker : Myself Neckseal maker : Myself Shoes : Painted Jolphur-boots EIB link : https://www.whitearmor.net/forum/topic/39150-tk-11131-requesting-anh-stunt-eib-status-da-props-648/?tab=comments#comment-524297
-
Hi, According to the CRL ;" Drop boxes must have full inner drop boxes to close the back. Flat covers are not allowed.". However in the post about the visual checklist in FISD there is no note about the chape of the backside : https://www.whitearmor.net/forum/topic/21465-anh-stunt-legion-centurion-visual-checklist/ So my question is : Do I need a rounded backcover in the dropbox for the centurion program or is closing with a flat piece of ABS enough ? Ergo : Which guide should I follow ?
-
Neb's E-11 build: Doopydoos, Tino kit, and custom electronics
Xinx replied to Neb Sgird's topic in ANH BlasTech E11
Looked at my ordering back then: I used 2.5Watt 4 Ohm speakers 20x40mm. These are Notebook speakers and perfectly fit in the Doopydoos pipe. These can be bought in a 2-pack (Left/Right speaker). I bought them at www.Aliexpress.com (and as far as I can see you can still buy them). Good luck. -
The final result:
-
The buck converter is placed underneath the charging handle so it won't be visible. After glueing the ammoclip, innerbolt and charging handle onto the blaster the project is finished.
-
The schematics above look simple, but when it's all combined it looks like spaghetti (without the meat-balls ). To be able to miniaturise this I made a layout of my resistors, pins and needed wires. After validating this schematic I made this in real life by soldering the resistors on a circuit board and adding sockets where I can place the MP3-player and Arduino-board. I used sockets so I don't have to solder the arduino and player directly to the circuit board. (Luckily I did this, because I blow up a the SDL/SCL gates during testing. I only needed to replace the arduino without soldering the circuit board again. To save space for all the wires I removed all non-used pins of the MP3-player and Arduino. <Open heart surgery in progress> Another benefit of using sockets is the fact there is room to solder the wires When everything is soldered I added the boards and put in the gap I created earlier.
-
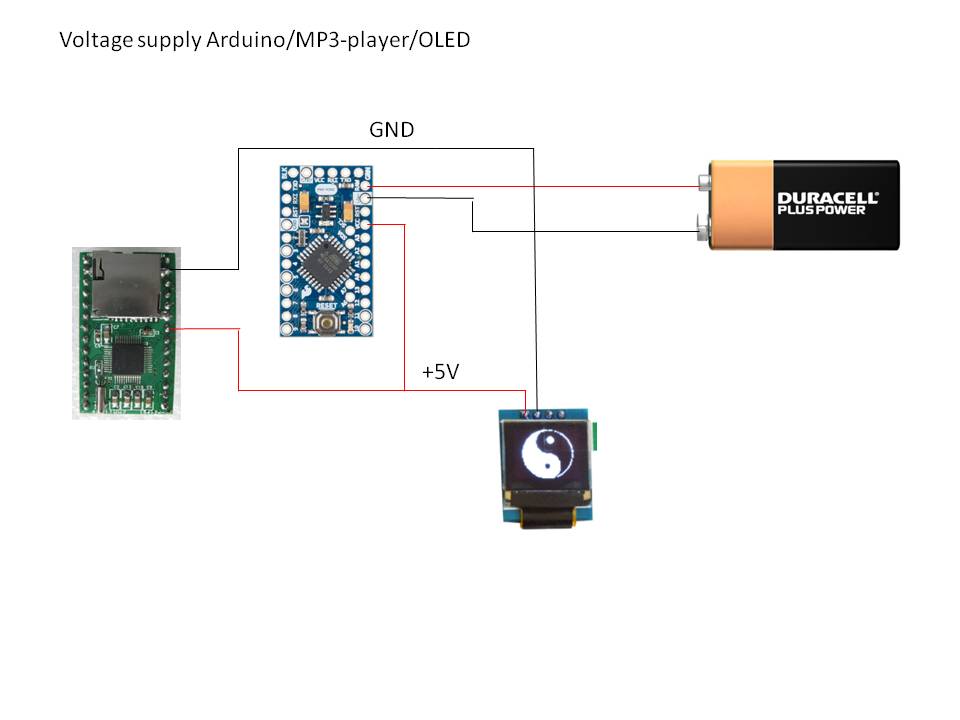
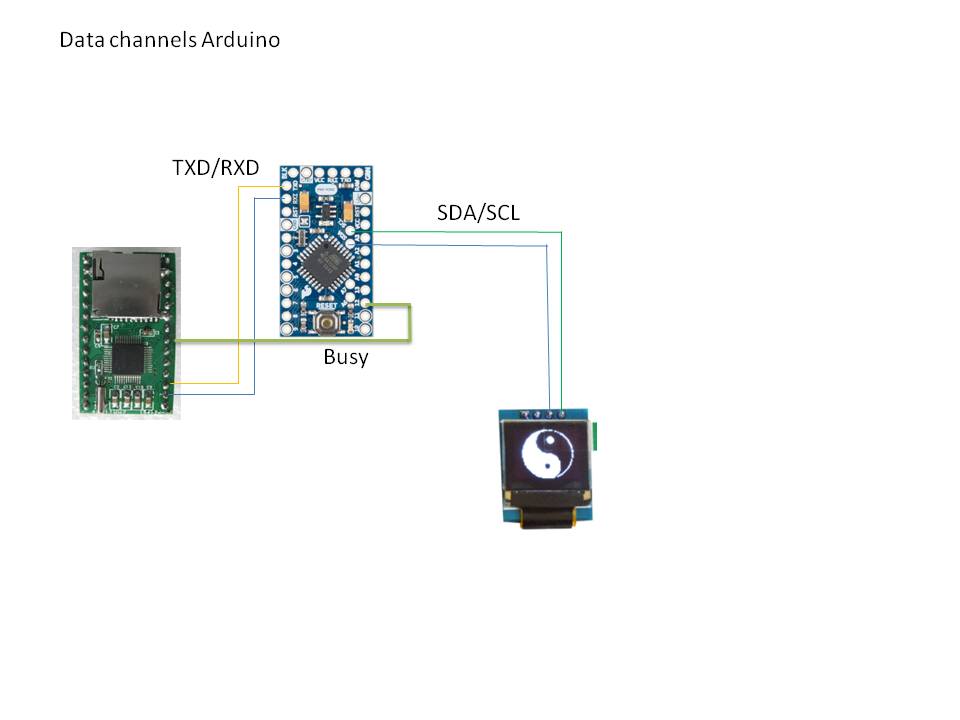
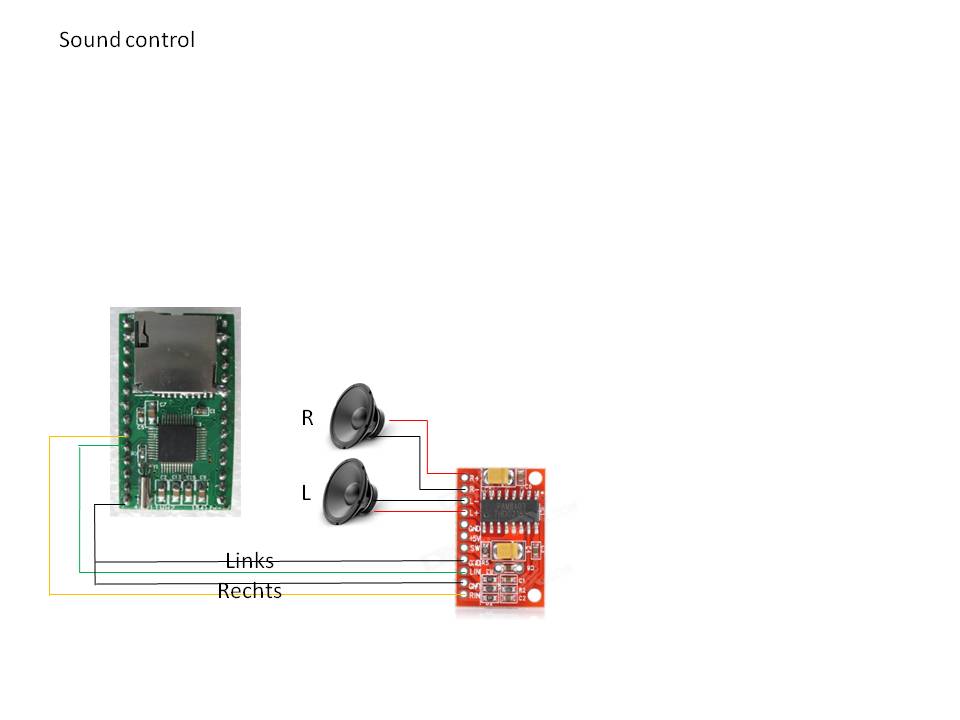
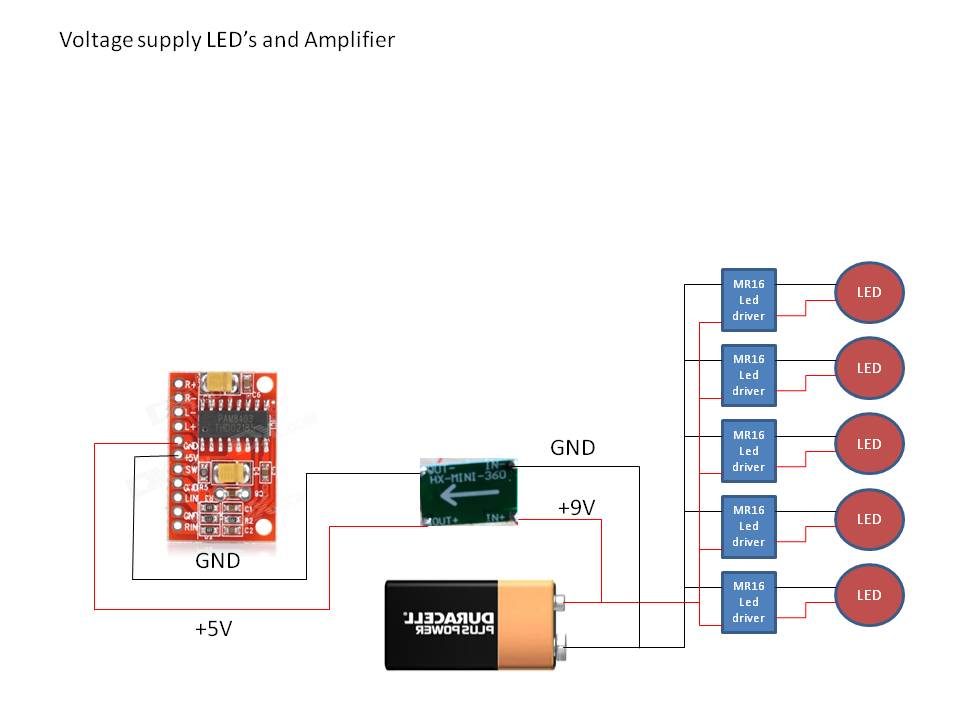
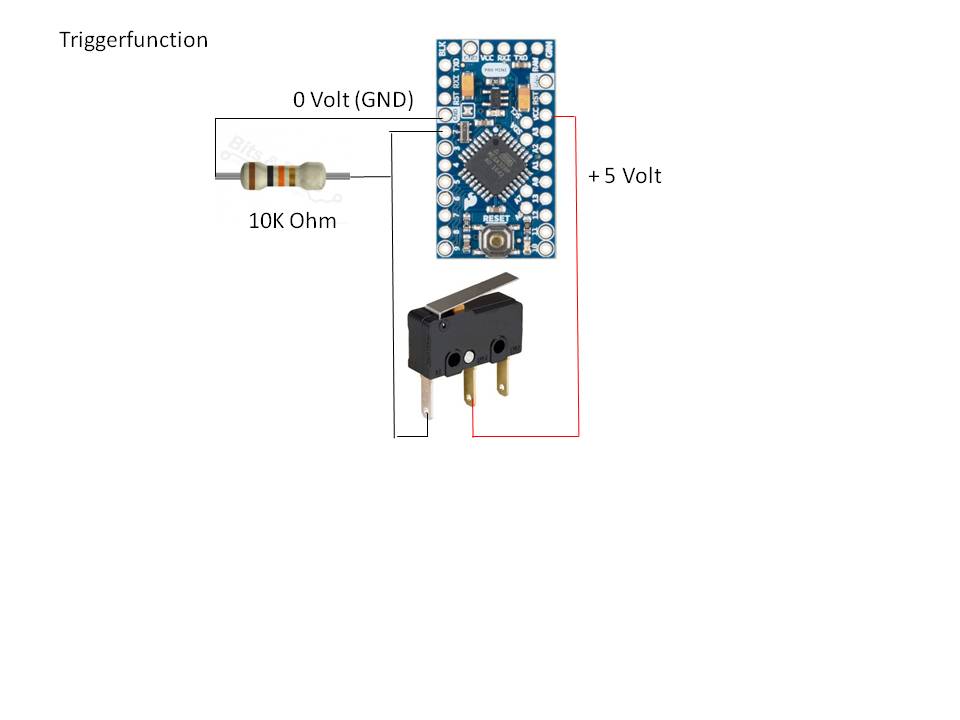
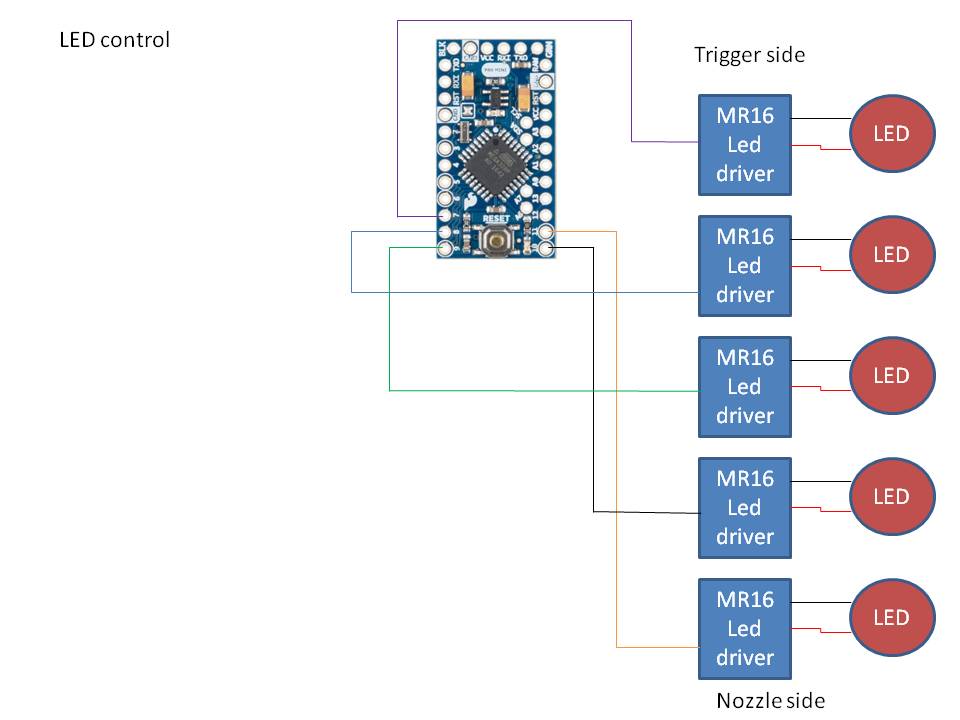
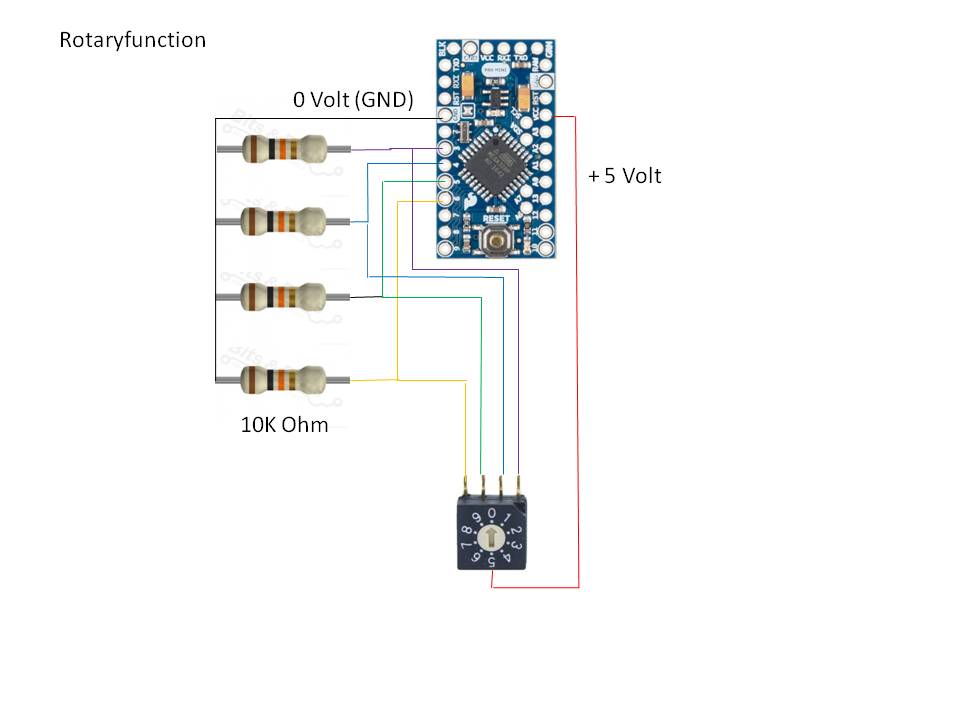
After describing all the subsystems it's time to combine it all. Beneath are the schematics of the electrical circuits. To keep everything "readable" I split each function into a separate sheet. 1) Data channels of the Arduino. There is a TXD/RXD-line towards the WT2000M02 player. To detect if the MP3-player is still busy the "BUSY"-line is used. The control of the OLED is done by the SDA/SCL port on the arduino (A4/A5) 2) Sound control Electrical connections from WT2000MO2 to 3W amplifier and speakers 3) Voltage supply of LED's and amplifier. As the amplifier needs 5V I added a buck converter (DC-DC Step down module : SG125-SZ) between the 9V-battery and the Amplifier. A buck converter is able to lower the voltage without much power consumption. 4) Triggerfunction A pull-down resistor is added to the trigger to create 0V or 5V when the trigger is pulled. 5) LED-control Not much to tell here. (At the latest moment I added 5 pull-up resistors to this circuit. This way the LED's are not lit when the blaster is starting up). 6) Rotary function Same as the triggerfunction. There are 4 pull-down resistors used. 7) Voltage supply arduino/OLED and MP3-module As the arduino module is able to convert 9V into 5V there is no need to add a buck converter here. sheet.
-
The Inner bolt : At the local hardware store I bought a piece of drain pipe which has approx. the same diameter as the doopydoos pipe. I made a piece that fits the hole. This piece will be the cover of the hole of the inner bolt. The able to positioning the Charging handle I used the same material as the end of the inner bolt. On the drain pipe I added a strip of metal to give it the authentic look. As I read in the reference guide, the charging handle can easily be broken off. So I used a large nail inside the handle to give it some strength. The complete set looks like the picture below. (Of course it needs a paintjob)
-
The next part of this project is getting the electonics (PBA's) in the pipe. As I used two PBA's which are to big to fit into the pipe (As it is full with other stuff), I made some space underneath the ammoclip. This marked square fits perfectly inside the ammoclip so there will be a big space between the battery and the other side of the pipe. To be able to position the PBA's I also cut the inner bolt. As this inner bolt needs to be replaced by something else, I needed some reference of the depth. Inside the Doopydoos pipe is a black plastic core. I used the outside of this core as reference of the depth.
-
As the wires of the OLED needs to go into the pipe I drilled a little hole in the pipe, just beside the Hengstler counter. I also made an hole in the metal part on which the hengstler counter and scope are mounted on. When it all is mounted, the wires are almost invisible (black, and close to the hengstler-counter).
