Leaderboard


Popular Content
Showing content with the highest reputation on 06/07/2021 in all areas
-
Reshot with some placement of the shoulder bells rolled forward Changed out to the v1 elastic loop. Are these an improvement?3 points
-
FINISHED! I just need to replace the side bracket with a metal one, and add the screws to mount to my thigh holster.2 points
-
Hi Mark, great to see your EIB app. I'm the D.O. that will be helping with your review. I'll be with you shortly.2 points
-
Kit looks fantastic especially since you changed the butt plate gap well done and best wishes for approval. I can’t remember if glen made comment but make sure you have someone help with positioning the armour when taking photos. after we start moving around everything changes and shifts but for approval photos we have a chance of getting great photos.2 points
-
I went for quick wins this weekend. Seems like small stuff, but its all adding up! Sanded off the of the resin on the bold , haven't yet carved out the ABS, but hey, it's progress. Also got these two guys in. Popped in the big grub. Another quick sand & screw: Hard to tell in the pic, but on the scope I got the shiny ones sitting flat and the three darker guys sitting above. Lastly, I took out some space in the stock. Tried to keep leave the bit that should remain. Any tips here? I've seen this step discussed a bit in other threads.2 points
-
On a separate note from the Hex Nut and Bolt is the final Mounting Method the prop department resorted to for the Counter and Power Cylinders. After initially being Glued on and falling off during production the Counters and Power Cylinders were eventually mounted to the blasters with a wire simply wrapped around them. As you can see after initially being glued on and falling off while filming(especially the trash compactor scene) the Counters were finally mounted to the blaster with a wire wrapped around the base of the scope feet. The ‘Power Cylinders’ eventually utilized the same type of mounting method the prop department resorted to for the counters; A wire was wrapped over the ‘Power Cylinders’ and around the mag well of the Sterling Sub-Machine Gun. Here are several more photos of the Counters mounted with a wire wrapped around the base of the scope feet. some of these images almost look like it could possibly be a thin zip tie too. There was definitely some kind of Wires and Electrical Tape connected to the socket terminals on this Hengstler Counter, old news I know but 4K resolution gives us some new insight. This image also shows the Hex Nut just over Leia’s shoulder.2 points
-
Name:. James W. Future Outpost: Southern California Garrison Maker: ANOVOS Helmet maker: ANOVOS Belt maker: TKittell (Imperial Issue) Neck seal maker: ANOVOS Boot maker: Imperial Boots Blaster maker: S&T (airsoft) with ebay T-tracks and m38 scope Gasket maker: ANOVOS Height, weight: 5'11 - 200lbs Type: ANH Stunt Special Thanks: @justjoseph63@ukswrath@TKSpartan@gmrhodes13@kman@TheSwede@CableGuy Note: L3 says minimal gap - should I order larger shoulder bells? I think my chest (pectorals) won't allow for sub-inch gap with the current bells. L3 - Slotted ear screws, vocoder repaint, L3 - White Rivets L3 - Single snap unpainted L3 - 45degree ammo belt corners L3 - Belt ammo pack rear enclosed L3 - T-Detonator using slotted pan screws L3 - 2 piece lenses L3 - Silicone handguards Ideally I would want to go to L3; but not sure what the approval format/order would be for the local garrison. Thanks!1 point
-
Hello there! My name is Natalie and I live in the central coast of Australia. I’ve just been approved for my ANH stunt TK kit! I’m so excited to start trooping with you guys! TK 12197 reporting for duty1 point
-
I moved my belt rivets (or snaps in my case), I did sew a small amount of fabric over each of the old holes as well just to make sure the snaps never pulled through being very close to the original hole. A few other references1 point
-
Haha *oops* so I did the Word is ”Up”1 point
-
Thanks Swede! I think you missed a word in your sentence regarding belt. Come "up"/"down" a tad?1 point
-
Looking good Trooper At Garrison level you only get approved (basic) and the higher levels (EIB and Centurion) are done here at the Detachment. Apart from already beeing mentioned for L3 I would guess your belt need to come up a tad but you’ll never know, I would have requested it during my time as a D.O anyway, here’s a reference: (I was a picky one so you can just wait to see what the current ones say at your EIB) Regarding the shoulder bells, here's a look at how an original bell looks side by side with a not so accurate one. The original (left) is trimmed with a curve hence beeing more suited for closing eventual gaps to the chestplate, not sure If you have enough left to trim yours but it might help others And finally, prepping the armor for approval pictures are what many do and that’s fine but....I strongly recommend everyone to film yourself when moving around to see how the armor holds up. Atleast I want to be sure that when I’m moving around and then stoppning for a picture my armor still look like it should1 point
-
awesome!!1 point
-
A certain package arrived on my doorstep today... Looks like its time to get building!1 point
-
Hello Cody and thanks for your patience!!! Before we can move you along we need an easy fix... -Frown is painted gray and does not leave the teeth area It appears that your frown paint needs a little cleanup. Using an acetone-free remover on a toothpick could be a good solution for the teeth. You're almost there Cody!!!1 point
-
Armor looks awesome Mark I can see a couple adjustment that may be required but I'll let the DO's make the call outs. Good luck with your application.1 point
-
Looking SHARP, Mark! Kudos on the paint work, especially the ab-plate buttons a vocoder . Although it won't affect your submission for EI, you might want to think about extending the paint on the traps above the ears to fill in the indented area a little more.... Since you are a dab hand with a paintbrush this should be an easy fix! (It also wouldn't hurt to take a few mm off of the brow trim ends). Reference images1 point
-
Just to make one comment and it’s just what I get the guys here to do is remove the printing on the thermal detonator, make sure you have someone with experience help with kitting up a few times and especially for photos.1 point
-
Thank you! Thank you all for the assistance. I definitely would've struggled a lot more had it not been for this community.1 point
-
OK here is my first time wearing my armor. It was an experience! I still have lots if adjustments and trimming to do. Just wanted to share. I used my ROTJ blaster for show.1 point
-
Nice progress! The little details can sometimes take long to get right. For the scope screws, you are correct to have the 3 screws sitting above. the 2 slotted heads are actually recessed or sitting behind that mounting disc on the real scopes. So you could sink them in a bit more. Also the real scopes had a black filler on those 2 holes so on most real scopes the 2 slotted heads are not visible. You don't have to replicate that black filler but just showing it for reference. For the stock, that is a tricky area to clear out and get the inner parts reveal look. If you have any, use small metal files to shape the opening better and if you take too much off use the green stuff to rebuild where you want it. I also used a small wood chisel tool set to carve away the resin. It makes the job easier. The files will help you get better defined edges for the open space look.1 point
-
Looking great James!! you're easy for basic and almost ready for higher levels, great work!!1 point
-
Hi there. Nice progress on your build. I'm almost at the exact same place it looks like. Not sure if it helps at all, but I made this for 3d printing: https://www.thingiverse.com/thing:4875306 It's a CRL correct thermal detonator with a screw top and the correct mount. What I discovered after looking at many photos of other builds and screen grabs from Rogue One and Mando, the control panel actually goes mostly around the thermal detonator. One kit I have has it a separate mount bracket and a separate control panel bracket. After working on it a bit, that 3d model is what I came up with. I just used the grebs from another model as a remix. I've also added several mount options to allow for magnets or how ever you want to mount it. Literally just got my neodymium magnets today. Good luck with everything and keep it up!1 point
-
Much better, well done1 point
-
Nice work, on the shoulder bells you are closer on the rear than the front so you could adjust these to close the gap on the front. Having the snap point further forward on the shoulder strap elastic helps bring them forward. Nice gaps all round, the only issue is your butt plate gap, you could try tighter strapping or even some V tabs With a heat gun (or oven) you bend strips of ABS plastic into the shape of a V, only glue one side and the other remains free to allow movement when you bend. Just helps stop the butt plate from pushing back from the back plate. Your ab snap is a little low, may get picked up at higher levels TD screws are a little on the large side, although may not be picked at higher levels Hoping to see you approved very soon, good luck1 point
-
http://blasterfactory.com/e-11-blaster-kits/1 point
-
This OK? Sent from my VOG-L29 using Tapatalk1 point
-
Great finds, Henry. Thank you for posting here. Looks like I soon have to update the reference. Next two weeks will be busy for me at work, so it will take some time to get this added. Thanks again.1 point
-
So I'm back, and while I haven't posted as much as I'd like, I've still been chugging along. And I am happy to say that I have submitted my build for basic approval! I still have a few mods I would like to make for EIB and Centurion (like replacing the belt with my Kittle belt) but I am so thrilled with how it came out! Thanks so much to everyone who has helped out, especially @ukswrath for creating the ultimate build Bible for Anovos TK armor. I couldn't have done it without the help and support of folks in this detachment. I look forward to joining your ranks hopefully soon, and down the line in EIB and Centurion! Until then...1 point
-
If you have wired through the MIC input try using the AUX input on the, I know the aker has an extra power wire through the MIC input which may be causing distortion. There is a thread here about Rom FX and using an Aker, some have had success but not sure how a bluetooth mic would work with the system. Have you tried using a cable mic to see if it changes the distortion.1 point
-
Finished the shoulder straps and will mount bells soon. Almost ready to wear the full kit minus belt for first time! Will be able to adjust fit and post some preliminary pics! Then paint!1 point
-
Hi all! It's been a minute but I'm back to working on my armor! So I've forged ahead and started with the strapping. I decided to go with the snaps method. I used line 24 snaps and nylon webbing to create the snapping system. It was a bit of a learning curve for setting the snaps but I ended up getting it working. I did some sizing to make sure everything lined up correctly and then glued the snaps in. The strapping on the back is still gluing. I'll post a picture of it completed when it's dry. So then I started working on the thighs. Once those were glued together, I started measuring out the thigh ammo belt for the right thigh. I got it lined up fine but I had a question about fastening the rivets to the thigh piece. How does one hammer a rivet in to a completed thigh piece? I thought maybe putting a piece of wood inside the thigh piece to give it something to hit into. Thoughts? Thanks!!1 point
-
Been making some good progress so time to post an update I finally got that sniper knee fiasco under control and got it to stick. It's amazing how pliable ABS is. One of the the things that solved my problems was that the inner leg side of the sniper knee was too long so I trimmed that a bit and that made it work. A bunch of glue, tape, and clamps later and bam: While that was drying, I skipped around to the abs and kidney section for a bit. I drilled holes for the Anovos supplied split rivets and made sure they fit nicely. Next up on that front will be painting the rivets white. And next up for the shins/calves will be installing the hook system to hold them together.1 point
-
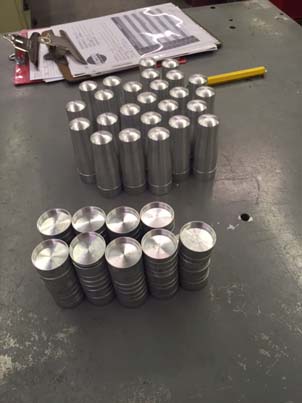
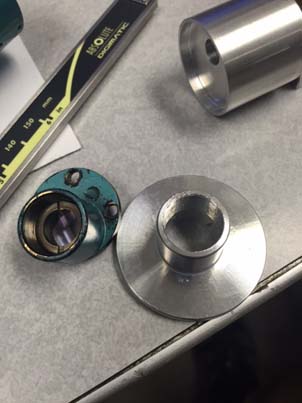
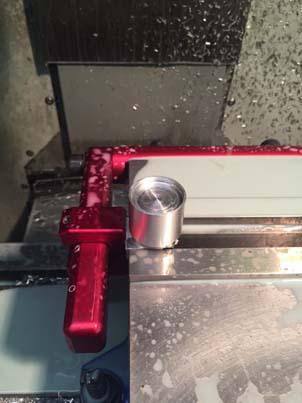
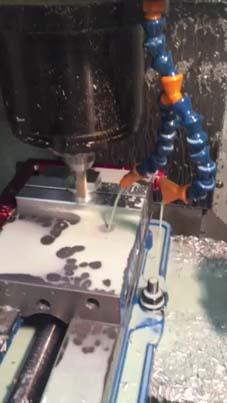
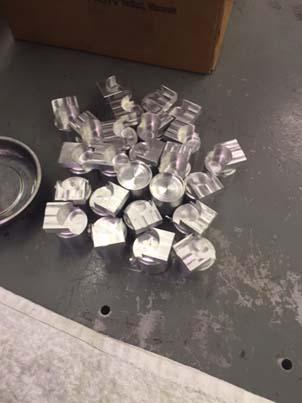
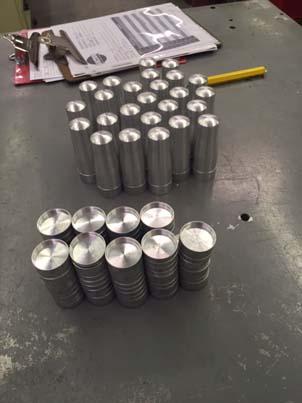
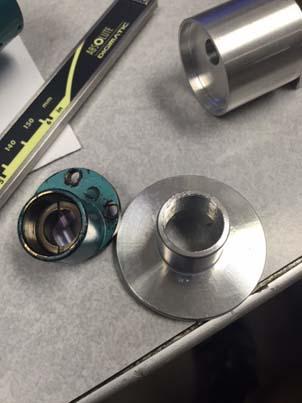
The original scope was a casting, not something i can do at this time so i machined it in sections.
 1 point
 -
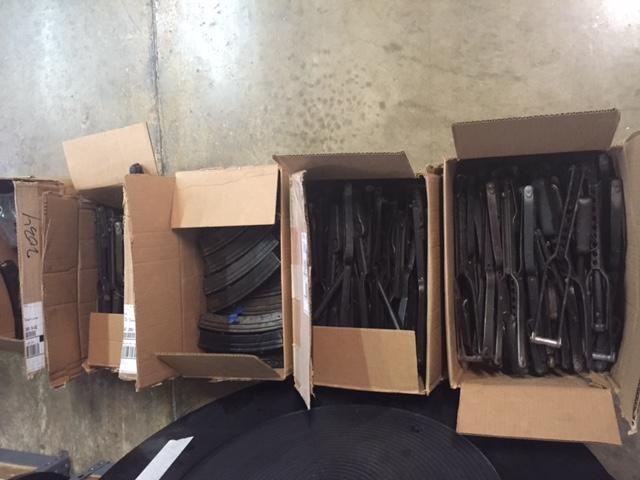
I have started building my e11 blaster and would like to give credit where its due. Some very talented , ingenius and very dedicated people mostly from this site have provided a invaluble resourse to recreate the props from our favorite Empire. I started building and planing this build years ago when a aquired through one of my vendors a quantity of sterlings. From there i realized aquireing the coveted HENGSTLER counter and m38 scope is a major challenge.. Fortunately i already had a scope in my ww2 collection along with several other sherman tank periscopes..... The counter took some digging. I finally found 20 or so in a old textile mill that was being converted, the """ junk "" was actioned off... LOL . This gave me the idea to reproduce these items 1. create e11 from original parts 2. reproduce e11 reproduction 3. m38 scope repro 4. hengstler counter repro from oringinal 5. create the power cylinders (cant find that to copy, relying on research and photos from this site and the movie)
 1 point