


Shears
-
Posts
23 -
Joined
-
Last visited
About Shears

Recent Profile Visitors
1,133 profile views

-
Hey @revlimiter and @gmrhodes13 -- thank you SO much for the suggestions here. I spent a while last night with the Ultimate Compound and those trouble spots are all but gone. In case anybody else has this issue in the future: I used Meguiar's Ultimate Compound with a microfiber round at first, similar to this. I really wasn't getting anywhere and started to feel disheartened. I eventually switched to plain paper towel which seemed to work a lot better, and gave me more control as to pressure/angle/precision. A small buffing tool would've certainly helped because I had to polish for a LONG time to get this discoloration out. I also probably used more compound that I needed, but it's hard to say. Using it pretty generously definitely seemed to help.
-
Thanks again - I've got some Ultimate Compound arriving tomorrow. I'll give it a go and report back.
-
Thanks you both, @revlimiter @gmrhodes13 -- I had Novus on hand so I gave that a swing first (3 and 2). It definitely helped in some areas, but I'm not much better off on the front. I can't feel the indents of scratches, but the color marking is still there (See photo below). It almost feels like a little daub of paint would do the trick. Is that ill advised? Or just something that would bleach out that bluish gray. Thanks again.
-
Hey all -- Long story short, my bucket got scuffed in a cross-country move. The motorcycle helmet bag I purchased had some seams on the inside that did a number on the shiny white helmet. Pretty bummed as the scratches are in prominent spots. Any ideas on how to fix? This is the 2016 anovos bucket. It almost looks like a layer of white was taken off revealing grey underneath in places, but the earpiece seems to have discolored without scratching? Open to any ideas here, though a relative noobie. Thanks in advance!
-

Shears E-11 Blaster Build 2021 (Doopydoos + T-Jay's)
Shears replied to Shears's topic in ANH BlasTech E11
I went for quick wins this weekend. Seems like small stuff, but its all adding up! Sanded off the of the resin on the bold , haven't yet carved out the ABS, but hey, it's progress. Also got these two guys in. Popped in the big grub. Another quick sand & screw: Hard to tell in the pic, but on the scope I got the shiny ones sitting flat and the three darker guys sitting above. Lastly, I took out some space in the stock. Tried to keep leave the bit that should remain. Any tips here? I've seen this step discussed a bit in other threads. -
Shears E-11 Blaster Build 2021 (Doopydoos + T-Jay's)
Shears replied to Shears's topic in ANH BlasTech E11
Good call! I'm holding off on gluing anything until i've painted -- I haven't entirely figured out my plan for that yet, but its in the works. Speaking of which, i haven't really considered what 'hardware' and screws i'm going to have to take out before painting. Will definitely have to pay attention to the reference photos. -
Shears E-11 Blaster Build 2021 (Doopydoos + T-Jay's)
Shears replied to Shears's topic in ANH BlasTech E11
Routed out the stock today. Based on some feedback I had seen in other posts I tried to get as close as possible to where the indent line was. Successfully did the trick without cracking anything I did get pretty thin on the side, as you can see by the translucence here. Fortified with some green stuff right away Maybe I routed out too much, but the aluminum tube seems to be rattling around in there. Do you guys glue it down, or use anything to secure it in that area against the holes? -
Shears E-11 Blaster Build 2021 (Doopydoos + T-Jay's)
Shears replied to Shears's topic in ANH BlasTech E11
As a side note.... Big thanks to @Chemi for the imgur link. Made linking things here a lot easier! When I went to register for an account it said I already had one (though I had no memory of making it). I went through the password recovery process and was able to access an account I apparently made back in 2015. There was only one photo (see below) that I had apparently uploaded to post somewhere. What you're looking at is a painting I made during at a "fun-datory" work holiday party the week of TFA's release. Obviously my mind was elsewhere and I couldn't be bothered with holiday cheer - I remember the instructor not being amused. Figured this crew would enjoy! -
Shears E-11 Blaster Build 2021 (Doopydoos + T-Jay's)
Shears replied to Shears's topic in ANH BlasTech E11
Did a bit of work on the handle today Used the dremel to shave off the resin screw Got it nice and smooth Found the center point and drilled the hole: Screw in. Easy! Question: should I leave this "turnable" or would anybody recommend gluing it in there? Next I looked at the screw on the bottom. Seemed pretty like another quick win, so I went for it After routing out the hole I put it in backwards to make sure I had cleared enough material for it to fit in And there we go, its in. I know the progress here is minimal, but I've got to say that it feels pretty good to have just a few things done on the handle here. I'm feeling much more comfortable with the material and ready to get into the nitty gritty of it. -
Shears E-11 Blaster Build 2021 (Doopydoos + T-Jay's)
Shears replied to Shears's topic in ANH BlasTech E11
Hey thanks for passing this my way. Going to try this when I post tonight! -
Shears E-11 Blaster Build 2021 (Doopydoos + T-Jay's)
Shears replied to Shears's topic in ANH BlasTech E11
As a side note -- i've had to scale down the size of my photos here because my max upload size is 80kb... Is this some user error, or is there a way for me to increase that so I can post larger pics? Thanks! -
Shears E-11 Blaster Build 2021 (Doopydoos + T-Jay's)
Shears replied to Shears's topic in ANH BlasTech E11
First night was pretty straightforward (and pretty messy). Cleaned out the holes in the barrel -- Started with my smallest drill bit to get a pilot hole in the center of each one, then switched to my largest bit clear most of the material out. From there I used the routing tool in my Dremel to clean off the sides. Some of these might benefit from some finer sanding, but I'm saving that for another day. I realize most of the holes I drilled out here will be obscured anyway, but I really wanted to get a feel for the resin in a low-pressure place. Also pictured is the canned air -- super helpful in clearing dust/flakes from the barrel and making sure I could see what I'm doing.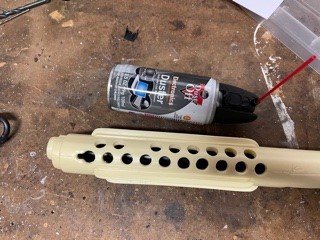
-
Shears E-11 Blaster Build 2021 (Doopydoos + T-Jay's)
Shears replied to Shears's topic in ANH BlasTech E11
@T-Jay Thanks! I think i'll definitely take you up on this. I love some of the stuff in the new version of the completion set -- especially those Hengstlers -- I'll put in an order when I get a little further along and take stock of what I plan to do. -
Shears changed their profile photo
-
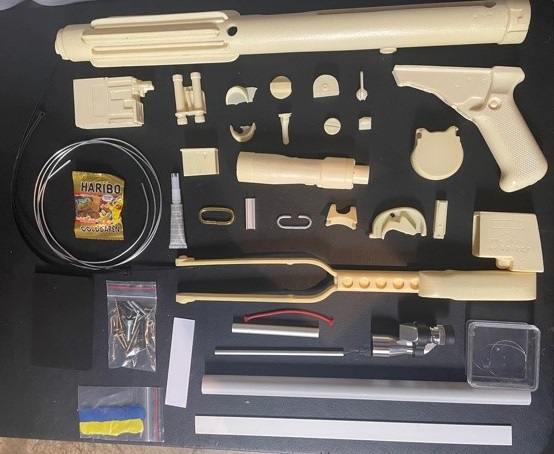
Hey all -- Very excited to start my first-ever build thread. I'm a total beginner to this, so please feel free to chime in with any suggestions/corrections as I work my way through this. I bought the Doopy's kit and the @T-Jay completion set back in 2016, but unfortunately life got in the way. I'm finally finding the time to tackle this after doing quite a bit of research. I've really enjoyed @Altair's build seen here, as well as the overall guidance from the @FISD E-11 Reference Team seen here and hope to base mine off of their work (with a few additional mods). Below are all the pieces I'm starting out with. Despite having been with me for several cross-country moves, all of the pieces are miraculously accounted for! Resin freshly rinsed and ready to roll!
-
Hey -- yeah, I'm using Doopydoos with the T-Jay completion kit. Got started this past weekend and was taking pics the whole time. Build thread incoming : )
