Leaderboard


Popular Content
Showing content with the highest reputation on 01/17/2021 in Posts
-
Great spot, Glen. Those bottom corners especially. I feel a little tweak coming. :-) Thanks for the kudos. Fully spray painting the whole helmet really brings a different edge to it. I’ve noticed that the side rivets are overlapping after I uploaded the photos. I’m expecting an “advisory” for that. ;-)2 points
-
As promised, here's a hell ton of pictures First of all: My mood during sanding, filling and more sanding: Flashbacks when I did the Captain Phasma Armor Anyways.. Arms: The shoulders were kinda simple. Just trimming the excess ABS and glueing the tabs on. Bicep armor: Here my perfectionism hit me with a bat. I didnt like the soft details that happen due to the bac forming process, so I filled it and carefully filed the new details in. I used 2 part epoxy glue to glue and fill. Forearms: For the formarms I didnt use the ABS box, instead I used my resin box which has sharper edges. I made that box years ago for the First Order Gunner costume and for Phasma, I mirrored the master and made a mold of it. So why not make use of that for my personal costume as well Handguards: CFO Handplates from Dan, filled and sanded Chest: Back: Still WIP, nothing to show yet Detonator: Nothing to show yet Ab Armor Boxes are secured with screws Cod and Butt plate: Just one picture as these parts are not really interesting Thighs: Here I also filled the soft pulled detail and refiled the detail Shins: These were kinda tricky. I asked a good friend to help out. Unfortunately both halves werent fixed enough so while the glue hardened, it slightly changed position. To fix this, I filled the seam with 2 part epoxy and refiled the seam. As I already stated, I got the 2 shin bars 3D scanned. Then I mirrored the parts and printed the left and right version out. CFO Clip Greeblie If possible, I will update this post later with more pictures :-)2 points
-
Yes that would work2 points
-
Hi, I'm planning on building an ANH (Stunt) TK and am just starting down the research path. Currently looking at RS Prop Masters and sending some questions over to them prior to reviewing other manufacturers as well. I am looking for info as to wether I should choose ABS or PVC for the material. PVC being a more brilliant white and also UV stable possibly seems a better option - I live in Australia and the sun gets pretty strong in summer. My first kit was an ArmoryShop TX which I fully commissioned myself, this time I am possibly going down the pre-commissioned - still tossing that up. Any and all suggestions/recommendations are most welcome.1 point
-
Aloha, I just received my kit from Dave yesterday. My first challenge so far is just trying to make sense of what is what. I have everything laid out in my living room on towels while I figure out what each part is. Being a mechanic, I have access to a lot of tools but I did order quite a few others including lexan scissors and small magnets. I’m definitely feeling mildly intimidated as I’ve never done anything like this but Ive been on the forums nonstop. Looking forward to this challenge even if it may take a while. Mahalo
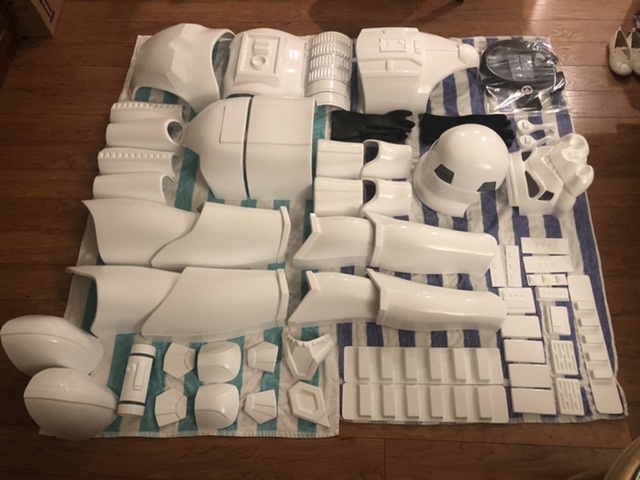 1 point
 -
Hi all, I'm Chris from Wiltshire in the UK. Great to finally be a part of this. I received my clearance and designation at the end of November but haven't had a chance to update it or delve in. Been a massive SW fan since I was young and although I was a fan of the rebels, I had a secret yearning to be Stormtrooper. Fast forward a lot of years and a fair amount of help from CableGuy (Dan), I'm now living the dream. Hopefully catch up with some of you in the future, but definately looking forward to the adventure! Chris (Harrybeau)1 point
-
Menshen or threshold guardian are divine guardians of doors and gates in Chinese folk religions, used to protect against evil influences or to encourage the entrance of positive ones. February 12 is the traditional Chinese New Year, I hope you have a peaceful and prosperous new year. 除厄免灾: Removal of bad luck and avoidance of disasters 家宅平安: Keep peace for your home On my chest there's a Chinese character 福(means happiness、satisfied、fulfilled),and it‘s on inverted position. In Chinese it‘s a homonym,福到了=happiness have arrived I know stormtroopers shouldn't use lightsabers,but it's just for fan~1 point
-
Hi everybody and thank you for your welcome. In few words, I’m 47 years old and of course, a big fan from starwars movies and series (episode 4-5 and 6, the mandolorian,...) and starwars univers. One of my dreams is to get one stormtrooper armor or more recently an mandolorian(din djarin) armor. This for my home theater room. thanks again for all your kindness and excuse myself for my English. regards Yannick1 point
-
Thanks guys!1 point
-
You may find it's just when you have lifted your arms, I've noticed that on a few apps1 point
-
1 point
-
Thanks for the input and good point. I am planning to go the double snap route and so could just make both a nylon and elastic version.1 point
-
Thank you both for the answers, I’m going to get the measurements down and tackle that TD this week. I think the armor was purchased about a decade ago, but I am not certain. Maybe it was simply a cheaper option available at the time. Regarding my options for those 2 holes, I think I’m going to go the route of ABS paste for now! I’ll keep posting on here for progress.1 point
-
Definitely a personal preference, my friend, but what I should have said was jagged points. Those things would rip an under suit to shreds, lol.1 point
-
Hi Joseph, It’s personal preference though, isn’t it. I know you mentioned that it “should” be trimmed as you suggested, however, if a trooper wants to follow the originals, they can follow screen used suits. Your suggested cut line is ideal if a trooper is after an ‘idealised’ look. [emoji1303] The photo of the RS suit is not jagged. With a little sand paper, you can easily follow the shape of the originals, yet not have any jagged edges. My own suit follows the originals yet I have no poking when suited up. I know you don’t like return edges either, however, same as above, that’s a personal preference. :-) With respect, of course, brother. :-)1 point
-
Nice work! :-) When you get the adding the coverstrips, if you are looking for screen accurate (vs idealised), note how the coverstrips stop with the shortest piece of armour: Either way is fine - just personal preference. :-)1 point
-
Congratulations trooper.1 point
-
Hi Geoff Good to see you found your way here. Take your time reading through posts and build threads here. This place is a gold mine of information. The reason I suggested RS is because they offer the full commission/pre built option, as I know you want to get out there trooping again ASAP. Other popular kits within KFG are AP and WTF. A few of us have Anovos kits, but as you know from your own experiences with them, “fast” is not a word one easily associates with that company. In terms of PVC vs ABS, it’s a personal choice IMO. Each has their advantage. You’ll notice a difference in colour between the 2 mediums, but no more than you’ll notice the different shades of white between manufacturers. I’m Knightfall’s FISD attaché, so I’ll be keeping an even closer eye on your thread than most [emoji4] As mentioned elsewhere, I’ll message you tonight about the blaster questions you had.1 point
-
So today I took the long taped up right bicep and completely fitted it to my arm, drew the cut lines, trimmed it front and back and temp gaffer taped it together awaiting cover strips. I was so confident in the procedure that I went ahead and performed the same on the left side. Both biceps fited.1 point
-
I hear ya. I'm turning 49 soon and every time I fly on our helicopters and hoist I feel OOOOOLLLLLLLDDDDDDDDDDDD File Downloaded. Not going to print and sell at all. Don't wanna get in that game. Once I get everything done I'll print it off and have and post it here. Cheers Glen!1 point
-
Okay, so I just realized it's almost exactly a year since I started this thread. Time for an update I guess.... I think I am about 80% done. Since posting, the world went to crap and I moved across the country and started a new job in the RCAF. Lots happening. I'll post a ton of pics here about the DLT. A few points: I'm trying to decide where to place the displays supplied in the BlastFx kit. The scope and rounds remaining displays. I don't like the round counter displayed on the bottom of gun as this doesn't seem logical. I may go my own way and install it on the back of the left side "aluminum box" with scope display so that it faces the shooter. Makes more sense to me. I have painted and assembled most items. I was installing the BlastFx elextronics and a few wire solder connections to components snapped. I think the overall quality is pretty freakin fantastic, but the wires are very thin and while trying to manipulate components into the blaster the connections failed. I soldered the items, but then some weird electronic stuff started happening. I got in contact with TRamp (fantastic service!) and after lots of back and forth troubleshooting, I sent my DLT and E11 components back to him in the UK. He is working on the stuff now, so the build is on hold. After a ton of research on the DLT and looking at pics of actual MG34's, I decided to upgrade much of the hard ware to make the blaster look more realistic. The hardware provided by 3Dprops is very functional, but not "real world" accurate A side note about the 3D props hardware: He does provide a schematic, but it is very hard to discern where each bolt, screw washer or nut goes. Better diagrams or instructions are required. Having spent DAYS and WEEKS looking at MG34's and other blaster builds, I can say that this kit is fantastic! Very accurate dimensionally and in detail. Another knit-pick is the bipod build-up. The bipod is split halfway up, and an aluminum plate is used as a joining plate on the inside between the two parts. I have glued this various ways and it has failed at least 3 times on one leg. It is attached now but there is a hairline crack between the two parts. Sanding and filling is required, with the obvious sanding and repaint. Build notes: I sanded like crazy, and used primer / filler rattle cans between sanding. Primed with 2 to 3 layers of black rattle can. There are Several different colours for MG34's, depending on quality, restoration, year made, etc. I didn't want a flat black, so repainted most components with Tamiya XF-85 Rubber Black. A very dark charcoal colour. Looks much better. I'm going easy on weathering. This is meant to replicate a blaster used on the Death Star Garrison, not in a swamp or desert. I mainly used the well known limited photos of the screen used DLT. Highlights and various scratches were done with Tamiya XF-16 Flat Aluminum and XF-56 Metallic Grey. I used graphite powder lightly rubbed along big flat surfaces to show wear and add visual interest. It was rubbed heavily on some corners, and also used on the two rings that join the receiver to the butt. Butt was sprayed with rattle can Rustoleum Satin Dark Walnut to replicate the bakelight material. I then sponged some lighter buff and black colour on it. The barrel T-strips will be replace by WannaWanga items. They are excellent quality and I won't need to sand like a madman... Overall pieces Wannawanga strips on right Front assembly; Wire is from barrel LED flash emitter. I asked TRAmp to install a connector and split wire in two. This way I can break down the DLT for transport. Barrel cooling jacket and barrel will be glued the front after feeding wire through. Replaced bipod attachment hardware with more accurate bolt and split pin. There is a bit of scratched paint on washer from using tools to bend pin. This will be touched up along with those little areas of orange plastic showing through LED emitter The front site is moveable (pivots up and down) as well Weathering Bipod legs Darn bipod crack.... Feed cover. Replaced hardware with more screen accurate. I cur off the head of a large lag bolt and glued on opening latch. Lots of sanding to get rid of 3D print lines Receiver: Hairspray method for chipping Rear sight moveable Extended peep sight. Numbers will be painted in. Receiver bottom. Main support tube is PVC pipe. I cut holes in bottom for easy wiring access to trigger wires. Will be cleaned up. Top view into receiver, towards the butt end. I cut the PVC pipe to have a big area for wiring and eventually a battery pack for everything. I kept a small piece of the PVC and re-glued it back in. This tab will eventually hold a magnet that will be used to secure the back of the feed cover. Reciever was printed in 2 parts, front and back. This is the seem line that I filled but then cracked. Will need to fill and repaint... Recover and cover pivoted up Cover just sitting down on receiver. A little force is used to squeeze two parts together. This is where the magnet will hopefully work. I also scribed the grip marks on the latch Butt colour. This is actually a little lighter. Dark colour due to lighting. Over exposed to show colour variations Sanded print lines smooth, then scribed the gripping grooves. Also drilled a hole and inserted the head of a lag bolt. Hole to be cleaned up. Note the 2 rings. These was simply done by masking the butt and receiver, then applying the graphite powder and buffing like crazy. Now looks like a separate metal piece. Less exposed pic Partially assembled. This is how far blaster will break down for transport. Sanded disk smooth, and used hairspray technique to weather. Supplied cocking handle with bolt. Can be unscrewed for storage and transport. It is way too short and thin. To attempt to make it bigger I started gluing plastic sheet on it. I bought a toilet repair pipe at Home Depot that looked like right thickness. This will slip over the supplied piece and get glued together. I have to figure out a way to do knurling. Barrel shroud Some hardware to replace supplied stuff. The small pack of screw posts will be used to replicate the domed screws on grips. And from when I first got the blaster. I have no clue what the part, 2nd from left, is or where it fits. It is the oval with hole drilled. Once again, the assembly instructions are lacking.1 point
-
Is there anything you can't do Glen? This is Awesome! I was also wondering why no-one did the curved handles. I just bought a resin 3D printer and haven't printed anything yet. This may be 2nd after a bunch of baby yoda's for family members... The quality should be great on my resin printer. Just to confirm, can I download this and print for my own use? I don't mind downloading and paying for files (going rate is about $25), but some don't include scope (easy to find a real one apparently) and as stated, the handles are flat. I won't use this for trooping. Just for poops and giggles factor.1 point
-
Research is the key, there is a lot of information on these forums, the search function works quite well, also when in doubt ask or check the gallery sections, photos don't lie1 point
-
Congratulations trooper, great to see your second Hero armor approved1 point
-
Excellent news for me today! First i've recieved my blaster from imperial warfighters: I only know very little about blasters, so I'm very much open to any suggested modifications that might be necessary to get this cleared up to centurion. The blaster feels quite a bit heavier than i expected it to be, so I put it on a scale and it shows to be exactly 1,2 kg. I've expected the blaster to be made out of rubber, but it doesn't feel like rubber at all, in fact it feels like most parts are made out of metall. So i checked back with my facebook chat with imperial warfighters, and it appears i forgot to mention which material i wanted my blaster to be - lol. Then checked the imperial warfighters shop, turns out he offers both resin and rubber versions of the E-11, but no metall. So I'm guessing this is resin? Anyway, handed the blaster to my sister for like 10 seconds (sic!) and she managed to break the trigger immediately I don't this this could have happened with a rubber blaster, luckily this will be easy to fix. On a second note, the German Garrison have taken the time over the holidays to work on a website that will allow them to handle costume applications without relying on e-mails to much. Last weekend they offered me, that I could resend my application, this time via the new website as a beta test for the site and I did so immediately. Today I've recieved the great news! The new application has been immediately labeled "ready for duty" without any complaints. All thanks to the great advice i've recieved from the many helpful minds here on the FISD. A huge Thank You to all of you who supported me throughout this build! Now it should just be a matter of days until I recieve my TK-number and may begin to apply for Expert Infantry1 point
-
I learned the best place to get advice and figure out how to do your build is here. Follow peoples threads. You can use YouTube to see how certain little things can be done. But ultimately FISD is going to be your main help on your build. Definitely going to be ups and downs with your build. Try your best to do something productive on it as often as possible. You'll be done in no time bud.1 point
-
Ok settle down fellas. Chris is offering a very specific product. It is a replica of an E-11 that is very detailed made out of metal parts. Hence the cost. Whoever is in the market needs to first figure out what they are after. Do you want a highly detailed replica of an E-11 which in turn comes with a high cost? Or do you want an E-11 that you can be more rough with and have it lighter to be more comfortable to troop with at a lower price point? This hobby has all types of extremes and everyone would need to figure out what their end goal is. When I first started I bought a kit from DDay which was resin and a CNC milled barrel. Put it together and it was a fun little build. But I quickly realized that it wasn't going to work for me for trooping because A) it was a little more on the fragile side and I am a rough person and B it was very heavy. I then opted to get a Hyperfirm and haven't looked back since. It is very light and won't break. Also remember, that if your goal is to do a lot of trooping you will have children constantly trying to touch everything so you may want to figure out if you can handle a child constantly poking and touching your props.1 point
-
Exciting times, remember research is the key, measure twice and cut once, when in doubt check out the gallery sections https://www.whitearmor.net/forum/gallery/category/24-anh-tk-reference/ Good luck with the build1 point
-
Built this custom e11 with real vintage gold back eagle Hengstler counter, mag , power cylinders and M40 sherman tank scope1 point
-
It not hard to assemble and depending on your skill at painting it needs to be disassembled to do that properly... Got to my main site it has all the other blaster stuff too... Cylinders , scope ect... http://blasterfactory.com/ In response to the cost of my products $$$$$ i make highly detailed replica out of quality materials... mostly cnc machined. I laser scan real vintage part to preserve authenticity and screen accuracy .. i high;y suggest checking my site and build blogs like this thread and on the rpf http://blasterfactory.com/blog/ https://www.therpf.com/showthread.php?t=272875&page=51 point
-
WOW, looks very nice. Heavy or not, I'd have one1 point