Leaderboard


Popular Content
Showing content with the highest reputation on 12/02/2020 in all areas
-
I think it’s time to revisit this thread started by Dan @CableGuy It’s a nice way the get to know a little about the avatars you see on screen. Perhaps we can get some more players this time around as well as see if something has changed with the first participants. Now....I would get the ball rolling but I feel it’s only right that Dan takes the lead ones again (but only if you want too)4 points
-
I got it! Finally and the brow seems alot tighter now. I had to disassemnble/drill out the rivets, used magnets this time up front. slotted all 4 rivet holes and retightened. The Magnets I think did the trick as I would need like 3 or 4 arms otherwise.3 points
-
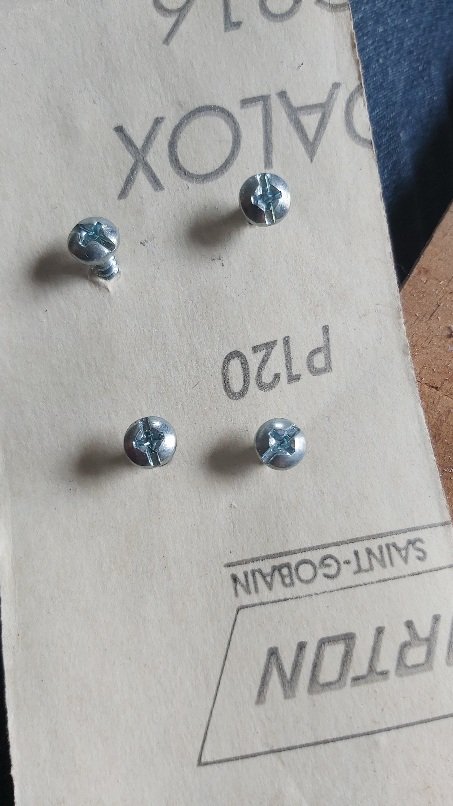
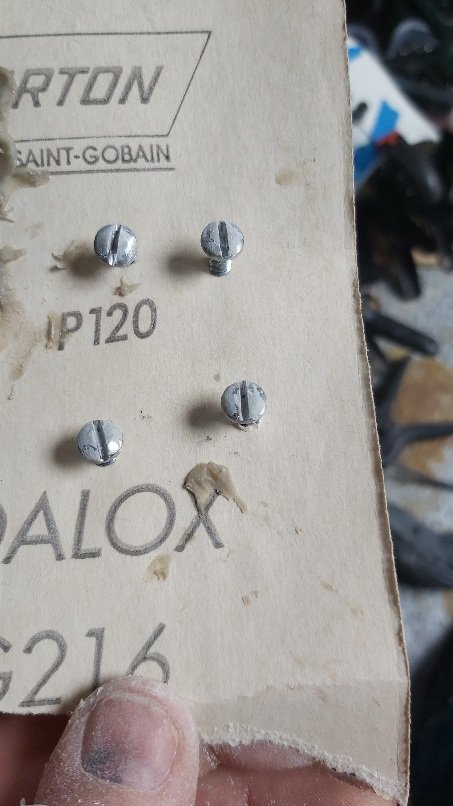
You could always do like I did, use a little bondo on some Philips head screws Closest we have at local hardware are slotted Phillips Apply some filler/bondo Sand and file the slot

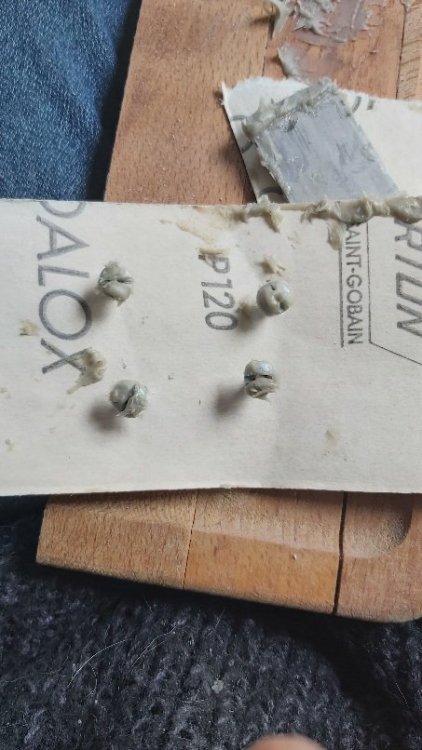
 2 points
 -
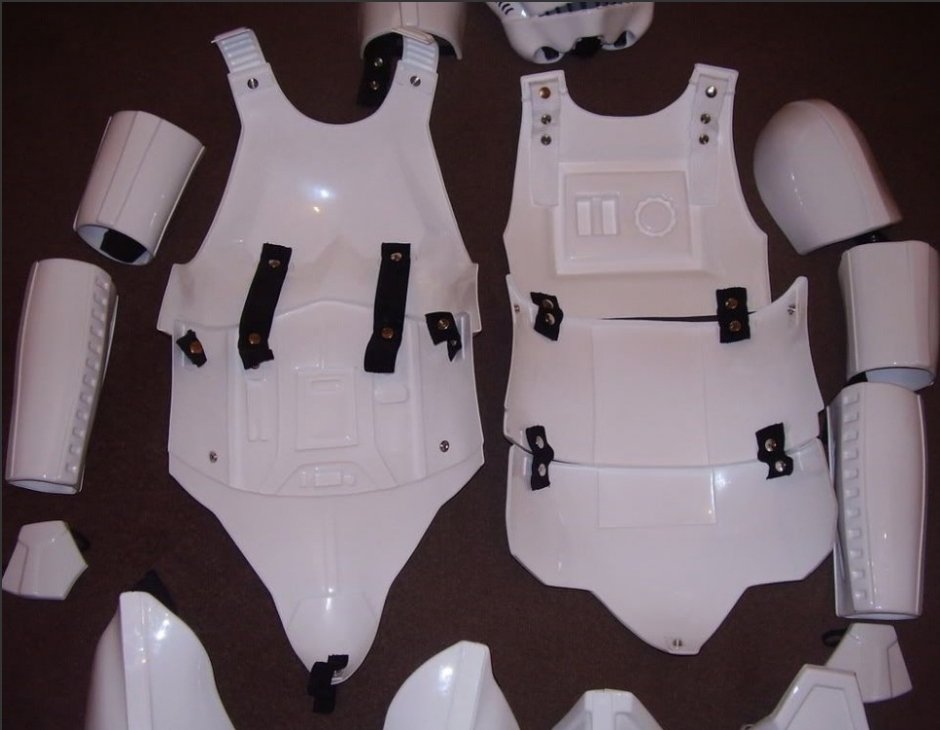
Overall, you're looking pretty sharp there, trooper! Good work! My suggestion to make your armor look a little bit better would be to bring in those shoulder bells a bit. You've got that "linebacker trooper" look. It's nothing that'll stop you from basic approval, but it might get a mention if you plan on applying for your EIB or Centurion awards. As they are now, they're somewhat square. Note how the shoulder bells on these troopers taper inwards. Bells are usually trimmed with a curve (or swoop) to them, not straight up and down (square). Note the cut lines on the yellowed (screen used) bells here: A little bit of trimming will help bring in the shoulder bells a bit and reduce that linebacker look.2 points
-
Another one to add to the list! Congrats to Colin (OddViking327) TK 25622 for earning his spot as Centurion # 485, leaving only 15 before we hit 500. Way to go Colin!2 points
-
Nice work, I normally only use two elastic straps behind the ab/chest and these have adjusters on so I can get the heights just right. Normally 2 makes it a little easier to adjust. Here is an example of what most use.
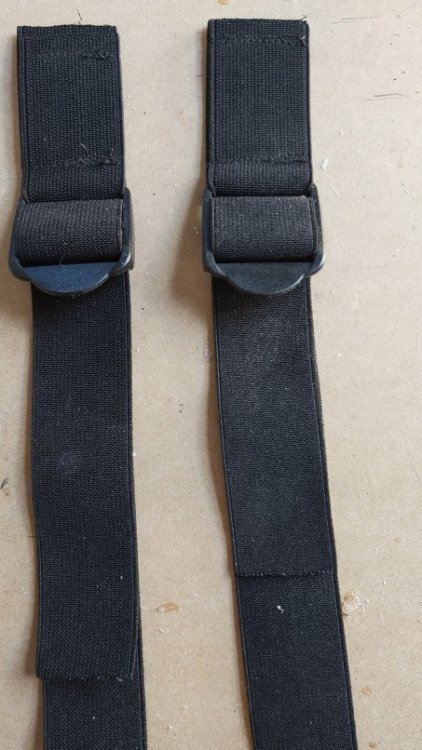
 2 points
 -
Good call Daniel, Dan the ball is in your court sir.2 points
-
And not to forget the intent of the award as Paul posted previously, it is only for those you have helped to reach EI, if it was just to help anyone to basic BOY I'd have a few2 points
-
It’s believe that the photo from outside Shepperton Design Studios (that you posted above) was prior to the actual studios making changes to the helmets. Those mic tips were likely replaced by the studio for something a little better. For hero helmets, the inside wall were actually black, as was the metal mesh. The “nipple” at the back was white. For some outstanding background information and images, check out http://www.starwarshelmets.com/original-ANH-hero-Stormtrooper-armor-helmets.htm StarWarsHelmets.com was one of my most visited websites in my early days. It is JAM PACKED with information, most of which is well researched and accurate. Also, the FISD gallery is a truly wonderful resource. https://www.whitearmor.net/forum/gallery/category/19-ottk-reference/ Here are some Hero helmets for reference; To my knowledge, the “white” on the rims and outside of the hovi-tips is NOT white paint. The hovi-tips are originally white (or close to it) and we’re then painted black. The areas of white are where the black paint has been scratched or rubbed off due to wear and tear. So, I’m my opinion, the best way to recreate this is to have a white hovi tip, paint it black, then gently weather the piece to reveal subtle amounts of the white beneath.2 points
-
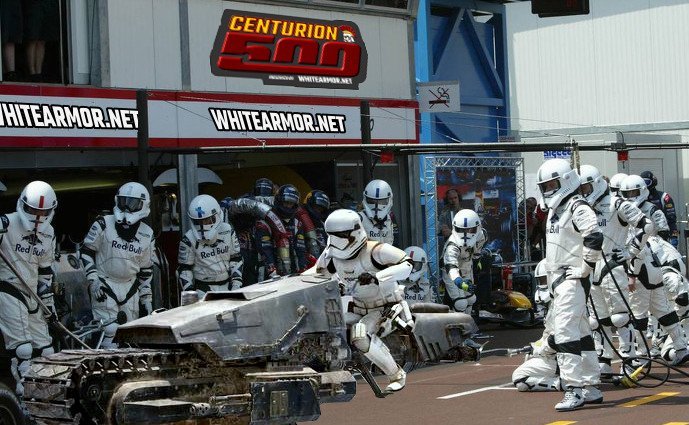
Hot off the heals of our Victory1000 celebrations, FISD are proud to bring you our next target event. We are fast approaching another milestone and another chance to celebrate victory as we hit 500 Centurions approved. This miles stone will also come with another special Centurion only piece of merch for the first 500, in the form of a pin to match the Expert Infantry exclusive. Our very own gmrhodes13 (Glen) has outdone himself yet again and put together the perfect introduction for this milestone event so without further adieu, FISD brings you. THERE ARE ONLY 7 POSITIONS ON THE GRID, SO IT'S TIME TO HIT THE ACCELERATOR, SHIFT INTO HYPER-DRIVE AND HELP US BLAST ACROSS THE LINE! Now that we have reached 1000 Expert Infantry, It's time to once again become part of FISD history and enter the "Centurion 500" We are aiming to have 500 approved Centurions by the end of the year. We only have 7 to go, so in order to reach that goal we are asking that you read over the CRLs for your particular armor, (this thread will help) make any necessary adjustments and post up your submission! Photo Checklists - Link here Apply here Questions: 1. Not sure if I have what it takes to reach Centurion- You don't know until you try, and you have not only the D.O. staff but an entire Detachment to help! 2. I need some repairs/fixes first- This is why we are here! We honestly want you to succeed and are here to help in any way we can. 3. I am happy with the way my armor looks, so why bother?- It not only makes you look more screen accurate, it instills a sense of pride and "esprit de corps"! 4. What if I don't make it? No worries, we will provide detailed suggestions on how to reach your goal! Benefits: 1 Bragging rights for being one of the "Original 500" 2. You get a cool badge under your name here on the FISD (full forum version) 3. Access to Exclusive Centurion500 pin for those in the original 500. 4. Certificate for your accomplishment. 5. You will have a more screen accurate looking set of armor. Now that the entire Staff and those who have reached Levels 2 and 3 are here to help in any way we can, you are more than welcome (and encouraged) to ask any and all questions you may have here on this thread, or contact Joseph, Sha Sha or Mario. Let's get up to speed, push that throttle and prepare for lightspeed, you can do it troopers Your Deployment Officers, Staff and the whole detachment crew are standing by ready to assist If you'd like to show your support on FB here is the link to the Centurion500 profile frame www.facebook.com/profilepicframes/?selected_overlay_id=331320651285964
 1 point
 -
Hellos to all members of the 501st ...My names Stuart i live in the UK it Was in the 70s I remember my bro showing me Starwars, my first comment after seeing the big guy in the black outfit was i am going to work for Vader when i grow up ( i am 50) okay a lil more then grown up now , depends who you ask lol, so yes i have my RS Prop masters Suit that was built to my measurements with the stunt bucket, i am soaking up all the info i can. i look forwards to getting my suit passed for centurion level and get ready to troop, that's when we can that is, sadly. Thanks1 point
-
No worries. Thanks for the update, Justin. I just never want people to feel like they've been forgotten. We will definitely be here whenever you all are ready.1 point
-
Hey @shashachu - I'm in contact with Michael and I know he's still intent on getting this resubmitted - it's just been difficult to assist him (and others) in person with their builds due to the rising Covid numbers out here in CA (/the US). We'll definitely get him squared away as soon as we safely can!1 point
-
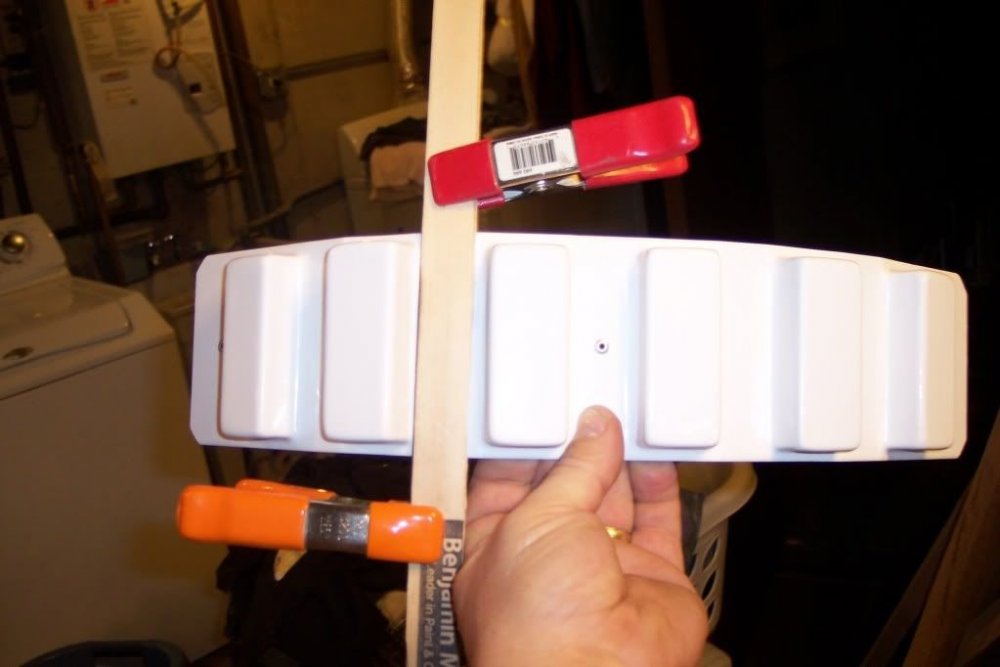
Just a small tweak. I'm not sure if you did it but it does help to stop your snaps popping off if you curve your belt, less strain when it is curved Clamp two pieces of wood between the belt spacing then gently push downwards
 1 point
 -
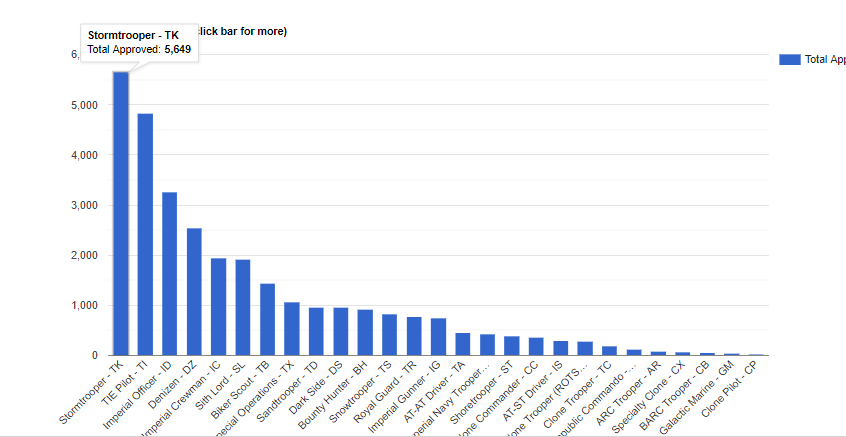
@gmrhodes13 Wow, thanks, that is exactly what I was looking for. So as it stands, with: 5,649 total, and 1,011 EIB and 485 Centurion, that makes (rounding) about: 18% of troopers go on to reach Expert Infantry 8.5% attain Centurion. (real numbers 17.8969% for EIB, and 8.5856% for Centurion with today's count). Thanks for helping me put my achievement in context, and also amazing to see how popular the TK category is Legion-wide!1 point
-
Exactly what I was looking for.1 point
-
Check out @ukswrath build thread, his belt attachment is here:1 point
-
Doing my best Jedi hand wave - you never saw me say that GMRHodes was selling those.1 point
-
Definitely have the kidney on as well, fitting the belt is one of the last things I do on an armor build, you can also check the length of the belt when you have all the armor on1 point
-
What you want to really do is align with the height of the belt and large ab plate, the belt should sit just under the bottom button. I normally check while wearing as the belt can sit slightly higher at the back and can change the position of the snaps a little. While wearing the belt have some painters/masking tape handy, add some to the ab just on top of the belt you can then work out how far down you need to place the snap1 point
-
sheesh man. I swear you have been through it all with builds you know every trick in the book. Haha. Uks is mailing me some. Hes only about 2hr drive away.1 point
-
Agree with Glenn, with experience you can use a Hot gun ar even the induction cooktop or electric stovetop .1 point
-
And the breakdown of those
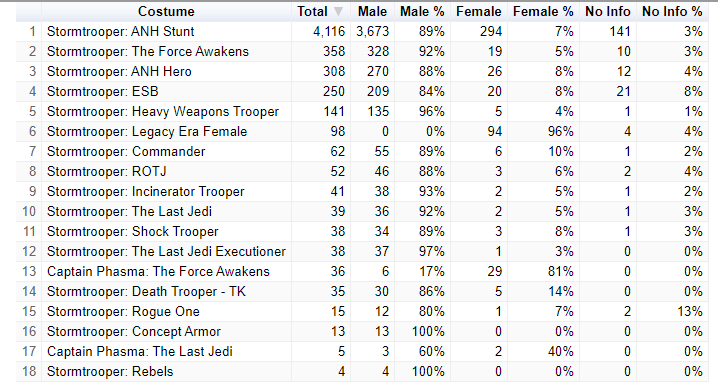 1 point
 -
Using painters on armor to give a visual reference before trimming is a good idea, full length mirror can also be a great help1 point
-
It's an interesting video, with ABS plastic you have to take care with heat, most people use a hot water bath method to help ABS plastic conform or bend, I use a heat gun but that's after a lot of practice, heating ABS is a funny thing, it can go from slightly bending to molten miss within a blink of an eye. Most of the shimming normally needed is with flatter pieces of plastic so I'm not sure if the process in the video would be of help.1 point
-
Your not kidding Gmrhodes. Muddling through but thanks to you guys' help breaking through one wall at a time.1 point
-
Congratulations Colin!!! Welcome to the Centurion ranks!!!1 point
-
Lol - yea onto the next crisis Thanks buddy.1 point
-
No actual post, although I should perhaps add it to the how to section once it's cleaned up. I found using one either side is enough, thickness is what every you have for cover strip material, width 1 to 2 inch is sufficient, here are the images I use i)1 point
-
Uhm. Ok. Well I mean it's together and now looking like a stormtrooper but the Brow is looking and feeling a little wonky. and this is why. I big gap at the brow. Now how did that happen. The brow is fairly unstable. And it seems like it's sticking out too far forward. I mean I intentionally wanted a low brow, I never much cared for the high brow. Maybe I'm trying to make this look Hero model. So after consulting with many, many on Ohio Garrison and FISD, they showed me the light. Well first it was said to just put on the ears and it'd fix itself. Well, it didn't. Next I learned I was going to have to tear it all back down again, drill out the rivets and slot out the hole so that I could pull the backcap back and the face forward. Nuts!1 point
-
There are 5648 active Stormtroopers in the Legion1 point
-
Thank you for your service.1 point
-
Wow, Mark... just WOW! Awesome job on this build, sir, and great attention to detail (I see you have really done your research)! Mario will be with ya' soon, so hang in there.1 point
-
I would highly recommend it. The aim is to size it right for you, so you look your absolute best. You will need the boots as well to size the bottom of the calves correctly and the neck seal.1 point
-
Correct. Even at 1000 EI we are far short of our target with is closer to 2400 EI. It's really trying to be yet another carrot to incentivize people to go EI, in this case by helping others to get to EI.1 point
-
No worries, and I appreciate even the consideration. I was just getting a little down on the shape of things yesterday as my state began shutting back down due to rising Covid numbers, and unfortunately, I don't know when things will be safe to mentor in person again, so I figured it would be worth asking if a change could be considered. We would obviously still need a clear differentiation between casual forum posting and the folks who go out of their way to answer specific questions and mentor outside the forums as well, but I would encourage the team to keep this in mind and on the backburner as we continue to see how the pandemic plays out.1 point
-
Indeed. I think we just leave the program to the side line until things get closer normal. It is very much a hands on award scheme. Great to see you thinking outside the box though Justin1 point
-
Hero helmets where made separately from the original ANH helmets (a few weeks later). Apart from the amount of teeth cut out, there is also the ear bumps with only 3 of those, only 2 screws on the ears, bubble lenses, lower brow trim and of course the mic tips. The company's original receipts show that in total Andrew Ainsworth at Shepperton Design Studios (SDS) fabricated fifty-six Stormtrooper helmets, twelve Imperial Forces' helmets, twelve Imperial Fighter Pilots' helmets and twenty X-Wing Fighter Pilots' helmets. For the Stormtrooper Helmets, an initial run of 50 "Stunt" helmets were made from a Khaki-coloured HDPE material, which was subsequently painted white. Following this 6 "Hero" helmets were made for close up work out of white ABS (i.e. no need to paint) and these were the helmets worn by the Luke and Han characters when in Stormtrooper Armor Details on helmets such as the Stormtrooper�s, were made from whatever they could lay their hands on. The mic tips have the words "HOVI MIX pa2" written on the side of them. Even now its not clear whether these were actually rheostat knobs (possibly military?), air inlet valves or microphone condenser tips. Note its possible some of the helmets had the real mic tips, however the majority of the Stunt helmets had resin casts of them. An interesting read on hovi tips, unfortunately a very old thread and a lot of links and photos are missing but an interesting read1 point
-
after many failed attempts at putting the screen in my hovi tips i just purchased some from etsy.1 point
-
mobility cuts really make a huge difference.highly advise it.1 point
-
Well... it’s after thanksgiving. Time to clean up all the messes.1 point
-
Sorry for the delay, updated! @DarthBiscuit @AradunFF @CharlieMcN33l @BuzzBomber @MightyAtom @Chris1880 @Zorg @Mzungu @TxTrooper @MARKVADER if you can pm me a screenshot of your profile info I'll sort you out. @TK 10738 please link your profile.1 point
-
status report .Started putting these together.1 point
-
Had to remind the youngling... “it’s that time of year, and Anakin is always watching!”1 point
-
It should do but it does mean you have pressure on the ears when you are checking when sanding/trimming, I normally use magnets to keep the sides pressed together tight, just makes trimming the ears a little easier. Doing a little extra work now will make you happier in the end1 point
-
It does look like the faceplate wants to come further forward, you do have a gap between it and the brow trim. There is no reason you can't add extra srews/bolts to any areas that aren't sitting flush, as long as they are in areas the ear will cover1 point
-
Thanks!! 20 years in the army taught me how much fun rubber gloves are, with or without liners. I'll go with the nomex for now, and if i need to upgrade later, it's not a big bucks item.1 point
-
After 2 years of trooping (as part of the Galactic Academy) alongside my father (TK-72313) and my uncle (TK-17671) in my own TK, I finally became an official member of the 501st this month! Now to get my Expert Infantry and Centurion approvals! Big thanks to my squad mate @DeathTrap for the Photoshop!
 1 point
 -
Awesome! I envy your journey to the 501st. Congrats to you and wish you many happy troops. Hope to see you get EIB & Centurion soon! Good luck!1 point
-
4e. Ab Waist Belt Mount In this section I'll be installing the male snaps for the waist belt mounting. I'll be using screen accurate male popper snaps to be used with the female poppers installed on the waist belt mentioned earlier in the waist belt accuracy modification section http://www.whitearmor.net/forum/topic/35086-ukswraths-anovos-tk-build/?p=465111. The line 24 male snaps provided by ANOVOS will work just as well and are approved at all levels. The popper snaps are for accuracy only. Here's some screen used armor for reference. Waist belt mount: ANOVOS supplied instructions have you place the belt almost directly centered with the ab plate. Screen shots however show the belt off center from the ab center and instead centered with the large button plate on the ab. Sounds a bit confusing I know so here's a few screen shots. Notice how the center button of the belt is slightly off set from the ab plate itself. There's no right or wrong in regards to which of the two positions you choose to use. I prefer to use the position shown in the pics above instead of ANOVOS's suggested position. With that said you can either follow along with my instructions or you're more than welcome to use ANOVOS instructions listed on page 1. Either way is accepted at all levels of approval. If you go the ANOVOS route, afterwards skip on down to "Drilling holes for male snap" and continue from there. Note: Though this may stir some debate among the accuracy elitists don't fret, in the end we're all just spacemen looking to have some fun, right? Another note: These measurements will work with the soft ANOVOS belt. If using a belt like Kittles you'll need to account for the stiffness and flex of the belt. On with it then. After replacing the waist belt line 24 snaps with poppers I double checked the snap to snap distance which measured 13-1/4". NOTE: If you're using the ANOVOS supplied belt your measurements should be the same as mine despite the fact I changed the snaps. The measurements were the same before I replaced them. Use the following measurements to locate and mark the male mounting snap holes. Left mounting hole (illustrated below) 1-3/8" from left/center return edge 1/2" from lower return edge Right mounting hole: 1-1/4" from right/center return edge 1" from lower return edge Afterwards use a fabric tape to measure and confirm the distance between left and right mounting locations on the ab are the same as the belt. Drilling holes for male snap. The particular poppets I used required a 11/64 drill bit. Drill holes at the snap mounting location. After drilling Install male snaps: Starting with the posts. Insert posts from the inside of the armor. Using a strong block of wood or other, place on a firm footing ex. floor, vise, etc. Place behind male snap. If using a line 24 snap use the post tool behind the snap first. Install male snap Using popper setting tool to drive and secure male snap onto post. For line 24 snaps use setting tool for that type of snap. After Test fit belt1 point