Leaderboard


Popular Content
Showing content with the highest reputation on 06/17/2020 in Posts
-
Let's discuss the thigh holster for the blaster, shall we? I printed out a functional thigh holster bracket (found over on Thingiverse) and scaled it so it would properly fit Cameron's thigh armor. The files aren't perfectly accurate, but they'll do for the most part. Scaling it to fit involved a bunch of eyeballing and scaling in Windows 3D program, but I got it right. It came in three pieces: base part to attach to the thigh, a middle bracket, and an upper (smaller) bracket. Typically, I'd just glue them all together with E6000 and call it a day. But even though I printed these in ABS, the bracket needs to be quite structurally sound because it's intended to be fully functional. Time for a mod. After lots of thinking, I decided to reinforce the bracket piece that holds the most weight (where the screws of the blaster lock into the holster) with a layer of sheet aluminum. I had printed out two of these parts due to their small size, and I used one of them as a template. I traced the bracket, cut it to shape with some tin snips, and drilled out holes where the screws would go. Here is a rough beginning: The big dog-leg hole was my biggest challenge to get cleared out. A little more drilling in the middle, more trims with tin snips, and sanding with a metal file, and the hole was clear. I hit it with more sandpaper to smooth out rough edges. See, it fits! This piece is now quite strong, and I won't worry at all when Cameron holsters his F-11D. Here you can see what I had to work with. These parts are covered in spot putty right now, and the 3D "screws" leave a lot to be desired. Much better with actual screws, amIright? In case anyone was wondering, the screws I'm currently using on the modded bracket are M3s, and that's an M3 ball bearing on there as well.4 points
-
I'm Shawn from Chicago. I was approved on May 25th after more than a year of fine tuning my TK Hero. I can't wait to stand alongside ( or at least 6ft apart) the rest of you great folks.3 points
-
COSTUME NFORMATION Armour: Anovos TFA beta kit, with mods and accuracy upgrades, including: - new accurate chestplate - new accurate thermal detonator - upgraded clip greeblies - reworked biceps detail strip - new forearm detail boxes, forearms have the "Finn" mod for mobility - lightly weathered to match the screen used battle look Helmet: Anovos Premier line, repainted to match the armour Gaskets: private run, latex backed with t-shirt fabric Belt: supplies from amazon (mostly), fully working metal holster (R2Dan - d'oh), resin box pieces (R2Dan), pouches kindly made by TK72216 to specs I supplied Boots & gloves: Imperial Boots, topped with resin handguards (R2Dan) Undersuit: Extreme Racing F11D Blaster: Justinian kit SE-44C Blaster: 3D print (files by The5thHorseman) Name: Dan Sczudlik Height: 173cm (5‘8“) Weight: 72kg (159 lbs) TKID: 8527 Level 1 approval: https://www.501st.com/members/displaymember.php?userID=8369&costumeID=326 EIB approval: APPLICATION PHOTOS Parts: Action poses:3 points
-
Hey there everyone, my name is James, I’m currently living in Palmdale California, and currently I am hoping to get some stormtrooper armor together as well as a stormtrooper officer uniform. I’m still doing much reading and I found this forum thanks to the great recruiters on Facebook. I look forward to learning as much as I can and having a good time doing it. Looking good is just an added bonus.3 points
-
Wow! Amazing work. I was looking into doing this for my son - but after seeing the amount of work you are going through, I've come to realize that I don't love him that much.3 points
-
***OPERATION RIGHT THIGH SALVATION*** - UPDATE I've started to reattach the off-cuts to the rear of the right thigh pieces as shown below - one side is complete and the other is glued and drying overnight. If you squint and hold your device far away enough from your face, you'll see that it looks as good as new from the outside, right? No? Okay, I know that Jedi mind tricks don't work on you guys, but hopefully it will be good enough when finished to give me a second chance to resize without any major surgery required - we will see! Other side drying overnight:2 points
-
Thanks for the welcoming words everyone. I realized I tend to not actually post (sticking to reactions/likes to indicate I've seen yours). So I apologize for that preemptively. Possibly because I feel I have little of value to add yet. I do and will mainly try to find answers where questions have already been posed. But I'll also attempt to be somewhat active in posting when the need arises. Side note: I can definitely get lost, in the best possible way, in ukswrath's content. Awe-inspiring builds that I've seen so far.2 points
-
Thank you! And thanks for the tips! I will keep that in mind going forward on trimming both ab plates.2 points
-
When trimming the small (4 button) plate, as seen in the reference image Mario supplied, note that the corners are also squared off and do not extend beyond the ridges of the raised area that it is mounted to. It's also worth remembering that the paint does not go all the way to the bottom of the actual button. Those 2 issues are among the most common we see when reviewing a submission for the higher levels, so it's easier to do it now rather than have to go back and fix it later! I would also suggest sanding down the sides of the large plate before gluing and maybe a tiny bit of trimming. You are doing a fantastic job by posting up lots of photos... unfortunately, many future troopers fail to do this (or ask questions) before forging ahead and end up having issues to deal with down the road. Keep up the great work!2 points
-
Wowee photo time! Here is some photos of my fully suited up! Things you should note are: -I chose to wear the holster off so you can see the hard armour better -The right side of the chest plate isn't snapped, as we lost the connection, so it flares out a bit -I wore the frill of my neckseal over my shirt, so you can see it stick out a bit near my shoulder bells! -I'm still in the middle of making the TD -I didn't wear my handguards as these are my Nomex Flight Gloves, which i've heard many of you use as it is breatheable, I still have my rubber ones around too I need to get a tighter black shirt, it makes frog-toe-webbing under my shoulders when I lift my arm out. I've always felt self consious about how skinny I am, hope it doesn't look too skinny in some areas. I feel the armour looks the worst from behind but you guys are the experts! I also probably could have done with rotating the shoulders a bit better forward, but easy fix, hard to tell what I look like in the mirror while I have it all on. Please give constructive critisim, pros? cons? What should be address? Am I handsome stormtrooper? Thank you, very close to finishing! Please keep in mind I am going for certification 32 points
-
try to emulate this alignment2 points
-
Alrighty time for a little update! Started disassembly on my helmet today! This isn't exactly rocket surgery, but I'll take you guys along for the ride if you've never seen it done before: Step one - start peeling off that bottom neck seal trim. There is a bit of adhesive on it, so work slow, especially around the ears. I'm not a huge fan of the Anovos neck seal trim, so I may replace it anyways, but one thing I always do is at least spin it around - I like the split to be in the front where it's hidden a little better by the black of the vocoder. It helps to leave the rubber trim outside in the sun for a bit to soften it up and make it more pliable before reinstallation. Always leave it a tiny bit longer than you think it needs to be if you're cutting it - the pressure will help it wedge into the tight corners and stay in place better, plus no visible gap. Next up, pop out that lens and peel off the frown mesh carefully - they're held on by double sided tape, sticky foam blocks, and a little velcro. Next up, mic tips! You can see where the helmet is a little deformed in the depression - be SUPER SUPER careful, as this is one of the weakest areas of the entire helmet, due in part to how far the ABS has to be stretched to make those deep depressions. Anovos just screws right into the resin tips... not my favorite system and should probably have a washer at minimum. I've seen the outer casing separate from the white insert too, so be mindful. Next up, remove the foam covering the ear screws... it's not bad to have, but I just chuck it. Carefully remove using some pliers to hold the nut and a small flat head screwdriver. Love those smooth cut lines, Anovos... *eye roll* Be careful - my ear was glued a little down at the very bottom from the neck seal trim, so gently pry until it separates. There should just be two more screws holding the back cap and front mask together - these must have had a little dab of CA on them as they were stubborn but eventually worked loose. Boom, now you can separate the two main parts of the helmet. Pull that brow trim off... And you're pretty much done! Here's everything all laid out. You may be asking why I bothered doing this, and there are several reasons. First up, I like to spray the insides of all my helmets black - it's not technically accurate but I like the look better and I feel like your features are less noticeable in a dark helmet. The inside will be getting several coats of Rustoleum truck bedliner spray - I'd like to think that it adds the tiniest extra bit of strength, and I like the look and texture. It will also be easier to rub all the painted on graphics off for replacement with ESB decals - just be careful, I forgot how thin these helmets are. If you hold this one up to the light, you can see almost see through the white, and in several spots, you could tell how scary thin it is... Another reason to pull it all apart is to replace the hardware and mic tips with more accurate ones for Centurion. The hardware is from @justjoseph63 - I painted the screws white and used nylock nuts and washers that I painted black already. The mic tips are from @ukswrath and I'll need to sand them a bit and paint the interiors white - he left em black for me but I ended up using another set for my R1 build. Here's a little comparison of the inaccurate, rusty stock Anovos screws on the left below (right above, oops) and Joseph's set on the right below if you haven't seen the difference before. Ironically, I want to say the incorrect Anovos helmet screws can actually be used as correct Thermal Detonator clip screws last I checked! Anyways, when I get a chance, I'll paint the interior of the helmet black, remove the painted details, then reassemble with more accurate odds and ends. More to come! Thanks for stopping by!2 points
-
I've been slowly working on a 3D print build of Nico Henderson's R1TK helmet. Nico is well known for his accuracy on his Shoretrooper helmet design, so when I saw him post on Facebook that he was going to be releasing a 3D printable model of the R1TK I knew I had to give it a try. It's a beautiful design and I believe it to be the most accurate I've seen. I didn't know how far I was going to get with this build tbh so I hadn't started a build thread, but now that I'm getting close to painting I figured now would be a good time to post my progress. I'll probably need some advice on paint here soon as well, so any advice on paint and/or threads to read would be appreciated!! Here are some pics of the freshly printed pieces: And here's a few of the mockup of the raw printed pieces (except for the chin and ears which I had already started to sand): So after I had sanded things down a bit, I wasn't sure which method I wanted to use to fill the print lines I couldn't get with sandpaper. I had heard some people talking about using XTC3D so I decided to give that a try. My opinion is that it's good if you don't want to process it too much further than the initial polish, but I ended up with bubbles in the dried resin and found it difficult to sand, I think I could've gotten the same results easier just using filler primer, which is WAY easier to sand and get smooth. After endless hours of sanding I was finally ready to attach some of the pieces together. I started with the face and the back, then attached the dome. I wanted to fill the seam line between the back of the helmet and the dome. I wasn't ready to attach the chin yet as I wanted to get the face/back/dome piece as well as the chin up to paint ready smoothness with wet sanding before I attached the rest of the face together. Mostly so I wouldn't have to try and sand the seam between where the chin and cheek tubes meet, as well as the surfaces leading into the frown. So finally, I'm caught up to my current progress. I've got everything wet sanded up to 2000 grit and I have attached the chin to the rest of the helmet. I've mocked up the ears, brow trim and vocoder for looks, everything else you see is attached. Now I need to know how to proceed with painting. I've been trying to research rattle can options and the steps I should follow. I've never attempted to spray paint a project that needed to achieve the level of gloss and smoothness that this requires, so I want to get all the input I can before I proceed. I'm not sure if I should be laying down a particular type of primer first (should I use white primer?) and then what type of paint is best and how I should be going about getting all the angles without missing spots or pooling problems. Also, I've seen people talking about just using gloss white, but then I saw someone mention appliance epoxy, which I think might be a good idea due to the fact that it resists chipping? I found some at my local Home Depot but wasn't sure so I haven't gotten anything yet. This is what I found: Alright, well I'd love to get some feedback on the painting process as well as how to proceed with painting the greeblies (tears and traps) as well!1 point
-
So during Force Friday II the new Phasma novel came out. I don't want to give out any spoilers but there is a new character named Captain Cardinal. He is a captain in the First Order much like Phasma, however he is in charge of training and conditioning the younger recruits while Phasma is in charge of teenagers through regular troopers. Here he is on the special Barnes and Noble edition poster that came with the book. And here he is with a helmet on appearing on the back cover of the book. There are also some descriptions of him in the book. From everything I gathered the only difference between him and a regular FOTK is the Captain's cape and The red hue of everything he wears/uses. Would this even be an armor that could be approved? I was just about to start a FOTK and I absolutely fell in love with this character and his motivations. Plus him armor is pretty sweet lol. So before I get started trying to paint/dye everything red I wanted to check on here about it first. If not then I'll get to work on my normal FOTK so no harm no foul.1 point
-
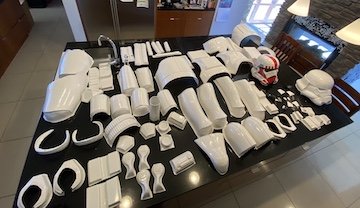
Heeey troopers! It's me again, with yet another build. I've had to fast track this one, so it's taking priority over progress on my 3D printed Shoretrooper (that build is going on over at the Pathfinder's Detachment). I finally have enough pieces printed/welded together that I can share some activity now. I'll begin by saying that this is a build for my 10-year-old son, Cameron. A few years ago, I built a Battle Buddy FOTK conversion for him, and he loved it more than anything. He would have slept in it if I allowed it. He was treated like a rock star everywhere he went in it, and he completely embraced the bada$$ FOTK trooper we all know and love from the movies. He was approved in it for Galactic Academy, and has trooped with me many times- always stealing the show! Earlier this year I was approached by our GML who requested some guidance from me about the FOTK Battle Buddy conversion process. The Garrison was looking to build a kid-sized FOTK for a 5-year-old boy named Jimmy (he has chronic heart conditions) whose only wish was to have a stormtrooper helmet. (Most people don't even consider that something like an entire suit of FOTK armor exists in a child's size, so the best Jimmy could hope for was a FOTK helmet.) However, we ALL know that it's possible! Since I am one of just a few troopers in our Garrison who have taken the journey of the FOTK Battle Buddy build, there was hope that I could help with putting one together for Jimmy. I told my son about Jimmy and his conditions and that I *might* be making another one. My son started to cry, and when I asked him why, he said, "I want Jimmy to have my stormtrooper armor. He's had a hard life, and I want him to feel happy." I was very moved by his reaction, but told him to think about it first. I didn't want Cameron to give his armor away simply because he thought it was something that I wanted him to do. He was very attached to his armor, and I didn't understand how he suddenly could offer it up like that. He said he would think about it, and we didn't discuss it any further. A week later, Cameron brought $60 of his saved allowance (which was pretty much all he had), dumped it on our kitchen counter, and said, "I want to donate this to the American Heart Association." What??? It was such an "out-of-the-blue" gesture for him, and it took me by surprise. Then I remembered Jimmy. So I asked Cameron, "So, is this about Jimmy? The armor?" And he yelled at me, "Yes! I want to help Jimmy! I want to give my armor to him. I haven't changed my mind!" Okay then. He wanted to keep the helmet, though. And that's what happened. Somehow I was chosen to be the person who was the "voice" for the surprises during the Bert's Big Adventure presentation . (Watch out- nerd with a mic!) The Georgia Garrison presented Jimmy with a Battle Buddy first. Jimmy was soooo excited about it! I don't think that the family knew that there was moooooore! After that, Lord Vader presented Jimmy with a FOTK helmet (a lovely Rubies Deluxe conversion crafted by our own Sith Lord, Scott Britt). Jimmy was thrilled! Then came the biggie... the Garrison donated a small case on wheels to hold the armor (just like the one I used for Cameron's armor), and the case was wheeled out in front of Jimmy and his family. I don't think they understood what was being presented until I started pulling out the chest and back plates and said, it's his VERY OWN ARMOR. Jimmy cheered, and the parents started to cry. Cameron suddenly became shy and stood off to the side, a little overwhelmed at all the people and the excitement. Could a mom be any prouder? I think not! And if you're still here... As a gesture of thanks to Cameron, I'm rewarding him with a new set of 3D printed FOTK armor. This set will be more screen accurate than the Battle Buddy for sure. I'm trying to build to 501st specs along the way. I don't know a thing about the FOTK armor, so I'm learning as I go. I bought my files here, and the person who made the files has been very, very, very receptive when I've requested changes to the files for improved accuracy and/or model print improvements. Seriously, if I ask for a change, I usually get a new file within an hour. I don't think he ever sleeps. Most change requests were for improved thickness of the parts. Everything prints out really solid. Here are most of the parts I've printed/assembled so far. Using Armorsmith, I've been able to scale everything down to fit Cameron nicely. Still have lots of sanding and gluing of greeblies before priming these parts. The white stuff on the seams is Apoxie Paste, and it sands like buttah. The shins are two halves (another request I made), and they are attached with heavy white elastic on the outside. I'll be securing them closed on the insides with some elastic and velcro. I love the shape of the FOTK back. Another change that was made per my request was that the yoke and back be formed in one piece. It is incredibly solid and very strong, yet has some flex to it as well (yay for ABS printing!). Cameron loves sliding this piece on. He keeps saying that it's like a Halo backpack. And today was the first day of priming parts! The weather was nice enough today to get a few light coats of filler primer on the biceps. One thing I love about filler primer is how it shows you what you need to work on. Like more fine sanding on those printed buckles. A small step on a much longer journey, but I'm excited about the trip!1 point
-
Hi y'all, I am starting my first TK/TD armor. I just had My BBB and am really excited! I've cosplayed before so I at least have some idea of what to expect lol.
 1 point
 -
[EDIT 6-17-20: Please do read this entire thread but the packs are done and the files are HERE: https://www.thingiverse.com/thing:4462006 ] Hey all! I'm an approved ANH Stunt TK with aspirations to become a HWT. I started my pack project about two years ago but got derailed by life. I'm building two packs, one for me and one for a friend currently building a TK. The first pack is almost done and has used my initial 3d printed parts to test it, and after building that I have gone back and modified my files. I'm going to post screen captures first to see if there are any issues or CRL conflicts before I start printing them to make the second pack. After everything is approved and assembled, I will be releasing the files to my Thingiverse for any future HWT that want to use my parts to build their pack vs. scratch building everything. I used ukswrath's build, the published approximate dimensions needed for each component, and screen grabs from the game to base my parts on. The base of the pack is still an oil can, the radio base is still a "memories" box, the upper center tube is a wipes container, and the side tube is PVC. CRL: https://databank.501st.com/databank/Costuming:TK_hwt UK's Build: Game Screen Grabs: Pack Specs: First, here is my "rough draft" pack. It is currently only lacking 1" webbing straps, weathering, and the chest MP40 pack before I consider it complete. Bear in mind the rendered parts are the current revision, mostly just added some radii and screw holes for the corner screws. Upper Left Button Box. I've made each sub component that is painted a different color a separate part for ease of assembly. The frame the buttons fit into actually sits in a pocket in the button base so that everything will easily line up straight. The parts will just be glued together unless there is any reason to add holes for screws? The buttons are based on the same dimensions as the rubber bumpers used in UKWrath's build as they seem popular. The bumpers could be used in lieu of the printed buttons, but its way cheaper to just print them IMO. Top Middle Wipe Tube cover. I'm still using the standard plastic dollar store wipe tube. I could just print a tube with a flat back but honestly for $1 its not worth it, although with the covid pandemic wipes have all but vanished. I may go ahead and make a file just to have it available though. I've seen some people just use black electrical tape to make the cover, others use cardboard, others use sheet plastic. This 3d printed part just makes it look more "real" IMO. Upper right flap vent box. I really thought this would be tough to draw but it turned out to be simple. The vent section prints as a separate part that fits into a pocket in the base. No more cutting of strips and trying to glue them together perfectly as this prints and looks great. The look is more akin to the UKWrath build than the game as the vents go all the way to the bottom of the part. The CRL also shows the vent flaps going lower. I can mimic this if people think matching the game is better than matching what most people seem to build? Lower left radio. I have made two files for the faceplate as it is larger than what my printer can fit. The top section is the "screen" and the lower section is for the knobs. I am still attaching this to the cut-down heavy cardboard "Memories" box as my printer can't make something that large for less than what the box costs. I have also made a file for the knobs with holes to screw into the plastic faceplate. They're roughly the same size as the plastic caps from the oil can base so either could be used but with holes perfectly centered on the printed part I'll just let the machine make them. Center right is the angled box with tombstone shaped vents. Per the game, this box is angled although most builds have it as a flat box due to limitations of scratch-building nice parts. Again, the faceplate is a separate part for painting and assembles with glue. There is a neat trick that if I print the box upside down, the face that points outwards will have some drooping plastic bridges that look like vent media underneath the faceplate (see the pic of my test pack). I've removed the corner screws from the original part and added those screws to the outside of the base instead. Lower right Drop Siphon. Again, the upper black section and the lower tapered grey section are printed in two parts. I have left a lug on the tapered section and a hole on the upper section so that they will easily line up for assembly after painting. Also, I needed this to print in two parts so that they would fit onto my printer. The upper section has the cap integrated into the design with the same rough size and shape as a juice lid used on many builds. The upper black section also has a flat base on the back to allow for simpler mounting to the oil can base. The grey tapered section has 8 1/8" holes evenly spaced around it for placement of real rivets. I could just integrate 3d printed rivet look-alikes but honestly I like the look of real hardware on the 3d prints to give it a bit more realism. And lastly are parts for the 24" PVC tube mounted on the right side of the pack. Instead of buying a vacuum formed TK shoulder strap or PVC caps I have just made files to print look-alikes. The tube stripe prints with the same diameter bend as the OD of the pipe so no need to heat it up with a heat gun and crinkle it to death. The caps could be sourced and cut down from a hardware store, but if I can print perfect parts that are ready to go right off the printer I'd rather just make the file. The biggest concern I have for making it approvable are my "clamps" that attach the pipe to the side of the pack. They make the tube stick out from the body of the pack a hair, but I don't think its enough to hurt. I know some people just screw them on or use toggle screws but I wanted something that looked a little more military and polished. The clamp first attaches to the side of the oil can with 1/4"-20 screws and then the PVC pipe is attached to the clamp via screws. I think it looks super neat and it is very, very solidly mounted so its worth the slight deviation from the norm. So.... please give me any input or criticism to make these parts more accurate, buildable, etc. I'd like to make any modifications to my files before I print up a second batch for another pack and before I release them to the wild on Thingiverse. I can also drop the files on FISD just have a backup source if I can upload STLs.1 point
-
I've had issues with some paints before especially Rustoleum, sometimes it can be thickness of paint, different paint, or even paint not fully dried. I moved back to acrylic automotive paints and have not had any issues to date. Probably not an easy fix but I would suggest removing all the paint and starting again, a pain to be sure but at least you can start with a fresh base.1 point
-
Never in doubt, congratulations trooper, well deserved1 point
-
Dan Sczudlik 8527 A4 please Sha Sha Dankeschön Gern geschehen! http://www.whitearmor.net/eib/certificates/8527-eib.png 2861 point
-
Excellent points - thanks for highlighting those Caleb. You are spot on that working with your GML on this as you go and seeing it as an educational process is much better than just tossing pix over the wall and hoping the other side understands in a vacuum.1 point
-
Yesterday I glued the front cover strip on my right thigh. I only have 12 of the 22mm N40 magnets, which I prefer to use when gluing anything with an inner and outer cover strip, so the left thigh will wait until today. After a month of working with those big rare earth magnets, they still make me nervous when I handle them. I've also spent over an hour cleaning up the glue from my biceps, forearms, shins, and thighs, prepping the parts for showtime. I don't yet have the scrap material to make my bicep hooks (I'm saving scrap for reinforcing the chest and back after I glue my snaps), so I'll leave those pieces for now. I think it's time to pivot to the helmet : 1. Use mineral spirits to clean up frown paint and around the vocoder. Re-paint frown, extending the edges 2. Dremel/ small file the edges of the eyes. 3. Paint ear screws white, swap current screws to the TD 4. Strip all Velcro from interior, using Goo Gone for cleanup. Clean interior of helmet with rubbing alcohol (maybe mineral spirits instead?). Mask features. Spray 3 coats of plasti dip, 30 min in between, and then let air out for 4-5 days. 5. Cut green lenses to size, attach lenses and frown with Sugru 6. Re-attach S trim, connecting under the chin 7. Test tactical pads, assessing if they're too tall/ will take up too much room For the Hovi tips, I'm still deciding between Tony's mic tips or just replacing the mesh for now. If I replace the mesh, I'll paint the edges white. Down the road I imagine I'll try and trim my ears so they sit flush.1 point
-
Welcome to the FISD James, lots of great resources and Troopers here to give advice and assist you on your path to the dark side. Sent from my SM-G960F using Tapatalk1 point
-
Someone posted in a different thread (cannot link atm, not at my main computer atm) that RS told that in a CS response. your linked page shows it out of stock1 point
-
Thanks everyone for your kind words, suggestions and encouragement, it's reassuring to say the least!1 point
-
I totally agree with Dan, your doing great. I am currently finishing up my RS build. For the thigh miss-alingment as shown in your pics, this will be covered by the knee ammo piece. Here is my RS thigh. Behind the ammo piece is the exact same miss-alignment as yours which cannot be seen. The cover strips hide the top miss-alignments. Hope this helps ease any worries and remember. The RS armour is made from an original suit which were literally thrown together for the movie, so there is very little symmetry which in my opinion, adds to the charm of the original TK's. Cheers, Martyn (Mar2D2) [emoji1591][emoji41][emoji1591] Sent from my SM-G920F using Tapatalk1 point
-
Hi Adam, Great progress, trooper. [emoji1303] Just to touch on something : there have been some suggestions in the thread to trim certain parts to remove the “offset” between certain inner and outer parts, in this case the arms and thighs. Personally, I’d advise against this - I’d say you’re doing the best thing and maintaining the beauty of the RS suit and it’s lineage to the original suits by NOT doing this. Most other, idealised suits will lose this type of character and charm. Keep up the good work. [emoji1303]1 point
-
Thanks, that's the photo I went off of, now getting the ears to sit right is... Entertaining lol. I will see what I can get done tomorrow with it1 point
-
Hi Emma, for the buttons plates consider the following reference, cheers1 point
-
Thanks for the tips! Cleaned up the spats tonight quite a bit. Will add a tab to them tomorrow so they can be securely attached. Then work shall begin on the shins! I've decided to try and work my way from the bottom up so I can try and stay focused on one part instead of constantly doing a bit on everything all at once, and then working on one part a day.1 point
-
You may need to bargain a bit with your GML, and you may even consider reaching out to them before printing. Keep in mind your GML may not necessarily be well-versed in the HWT, and may therefore put a lot of stock in the CRL reference images, rather than game images. Note, too, that the oil pan which Joseph used in the CRL images is no longer produced, and weren’t readily available all over the world anyway, so obviously some latitude is in order for builders. Sent from my iPhone using Tapatalk1 point
-
A lot of strength Caleb ... I hope everything goes well for you and your family ... A big hug ...1 point
-
Hot water bath for the win. Also, for higher levels of accuracy, be sure to leave the corners on both those plates crisp at 90 degree angles. It will be tempting to sand them round. Sent from my iPhone using Tapatalk1 point
-
Hi Adam, don't feel bad , you haven't messed this up rather spectacularly , I have messed it better sometimes . about your thighs, If i can make some suggestions: 1- for alignment of the thigh you must start from bottom to top and them trim the excess on top. 2- It is always recommendable to make the first fit using painters tape or some tape before any cut. You can gain some more room by removing all the return edge of the thighs, taking care of no cut the bottom ridge What i certainly would do, Is first, try removing the return edge, make a fit test and look if the shims are necessary. You can also make an internal cover strip wider and leave more space between both pieces and then hide them with the external cover strip. Hope I have been clear, it's difficult because of the language. Try to post photos. Cheers1 point
-
You got it mate, go for it, there's no way back!!!,1 point
-
Great work Thomas. Remember for the TD to take a look to the reference photos, Centurion Application threads and measure twice, cut and glue once.1 point
-
I would say, all good as long as your end cap doesn't get any problems...1 point
-
Annnnnnd its live on Thingiverse! If you see any changes I need to make or suggestions for new parts I'm open to ideas. https://www.thingiverse.com/thing:44620061 point
-
Thanks for the praise. That's more or less what I was aiming for with the build, a replica (as far as the vac formed kit would allow it). There are still a couple small things I may have to change, but overall I'm quite pleased with it1 point
-
In Memoriam Detachment Leader Executive Officer Provost Marshall Deployment Office Pre Approval Forum 3D Section Field Exercise Award Master Armorer Program Replica Section Program First Order Battle Group Forum Hosting Hall of Fame Just For Laughs Order 66 In The Media Challenge Coins Common FISD Acronyms and TK Glossary Imperial Attaché Program EIB & Centurion: What do these terms mean? Advanced Tactics Awards EIB - The March To 1000 Fire Teams Merchandise Public Relations Staff List 2020 Follow FISD On 16th April 2020, Henry Winland (SL-7133) passed away. Henry was instrumental in the formation of the first 501st Canadian Garrison Squad, and the 501st Legion - Badlands Garrison, that became his home. It is said that the quality of Henry’s Darth Vader attracted new members to the 501st Legion. Henry was an engineer, and he put his skill to test in his fandom. Henry created droids and other remote automations. His creations displayed his personality as Henry quietly stepped back and interacted via his remote controls. Henry is survived by his beloved children, Madison, Gavin, and Hugh. Our condolences go out to his family and friends. "Buckets Off" On the 20th of April, 2020, Jon Farmer of the Southern California Garrison passed away. Jon bears the distinction of being a honorary member, before becoming a full-fledged, active trooper in both the 501st Legion and Rebel Legion. His accolades include model-making and animation for “Star Wars Episodes II and III,” “The Clone Wars”, and helping to create the “Star Wars: Galaxy’s Edge” theme park for Disney. Humble and generous with sharing his talent, Jon was known for his infectious smile that would light up any room. Our condolences go out to his family and friends. "Buckets Off" Boom operator Ken Nightingall, who is well known for his work on Star Wars: A New Hope, has passed away at the age of 92. The Association of Motion Pure Sound (AMPS) confirmed the news of Nighingall's death, saying he passed away in his home on Tuesday, May 19th (via Deadline). Nightingall is survived by his son Terence Nightingall, who also works in the film industry as a camera operator and a director on projects like NCIS: Los Angeles. Our condolences go out to his family and friends. "Buckets Off" What a busy month it's been so far! There are several people I would like to shout out for getting stuck into moving things forward since the last news letter and into June. Not in any particular order Wingnut TK50297 Jeff, for his continued work on the Visual guides. And hes just completed the Incinerator trooper, so go check those out. Hoda TK77520 Eric, for getting the trading cards caught up to date and ready for invoices. gmrhodes13 TK85421 Glen, for all the marvelous forum header and Facebook template work Ripper_L TK55550 Danny, for his video editing all nighter for our order 66 Detachment submission Thanks guys, I and I'm positive the membership thank you for your contributions. We move ever closer to the magic 1000 EI, keep those applications coming in, our Deployment officers are ready and waiting for you. The legions first global campaign Order 66, was an on again off again on again event that finally made it to social media, i hope everyone had some time to get online and enjoy the content from garrisons and detachments around the world. I must say there were some outstanding submission and I felt very proud to be a member of the legion. I cant wait for the next event like this because I know the game will be on to have the most impressive video content in the galaxy. Back to the Detachment, we have started some work on the RotJ CRL, the staff had a discussion and we think it's time for the inclusion of as weathered Endor variant to this CRL. The decision will be made with the LMO team as to it becoming an addition to the current version or it's very own CRL, we have a few options but once we get into it we shall keep you posted as it starts to form. We are also looking to make a small change to the TFA FOTK CRL with regards to the Thermal Detonator. This would be the addition of some language making it acceptable for the part to have visible seams as they were constructed for the movies. We understand not all armour makers can facilitate that so the hopes are the LMO's will deem both acceptable. HIGH IMPORTANCE Last Years Detachment Shirt Run As you are aware, last year saw a rather large run on detachment shirts. Due to the increase in quantity a further price break was reached so there is a remainder of monies left over. Mark who helmed the run will be creating a new thread for all those that purchased to chime in on whether they would like a refund of the small difference or would like to donate their couple of bucks to charity. We are thinking MAW (Make a wish) would be the best charity to support as it fellows in the footsteps of the recent Legion Order 66 fund raiser . Make sure you do take the time to chime in on that post as it will only be open for little over a month. If you do not make comment on Refund or Donate, it will be assumed you are happy to have your amount donated. We will be posting the final amount donated along with a copy of the donation receipt once this is done. It's Pride month so feel free to fly your Pride colours and share your patches coins and designs. Aside from it unifying, us you've got to love the rainbow colours brightening up the place. While we talk about brightening up the place, we have done a small tidy up of the Replica section and introduced a new banner for the department. (thanks for the design gmrhodes13). As we have done with the First Order Battle Group, we will continue to move through the term rejuvenating the forums section by section. Stay well, stay safe and see you all again for next months edition. With Unquestioned Loyalty Andrew Franke TK11469 "Sly11" Detachment Leader With Unquestioned Loyalty Tony Jobe TK10116 "ukswrath" Executive Officer With Unquestioned Loyalty Tim Waychoff TK51878 “Dark CMF” Executive Officer With Unquestioned Loyalty Steve Sheades TK10466 "starsaber25" Leading Provost Marshall With Unquestioned Loyalty Chris Pearson TK10991"themaninthesuitcase" Provost Marshal With Unquestioned Loyalty Aaron Gibson TK99725 “Pyrates” Provost Marshall New Deputy Deployment Officer! On behalf of the entire Command Staff, I would like to take this opportunity to welcome the newest member of the Deployment Officer team! As a Centurion level TK, Mario (TKSpartan) has proven himself time and time again with solid, practical advice for those not only starting a build, but for those aiming for higher levels as well. Dueto his armor knowledge, constant presence here on the FISD and willingness to help one and all he now joins the Command Staff as Deputy Deployment Officer, so please help me in welcoming him. Congrats, Mario!! ATTENTION: Future Expert Infantry level TKs! Due to Rebel propaganda, we as Stormtroopers are (unfairly) notorious for our "inability" to hit a target. BUT, one we will definitely be hitting a bullseye on this year is the 1000 mark for those earning the Expert Infantry badge! As you may have read, we have ONLY 31 spots left to be a part of this milestone in FISD history, and you can be a part of it! We as D.O.s as well as the rest of the Staff and Detachment are here to help you do what it takes not only to get that badge under your name, but to have a much better looking set of armor! DON"T Forget! We have a special one-of-a-kind merch item that will accompany this milestone! One thing we ask is that you take a look at the following links before submitting, and if you have questions, just ask. If you have any specific concerns, always feel free to PM either of us... we are here for you! @justjoseph63 @shashachu. 1. March to 1000 info.- Link 2. CRL page- Link 3. EI/Centurion info- Link 4. CRL quick reference guide (OT)- Link Deployment Officers With Unquestioned Loyalty Sha Sha Chu TK-19233 "shashachu" Deployment Officer With Unquestioned Loyalty Joseph Pedigo TK-10963 "justjoseph63" Deployment Officer Deputy Deployment Officers With Unquestioned Loyalty Mario TK-48117 "TKSpartan" Deputy Deployment Officer The FISD is pleased to announce the addition of a new area in the Advanced Tactics forum dedicated to those ready to submit for basic 501st TK approval. This section will allow future Troopers the opportunity to submit photos of their completed build to be reviewed by the Staff, Imperial Attaches and others in preparation for forwarding it to their GML for approval. Any and all advice/suggestions given will be specific, constructive, helpful and respectful. Please note that this program will NOT take the place of your local GML, as Detachments are not chartered for costume approval and can not override a GMLs decision, but is instead a peer review program designed to help you look your best and offer guidance and positive feedback. You will have the opportunity to ask questions about your completed armor, weapons (if applicable), accessories, etc. and get accurate information from the experts here at the FISD.. the definitive home of TKs worldwide. For more information on this program, please visit the link here Contributor Awards Greeting fellow Troopers, Don't forget to visit our 3D section when next surfing the FISD forums, there is plenty of useful information to potentially help you on your next TK adventure. You may be a designer wishing to showcase your latest designs or prints, or maybe looking for a file to print your very own Blaster or Laser Axe. You might be feeling may generous and share with our community a new TK related 3D file and maybe win yourself a 3D contributors award so check out the details below and be part of the in house 3D community. Keep your eyes on this guy: Bsati from the German Garrison is working on updating his TFA helmet files, he's making great progress and we truly appreciate his transparency and skills shown with his work. Keep up the great work Trooper Take a look at his progress. Main forum title: 3D Parts and Technical Sub topics: 3D Printer owners Your place to discuss what printer/s you own, recommendations, tech talk and the like, It’s a place to learn something new 3D CAD Designers Home of talented 3D cad designers, show off your 3D renders, of FISD related costume parts and accessories. Offer help and advice on programs, or offer to commission a piece for a fellow member 3D File Depository A home for 3D file sharing, Troopers helping Troopers is what this section is all about; yes a single location to keep any 3D files offered up by our extremely generous membership. This will be a 501st member’s only section and rules will apply to any usage of the content. I will be looking for content to continue the growth of these new sections so If you are interested in helping drive the 3D forums, then please send me a PM and let’s get the threads and the filament flowing. 3D printer heads will understand that last comment Here is a link to the FISD 3D Contributor program. Don't forget to create a troop log here on FISD and get awarded for your adventures The list of accomplished troopers keeps growing, so get on board and register your troops today. We understand not everyone can help build multiple sets of armour for their fellow troopers, nor own a 3D printer or have the time and skill set to design and offer free 3D files to the detachment. There is however one thing we all can do, and that is troop. Here is your opportunity to stand and be recognised for simply trooping in your TK. We're rolling out a new award system to encourage and reward our members who take the time to post up their field training exercises and keep a troop log. As you attend events and post logs, you'll earn these shiny profile badges, here are a few: Keep the troop logs coming folks, not only can you earn the badge but you can show others your favorite troops. You know we love photos here on the forums. Simply start (or update!) your troop log, keep the running total in the title, and post (at least!) a date and name for the official 501st event where you wore your TK! Once you've hit a milestone count, go over to the "Field Exercise Awards -- Post your milestones here" thread to request your profile be updated! Simple, right? Troop log title examples: Milestone post example: Milestone and Troop Log Title: [100] TK12345 My troop log Date and Event: 8/23/2019 -- Death Star Cooking Class FAQ: Do my past troops count? Yes! You can update your troop log thread with all your past events for credit Is there any costume requirement?You have to have attended the event in a costume that falls under the First Imperial Stormtrooper Detachment for credit. We love pictures from any events with white armor though, so even if you attended an event in another costume with stormtroopers present don't hesitate to show off!Do I have to include pictures?Pictures are not required, but are highly encouraged! Your picture may end up in the Stormtrooper Hall of Fame Award Recipients May - June --- TK14057 "JODOKAST" Marcus - --- --- --- --- --- --- --- Congratulations troopers The FISD Master Armorer program is an optional, detachment only incentive award to recognize individuals who have directly helped another 501st stormtrooper to achieve Expert Infantry status. Some people spend countless hours helping others, and want to reward their results as well as incentivizing new people to help as well. To register a “win” in the program, the assistance must have provided hands-on help trimming, building, and/or fitting of said armor for the person who was awarded Expert Infantry status. Other program notes: • Helping remotely, giving advice, or taking payment in exchange for help does not account, all work must be voluntary and without expectation of compensation. • The assistance must be for a period of 30 minutes or more. Spending 15 minutes tweaking someone’s fitting or taking photos does not count. • "wins" can be retroactive, e.g. if you helped 5 people in 2017 already, those can count as long as they are fully documented. Award Levels • 5+ “wins”: FISD Armorer Badge • 15+ “wins” FISD Senior Armorer Badge • 25+ “wins” FISD Master Armorer Badge The process • Person applying for the award will create an application thread to track the help they give. • For each “win”, they will list the person they helped achieve Expert Infantry status by copying their EI approval thread. • For each “win”, the person who was helped will validate that this person helped them. You can find the master award area here https://www.whitearmor.net/forum/forum/182-fisd-master-armorer-program/ With Unquestioned Loyalty Dan Branton TK429110 "CableGuy" PRO Replica Section Curator With Unquestioned Loyalty Daniel Melin TK99665 "TheSwede" PRO Replica Section Curator What is the First Order battle Group why have we created it: This is your one stop home for all things related to the First Order Stormtroopers. What you will find within these corridors: CRL's, Build threads, vendors and accessory lists, Howto guides, plenty of recommendations & valuable resources to get you up and running ready for battle. This section has been designed to keep it simple when researching your first build or adding to an existing costume. No more digging through countless pages of OT TK threads to find all your First order needs. This new section will continue to grow as we relocate FO specific information into this truly dedicated section of our forms. Our First order members and newbies are a very important part of our community and as promised in my Election speech, we are moving forward in giving them an easier path to costuming excellence, a much more visible and dedicated presence, and as the section statement expresses, no more digging through tons of OT stuff you don't need, to find what you do. I really hope this does make life easier for many from this day forward. If you wish to view the First order section as its own forum, simply click or double click on the gray bar at the top in the forums section and it opens with the above graphic and header info. Stay tuned for more forum changes and upgrades down the track. Post from 501st legion forum: https://www.501st.com/forum/viewtopic.php?f=11&t=106862&p=1352596#p1352596 The last drive in 2015 raised funds to cover the Legion's hosting bills for the period of February 2015 through August 2020, and it was a drive for only 501st.com. It is time for us to pass the bucket again - combining the drives for the Legion and six hosted detachments. Our first goal is just to keep the lights on for one year for 501st.com and the six detachments (FISD is one of those), no contract, paid month to month. Our second goal would allow us to lock in a contract with some price savings for three years, while our third (stretch) goal would allow us to go beyond that as well as explore other services and/or enfolding more detachments (if they choose) under the AWS account. Please make sure you are logged into the forums, and then take a moment to visit the donation page, and make a small contribution to help fund the site: https://www.501st.com/donate/ There you will be able to make a donation and see how we are progressing at meeting the goals for this drive. If anyone has any questions - feel free to post here, or to email us at [email protected]. Thank You! ~C Rhaethe Legion Webmaster NOTE this is open to members and no members alike, anyone can donate "troopers helping troopers" as of 15th June With our worldly reboot underway - I welcome all of you back! A super huge thanks to all of the many frontline workers, emergency staff, healthcare, food supply outlets, and transportation - my bucket off to all of you for rising to the occasion of what needed to be done not to mention your ongoing efforts today! Please welcome TK - 19511 Freddy to the Stormtrooper Hall of Fame! https://www.whitearmor.net/forum/topic/47884-21-tk-19511-troop-log/ With Unquestioned Loyalty Aaron Gibson TK-99725 "Pyrates" Curator Hall of Fame For those of you not aware the legion held an online event "Order 66" on the 6th of June across it's social media platforms which featured videos from detachments, garrison's, members and friends of the legion. If you missed it here is FISD's contribution: Well done to all involved in the project. If you would like to see more either head over to the legion's Facebook, Instagram of YouTube pages. Star Wars Stormtroopers secure Disney Springs with new Social Distancing Measures Challenge Coin Rules Are you new to the FISD and wondering what the heck all those abbreviations and strange sounding terms mean? To help you @justjoseph63 has started a list of the most commonly used ones that will give you some insight. If you have ANY questions about a particular term that is not listed or suggestions for new ones please contact Joseph. You can find the list here: Serve proudly, ladies and gentlemen, and as Tim (Dark CMF) says: "Keep doing what it is that got you here"! Are you an approved TK that spends more time on the boards than the average Trooper? Do you enjoy using your knowledge to help out future and existing Troopers? If so, we would like to invite you to join the Imperial Attaché program! Members of the I.A. team are chosen to help out not only those here on the boards, but on a local level as well. Our aim is to have at least one in each and every Garrison, Squad and Outpost in the entire legion to be the eyes and ears of the FISD on a local level. A suggested level of EIB or above is preferred, as part of the duties include assisting those aiming for levels 2 and 3, but is not a requirement. Being active on the boards on a regular basis , welcoming new members and helping out where you can is, though. Some of the benefits: 1. Access to exclusive Attaché merch., including patches, etc. 2. Having the Imperial Attaché title under your name. 3. Being a part of the team that welcomes new and prospective members of the FISD. 4. Being the "go-to" person in your Garrison, Squad or Outpost. 5. Exclusive access to the Attaché HQ area, Imperial Propaganda Machine (newsletter) and merchandise discussions. We are currently in need of Attaches in many units, especially International Garrisons/Squads and Outposts. For more information on this program, please head here and if you should have any questions or concerns, feel free to contact me at any time. (Pretzel) For a complete list of Imperial Attaches, go here IMPERIAL ATTACHE AWARD Imperial Attaché Award for those attaché's who have gone above and beyond [minimum 1 year of service] You can find a list of prior recipients here ATTACHE MERCHANDISE Attaché Patch For those of you on the Imperial Attaché staff, the official I.A. patches are available Here are the details.. PLEASE READ CAREFULLY! Patches will be limited to TWO per person, and will only be sold to those who are currently serving FISD Imperial Attaches. These patches have been graciously DONATED to the FISD, so all you will need to do is cover the cost of shipping and PP fees, which will be $1.00 each for those in the U.S. and P.R. and $1.50 each for those outside the U.S. What a deal! Thank you Joseph @justjoseph63for looking after these. You can find the thread here ATTACHE ROCKER For those of you on the Imperial Attaché staff, the official I.A. rockers are now available. Link below Attaché Ambassador As 2020 rolls on and gets more interesting the FISD community is moving along strong. Things are getting done and people are stepping up. I’d like to point out@Chemi and@Gooftrooper have been added as attaches. @Chemi a Centurion TK will be stepping up to help out with the Spanish Garrison. @Gooftrooper will be helping out the Dune Sea Garrison using his TK knowledge. Thank you all for helping out. We have a great community here and I’m glad to be a part of it. With Unquestioned Loyalty Frank Peranteau TK75139 "Frank75139" Attaché Ambassador So what exactly are EIB (Expert Infantry Badge) and Centurion levels? These programs were designed for those who choose to take their armor above and beyond the minimum requirements for basic 501st Legion approval. It gives you the chance to show a level of dedication and pride that takes your armor closer to being as "screen accurate" as possible, without as much extra work as you may realize! It also works on giving a better look to the Legion as an entity, and you can bet others will take notice of your hard work. The 501st has a list of detailed requirements for Basic approval, (level 1), EIB, (level 2) and Centurion, (level 3) which can be found here in the Costume Reference Library, (CRL) http://databank.501st.com/databank/Costuming:FISD_CRL Here are a few of the questions people may be wondering about: 1. "I am a (tall/short/heavy/thin) Trooper. Can I still apply? Of course! These programs are open and encouraged for all sizes of TKs, as long as the costume is correct and meets the guidelines. There are many specific build tutorials to every option, as well as a vast network of fellow TKs on the FISD to help you out and offer suggestions. 2. "How much extra will I have to pay for extra items"? The cost is actually quite reasonable, considering the few extra supplies you will need, which are listed in the requirements area. While it may run you a little more to implement these additions to your costume, they will go a long way to improving accuracy. All needed items can be found for sale on this thread: https://www.whitearmor.net/forum/forum/16-ongoing-sales-project-orders/ While blasters are not required for basic approval, for EIB and Centurion levels they are, and may need upgrades (also listed in the CRL). 3. "I haven't even got my kit yet, is it too early to start planning"? Actually, aiming for Centurion is easiest to do right out of the box. 4. "I have my basic TK approval, can I still get in these programs"? In a word... absolutely! 5. "Are there any "perks" to this extra work and cost"? Besides knowing that you have a great looking set of armor, the 501st and FISD believes you should be deservedly recognized for your achievement(s), and allows you to wear the appropriate embroidered "rocker" badge of rank (available for a very minimum cost) on your shirt, helmet bag, etc., as well as rank decals to put on your armor bin. You will also have access to select "challenge coin" runs, receive (free) a cool certificate for your new rank, and have your title posted below your name in your FISD signature. Plus, once you reach these levels, you will have the extra knowledge to help out those who are looking to apply as well. 6. "Is it hard to apply, and what happens then"? After basic approval, all you do is make sure your armor is up to the standards set forth in the CRL, post a thread with the required photos in the appropriate area (see below), and wait a bit for the D.O.s (Deployment Officers) to address it. (Hint: Studying other people's threads before you submit can be a GREAT help). These are also listed on the main page of the FISD site. While waiting for approval, you will get some comments from others who will offer suggestions and constructive advice to help you out. If you should need any changes, the DOs will let you know, so you can adjust accordingly. Don't be dismayed if you do need changes... it's all for your benefit! After you are approved for EIB, then you can submit for Centurion. EIB https://www.whitearmor.net/forum/forum/19-request-expert-infantryman-status/ Centurion https://www.whitearmor.net/forum/forum/72-request-centurion-status/ Just remember that the FISD is here to help you every step of the way with whatever other questions you may have, but if you can't seem to find what you are looking for in your research, just ask away here on the forum. This area lists all those who have gone above and beyond basic approval toward screen accuracy. FOR May - June the 1st Imperial Stormtrooper Detachment would like to congratulate: Expert Infantry Badge Award: Eric "GoofTrooper" TK37423 EIB 966 Jasper "merkava74" TK7867 EIB 967 Peter "4Runner" TK33348 EIB 968 Ashley "arobertson" TK21864 EIB 969 GREAT job on your approval, now on to Level 3! Request your free EIB certificate here Centurion Badge Award: Eric "GoofTrooper" TK37423Centurion 465 Justin "TheRascalKing" TK61490 Centurion Approved Outstanding job on reaching Centurion, Troopers! Request your free Centurion certificate here If you see any of these Troopers around your Garrison or Squad, be sure to congratulate them! ONLY 31 SPOTS LEFT, TROOPERS, SO TIME TO STEP-UP! Now that many of us are unfortunately stuck at home and boredom is beginning to take it's toll, it's time to wipe the dust off of that armor bin and become a part of FISD history! Instead of binge-watching re-runs, we are suggesting that you put the D.O. Staff to the test and spend some time on that white armor you miss wearing so much by applying for your Expert Infantry badge! As you may be aware, we are aiming to have #1000 approved by the end of the year. We only have 31 to go, so in order to reach that goal we are asking that you read over the CRLs for your particular armor, (this thread will help) make any necessary adjustments and post up your submission! Photo Checklist- Link here Apply Here Questions: 1. Not sure if I have what it takes to get my EI badge- You don't know until you try, and you have not only the D.O. staff but an entire Detachment to help! 2. I need some repairs/fixes first- This is why we are here! We honestly want you to succeed and are here to help in any way we can. 3. I am happy with the way my armor looks, so why bother?- It not only makes you look more screen accurate, it instills a sense of pride and "esprit de corps"! 4. What if I don't make it? No worries, we will provide detailed suggestions on how to reach your goal! Benefits: 1 Bragging rights for being one of the "Original 1000" 2. You get a cool badge under your name here on the FISD. (Street cred). 3. Access to EI rocker badges (coming soon) to go above your FISD patch (also coming soon)! 4. Access to coin runs for EI awardees only. 5. Certificate for your accomplishment. 6. You'll be one step closer to Centurion! 7. Most importantly, having a more screen accurate looking set of armor!! Know that the entire Staff and those who have reached Levels 2 (and 3) are here to help in any way we can, and that you are more than welcome (and encouraged) to ask any and all questions you may have here on this thread, or contact myself or Sha Sha. There will be a very special piece of merch available for when we hit the 1000. Something to celebrate this auspicious occasion. It is already in the design phase, and will honor the old and the new. It will be a one off run as we only get to celebrate this milestone once, and I know you wont want to miss out. You can do it, Troopers. Let's turn this "anno horribilis" into a banner year for the FISD! 31 and counting Greetings Troopers. The Fire Team program is completely optional, and is intended to help form a common identity and spirit of camaraderie among 501st Legion stormtroopers in the same geographic area/garrison that troop together. Fire Teams are not officially recognized by the 501st Legion nor the FISD, although they will be able to access a Fire Team sub-forum on the detachment website. Because Fire Teams are unofficial groups, they cannot have any 501st or FISD markings, including 501st Legion, 501st, Legion logos, Vader's Fist etc. on their branding or logos. However, Teams will be allowed to use any unique markings at informal events provided they follow these guidelines. Guidelines No 501st or FISD markings. Period. Any active Legion member with a valid stormtrooper costume in the specified geographic area can join. The Team can create a name, logo, backstory, etc. for itself (names usually contain Fire Team, though this isn't required). A list of each Team (with their specific "Teams Name") with a current list their members will be kept in the Fire Team sub-forum on the Detachment website. A Team member must troop at least twice per year to maintain status as a member. Two or more Team members must troop together once per year to keep the group active. Merchandising Again, no 501st or FISD markings. Merchandising will only be limited by the imagination of the Fire Team. Any merchandising should be submitted to the detachment, or through proper Legion channels. A master list of all Fire Team merchandise (with photos) will be posted in the Fire Team sub-forum. If any of these guidelines are violated, the group will be disbanded. Here is a link to the Fire Team area: http://www.whitearmor.net/forum/forum/130-fire-team-area/ 501st membership is needed to view this area. This is a great program that is strictly just for fun and it also allows fellow TK's get to know each other better. I would love to help any Garrison/area get a Fire Team started, just let me know what I can do to help. If you would like to register a Fire Team here is the link In other business, just a reminder, if you have an addition, removal or any other change in you Fire Team's status, send me a PM and I'll get you all squared away. Welcome to our 58th Fire Team: Death Star Veterans!! They are also the first Austrian Fire Team. Region: Vorarlberg / Austrian Garrison - Austria Name: Death Star Veterans Logo: coming soon Congrats Troopers!! For the full list of Fire Teams head here With Unquestioned Loyalty Mark Ryner TK4584 "captsafe66 " FISD/Fire Team Director 2019 Racing Shirt Refund or Donation PLEASE RESPOND ASAP Hello Fellow Troopers, As most of you know, there was a very successful Race Shirt run at the end of last year. At the very beginning of taking orders, we were told by the manufacturer that they would offer discounts on the shirts if the numbers being ordered hit certain price break tiers. In the end, our shirts went from being $39.95 for Mens and Womens sizes, and $34.95 for Youth sizes, to $34.95 for Mens and Womens and $29.95 for Youth. I want to say first, that I am sorry I have not been able to process these refunds as fast as I would have liked to. From here on out, I am starting a new thread asking those of you that have not already received a refund, if you want one, or you can donate your refund to the Make A Wish Foundation. When this new thread is open, I will then begin to see who wants a refund, or who wants to donate to charity. Respond in this thread This process will take time, so I am asking for even more of your patience, as I have to cross reference the orders from the main list and what each order is in my PayPal. In the refunds that I have already processed, I am finding that they are only equaling out to $2 or so, after PayPal charges me a fee for processing each one. I thank you all for your patience moving forward on this. Please bear with me, as I try to work out the responses on this new thread. Mark "TK-42134" TK42134 Newsletter If you have any interesting stories or photos or something you think newsworthy please send them to me via pm @gmrhodes13 With Unquestioned Loyalty Glen "Q" Rhodes TK-85421 "gmrhodes13" PRO Newsletter Social Media With Unquestioned Loyalty Jim Ferrel (Rat) TK95970 "Rat" PRO Social Media With Unquestioned Loyalty Teresa Nuthall TK41307 "Soulart" PRO Social Media Editor At Large With Unquestioned Loyalty Daniel Lauber TK55550 "Ripper_L" PRO Editor at Large Staff List 2020 Detachment Leader (DL): Andrew Franke (Sly11) TK11469 Executive Officer (DXO): Tony Jobe (ukswrath) TK-10116 Executive Officer (DXO): Tim Waychoff (Dark CMF) Deployment Officer (DCA): Joseph Pedigo (justjoseph63) TK-10963 Deployment Officer: (DCA): ShaSHa (ShaSHaChu) TK-19233 Deputy Deployment Officer: (DCA): Mario (TKSpartan) TK-48117 Lead Provost Marshal (DCOG): Steven Sheades (starsaber25) TK-10466 Provost Marshal (DCOG): Chris Pearson (themaninthesuitcase) TK-10911 Provost Marshal (DCOG): Aaron (Bronx) Gibson (Pyrates) TK-99725 Fire Team Relations (PRO): Mark Ryner (Captsafe66) TK-4584 Personnel Officer (PER): AC (Novatie) TK-5597 Content Editor At Large (PRO): Christoph (Danny) Lauber (Ripper_L) TK-55550 Content Editor Awards (PRO): This will be handled by the XO’s Newsletter Publisher (PRO): Glen Rhodes (gmrhodes13) TK-85421 Attaché Ambassador (PRO) Frank Peranteau (Frank75139) TK-75139 New team member Social Media Relations (PRO): Teresa Nuthall (Soulart) TK-41307 Social Media Relations (PRO): Jim Ferrell (Rat) TK-95970 New team member Imperial Propaganda Machine: Brien Edick (Harbinger) TK 92802 Imperial Propaganda Machine: Eric Ho (Hoda) TK 77520 Systems Administrator (DWM): Eric Brager (Darth Aloha) TK-9674 Systems Administrator (DWM): Mathias (Locitus) TK-2959 Detachment Founder (DF): Paul (Daetrin) TK-8020 Replica Section Curators (PRO): Dan Branton (CableGuy) TK-42911 Replica Section Curators (PRO): Daniel Melin (The Swede) TK-99665 Don't Forget We're on Facebook, Twitter & Instagram Facebook: www.facebook.com/whitearmor Facebook Group: 1st Imperial Stormtrooper Detachment (FISD) Official Twitter: www.twitter.com/FISD501st or @FISD501st Instagram: www.instagram.com/fisd501st On behalf of the 1st Imperial Stormtrooper Detachment Command Staff and the Imperial Propaganda Department1 point
-
It's been a wild ride. I started this journey on November 11th 2019 and completed it (never complete) at the end of May. My little printer (Ender 3 pro) ran pretty much 24/7. I went through roughly 26 rolls of fillament. I do have a box of bad prints (haha). I will continue to work on getting his periscope to work. I can already see that I may need a larger power amp. I am currently running 20w but talking to some of the droid guys they seem to be running 50w min. I also will work down the road at adding an effect to making his arm extend and using some LEDs to make it look like a zapper. Who knows. As usual thanks to my brothers and sisters in white armor for the support. Here is a link to my facebook account if anyone wants to see him moving with some sound. I was trying to video and move him so it's a little (a lot) wonky. Thanks again!!1 point
-
Latest fitting, with a few minor mods - V-tabs added - Thanks @gmrhodes13 for the advice - Calf closures completed - Thanks @Cricket for the tutorial and advice! - Back of thigh mobility trims - Cheers @Chemi - Forearms mobility trim - Internal strapping adjustment (Also misplaced an ear screw, so I purchased some: Brass Metric Flat Head Slotted Screws M3.5 x 0.6 x 30 from https://www.spaldingfasteners.co.uk/, which match the RS Prop Masters perfectly) No butt flare! Better alignment on the split rivets below What's left? - New Belt, as this one is too small, the velcro doesn't overlap. - Belt snap covers to be added - Paint the thigh split rivets - V-tabs on the far sides of the butt plates - Install the Aker comms - A general tidy up of any joins and I think I might be ready for submission.1 point
-
I have GOT to stop watching things like this while I cut onions.....1 point
-
I'm not crying, you're crying.... move along nothing to see hear....it's hay fever, I'm sure it's just hay fever. That was very touching Christine, your boy has a heart of gold you must be so proud. Thank you for sharing.this amazing story.1 point
-
4 words: Mom of the YEAR!1 point
-
COSTUME INFORMATION Armour, Helmet and Neck Seal: Anovos TFA Gaskets: Imperial Gaskets (rubber) Belt: Belts of the First Order Hand plates and Holster: R2Dan Boots and Gloves: Imperial boots Undersuit: Stormtrooperundersuit F11D Blaster: Resin kit (Justinian) Name: Jasper Tan Height: 170cm Weight: 80kg TKID: 7867 Garrison: Singapore Garrison EIB Approval: APPLICATION PHOTOS FULL BODY HELMET ARMOUR DETAILS NECK SEAL CHEST, YOKE AND BACK THERMAL DETONATOR SHOULDER AND ELBOW GASKETS SHOULDER BELLS BICEPS FOREARMS GLOVES AND HAND PLATES ABDOMEN COD AND POSTERIOR BELT UNDERSUIT THIGHS KNEE GASKETS KNEE PLATES SHINS ANKLE SPATS BOOTS F11D HEAVY RIFLE ACTION SHOTS Here's my submission for Centurion. The photos are largely the same, except for an additional helmet photo showing that the tube stripes are fully cut out, and also some different action shots. For the DO's kind considerations, and do feel free to ask me if you need any clarifications, thank you!1 point
-
Awesome! Time to get to work. I wasn't sure if should even attempt it but now I know I should! Since the only difference between his armor and a regular FOTK is the color I might as well start a build thread for the majority of it on here so I can get help if I need it.1 point
-
I imagine that since it comes from a canon source, it is approvable - once the CRL entry for him is written. That also means *someone* has to be the first Cardinal - hint, hint.1 point


.thumb.jpg.77bd551337f7adc46a4b151e703df6be.jpg)