Leaderboard


Popular Content
Showing content with the highest reputation on 05/26/2020 in all areas
-
I just got my Cassian Andor jacket shipped today... After 2 and a half years Sent from my CLT-AL00 using Tapatalk3 points
-
Hey party people, Justin "TheRascalKing" R. here. Decided to do another fun little side project with my Anovos ANH-S TK before retiring it and... convert to ESB! This was originally intended to be done in time for Celebration 2020 and the 40th Anniversary of The Empire Strikes Back, but it's looking that isn't going to happen now, so I guess no rush? But I recently started step #1, which was acquiring another Anovos helmet that I feel better about painting up. Not a huge deal, but my original ANH-S helmet is getting pretty beat up and I'd like to retire it without major changes before it's completely destroyed, seeing as it was technically screen-used and all. I was fortunate that a Garrison mate of mine had an Anovos helmet laying around that he sold to me for a great price! So, slowly but surely (wrapping up my Anthology build as well as my HWT Centurion push) I'll start modifying this helmet to convert it over to ESB, as well as my armor. My checklist is as below, but please feel free to comment if I've forgotten anything! It should be noted that this kit was previously approved at the Centurion level as ANH-S a couple years ago, and as HWT more recently, so I'll be focusing on the changes between ANH-S and ESB - the rest of the armor should already be up to snuff. This is also a screen-used kit, so no changes were made to the base suit - anything different for ESB is new parts. Helmet: - Remove all existing paint (except ears, no need) *reconsidering, as the decals are lighter grey... Apparently, this is appropriate. - Replace painted traps, tears, and tube stripes with decals from Trooperbay (unless there's something that fits Anovos helmets better?) - Repaint frown satin black, extending slightly further - Paint interior black (personal preference) and add padding/fans/audio - General Centurion upgrades (replace ear screws with proper countersunk flathead from @justjoseph63's accuracy kit, replace mic tips with @ukswrath ones with white lip/interior and proper mesh, open up the return around the eyes...) Armor: -Belt - new white canvas belt from Imperial Surplus to get rid of my 2 holster mounting holes - Holster - new holster from Darman's Props - black loops instead of brown leather straps and Chicago screws, worn on left side - Gloves - satin gloves from Amazon - Handguards - snowtrooper-style handguards (I sourced a set from AM that I'll trim down) Here are a few side by side photos of a fresh like V3 Anovos helmet (left) vs my Centurion-modified V1 after 3 years of trooping (right), for fun. The newer helmet (that has the LFL branding stickers) is noticeably thinner than my V1 and has a couple other changes from the factory, most noticeably the sharper ear bumps and thinner plastic. It is lighter tho... Thanks for stopping by, more updates in a bit!2 points
-
Thanks! Right?! And with the 40th, it's great timing! Would be awesome to see a bunch of ESB Stormtroopers at Celebration (even if it's next year...). Plus, this gives me my next project to work on and keep my mind busy without having to put money I don't have into a totally new kit I don't need haha I just reeeeeeeally didn't want to paint over my ANH helmet, so finding this one was amazing. They're getting up there in price for NIB Anovos (cheapest I found was $240!) so I'm stoked a Garrison mate (and fellow R1 builder!) hooked me up. Any suggestions on what to use to remove the stock paint? I only have acetone on hand (LOL!) so I was thinking... mineral spirits?2 points
-
You're doing a great job so far. For the rivets go the other direction and let the nub sit on the inside. I'd also recommend a rivet washer for the backside. More coverage for holding the better. Keep up the good work and we'll keep following along. You're getting there!2 points
-
Thanks for the tips! The dashes are my cut line to get to 20mm for my next test fit. I will make sure to trim the edges on the forearm and bicep to follow the curve and reduce any pinch points.2 points
-
Sanded down the putty to 220. Taped the openings from the outside. Looks weird lol. Here's the interior before primer. And after. I think I'll give it until tomorrow before I sand the inside to 400. And then I'll (hopefully) brush paint some black acrylic in there!2 points
-
And I'm approved! Gonna be submitted for EIB soon!2 points
-
Mineral spirits would definitely be a lot more gentle than acetone, usually acetone doesn't work with plastic very well and can melt. I do love the black teeth and do get asked sometimes "why does that one look different", but only a few ask1 point
-
Neck seal may cover it, could also go over with a permanent marker1 point
-
Nice project Justin, enjoy. following your thread now.1 point
-
Just used some abs plastic I had and cut them into rectangle pieces and glued to the armor with E60001 point
-
Caleb- I'm right there with ya. I grew up on the OT soundtracks so I'm heavily biased in that direction. But I am also a big fan of some prequel tracks from TPM and ROTS (Duel of the Fates, The Droid Invasion, Anakin's Betrayal, and Anakin's Dark Deeds come to mind). For the water bath, I'll try that 5 gallon bucket suggestion. I was hesitant to put near-boiling water in a thin Home Depot plastic bucket, but it looks like the HDPE material can withstand 110 C for short periods of time. Justin- I appreciate the feedback. I'll go grab some standard 1" velcro instead of using my Anovos velcro. For the rest of the armor, I'll be using Tandy snaps, employing double snaps, nylon, and elastic similar to your setup. Recent Progress: I was able to spend a decent amount of time working between yesterday and today. I finished trimming my thighs (only one required some adjustment), and I glued an inner cover strip to each piece, choosing the slow route so assembly is easier. After 24 hrs, I glued one of the thigh pieces together in the front. I'll wait for this to dry before gluing the back, and finally the outer cover strips. I also glued inner cover strips to the outer joints on my forearms. With all of my clamps and magnets in-use, I decided to start on my HWT ammo pouches . Here are all four, as delivered, with foam inserts. I started by removing all foam inserts, cleaning up the mess they left in the pouches, then I wrapped the foam in electrical tape to water proof and contain the foam from further degradation. Next was cleaning and conditioning the leather pouches, as they came with some marks on them. I used some leather products from my car detailing bucket and I touched up my Imperial Boots while I was at it. Lastly, I sat down with a pen and starting coloring the white stitching black (it took me around 45 min to do the one on the left). One down, two to go. Next up: Finish the thighs over the next 3 days. Then I'll clean all the excess glue off all the limbs to tidy things up. Glue reinforcement strips around the torso pieces and then do another test fit. I still need to order my TKitell belt but I want to assemble and measure the torso pieces first to get the sizing dead-on.1 point
-
It's official. 501st Legion TK31564 reporting for duty. Dune Sea Garrison1 point
-
You may want to use some app to store photos and then post then via direct link. most in this forum uses Imgur. Here are 2 links that may help: https://www.whitearmor.net/forum/topic/42381-howto-post-images-in-threads-using-imgur-easy/ https://www.whitearmor.net/forum/topic/48799-posting-photos-using-imgur-101/1 point
-
Thank you all, guys!, Hope to be trooping soon :)1 point
-
They appear to meet all the requirements, but the only thing they may ding you on is that the manufacturer's name is very prominent on the heel. That would not be acceptable for L2 as a regular TK. That could probably be sanded off, and they could definitely be polished for a better shine.1 point
-
Hello all, sorry for the slowdown on updates, I have been busy getting my new Etsy store up and running. What is the best way to attach the belt box halves together? Thanks! https://i.imgur.com/W7I5vP8.jpg1 point
-
Yes, as @magni says, "For the rivets go the other direction and let the nub sit on the inside", and cover the nub with something soft so it doesn't scratch the armor...
 1 point
 -
Yep it’s very different from my tie helmet and seems that I can only get it on when it is turned to the right.... Sent from my iPad using Tapatalk1 point
-
Great to hear you are still building, looking forward to seeing some images1 point
-
First, when putting your bucket on know that it NEVER goes straight on, but goes on at an angle and then gets straightened up so that you can see (somewhat) clearly.1 point
-
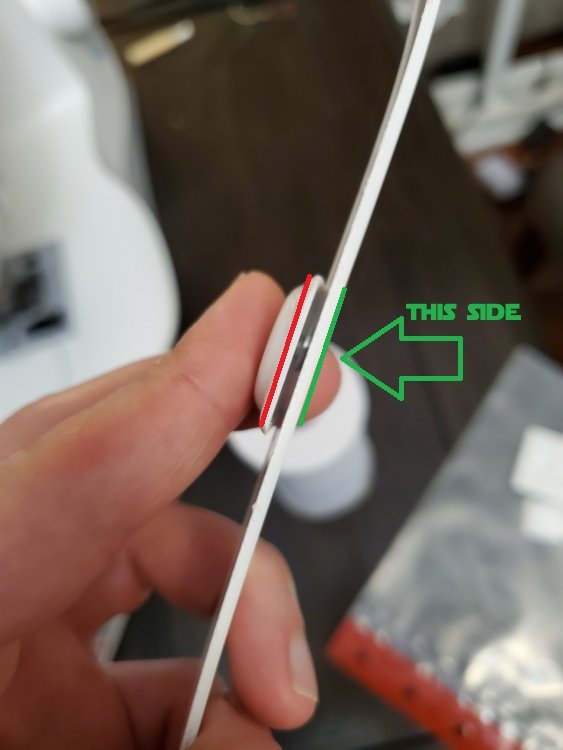
If I may offer a couple of tips, they would be these, Ryan.. First, know that your arms will be bent most of the time while trooping, and that point (red arrow) will poke into your arm, so I would suggest cutting it off. There are quite a few examples of this particular point being left on in the OT armor, but let's face it, sometimes we do extended troops and having that jab into your arm for several hours is no picnic. As long as the cover strips cover the seam you are golden1 point
-
I tested the fit on the bicep for 20mm cover strips and it seems about right to bend my arm comfortably. I got the left forearm and bicep marked to 10mm per side for the first cut. For these sides, is it better to use lexan scissors and even out with sandpaper or score and snap with clamps and a straight edge? Based on my initial trimming the score and snap requires less sanding but scissors would follow the line better with the curve of the armor.1 point
-
Powering along, nice work1 point
-
For covering the screws, i would recommend to trim them first, you can use a square of foam, glue it with superglue or zap a gap. Place a piece of Velcro to attach the lenses. This is a practical solution. another practical solution for padding and easy to clean after trooping.1 point
-
Maybe this topic can help you, but remember: "don't blindly follow them, check them on your armour brand, ensure it looks right. " Regards...1 point
-
Have your read through this thread, you'll find another maker listed1 point
-
Hi Pat and welcome to the FISD! Good luck with your build!1 point
-
Hi Pat, welcome to FISD, looking forward for your building thread.!1 point
-
Welcome aboard Pat.1 point
-
Welcome!1 point
-
Hi Pat, welcome to FISD...1 point
-
Hello and welcome aboard, looking forward to seeing a build thread from you soon, good luck1 point
-
You forgot the link. No problem https://www.501st.com/members/displaymemberdetails.php?userID=314821 point
-
Correct, and the facts remain... Recasting is bad for everyone Mark has proven his armor was recast by TM. People can choose to believe it or not. Garrisons and Detachments have taken their stand which undoubtedly will cause a rift in the force, for a while at least. A vote from the FISD staff by the end of the week will determine if TM remains on the vetted vendors list and a member of the FISD. FISD staff DO NOT promote one armor over another, our sole purpose is (as Caleb nicely put it) guide members/newcomers toward vendors who have a good reputation and deliver accurate and timely products, while not showing undue preference.1 point
-
I am working with him right now for a Mando visor. Been fine so far and Garrison mates have worked with him before.1 point
-
I will add, and also have this added to Joseph original post, but there will be a very special piece of merch available for when we hit the 1000. Something to celebrate this auspicious occasion. It is already in the design phase, and will honor the old and the new. It will be a one off run as we only get to celebrate this milestone once, and I know you wont want to miss out.1 point
-
Hi Paul. I'm in Maryland also. If you decide to do a build, you may want to get hooked up with some of us other TKs here in the area. It can seam a little overwhelming trying to do your own build , but the Old Line Garrison here in Maryland is full of some awesome people. They will offer a ton of advice and help. Best to get hooked up with one or two of the TKS that have done a couple of builds and live close to you. If you run into some issues then someone would be close by to offer some on the spot advice and help. It sounds like you have been in touch with the Academy. That is a great move on your part. Bryan and the rest of the staff know just what you need. Good Luck, and welcome aboard. Tom.1 point
-
Welder shield is correct. Mines from home depot or princess auto, as back up. Ata supplies it. When painting using stencils, paint a layer or two of white first and let dry. Then, paint the blue. If using humbrol, it needs. To. Be. Mixed. Crazy. Lots. Well. When you think its stirred enough, stir it more. Then more. Then a bit more. Then paint. I use chopsticks or wooden stir sticks.1 point
-
Hi there, where are you located in Canada? You should join your appropriate garrison's forums if you haven't yet. There could be armour parties in your area that could be very useful. Think everyone has answered most of your questions. Regarding the S-trim, I have looked at a lot of places with no luck. If there is an auto parts shop (Princess Auto here) then you may have luck finding something. Oh, and one small tip for when you put those tube stripes on: they should "lean" towards the front of the helmet, not towards the ears, and they should sit a pencil's width away from the cheeks.1 point