Leaderboard


Popular Content
Showing content with the highest reputation on 05/16/2020 in all areas
-
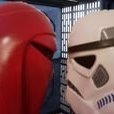
Well, that helped me rule out that this is not an authentic Anovos helmet kit. My pieces are not near that crisp or clean (around the edges). I didn't have any of the additional parts, and my ears are uncut. But to me it doesn't matter. This is my first armor and I want to drive forward and complete it.3 points
-
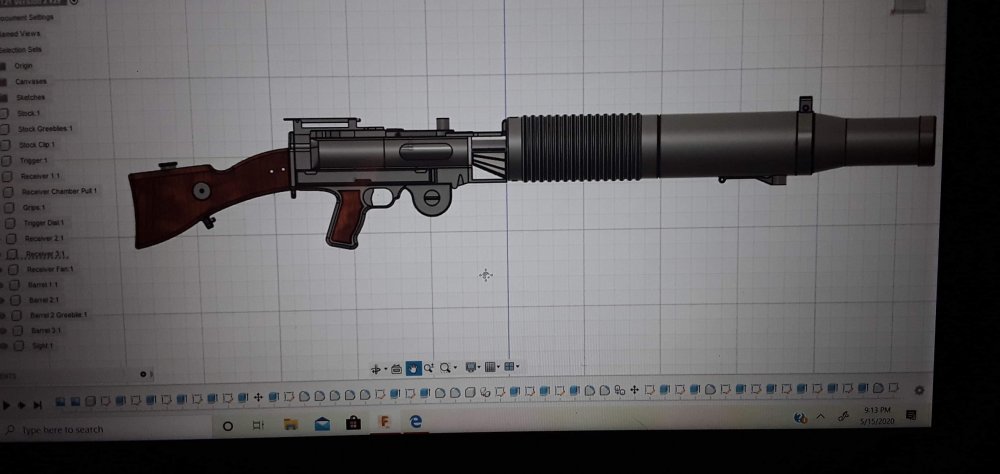
Well guys, it arrived and I was so excited that I had to put it together. Behold: Now I'll have ALL the firepower to wipe out the rebel scum.3 points
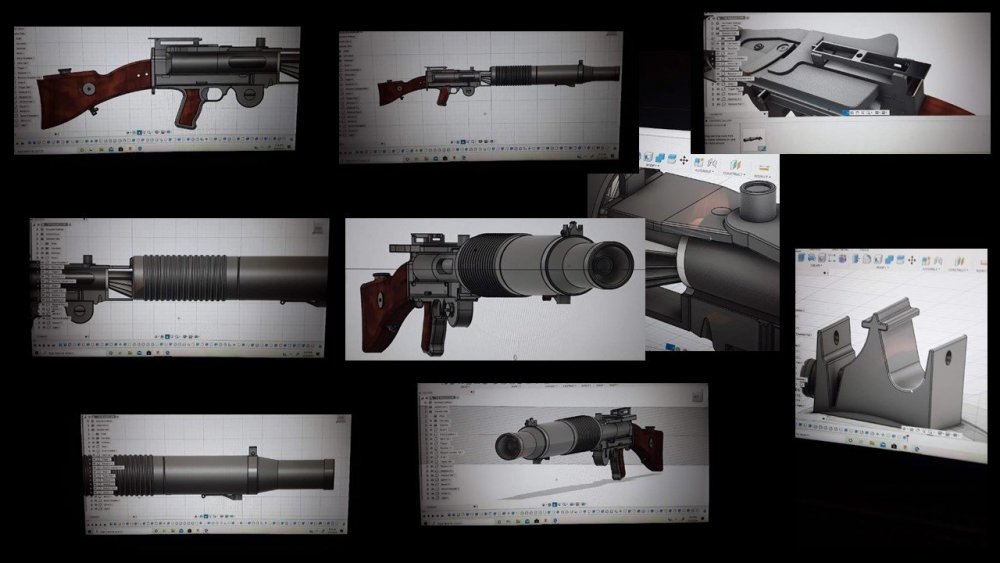
-
I am brand new to the forum, but had to reach out to the community. I finally, after 2 months of work, finished the modelling for a custom T-21. The first of 25 or so pieces is currently 3d printing. I really need more printers.
 2 points
 -
For cover strips I used metal ruler and box cutter to score/snap. Leaving a tiny extra for sanding. Sent from my iPhone using Tapatalk2 points
-
I used a similar pair of shorts, saved spending hundreds of dollars on a all in one setup1 point
-
Still looks ANH to me, apart from the screws there is also the grey teeth and trapezoid black lines which are ANH ROTJ1 point
-
What he ^^ said1 point
-
Now that's the spirit! Just keep posting pics and asking questions and you'll be a shiny white plastic spaceman before you know it!1 point
-
"The pin keeps bending while hammering instead of curling. Am I hitting it too hard? not hard enough? any tutorials on how to snap properly that I missed"? What I would try is this: Before hitting it with the pin, hit it with the point of a a philips screwdriver tip instead. This should split the shank into 4 strips, then hit it with the pin to flatten it..1 point
-
Welcome to FISD - home to every TK https://www.whitearmor.net/forum/forum/218-first-order-battle-group/1 point
-
And we're back in acton! Rebuilt with a Titanium heat break to help prevent future mishaps. Not surprised the old one broke, it took a lot of ignorance to get the old nozzle out of the heat block. The other half of the heat sink is very stuck in the heat sink, not sure how I'll get that out but it's not a big deal if I can't. For reference E3D are good people, and were very helpful with my screw ups. First print was meant to be the end of one of the yoke arms but the supports just were not sticking. Turns out the bed seems to have developed a bit of a warp, but nothing a couple of hours calibrating couldn't fix but blew out the available print time for the day. Back on with the back/yoke tomorrow. My Mk2.5S comes Monday so I'll probably swap to getting the upgrade parts for that once I get the back parts cranked out and swap out the warped bed.1 point
-
RS cleans up their bridges a lot better, and they come out of the box like this:1 point
-
Thanks a lot, comrades - I'm really very happy about this promotion!!!1 point
-
Welcome to Expert Infantry Daniel1 point
-
This is probably one of the best reply threads out there, but I do want to add my own two cents Helmet Interior This is such a personal preference. I've seen people put more money in to the insides of their helmet (painting, fans, electronics, speakers, etc.) than anything else besides the armor kit proper. My own helmets are as sparse as you can get - a foam pad on top and some mesh taped across the frown. Nothing else. A very empty helmet means a lot of air flow and at least where I live (Seattle area) no need for fans at all, even in the summer. The more stuff you put in the bucket the less air flow and more need for fans. Back in the day few people had speaker systems so it wasn't really thought of as mandatory and I didn't stand out for not having one, but these days nearly everyone has one and you will stand out if you don't, hence me going to speaker-up this summer. Its expected nowadays and at some point I wonder if they will ever become part of a CRL. I'm 6'0" am around 180lbs. ATA fit fine, though I did get RT shins (e.g. larger shins) as the ones out of the box were too short for me. For the DLT-19, if you ever find a hyper-firm one, get it. I had one, loved it, sold it, and have regretted it ever since. It's nice to be able to drop it and not care. Regarding thighs, IMHO I think people should just velcro the backs until they have trooped a few times to ensure proper fit and only then glue the backs (realizing that the velcro gives a little more space and give). I've seen enough times where people had to figure out how to unglue them as standing at home for a fitting is not the same thing as walking up/down stairs in armor, running in armor, etc. You may also want to get nomex gloves for casual events where comfort is more important than accuracy. Love the face mask, btw. For the holster, take care that you get one that won't make black marks against your left thigh - mine does and it's a pain. Good points about the neck seal from Justin. I've never worn a balaclava and hope to never have to, TBH, so getting a good neck seal is worth it. If you really want to DIY, sew it directly in to the underarmor top so you never forget to pack it with your kit (ask me how I know ). This is one of the most fun build threads I've seen in awhile, we should get a thread going of the best of the best as reference. So far this is excellent for any new timer to read through, and even us old vets.1 point
-
The pics of your 6200 mask look legit to me. I have a 6200, and it looks identical to what I have, including the model #s on the mask. The filter package also looks fine. I'm using different filters (the huge pink disc ones), but the ones you have pics of look similar to ones I've purchased and used in the past. I filled my kitchen sink with hot water and placed the holster in it vertically, keeping any areas that didn't need stretching (i.e. holster strap) above and out of the water. Soak it for about 10 minutes or so to make sure that the water fully penetrates the leather. I wrapped my E-11 in several plastic bags from the market and two large Ziploc storage bags. Once your holster is fully soaked, you'll want to stuff the wrapped blaster into the holster. It will be a very snug fit. To dry, I placed my blaster vertically on a towel next to a floor vent. It should dry out fully within a few days. Once dry, remove the blaster and plastic bags. Fit the blaster into the holster. If it's still tight (and it probably will be), repeat the soaking process again and add a few more bags. Your goal is to have the holster fit be snug enough that it holds the blaster well but can also be removed with minimal effort. This process can take a few soak/dry attempts. Once I got the holster fit just right for my blaster, I sprayed the inside of the holster with holster lubricant (check Amazon). It really makes a difference on how the holster reacts to the blaster!1 point
-
Congratulations Carsten!!!!...Next step, Centurion!!!!1 point
-
Congratulations!1 point
-
Hi Carsten, and thank you for your second EI submission! In the following review I will be going over items pertaining to your current submission, as well as those that will be required for Centurion level should you choose to apply. CRL and EIB Application Requirements: All required submission photos have been posted and I am very pleased to announce your armor displays all the necessary elements to qualify for Heavy Weapons Trooper Expert Infantry. On behalf of Sha Sha and myself, Congratulations! Other-Armor Fit/Assembly: In this section we review observations made by your fellow troopers and ourselves. Some observations may lead to suggestions to improve the overall look of your armor. Note that we consider both text (CRL) and pictures (screen caps/reference images) when reviewing submissions. First up, I gotta' say that it's a PLEASURE to approve a fellow HWT at Expert Infantry level, brother! You have a few issues in this area to work on, but nothing too major. Please note though that I have to consider not only the pics from this submission, but references from your ANH Stunt application as well. Also note that since this particular costume is based on ANH armor that references to that will apply. You are aware of the sniper knee behind the thigh, so we are good to go there. As seen below, the gaps between the shoulder bells and chest are pretty wide. We do take into account that Troopers come in all shapes and sizes, but if possible we would like to see the tops of the bells taken in to reduce that space. Video game reference image Just a strapping issue here, sir. Your right forearm could stand to come up an inch or so to match the left. The forearm/bicep gaps should be equal on both sides. Reference image Side note: SUPER nice job on that DLT-19, Carsten! That metallic finish looks incredible, and I'm impressed to see that you added the wires to the ends of the T-tracks. Most people miss this detail, so my bucket is off to you, sir! Centurion Requirements In this section we prepare you for Centurion. More photos may be requested in the future that allow us to make better decisions on possible adjustments. If there are any areas of concern they will be discussed here. Because Centurion photos show much more detail than those for Expert Infantry, items to pertaining to Centurion might be seen there and not here. We try to point out all that we can from what is seen, but the final accuracy is the responsibility of the trooper. As you are aware, being as it is a separate piece and not integrated into the helmet the vocoder is not acceptable for L3. Reference images I'm not sure how you have it attached, but your shoulder ammo pack is sitting way too high, and actually looks like it may be hindering your ability to look to the left. If you need a few tips on how to rectify this and improve your range of vision just shoot me a PM and I'll be happy to help you with that. Videogame references CRL reference Another issue I'm sure you know about is that a few of the buttons on SDS ab plates are not integrated but are separate, and not permissible at Level 3. Perfect job on the ABS belt placement, by the way!! Reference image The shim you installed on the right looks SO close to being perfect, but as per the CRL there can be no seam. Although the MP 40 ammo packs hide it, it will need to be addressed before we can get you to Level 3. Reference images Your cloth belt will need to be a bit longer. Although the pack hides most of the back, there is still a good size section of Velcro showing. Alternatively, you can also just remove the excess Velcro! Reference images Last up, unfortunately your mobility cuts extend beyond the raised ridge as seen below. Although not specified in the HWT CRL, as I mentioned before the costume is based on ANH armor so this is applicable. Reference images- Note that the top of the ridge is present Again, fantastic job on this armor, sir, Your weathering is spot-on, and I am more than pleased to welcome you to the rank of Expert Infantry as a fellow Heavy Weapons Trooper!1 point
-
The CRLs are ever-evolving. As new, more detailed images become available we can see things that were just not apparent before. But, when the CRLs do change, it's no more than once a year and plenty of notice is given in advance (at least here on the FISD). Also, those who are in the process of a build or have current EI or Centurion submissions at the time they change are exempt ("Grandfathered" in). As of now, prospective changes will be posted for all members to not only see, but to be actively involved in the process and share their opinions on each issue.1 point
-
Number changed, Freddy. If you have trouble changing it in the future just let me know!1 point
-
Maybe so, but that face plate is not Anovos and the shoulder bridges are very soft. Could actually be an RS. I'd have to see more parts to have a better chance of positively identifying the maker of the kit. Either way, building it is the same no matter who made it.1 point
-
Building a helmet is pretty much the same thing regardless of were you got it from but if you follow the link above he also have videos of him building it.1 point
-
Anovos do sell helmet kits.1 point
-
It's definitely not Anovos. It's an RS recast - most likely a TE, but there are so many recasters out there making armour that it's hard to say for sure.1 point
-
So it's a symmetrical ROTJ helmet? Alright, no clue how I'll pull that off. I had an idea of getting a R1 helmet, cutting off the ears, and replacing them with the correct ones after filling in the tube stripes. I'll need to look into this further... On another note, a certain package containing a certain big gun was delivered to me today. I'll have pictures of that up soon for your amusement.1 point
-
Thanks for the advice, I’ll go ahead and shoot RS an email right now. You’re absolutely right, their customer service is excellent!1 point
-
They're ok.1 point
-
Parts arrived from E3D today, complete new hot end kit and a titanium heat break. Will be rebuilding tomorrow with a 0.4 nozzle as my Prusa 2.5S upgrade kit is arriving Monday and I'll need to print the parts for that which need a 0.4. Once those are done I will reattempt to swap to the 0.6 I also received some shiny faux leather cycle shorts for the under suit, £8 after a discount though post was about £3. Hoping these are OKd by my GML, and I hope they will be fine for Lvl2+1 point
-
Sounds awesome1 point
-
Since you aiming for Level 3, (), one thing you will need to do is trim back the end of the ABS belt a tad. As per the CRL for Centurion, the "corners of the plastic ammo belt shall be trimmed at a 45 degree angle (you nailed that part) that meets the outer edges of the cloth belt". Super easy fix! Reference images The position of the ABS belt is acceptable, but if you could bring it up just a teeeeny bit more that would be terrific! The angle of the cloth belt is a bit askew, and ideally the entire belt should sit more more horizontally. I say ideally because the majority of the ones seen onscreen were either horizontal or close to it. We realize of course that troopers come in all shapes and sizes, but with your build you should be able to pull this off. I know it seems we are throwing a lot of curve-balls at ya', but you seem to be a perfectionist and have come through with flying colors with all the suggestions we have made. As a D.O. this means a lot, and I am looking forward to the day that you become the newest Centurion of the Knightfall Garrison!1 point
-
Excellent news This is the embodiment of a huge amount of work on the part of staff to bring this together, and I hope everyone appreciates it. :sith:1 point
-
Hi Marc, welcome to the FISD. Sent from my SM-G960F using Tapatalk1 point
-
I am just getting started as well. Currently searching for the right kit for me. I am also here in S.C. in the Greenville area. But used to live in Charleston, mt pleasant, and West Ashley. Most of all, welcome1 point
-
Having variations in the CRL should work. Just with the ROTJ style armor there are a few differences, much rounder around the butt plate also the kidney and butt are one piece so to cut down on some work purchasing ROTJ would be the easiest option.1 point
-
Hello Jason, welcome to FISD!1 point
-
Hello Jason, welcome aboard!1 point
-
It sound like you are interested in the OT (original trilogy) trooper, which are the most popular. I have a thread that breaks down the differences in each one of these that may help, and you can find that here. You are only about 30 minutes from me, and once you get your kit if you feel like bringing it down I can give you a hand with your build.1 point