
Leaderboard


Popular Content
Showing content with the highest reputation on 02/02/2020 in all areas
-
Some nice First Order-centric concepts from SW:DOTF. Source: Reddit Sent from my iPhone using Tapatalk Pro3 points
-
The left arm is a fan sculpt.. Not many people know this but the RS is about 3/4 cast from an original and not 100% like they would have you believe. I don;t think there is much you can do about the shape. Just make it fit as best you can as mentioned.2 points
-
As long as you paint the inside and rim white you are good to go for Centurion2 points
-
Just fixed it! No needing to bend it just had to remove the return edge so it could come up more: Sent from my iPhone using Tapatalk2 points
-
I'm sure most of you has seen the image below. These Billgrams have become a bedrock on which many TKs have been built. However this image, and 1 very similar, has a colour on it no longer deemed correct. Rather than carrying on explaining it I've made a new diagram, sorry no catchy name this time, with just the correct colours. The images show the Humbrol colours, but the Testors equivalents are shown too if that's easier to source. All this was built upon Billhags work, so it would be wrong for me not to thank him for it. He's also my GML so he has had a hand in me getting this far in more than just billgrams. I already owe him a pint, so Bill if you see this and the opportunity presents it's self, make that 2. ANH Stormtrooper Paint Colours by Christopher Pearson, on Flickr Click through to flickr to get access to a full resolution version, and feel free to share this if you find it helpful.1 point
-
I see this topic come up a lot and I have not seen a comparison so I thought I would do one. Please keep in mind that my knowledge on this subject is limited and I do not have any experience with OT TKs. So the obvious… Rogue One TKs are more detailed than OT. As far as I know, all the OT TKs were vacuum formed in High Impact Poly Styrene (HIPS). This process requires a buck (mold) that heated plastic is laid over then sucked to the buck by vacuum. This is a fast and efficient method of mass producing these costumes; however, the trade off is that all detail is minimalized and designed so that the formed plastic can be removed without damaging the buck. For this reason, parts like the helmet and forearms are formed in parts rather than one solid object. Consider an ANH forearm, the rectangle details are not very well defined. There are 2 parts to the forearm. One part has the rectangles and the other does not. The two parts are glued together and then cover strips of plastic are used to hide the seams. Rogue One TKs are were not vacuum formed. I have heard (although I do not know for sure) that the RO TKs were injection molded. This process requires a 2 or more-sided mold that is completely closed off then heated liquid plastic is injected into the mold. Once the plastic is cured, the mold is opened, and the parts removed. This process allows for thicker and more detailed parts. So both the OT and the RO stormtroopers armor are made from plastic but the RO version is thicker and more detailed. Yes there are differences between ANH, ESB, and ROTJ TK’s but for the most part, the process of making the armor was the same. RO, Solo, and some of The Mandalorian TKs were made to the RO standard. Another consideration in comparing the two types TKs is the methods of assembly and strapping. There is a ton of reference material on how the OT TKs were assembled. There are very specific requirements in the CRLs as to what type of snaps, straps, Velcro, and rivets are used and how they are used. Oddly enough we have less information about how the RO TK is assembled and strapped. One of the best sources I have found for RO TKs is the images from Celebration Europe 2016. In these images we can see Velcro in various places as well as some sort of plastic hook lines connecting the shoulder bells to the biceps. Regardless, the 501st CRLs for RO TKs does not specify how the TK is strapped as long as the strapping is not visible with the exception of the drop boxes and the thighs. It would be awesome if someone who has some contacts with LFL could get some more detailed information and pictures since there is no reason for this information to remain secret this long after RO, I digress. Additionally, there are significant differences in the soft parts of the costume. OT TKs have a neck seal and a black one or two-part undersuit. The undersuit has no detail and most of the people I know who have OT TKs wear under armor. The gloves were rubber military chemical gloves and the boots were slip on brown chelsea boots dyed white. RO TKs have a undersuit that has ribbed fabric at most of the joints and the neck seal. The top shirt has hex mesh in the armpits and the ribbed fabric runs from the top of the neck seal to mid chest. The ribbed fabric must be stitched between the ribs. The boots are the same as the FO boots with a flat sole and side zipper. The gloves are also the same as the FO; although they are all black with leather patches and gridded fabric similar to a mechanics brand glove. Lastly, the OT Tks had holsters and their E-11s are slightly different from the RO E-11. RO TKs did not have holsters. I suspect that it would be difficult to holster the E-11 with a tac-light on the side of it. So lets look at some comparison pictures. These were taking at the ROSW premier. On the left is a member of my Garrison (TK 41808) in his RS Prop Masters ANH Stunt. On the right is me (TK 20980) in my Jimmiroquai RO. Initially, we look very similar; however, closer inspection reveals the level of detail, shape, construction in each part. So, let’s start at the top and work out way down. The helmet: On the left is an OT TK from ANH, on the right is my ROTK helmet. One of the most talked about parts of the helmet is the infamous eye bump. Look at the right eye on the OT helmet, notice the bump along the bottom of the eye just left of the nose? That is the eye bump. All of the bucks for the OT helmets were hand sculpted and it is unclear if this bump was in the original buck or if it is a result of the vacuum forming process; however, what we do know is that the helmets are not symmetrical. RO helmets are symmetrical and although some people swear, they can see the eye bump, I do not see it on the RO helmet. Moving on, the frown is more pronounced on the OT helmet. The number of visible teeth is also an issue. There are images from ANH that show between 6 and 10 teeth. RO helmets have only 7 individual teeth backed by a dark grey mesh. Another difference is the height of the brow trim above the eyes. The brow trim on the OT helmet fits on the edge of the top dome and is adjustable. I believe the proper gap is about ¼” while the gap on the RO helmet is about 1/8”. It is unclear if the brow trim on the RO helmet is actually separate or painted on. On my helmet it is molded into the helmet and I painted it. I should note that is on of the things that must be modified on the Black Series helmet to make it CRL compliant. The gap on the black series is closer to an OT gap. Lastly, the V-coder on the OT helmet is a molded part that is painted. On the RO helmet, the V-coder is a separate part and there must be a visible gap at the bulbous part of the V-coder and the helmet. Looking at the sides of the helmets, the OT tear traps are a simple depression that is painted. The vent lines are painted as is the black outline. The same is true for the temple boxes, although there are no vent lines in the temple boxes. On the RO helmet, the tear traps are also depressed; however, there is a raised portion in the center that is painted grey and the vent lines are cut out (engraved) in this raised portion. I suspect on the screen used helmets the depression is painted black and the raised portion is a glued in part that has the vent lines cut out. On my helmet, I cut the vents out completely and backed them black breathable fabric. The temple boxes on the RO helmet also have a raised portion that is painted grey and just like the OT, there are no vent lines. I have seen a gap between the end of the brown trim and the top of the ear cap on some OT helmets. On the RO, the brow trim comes past the temple box and terminates at the center of the ear cap. There is no gap between the brow trim and the ear cap and the brow trim terminates at an angle. The OT ear caps have visible flat head pan screws (3 of them) and the CRLs require them. These screws actually hold the helmet together connecting the front and back halves and attaching the ear caps over the seams. On the RO ear caps, the screws (2 of them) are molded in and are non-functional. Additionally, the ear bumps on the OT helmets are different. The RO ear bumps are all the same and a very different design from the OT. The outer circle of the ear cap as well as the ear bumps are more detailed and defined on the RO helmet. Lastly, the blue tube stripes on the OT helmet is either a decal or painted on. On the RO helmet the tube stripes are completely cut out and for the screen used helmets, they were backed with blue painters’ tape. On my helmet I backed the stripes with a blue breathable fabric. The back of both helmets are very similar. On the OT helmet the rear boxes are more trapezoidal rounded in the corners, the box is a depression that is painted grey and again the vent lines are painted. On the RO helmet, the boxes are more rectangular and again they are depressed with a raised portion that is painted grey with vent lines cut out. Again, I believe the screen used helmets had a depression that was painted black and additional parts with the vent lines cut out was painted grey and glued in place. On my helmet, these vent lines are cut out and backed with a black fabric. On the black series helmet, there is a battery box and speaker that must be modified for approval. Although the shape of both helmets are very similar, there are some minor differences. The RO helmet looks thinner overall. On the black series I had to extend the jaw line about 1.5” to fit a proper RO V-coder. The Hovi mics on the RO are exactly the same as the ANH Hovi mics with white interiors and the proper mesh screen. The lenses on the RO are also the same as the ANH lenses, green. If you are considering a ROTK, there are several options for helmets available to you. The least amount of work would be a Jimmiroquai helmet and the largest about of work would be modifying a black series helmet. I have a tutorial for the modifications I recommend in the RO thread. I do not recommend attempting to convert an OT helmet to a RO helmet, but I guess anything is possible. Next, I will be comparing the upper torso and arms. Thanks for the interest.1 point
-
Hello everyone,, I am new to this site, I have joined the 501t Legion back in april of 2019. I am enjoying the company of the Dew Back Rigde group, I was unaware of this site. I do hope to be accepted and to continue to troop.1 point
-
Due to elections I won’t hearing back till mid or late February but have just fixed my back armour. Details on how it now looks is on my build thread. Sent from my iPhone using Tapatalk1 point
-
Yeah saw this already, but didn't had enough time so far to dig in. Will spend a closer look the next days. Thanks so far good night1 point
-
OK, have finally been able to make some more progress and happy to report I'm comfortable with the way the helmet fits and I can actually get it on and off reasonably with out too much cussing New opening sizes : Front to Back - approx 18cm Ear to Ear - approx 23.5cm I know not a lot, but i made a difference for me. I'll see how it goes and might consider taking a bit more. Question: I've put the neck seal AP sends and I've snugged it under the ears to help hold it in place. I haven't been able to find any specific pics showing if this is OK or not? I do plan to get the "S" Seal for Centurion approval.1 point
-
Thanks for the feedback. The more I look at the biceps the more I think you're right that they're too large. I want to leave some growing room where possible and so far the only parts I've shortened are the tops of the thighs. Here's a photo from a fitting today. Forgive the ski gloves he's wearing! Left thigh is held up with masking tape temporarily. Neck seal and gloves are on their way and a holster from Darman. Snag list includes raising belt and stopping shoulder bells rotating backwards.1 point
-
Make the forearms fit your arms , that's my advice !1 point
-
thats a big difference. my ata forearms are different sizes also but not as much.1 point
-
Have started to paint the ab buttons. Gonna give them a second coat. You can see a few of them need touch ups which ill go through with a toothpick. Do they look like a decent size? I know you can paint them a bit too much as it isn't all on the white button. My Dad wanted to show you guys him using a scribe to measure the cut lines for the cover strips, and wanted to know if any of you use the same technique!1 point
-
Would also be neat to see other legions with this type of armor. However let's start with the basics. Very happy to see the progress.1 point
-
Perfect, well done Nada. Sent from my iPhone using Tapatalk1 point
-
It is ok to have cut out sections, they had been seen on some screen armor1 point
-
Regarding the black/brown debate. I don't know much about this strapping but having worked a lot with photography, I can say it is very hard to determine dark colours. Black - and near black - are the hardest to determine IMO. Various materials will catch light differently and because of the very non-reflective nature of black (hence... black) the interaction of the material with various light sources can greatly alter how we (or the camera) perceive said black. That combined with the fact that some black material does fade to a brown colour with use (sweat and sun are awful) also doesn't help. So, unless these straps can be observed in person, I would say that black is our best bet right now - with brown being possible but less probable. My two cents.1 point
-
Twist your arm (and forearm piece) so palm is up and then bend your arm, that way the swoop get in a better position. I wouldn’t trim the forearms is I were you. That is normal, moving in a TK takes some getting used to Here’s a few videos that might help you get an Idea on fit. First one is yours truly and the other Dan, Cableguy on here.1 point
-
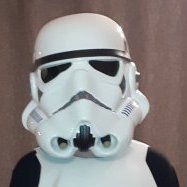
The model itself is built off the ingame model, so how some of the helmet is shaped is pretty accurate. And while i do agree on the brow, I didn't want to mess with the design too much, and the look is just very iconic for me Btw, the new helmet was modeled by my good friend Boon from Skylu 3D Props, and you can check his work out here: https://www.facebook.com/Skylu3D/1 point
-
Thigh strapping on way!1 point
-
yeah, the originals from anovos slid over the rubber, and the flap still worked so you could connect the buckle. kept the pouch flat. sliding the entire thing over the buckle makes it bulge out and just looks like its going to flop around. my red set was the second method and I added the side slots. never finished that concept tho.1 point
-
Haven't forgotten about ya', Katie. Working on a few items and will be with you ASAP.1 point
-
Hi everyone, thanks for the input! I am reaching out to RS to see about getting replacements.1 point
-
I got vmusicstore's E-11 M38 tank scope today and it's solid! Now I'm just looking for mounting options. I also got started on changing the existing t-tracks on the blaster for accuracy - the ones stock, as pointed by you good souls, were too short. I ordered Super6Props' t-tracks and had a few learning experiences. I had trouble getting the tension of the bend just right, often it was too long, or too short, causing it to bow, or not hold in place. After some trial and error, I found that 1cm was enough to give a proper bend and tension, combined with the distance between the closest edges of the two vent holes. It took a while trying to maintain a nice hot boiling cup of water on my desk - (had to refill several times per track), when the water was too cool, the tracks were not easy to work with. I also ended up peeling off the included tape on the t-tracks, those tracks were no were near close to hugging the barrel shroud - my only guess are that the vent holes on other blasters were larger in diameter than the ones on this airsoft gun's. Overall, I'm quite happy how it turned out. I think upon completion, I'll add some glue to the end holes to prevent the t-tracks from coming loose. According to this guide - they mention securing the t-tracks with wire? Anyone have an instructional of how this is done?1 point
-
References (TFA)1 point
-
1 point
-
Welcome Luca, Good to see you are doing your research, it’s the most important part of preparation for building a costume and you learn so much from it. My fellow troopers have certainly got you Pointed in the right direction, and it’s good to se you have also reached out to your fellow countryman Davide. Good luck on your journey and once again, welcome. Sent from my iPhone using Tapatalk1 point
-
Ok, continuing with the abdominal plate. The front of the OT abdominal plate is one of the most detailed parts of the body armor. The groin plate is incorporated into the abdominal armor. In this picture I have several images to illustrate the details. In the top left is the inside (faces the body) of the abdominal plate. Note the return edge along the top, the return edge is present on a lot of the OT armor but not every part has a return edge. Also note the groin plate is all part of the same piece, it is not a separate part. The two detail parts, the center box with 5 button discs and horizontal lines, and the side 4 button box are parts that are glued to the abdominal plate. The bottom left image is the front of an unfinished abdominal plate where you can see that the center box has not been attached. The center image is a completed OT front abdominal plate and the two right images are close ups of the detail parts. Notice the other raised detail in the abdominal plate and how the edges are not as drastic as the edge detail we will see on the RO abdominal plate, again this is the result of vacuum forming. In the image above from ANH, you can see how the chest plate sits on top of the abdominal plate. The ammunition belt sits on top of the abdominal plate and is attached with snaps. The ammunition belt is constructed from a single piece of vacuum formed plastic that is trimmed. This piece is about 3” wide and all six ammunition boxes are formed with this part. The belt is attached to a white cotton belt that you observed in the back-side images. Additionally, there are two drop boxes that are made from 4 vacuum formed rectangles and are suspended from the ammunition belt with white elastic. In these images you can also see the attachment of the holster. The front of the RO abdominal plate is significantly more detailed. In the two images above you can see the vertical raised lines and how much more defined they are from the OT abdominal plate. Additionally, notice the three detailed sections. First, on the left there is a raised rectangle with three horizontal raised lines. Next is the center raised rectangle that starts from the abdominal armor with an angled top. Then there is another raised rectangle inset with the 4 discs on the left side and raised ridges on the right. Notice the detail of the depressed rectangle above the ridges. Even the discs have a raised outline. The raised rectangle on the right side of the abdominal plate has similar staggered detail. Lastly, there are two depressed vertical boxes in the center above the large center detail box. The RO ammunition belt is also very different from the OT. The belt is plastic and has a front and back section. The back overlaps the front belt on the sides and looks to be connect with Velcro. The front belt is about ¼” thick and has teeth along the top that align and lock (like gear teeth) between the raised vertical segments of the abdominal armor. The bottom front of the belt protrudes below the two center boxes and then tapers at an angle to a uniform belt height the same as the back belt. On the front belt there are six ammunition boxes like the OT belt; however, not all of these boxes are the same size or shape. The two center boxes are simple rectangles with beveled edges. The next two boxes are rectangles but slightly wider and have a unique angled top with beveled edges. Next the two outermost boxes are larger nearly square boxes with beveled edges. Lastly, the two drop boxes are larger rectangles similar to the OT drop boxes, but the RO drop boxes have beveled edges and are suspended by black 1” Velcro or nylon straps. And that is it for now. More to come and thanks for the interest.1 point


.thumb.jpg.7571e70f04d50e4c2dce694b1944564a.jpg)
