Leaderboard


Popular Content
Showing content with the highest reputation on 01/23/2020 in all areas
-
Armor Bin Imperial Cog Wheel Covers File-Name: Wheel_cover_imperial_logo.stl, Wheel_cover_base.stl Designer: GoofTrooper [TK-37423] Last Update: 01/2020 File-URL: https://www.thingiverse.com/thing:4122064 Description: This is a wheel cover for your Husky brand rolling toolbox used for armor storage. Customize your armor bin by changing the look of the stock wheels to an Imperial Cog. I designed these wheel covers to use on a Husky brand 37 in. toolbox. I'm not sure if they will fit other sizes of Husky toolboxes. Let me know if they do! Terms of Use: This design is licensed under the Creative Commons - Attribution license. Image:8 points
-
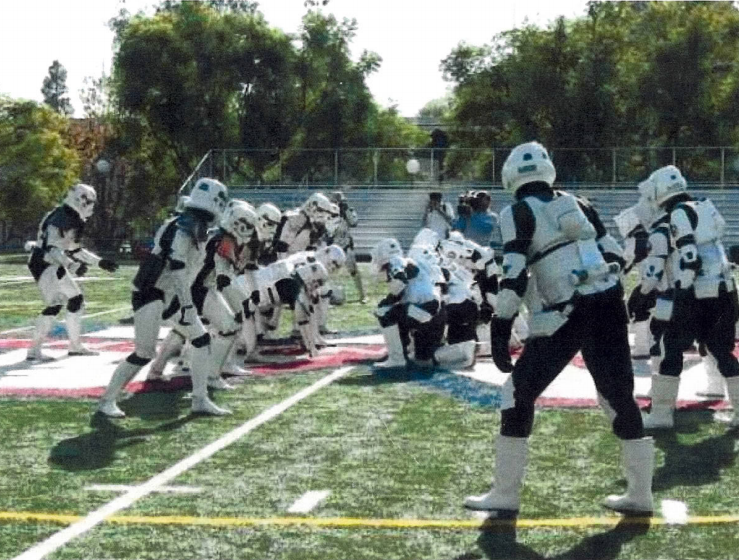
And, here it is. I'm the black pauldron wearing TD playing tight end on the right. We ended up playing 4 downs or so before we were called back. Wish someone had a video...
 8 points
 -
Wrong topic by accident? Wasn't that intended for the don't run in armor thread?3 points
-
The TK's are at a distinct visibility disadvantage, just need a few trees and those Biker scouts are toast3 points
-
LOL yeah, I need to move it. But you have to admit it's been some fun feedback.2 points
-
If it fits properly, you should be very mobile. I have an old photo if I can find it of us TKs playing a down of football against the TBs at the Rose Parade in 2007.2 points
-
As do I, (just not in armor, lol).2 points
-
Now we will finish the comparison with the lower half of the costume. Here is some pictures of the OT TK lower half front and back. And this is the RO TK lower half front and back Starting off, the Thermal Detonator on the OT TK is constructed of a grey cylinder with vacuum formed parts glued to it and two aluminum metal belt clips screwed to it. The two ends caps are simple caps with no panel lines or additional detail. The control pad has a row of button that lack significant edges. The circular greeble is simple and lacking sharp details. The two clips are used to attach the Thermal Detonator to the back-canvas belt. The RO Thermal Detonator is also constructed of a grey cylinder; however, then end caps and control panel are more detailed. The end caps have sharp edge lines and an outer panel line. The center of the inside of the end caps is grey which is a significant difference from the OT version. Additionally, the control panel has an outer panel line, a “D” shape cutout, a raised rectangle with seven defined buttons and the circular greeble is complex with sharp edges, panel lines, and gear teeth. The hard plastic back belt has a mounting base for the Thermal Detonator molded into it. The posterior plate on the OT is made from vacuum formed plastic with a return edge. There is a raised rectangular panel in the center. Notice the hole at the end of the bottom triangle, this is for a strap that connects the groin plate to the posterior plate between the legs. The RO posterior plate is similar in design and also sports a raised rectangle panel; however, the edges of the raised panel are sharper, and all the outer edge lines are distinct sharp angles. Looking at the right leg (as worn) of the OT TK, we have the thigh with ammunition pack. Both thighs are mirrored and constructed of two pieces of vacuum formed plastic. The right thigh has the vacuum formed 5 box ammunition belt attached to it with pop-rivets. The front and back butt joints are covered with a flat piece of HIPS used as a cover strip. The thighs are completely closed and do not open along the back seam. There is a raised lip detail along the bottom edge of the thigh. The top of the thigh is angled to fit the body. The lower leg armor is also constructed from two pieces of vacuum formed plastic with cover strips over the front and back seams; however, the back joint is not glued shut and can be opened to out the armor on. It is held closed with elastic and clasps on the inside. The top edge has a raised detail lip and the bottom is tapered to flair and drop along the sides of the boots. The OT left leg (as worn) has a mirrored thigh to the right leg; however, there is no ammunition pack on this thigh. The lower left leg is mirrored to the right leg; however, this lower leg has the sniper knee plate attached. The Knee plate is a vacuum formed part that has a raised lip along the tip with a return edge. There are 8 protruding Square frustums along the bottom edge. The RO TK legs are similar to the OT legs; however, the detail is sharper and more complex. The ammunition pack on the right leg looks to be an added greeble and is similar in shape to the OT with cleaner and sharper edges. There are no visible rivets and is most likely glued in place. The sniper knee plate on the left leg is also an added greeble and is similar to the OT part with greater detail and sharper lines. The RO lower legs also look to be more shapely and have a greater flair at the bottom to cover the sides of the boots. The main difference between the OT and the RO legs are he cover strips and both the thighs and lower legs are open in the back on the RO legs. As discussed previously, these parts may be constructed of a single piece of injection molded plastic rather than the two part construction of the OT leg armor. The OT Boots were Stuart brand slip-on chealsy boots (made in England). These boots were all black leather boots with elastic on the sides and leather soles with a slight heel. The boots were painted or dyed white. The RO boots were the same boots as used for the First Order stormtrooper with one difference. The RO boots had a slight hole in the tread on the bottom. This hole is an Easter egg for the original Star Wars action figures from the 1970s that had holes in the bottom of their feet to stand on pegs. You can see the holes in the pictures below. Other difference from the OT boots include a flat black rubber sole with no heel, side zipers instead of slip-on, and were all white leather. So this should cover all the armor. As I mentioned previously, the gloves and undersuit are different as well. For the OT, storm troopers wore a thin black body suit and the only addition was the neck seal which was made from a ribbed fabric. The RO undersuit is made from four materials. The top is constructed with ribbed fabric for all the exposed areas. The ribbed fabric is stitched between each rib and is a requirement in the CRLs. There neck seal is part of the top and is made from a shiny ribbed fabric. There is octagon nylon mesh in the armpits and center front and back. The bottom sides and arm ends of the top are made from a polyester black material. The pants are constructed from a polyester black material with the ribbed fabric on the front and back at the knees. Again, this ribbed fabric has stitching between the ribs. The OT gloves were military black rubber chemical gloves. The RO glovers were specially designed and are similar to Mechanics brand gloves. They are ribbed fabric with leather patches. Well that just about covers everything. If I have forgotten anything or anyone has any questions, please feel free to ask. One last note, the RO E-11 is different from the OT E-11. There is robust discussion and part identification starting on page 13 of the CRL thread here: https://www.whitearmor.net/forum/topic/38187-rogue-one-stormtrooper-crl/page/13/ Thanks for the interest.2 points
-
It's a bit hard to have a generic file, counters are differently sized depending on what you use, also customizing numbers.1 point
-
It may well be concept art but if we got Trevorrow’s DUEL OF THE FATES it would have been a darker First Order. Source: Imgur Sent from my iPhone using Tapatalk Pro1 point
-
Soooo who’s gonna be the one to print them for the rest of us that don’t have a printer? I’d pay for material and shipping. Sent from my iPhone using Tapatalk1 point
-
Directly from Anovos .. they are shipping but in batches .. Shipping notification came out of the blue!1 point
-
Hi Daniel. Welcome to the FISD! As mentioned above, post a picture of your helmet here and we should be able to help you out in short order. The RS armor is a very good choice. Congrats on starting your 501st journey! There is much awesomeness ahead of you.1 point
-
Hello Daniel, Welcome to FISD. Some pictures would certainly help us to judge if your helmet is eligible, here is a guide to posting images on the forum:1 point
-
Fit perfectly on my smaller Husky 35 in. bin! Thanks for a great share!1 point
-
Holy hell. It's a bit early, but this is already the clear front runner for the "Best Things I Saw in 2020" Award. Well done.1 point
-
Well, with only a little more than thirteen thousand posts here you are getting pretty darned close!1 point
-
There is a Tk on Instagram who runs 5K races in his armor. Sent from my iPhone using Tapatalk1 point
-
I like Pyre, there are not that many troopers who are main antagonists in many canon star wars stories. Those roles are mainly reserved for officers (not troopers), dark siders and the like. The only other troopers I get in mind are Phasma, SCAR Squadron and maybe Agent Terex?1 point
-
Thanks, or I can run a poll just as easily TBH. I think I'll wait until after elections though - don't want to muddy any waters.1 point
-
I'm in the middle of putting a comparison guide together but I have a bit on at the moment.1 point
-
Welcome Edgar, to FISD, and Star Garrison! Where in Texas are you located? Naturally, because... Texas... We are one of the largest Garrisons within the Legion. We have multiple squads, and each serves and supports a specific part of the state. Knowing where you are may prove helpful in finding you some local contacts, although you may already have some since you met our members at an event. As already mentioned above, that link is the pipeline to the shiny white armory. Dig in there, and ask, ask, ask if you have questions. The community here is always excited to welcome new members and to guide them along to their ultimate (Centurion ?) approval.1 point
-
I have a thought about the hours thing, but I'll take it to Staff for the time being.1 point
-
Mike Great job! You can cut off the big rear tabs on the shoulder bridges if they are too long for you, I did my bridges 2" longer than the original to accomodate larger bodies, the movie original didn't have big tabs on the back. Mark (AP)1 point
-
Welcome my fellow Garrison mate!1 point
-
This is a nice build thread (see below) To answer your question, like other kits with the new inner chest section your head size will play a part in how you build your armor. I've seen others carve out the inner chest (behind the outer chest plate) to accommodate for their head. Since it's hid behind the outer chest you can make necessary alterations.1 point
-
Congratulations Andrea! Looking Sharp! Have fun out there!1 point
-
Congratulations Andrea, and thank you for your commitment to the Empire! Your armor looks sharp! Heros lead the way!1 point
-
Thanks for the input guys. Regarding magnets, I’ve tried them on the wrist sections and they’re fine. I used them in the chest to yoke connection too. I’ll put photos up later. I had a really productive Sunday, taking advantage of a nice warm day to get the whole kit painted, after priming it last week. Excuse the awful pictures, it’s like a game of Jenga in the shed, and I’m scared too move everything until the weekend. Remember, that this was the kit that Anovos said required no paint. Then they said the resin parts only. Trust me. The whole kit needs painting. Regarding the paint, I’m ok with painting, and used cans of 2k paint, so no need to lacquer. The paint is TC10 2k and I have it from the supplier that this is the colour used to touch up the rubber screen suits and to paint any none rubber parts. I’ve seen the sample cards from the movie in his store. It’s the same supplier that supply the studio. This sample was from the spacebear sample cards which was the working title for TLJ. The name was space trooper white, and the pint code was TC10. It was quite cool for him to let me flick through the sample cards. I’m trying to go there again regarding the TR1XIE colours for another costume. I managed to get the right thigh out and fit dans holster. And all I had to hand to try it was an F11D. On a side note Dans holster is a few mm smaller than the Anovos one. The holes in the Anovos resin part need re drilling to take this holster. And the self tapping screws that he supplied need cutting by a couple of mm. Hopefully get more pictures up soon as trying to get clearance for a con. Painting was the big job. The rest is fairly straightforward. Also, along with the instructions and the Velcro Anovos supply, toss the resin holster in the trash. Sent from my iPhone using Tapatalk1 point
-
Reposting the Power Cylinders Template by @PlayfulWolfCub as they seem to have gone missing. This isn't the original file and so it's all a bit JPEGd now, and you can't trust the "Print at 300dpi" bit. E11 Cylinders M38 M19 variants by Christopher Pearson, on Flickr Click through for the largest size I have.1 point