Leaderboard


Popular Content
Showing content with the highest reputation on 11/01/2019 in all areas
-
2019 Comic Cons have come and gone. Halloween has now come and gone. Reality is starting to set in that we wont get these kits for Rise of Skywalker either.......3 points
-
I'm hoping this wraps up the end of not just this trilogy but also brings all the movies together, sounds like that is exactly what JJ is trying to do. Will everyone be happy with the movie and how it ends, well NO we aren't the writers or directors, what will be will be, enjoy or don't but if nothing else lets not TROLL after we've seen it, no matter how we feel, it's a movie, make believe, although many of us wish it was so much more2 points
-
Nice Trailer, not more ;) The movie will be awesome regarding scenes, art and pictures. But my expectation after the last two episodes (especially the last one) is, that this movie will not bring the story to an end that I could call star warsy or that will correct the disaster from Episode VIII ;) Don't missunderstand me. I look forward to see this movie like all other episodes in cinema with the same friends since Epsiode VII and Rogue One on the big screen. But I expect absolutely nothing. So this movie could only get better ;) Regarding the last Trailer, I did not feel anything. Not even goose bumps. In comparison, I saw the "Mandalorian"-Trailer this week. This Trailer has much more Star Wars feeling than the last two Saga movies together including goose bumps. :)2 points
-
I was in Wal-Mart and found out that they started carrying Scout Trooper boots All they need are a few modifications here and there. ]1 point
-
So here we go, I am finally going (try) to build (rebuild?) my SDS armor that I got half a year ago to centurion level. Background: I don't think the stormtroopers were the first Star Wars character I saw, nor were they the first of my favorites. That would go to a certain Solo... However, that didn't stop them to be my favorites the first time I saw of them, and seeing that you could acquire of their armors in real life gave me a bit of a dream. Then found out about the 501st and the dream got a bit bigger, walking around in that pure armor together with other likeminded people, sign me up! So after being aware of the minimal age to enter, I waited till I was 18 (last spring) and got myself an armor. The problem is that I maybe was a bit too quick to decide where to buy from, I didn't research enough through my rashness and and bought an armor I thought looked good. And so the day comes and I receive the box and are were happy with the contents. Me, the day of arrival. And as such I knew I would have to add some things to make it better, so I turned to the internet for help and came opon this forum. Then I discovered the problems with SDS... I felt pretty bummed, I could have had a better and cheaper suit had I not been in such a hurry. So this got me wanting for another suit, such as a snowtrooper or scout, I felt like I really couldn't do anything about this armor yet in my life other than wear it around at home or have it sitting on my mannequin. But recently I decided to make an account here after half a year of having it just standing around and I thought an introduction would benefit me as I am training to be better socially. And I got some replies telling me to fix up my armor before buying a new one, then got in contact with Helotech (Dave) who has been a really nice guy and have had the same problem as me. He has been nothing but great and generous to me and has given me a bunch of tips and info on how he did it. So today I am making the start of a build thread and while Dave gave me much needed info, I would like to hear from others too about what to buy (preferably around Sweden) and needs. So with that out of the way I can list what I need to do (what Dave did, I go mostly after his example): HELMET Spray paint the inside of the helmet black Added Velcro in various spots so I can add padding and attach electronics. Changed the SDS ears for ATA Hero ears. Not much money and a much better upgrade. Add fans Added mesh inside the mouth area to block people seeing me. Remove all the stickers, and purchased stencils. Hand painted new details. Change out ear screws Add additional rivets under the ears. This helps the two pieces of the helmet fit more flush under the ears. BODY PIECES Remove all sticky Velcro attached to armour Remove all the snaps and little white plates they are attached to Glue ribbed shoulder straps to the chest piece Add wide elastic white shoulder straps and snaps Add thin white elastic to hold shoulder straps down Add snaps and white velcro to Ab armour to hold belt Add snaps and rivets to right and left ab Add snaps to cod piece Add Velcro in chest for electronics Add Mr. No stripes bracket and strap system Work on the Ab blue / grey button plates. The SDS plates have separate metal buttons. BELT / HOLSTER Replace ABS wrap around belt with fabric one from Trooperbay. Keep this long piece of ABS for your cover strips Purchase tan leather to replace the black loop of the holster Add 4 screws to attach holster to belt Add snaps to fabric belt to attach to ab armour Change out the white Velcro of drop down boxes for white elastic. Attach elastic with rivets. ARMS Trimm all return edges Add snaps system for bells to bicep, and bells to shoulder attachment Glue straps for bicep to forearm Remove Velcro overlap closures from bicep and forearm armor. Reshape the bells for better fit. GLOVES Purchase rubber hand armour to replace the plastic SDS ones. BLASTER Purchase a metal loop for the back of the blaster LEGS Trimm existing cover strips on thighs and lower legs above the raised areas. Add cover strips to back of thighs Add wide black elastic to top of thighs that got to my inner black belt Change overlap on lower legs to cover strips with velcro Add velcro to my boots and the bottom of lower legs so the shins don't ride up. This prevents boots coming untcuked Remove screw and nut from sniper knee plate. Attache with rivet and glue. Replace the right thigh ammo pouch. Cleane up the rough seams from the left and right armour pieces. THERMAL DETONATOR Replace the aluminum strips Replace hardware. Cut apart the TD to make it the proper length. Anything else I should be thinking about? Also today I bought some tools to help: Sandpaper, clamps an files I've heard Trooperbay.com was a good site to find supplies so i've made a list on what I am planning to buy from there: 1. Three tubes E6000 2. Brushes and paint (might need more help with this one) 3. Chicago screws (Don't know how many) 4. Rivets (How many?) 5. Magnets 6. Helmet frown screen 7. Snap fastener kit (How many?) 8. Nylon strapping? Elastic strapping? 9. Flexible handguards? 10. Helmet bag? 11. Velcro? 12. Blaster ring 13. Helmet masking templates Is there something that needs change/missing? I don't really know what sort of internal strapping I should use, ideas? I plan on buying the cloth belt from imperialissue.com Dave also mentioned ATA from FB for buying replacements for: 1. New ears 2. Thigh ammo belt 3. Sheets of plastic for making more cover strips And I think that's it, have I missed anything? Whew! That took some time to write. I will hopefully be able to start working soon.1 point
-
After 2 years of trooping (as part of the Galactic Academy) alongside my father (TK-72313) and my uncle (TK-17671) in my own TK, I finally became an official member of the 501st this month! Now to get my Expert Infantry and Centurion approvals! Big thanks to my squad mate @DeathTrap for the Photoshop!
 1 point
 -
Just did my third troop in my TK in one week! Armour bites are numerous...lol Sent from my SM-G955U using Tapatalk1 point
-
Great to see KB’s pallet of abs arrive early! Here’s hoping your kit arrives sooner than you hoped [emoji16] Sent from my iPhone using Tapatalk Pro1 point
-
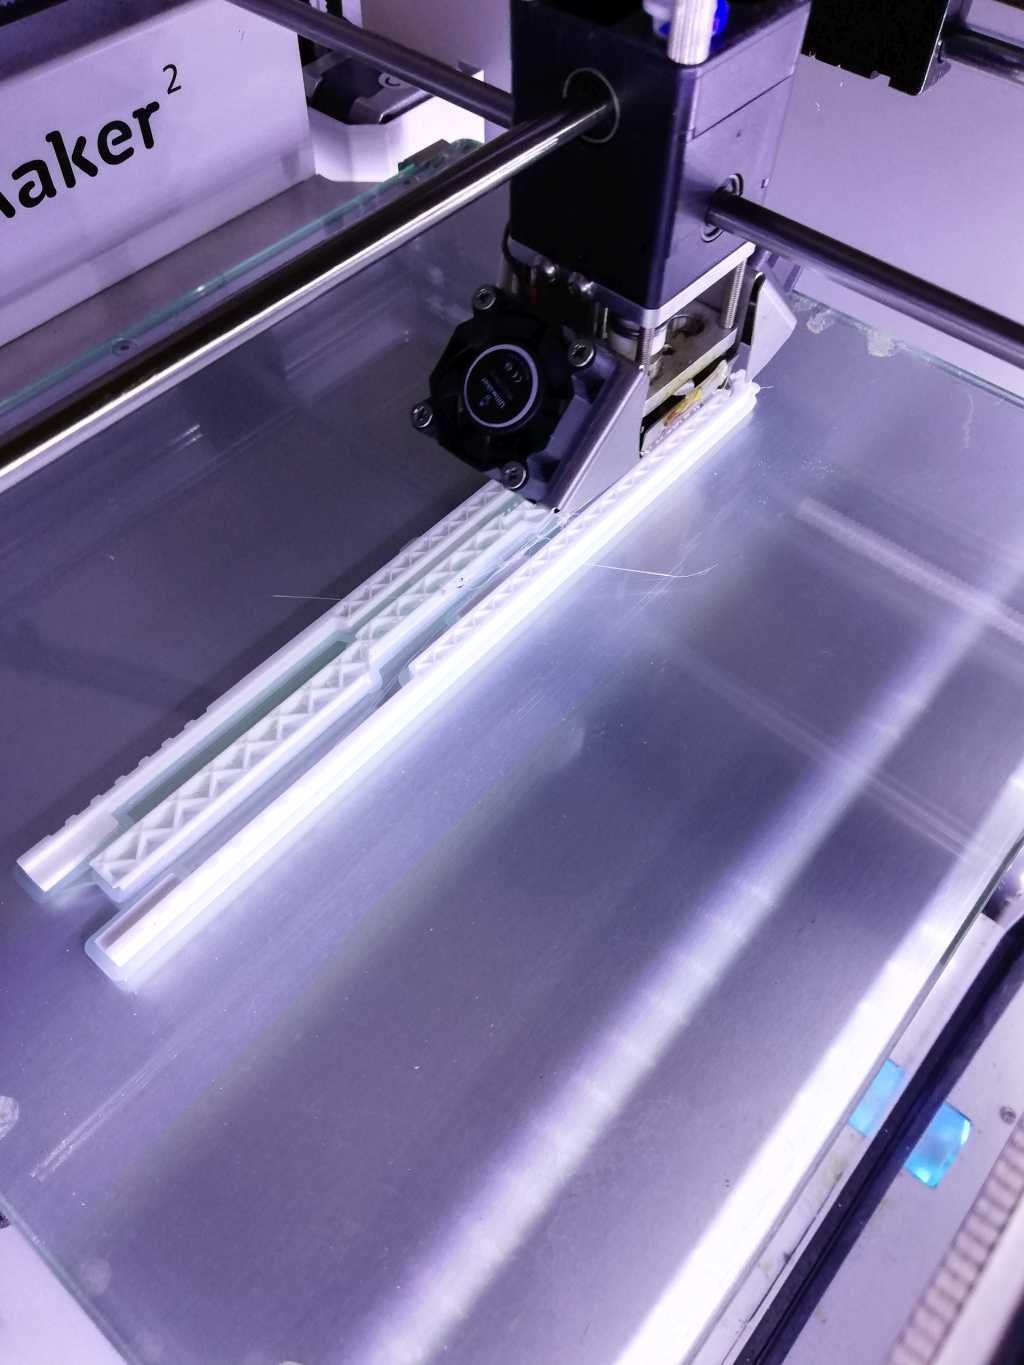
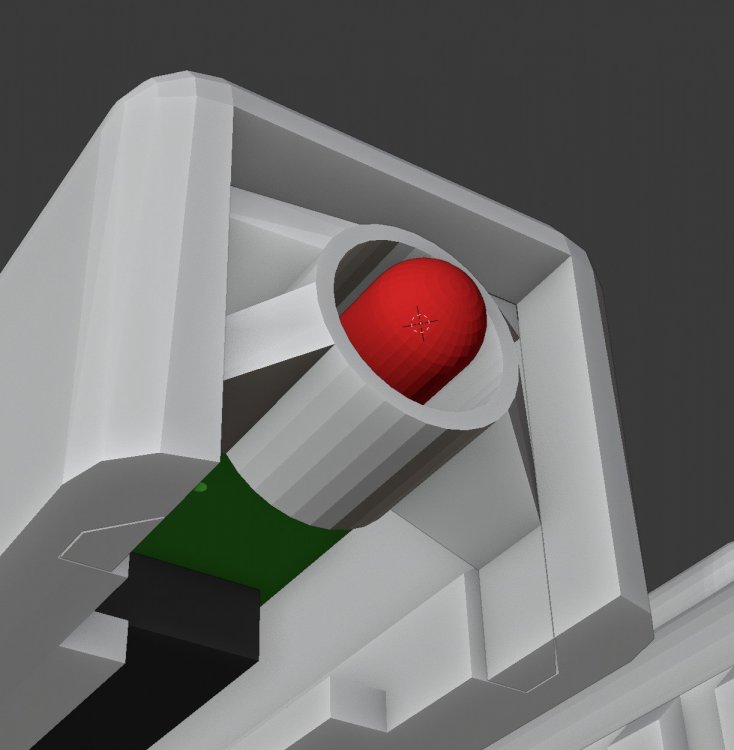
Yes that would be nice to know. However, I doubt that we could replicate that. With a professional workshop and access to more advanced materials and electronic components it probabily is a lot easier. I'll just use a regular 5mm square led as the indicator light. Not the most accurate solution, but at least it will glow nicely. Of course you will get to see it. Hopefully quite soon. That looks and sounds great. I'll be quite happy if my results are similar. I've also got a tiny update. The printer is currently printing the new slide: This morning, I already printed and painted the muzzle led holder: ...just to notice, that it is too large and I won't be able to assemble the blaster. So, back into blender and adapt the model: That's it for today.

 1 point
 -
Update, my package from Trooperbay has arrived! With it includes: -3 tubes of E6000 glue -Humbrol paint -Frownscreen -Snap fastener (with snaps) -20 magnets -4 clamps -Black nylon strapping -White elastic band -Flexible hand guards -D-ring for blaster -Helmet masking templates -A helmet bag Unfortunally they were out of brushes, oh well. I can buy those somewhere else. I am still waiting for -Brackets from MrNoStripes -Cloth belt from ImperialIssue Planning on starting tomorrow with what I have, wish me luck!1 point
-
99% complete. I ran out of accurate tox screws so gotta head out to pick them up tomorrow Sent from my Redmi K20 Pro using Tapatalk1 point
-
Can't wait for you to receive yours and start on your build buddy Sent from my Redmi K20 Pro using Tapatalk1 point
-
This is fantastic!1 point
-
1. For basic approval you should be fine with those side gaps. 2. Yes, due to your height those gaps should be fine. 3. That should be fine, but I would highly suggest putting a snap in the center as well, which will keep the belt from sagging in the front. Note that ideally the top of the ABS belt should sit at or just above the ab-button plate(s) as seen below:1 point
-
1 point
-
Wet sanding with 400 should work just as well for rattle can paint as it was for the professional paint job that was performed on my kit. Rustoleum 2x is 2in 1 paint, the primer is built in. Adhesion promoter is mainly used with professional painting but may work with rattle cans, contact an professional automotive paint supply for more information on that. I've seen people use additional primers or adhesion agents and some without. Results varied, none being better then the other. Primer is great for filling in minor scratches but may not be needed with the Rustoleum 2x. Key point is to ensure the armor is dust and water free, painted in a controlled environment to prevent foreign material or wind from effecting the process (DIY paint booth), painted in temperatures recommended by the manufacturer and following the paint process set out by the mfg. Hope this helps1 point
-
Nice looking bucket Chris, I'm assume it's relatively quiet inside while wearing, no echoing like previous versions? How are the lens, easy to see through?1 point
-
Thanks! I’m very excited to have the EIB and am looking forward to making the upgrades to apply for Centurion. Thanks to all for the help and support!1 point
-
I bought the TB/MTK Pauldron when it came out. I upgraded it to be larger using a plastic sign from a hardware store. I then covered in black leather. Very easy process. Sent from my iPhone using Tapatalk Pro1 point
-
To get a better fit, I glued one end of the spring into its slot in the trigger that way the spring wouldnt have the chance of falling out. Magnets are in today as well and glued into place for mag release. Everything held together with E6000 Sent from my Redmi K20 Pro using Tapatalk1 point
-
My kid probably has those jammies...1 point
-
TK performance wear1 point
-
Casual troopers1 point
-
I used automotive acrylic paint but same principals would apply no matter which paint you use, try to use the same make of paints, using different types can cause reactions. Make sure you wet sand the entire armor before applying primer (primer filler) you do not need an adhesion promoter. Using water with a little dish washing liquid helps to keep the paper from clogging as quickly and also allows the paper to glide a little better, also try to sand in circles, less chance of scratching. Once primer is applied and dry I like to scuff with 600 grit sandpaper dry, this will get rid of any little bits or imperfections that may have been stuck while applying the primer.1 point
-
I have had dental issues in the past, and worked with kids who have had allergies. So I prepared some alternative treats instead of candy for some kiddos. Legos were from a kit I had, they're like $5 a piece. But I found a bunch of toys at Ross, and each Hasbro figurine came out to under $2 Think the kiddos will like?1 point
-
Well, we've had calls out for CRL edits for over a year and for most of my term I was doing monthly updates. If you have specific language you want to see, you are always free to submit it as: What is currently says: What it should say: Also, as you are probably already aware the CRLs - not just ours but any in the 501st - aren't meant to capture every possible variation or wardrobe issue, but the canonical character. Hence why Mr. No Stripes is not in the CRL, etc.1 point
-
The real forearm difference is the shape at the elbow. A different cut altogether. The area you’ve highlighted as ‘grey ‘ is actually a dome head Allen key bolt. This was one of two bolts used to affix the Picatinny rail on the TLJ kits. There are three different cod shapes seen in TLJ and I trust the CRL will address this in time. It’s hard to enforce the all black end cap as standard when the TFA TD is seen several times in TLJ. Admittedly the TLJ TD was a complete redesign from TFA but it’s hard to ignore the facts seen above. Sent from my iPhone using Tapatalk Pro1 point
-
So this is The next part of the build update. Painted and did an assembly on each individual parts before I hit a snug. The holes between the glock slider and the body piece wasn't deep enough hence there's an awkward gap. Tomorrow once I receive my Dremel keyless chuck, will make the 2mm hole deeper with 1.5-2mm drill bit. As you can see with paint on, everything looks flawless due to the no to little print lines in SLA printed props while maintaining details A tip, to apply a dash of super glue on the small metal rod @ the trigger. This way it will keep the rod from sliding out. Thanks for reading and hope you are inspired. If you ever need an SLA print of this blaster, you may visit my page to get one for yourself, The Imperial Factory: https://www.facebook.com/ImperialFactory/ Sent from my Redmi K20 Pro using Tapatalk1 point
-
It was bad they missed the last movie with delivery but to miss the final in this trilogy, that’s just downright unforgivable. When anyone asks it’s a big NO to aNOvos, you guys had more than a few chances and you flippantly threw them away.1 point
-
What I like the most about watching new Star Wars trailers: - it brings back the excitement of a child at Christmas - the Lucasfilm Ltd. logo appears and expectations rise - the music, the pictures and the sounds make you feel home - tears of joy - and finally goose bumps all over Sometimes a trailer can cause more fascination, than the whole movie itself. Let's hope it will be different with this (last?) episode...1 point
-
Looking great, Jamie. Best of luck. :-)1 point
-
Hi Jonas, there's a lot of work ahead for you but I'm pretty sure you are in the best place to acomplish your project. About the strapping, I personally use a mix of both, Nylon and elastic, depending of wich armor section I need to be more fixed and wich one I need it to be more flexible. Example, I placed Nylon into the Ab-But connection, but use Elastic in the Chest- Ab connection to avoid any crack if I bend to give a hand to a child. I have learned this by reading the forum threads and by test and fails . good luck with your build and as you already know, there's a lot of experienced troopers here to help you. Cheers1 point
-
great thread! he's adorable!1 point
-
He was probably a huge hit! Sent from my iPhone using Tapatalk1 point
-
You can do it Fredrik1 point
-
Hiya Looking good. :-) Just a little note to watch the size of the ab buttons. Also, straight edges and corners on the little one. ;-)1 point
-
Came out great Keep it up your almost there One tiny little suggestion would be to straighten the corners on the ab button plates to match the original if you feel like it1 point