Leaderboard


Popular Content
Showing content with the highest reputation on 09/17/2019 in Posts
-
work in progress!! Hi All! Doing some research on helmet add-in's. Just wanted to throw together a list and see if anyone else knew of any others, or could give opinions. Not in any particular order. Tagging sources and sellers if they're on FISD, since we always want to support our own! Noting location where possible since it will affect shipping times and possibly taxes. Working list as I continue to gather more options and get more info. I plan on building a Fem7 (not 501st approved!) so space is key, so I will personally be more interested in space saving options, but will put as much info in here so others can refer if needed. Prices are not included, since prices can change due to costs, location, etc. UPDATE: 2020 JULY 8TH Going to slightly deep dive microphones and speakers, since I think this could potentially help those of us who are having difficulty being heard while wearing face masks. They will be detailed under VIII I. Fans (keep cool, prevent lens fogging) A. @ukswrath Stormtrooper Cooling system - USA California based - comes with battery pack, or get a power bank - option of a personalized 'bracket'; to mount 2 or 4 fans B. @CTID Troopacoola - UK based - just mount (some supplies included), and get a power bank - optional fan speed options C. @NeoNines First Order Concepts Rathtar - USA California based - powered by AAA batteries - use of little tubes to aim airflow at specific areas D. Trooper Tronix - optional rechargeable usb power units E. @StrmTRPR85 Fan Boys - USA Ohio based - optional control speed of fans - optional power on/off switch - optional power bank - has option of smaller fans: 35 x 35 x 10 mm F. Henry's Helmet Fans (also on FB, very responsive) - USA Washington based - has 3 different size options by request (smallest is 30mm) - depending on kit, has switch options, and 3D printing directions for directing air flow - needs power bank G. Make your own out of snow, that's a true SnowTrooper! 1. mini fans 2. power supply F. Only troop during blizzards II. Audio (hear the outside) A. @ukswrath Stormtrooper Hearing Assist (FISD) - USA California based - amp + 2 mikes + power; supply own speakers/earphones - option of purchasing 2 small flat speakers to put in the helmet B. Make your own 1. mini microphone(s) on outside (recommend in ear pieces) 2. amplifier 3. earphones or internal speakers C. Hope everyone speaks like Bernie Sanders III. Speakers (let others hear you) A. @ukswrath various audio systems B. Make your own 1. microphone 2. external speaker C. Do your best John Bercow impression... but say "First Ordah" instead of just "Ordah"! IV. Voice Changers (sound like the character, add radio static and clicks) A. @pwhitrowTRamp > note that due to size, cannot be placed in helmet unless it's Spaceballs bucket - UK based - comes with speaker, charge directly - option of keyfob control for voice clips, option fingertip buttons - not small, needs to be placed outside helmet - customize microSD on computer, need adapter B. @lerxstrulzTK-Talkie - USA, Texas based - need speaker, mic, power - lots of customization on phone app B. @TK6294iComm and shop (link in FISD thread is dead) - USA, Texas based - need speaker, mic, power - no background loops or sound bites - note that iComm itself has its own internal battery, which will die > mod to use external battery by @Sly11 C. @TK256 FX/ROM > no longer active, putting for archival purposes and thank you for your service D. @BrinkHouse*TrooperTalk > iOS based boooooo! Android is better!! - through iPhone so location is non-issue - needs mic, speaker, and splitter to connect all elements - highly customizable, since it's an app they probably will push the updates directly E. DIY using radios (See VII. D. for a great build) F. Take an acting class V. Chatter and sound bites A. *MiCom (FISD?) - USA based? - comes with battery, and palm-strapped remote with 8 buttons - need speaker B. @ukswrath probably has something the dude's like a one trooper bazaar C. Build your own 1. sound storage (phone or mp3 player) 2. speakers 3. optional: splitter (depends on what sound storage device is used) 3. optional: trigger item (PTT button, control gloves, etc) VI. Build your own A. Power supply options [credit @sharkbait breakdown of options in a short blurb, plus a longer explanation] 1. option: USB charged power banks 2. option: 9V 3. option: rechargeables B. Speaker options 1. Your own use (hear what's outside the bucket) a. option: mini speakers b. option: earbuds 2. to broadcast a. option: large speaker, placed on body b. option: small speaker, placed in helmet C. Microphones 1. option: wired - no need to worry about charge - depending other elements, may need to wire through clothes - depending other elements, can still be contained in bucket, but interior planning is a must 2. option: wireless - free of wires, bucket is easily removed without breaking image - power supply is to be considered - consider how connected (such as bluetooth) 3. option: throat mic - no concern over bucket space, can be hidden under clothing - consider ease of switching on/off when bucket is not worn - consider ease of use: throat mics need to be optimally positioned, and are affected by body hair and fat on the neck area D. Fans E. Voice changing or sound bites F. Padding VII. Recognizing awesome builds A. PatchBOTS Youtube - arduino based, puts in speakers, mic, audio, fan, lights, uses ROM/FX Board B. @MissionTrooper Troopduino - arduino based, voicechanger. He also has some shots of his fan build below, and is generous in providing the STL for 3D printed pieces C. @cjdesign DIY USB Helmet fan - what it says on the tin D. @TKedt static burst walkie talkie talk - uses 2 traditional walkie-talkies to voice change, amplify, and ability to speak privately with troop/handler E. @usaeatt2 TK Helmet Interior Assembly - absolutely beautiful interior design build that is screen accurate, using their own kit F. Not helmet related, but wanted to salute @Ruthar for his build on making armor Insulin Pump friendly G. @kamikaze Super clean helmet electronics/interior build - what it says on the tin, woooow that's clean H. @sharkbait gives a great breakdown of basic diy helmet below, but direct link here I. @themaninthesuitcase has an overview of diy fans below, direct link here VIII. Face Mask considerations A. Microphone Consider pickup location: is microphone is outside or inside the mask, or a throat mic Outside: May possibly be muffled, depending on distance to face. Would not have to deal with breathing noises or humidity. Inside: Will not be muffled, but will have to deal with breathing and humidity. Throat: sound pickup and humidity issues side stepped, but throat mics are inherently difficulty with placement. Consider connections: wired or unwired Wired: most stable, and will not require extra charging. However, wires will need to be tucked away, will need to be sanitized, and are a possible air leak or contamination risk depending on placement. Unwired: contamination and air leak avoided. Mic will need to be charged separately, and will need to be paired Consider contamination risk (may be more important for essential workers or those who have to wear for long periods of time) Consider ease of sanitation 1. Earset - can be outside or inside mask, though inside may be more difficult - possibly will interfere with ear loops (if wearing a bandanna or using ear savers, may not be an issue) 2. Headset - can be outside or inside mask, though inside may be more difficult - will definitely be more likely to interfere with masks and bandannas, depending on placement of band 3. Lavalier 2. Throat B. Speaker Consider placement Consider power C. Useful Links/videos/builds 1. @MissionTrooper recommended watching build of Adam Savage modifying a small lavaliere mic into glasses - Microphone is from the company Countryman, and specifically is the B6 lavaliere mic, which has a very small profile - Countryman does have other laveliere mics that are not as eyewatering, such as the EMW lavaliere mic, which is about half the price of the B64 points
-
Oh, I did make a little progress the other day if anyone's curious. Bought some random 2" suspenders off Amazon and retrofitted them to (mostly) work to hold up the barrel. It was just me working on this, so taking pics and adjusting things was a challenge, but I might as well bring ya'll along for the ride. Random Amazon suspenders: Chopped the ends off to add snaps: My assistant is useless, but means well: Made some tabs to stick in - these are only temporary until I finalize what I'm going to do to reinforce the barrel a bit: Boom, all mocked up! In hindsight, the suspenders are way too long and I had to max em out to get the barrel sitting high enough. I'll either need to cut and shorten them, or mount them lower in the barrel. A couple of crummy test fitting shots: The side connectors are definitely too long and will need to be trimmed down a bit so I didn't attach them in the front yet. I'lll also likely be taking a little off the top of the barrel, and off the top of the cod plate to get everything to fit well. I'm about 6ft and 160lbs, so on the slim side. This kit should fit slightly bigger troopers easier than I originally thought, but I'll need to trim it down, which is intimidating. Anyways, that's it for now!4 points
-
I'm happy to report that on September 12th I was approved!! I've posted this information on every platform I could and now I'm posting it here. When I first joined the FISD, I posted a before and after picture of myself and told the story of my weight loss journey and how joining the 501st was a goal of mine on my journey. I'm now happy to update that before and after picture. I would also like to take minute and thank a few that, l felt, were right along with me for my entire build. gmrhodes13, Coastertk, starsaber25, ukswrath. Thank you so much for your guidance and support. I truly couldn't have done it without you. Taking on a project of this magnitude is not for the faint of heart. I took it on because it's something I believe is worth it. If you are thinking of joining I suggest doing your homework first. Read, read, read...... Then read some more. There is a treasure trove of information and experience in this group and you would be a fool not to listen and utilize it. Thank you all so much for your warm welcome and guidance. I truly cherish every moment during this new journey. I can't wait to get out there and start trooping and meet some of you in person. "You've taken your first step into a larger world." Obi-Wan Kenobi Sent from my Pixel 3 XL using Tapatalk2 points
-
First Order Driver and Treadspeeder Sent from my iPhone using Tapatalk Pro2 points
-
Welcome Jonathan! This is not an inexpensive hobby. In addition to armor/bucket, you’ll be spending on other materials and accessories as well. check out the PX/Commissary when you can periodically. Forum members sometimes need to get rid of stuff in a hurry. You might get lucky.2 points
-
Welcome. Let me just add on that what’s everyone is saying is true this can get expensive but when well maintained you’ll get years of use and kids smiles out of it. So look at it more as an investment. Save up and do it right, it doesn’t have to be done right away. Sent from my iPhone using Tapatalk2 points
-
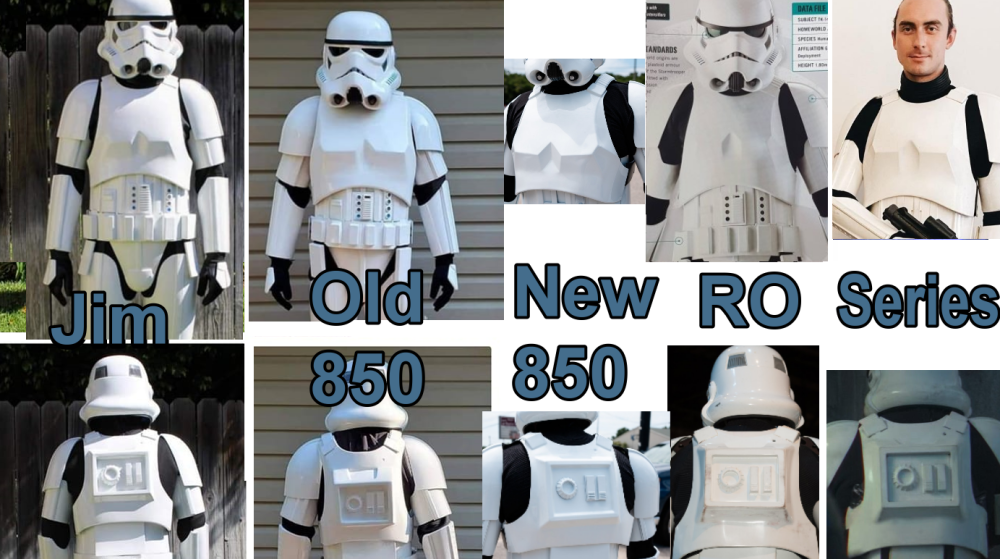
Rogue One TK Sources (updated 8-10-2020) Since I keep seeing these questions popping up from time to time, I figured I would make this simple for everyone. I do not have experience with some of these sources so if any of you do please chime in. Further, I am not pushing or supporting any of these sources, I am just providing you all the list and what they provide, and you choose who and what you want to go with. Lastly, If I do have experience with a specific source, I will note that and my overall experience with them. I am not pushing any sources, rather supplying you a list to work from if you are having a hard time finding stuff. Please feel free to add to this or provide "creative" comments. ROTK Sources Jimmiroquai Armor, Helmet, Under Suit [email protected] Jim was the first source for ROTK armor and is considered very accurate. The armor is flexible fiberglass and requires painting. I have a full set or armor, helmet, and under suit from Jim and I like everything. 850 Armor Works Armor, Helmet, Under Suit https://850armorworks.com/ 850 AW is offering vacuum formed ROTK armor. They produce this armor in ABS and it looks accurate from the pictures I have seen. They also offer a resin helmet and undersuit now. Helmet Nico Henderson Helmet 3D print files https://www.facebook.com/nico.heath Etsy Nicolai DesertFareCosplay https://www.etsy.com/au/listing/784808040/rogue-one-stormtroopersolo-mimban Nico designs extremely accurate helmets, his Shoretrooper helmet is considered the most accurate available and now he has designed a ROTK helmet that is extremely accurate and all the greebles are separate so you can print and paint them before attaching them. You will need to message him on FB. I have his ROTK helmet files and find them to be outstanding. Suggested print orientations https://www.whitearmor.net/forum/topic/53519-recommended-printing-positions-for-nicos-tk-helmet/ Updated files TKModder421 https://www.whitearmor.net/forum/topic/53406-modifying-the-nico-helmet/ OxProps https://www.thingiverse.com/thing:4227844 Lenses Green Rogue One TK lenses to fit the Nico Henderson helmet Mr Paul's Shoretrooper Build https://www.facebook.com/totalgrunt Armor akira-yuming Armor 3D print files https://www.cgtrader.com/3d-print-models/art/other/star-wars-rogue-one-tk-first-imperial-stormtrooper-armor ( Build thread Jason @BigJasoni build thread https://www.whitearmor.net/forum/topic/49826-the-bigjasonis-rotk-3d-print-build-thread/ Updated 3D files Jason @BigJasoni updated kidney plate https://www.whitearmor.net/forum/topic/52974-rogue-one-new-generation-eib-centurion-kidney-plate/ Jason @BigJasoni updated belt boxes https://drive.google.com/drive/folders/19k-95YPTsiBJzHGIumsGLYQjQlx_S0p4 Jeff @11b30b4 updated ab greebles https://www.thingiverse.com/thing:3973969 Jeff @11b30b4 updated handplates https://www.thingiverse.com/thing:3910278 (issue with sides of model) Ox Props hand plates https://www.thingiverse.com/thing:3750366 Shoulder Strap 3D files printed in TPU https://www.whitearmor.net/forum/topic/57810-rogue-one-tk-shoulder-straps/ Hasbro Black Series Helmet Amazon and others Very nice helmet that will require significant alteration to be 501st approved. I have one and I am planning on altering it for use with my 850 AW armor. Build threads updating Jeff @11b30b4 updating Black Series helmet https://www.whitearmor.net/forum/topic/48054-11b30b4-tutorial-rotk-black-series-helmet-mod/ Colin @OddViking327 updating Black Series helmet https://www.whitearmor.net/forum/topic/52589-modifying-a-black-series-helmet-for-accuracy/ Updating Colin @OddViking327 vent/traps updated 3D files https://www.thingiverse.com/thing:5455582 Please Note HeadShotProps is temporarily suspended as a recommended vendor, until they are back to normal and gain positive feedback from our members. HeadShotProps Armor, Helmet https://www.etsy.com/listing/830810037/rogue-one-stormtrooper-armor-kit?ref=shop_home_feat_4 The armor is vacuum formed and looks very similar to 850AW, although the TD looks better in the pics than the 850AW TD. The helmet looks to be a nice pull, this helmet is roto cast with greebles Soft Goods Other than the previously noted sources many of the soft goods are available from these sources: Dark Side Closet Under Suit https://www.facebook.com/TheDarkSideCloset/ I have messaged them for pricing and shipping, and they are very responsive. Geeky Pink’s Gaskets Under Suit https://www.facebook.com/GeekyPinksPhantasticGaskets/ You will need to message here and provide specifications. Keep Trooping RO Boots, Gloves, Strapping https://keeptrooping.com/ I have a set of boots and gloves from IB. I love the boots, the gloves are not the highest quality. Endor Finders RO Gloves https://www.endorfinders.com/ I have a set of gloves from EF and I love them. Katarra8 RO Pauldrons https://www.etsy.com/listing/150178963/classic-star-wars-stormtrooper-shoulder?ref=shop_home_feat_3&frs=1 I have a RO Orange Pauldron from Katarra8 and I love it. Veeds Pauldrons RO Pauldrons https://www.facebook.com/pages/category/Product-Service/Veeds-Pauldrons-305552456469495/ I do not have any of Veeds’ Pauldrons but he is highly reviewed and respected. Sheev's Emporium RO Undersuit and Gaskets https://www.facebook.com/sheevsemporium I do not have any of Sheev's goods but I do know they have been very active in the Shoretrooper community and the quality seems to nearly screen accurate. Crow Props RO Boots https://crowprops.bigcartel.com/product/fo-r1-tk E-11s Bryan @trooper96 3D print files https://www.printables.com/model/155855-st-sterling-l2a1-aeg-and-rogue-one-e-11-conversion Sterling conversion https://www.printables.com/model/168104-rogue-one-e-11-conversion-kit-for-sterling-smg-mk4 Hyperfirm Weaponry (HFx Productions) GOING OUT OF BUSINESS, NOT TAKING ANY NEW ORDERS RO E-11 https://www.facebook.com/HFx-Productions-1669859386576227/ I have a B-Grade RO E-11 from Hyperfirm and love it. Praetorian Blasters RO E-11 https://www.facebook.com/BlasterMaker/ I do not own a PB RO E-11 but it looks awesome. S&T Full Metal Airsoft Sterling E-11 RO E-11 https://www.evike.com/products/61969/ While most of the E-11s used in RO were made using the S&T Full Metal airsoft Sterling, this E-11 is not very accurate for RO. The scope, counter, and power cylinders are all wrong and there is not a light rail or tactical light. DoopyDoo’s RO E-11 parts https://www.doopydoos.com/star-wars-props-31-c.asp It has been noted that some of the E-11s used in RO were equipped with a DoopyDoo cast of the M.H.R. Co. M38 Telescope from Sherman M4 Tank (1943 version with wide front foot). War Machine RO E-11 parts http://www.warmachinepaintball.com/online-store-replicas/ If you are looking to make a full “all metal” RO E-11, look no further. War Machine makes everything you would ever need. Bulldog Props RO E-11 parts https://www.facebook.com/BulldogPropsJapan/ Brian makes resin casts of the M.H.R. Co. M38 Telescope from Sherman M4 Tank (1943 version with wide front foot) that are completely accurate and disassemble-able. I own one and love it. I have done a full review of it on FISD. Shear Tech RO E-11, Rubber RO Handguards https://www.facebook.com/sheartech/ I am not real familiar with these guys but the E-11 looks nice and the rubber hand guards are nice as well. Picatinny Rail ROTK / FOTK E-11/F11D Picatinny Rail - (evike.com) - Link (purchase) E-11/F-11D Picatinny Rail - (justloseph63) - Link (purchase) E-11/F-11D Picatinny Rail - (m416gelblaster) - Link (purchase) F-11D Picatinny Rail - (themaninthesuitcase) - Link 3D files E-11 Picatinny Rail - (TK14082) -Link Part of Rogue One 3D files While there are a lot more sources out there this is a fairly good list for anyone to work from. I did not include sources like static burst communication kits or urethane rubber shoulder straps sources, but they are out there and if you are looking for that stuff you should be able to find them. I hope this helps those of you who are looking to embark on your ROTK journey. Rough comparison Chest / Back
 1 point
 -
Was able to acquire an Anovos set and, since there's no way to replace SNAFUs, am a little bit nervous with this build. Manbehindthemask is currently assisting with this build and is doing a lot of the heavy-lifting. Also, as stated in my welcome post, I am 6'1" and my armor is designed for up to 6'... a little nervous about undertaking this project so the help is much needed. I've spent way too much money on an ANH and a RO Vader builds so, if I try to spend a lot on this one, my wife will probably leave me. Since I've done almost no research at this point, my list is short: Armor : Anovos Boots : Caboots Right now, Ryan and I are trimming the armor to size and I ordered my boots from Caboots because they're the ones that made my Vader boots and they are awesome - I have problems with my feet and standing for long periods... I am able to troop in my Vader boots without pain and without my prescribed insoles. Other than that, I'll add to my list as I go along. Thanks for reading and for any help or suggestions you have for me.1 point
-
Armor Maker: AP Helmet Maker: AP Blaster Type: Quest Designs Height: 6'1" Weight: 175lbs. Boots Maker: Imperial Boots Canvas Belt: AP Hand Plates Type: AP Electronics: ICOMM with Aker Neck Seal Type: Darman's Props Holster Maker: AP Full Body: Armor Details: Helmet Details: Blaster: Accessory Details: Added chest/ab connection showing elastic and front of ab plate without belt:1 point
-
Comic version is standard FOTK so could be a good push for FISD as an evolution costume of the rider1 point
-
A couple of threads which may be of help: https://www.whitearmor.net/forum/topic/37384-anovos-left-shin-and-sniper-plate/ https://www.whitearmor.net/forum/topic/35914-anovos-shins-help/ https://www.whitearmor.net/forum/topic/37350-anovos-shins/ https://www.whitearmor.net/forum/topic/35086-ukswraths-anovos-tk-build-stunt/page/3/?tab=comments#comment-4649871 point
-
Added additional photos to the original post of the white elastic connecting chest and back plate as well as the ab plate without the belt.1 point
-
If you need any help or have specific questions let me know. I'd be happy to explain or assist in any way we can. You can see in the facebook album we made some belt modifications so it's a softer rubber lol. I also got her a regular FOTK helmet but KW has the Fem7 inspired one1 point
-
5% is pretty good. My CC is 2%. Mod note, moved this to NCO as it not an item for sale/trade.1 point
-
Welcome, Jessy! Another newbie here, south of you in the San Lorenzo Valley.1 point
-
Always keeps us guessing1 point
-
I guess this bad boy will be headed for Pathfinders. Sent from my iPhone using Tapatalk Pro1 point
-
Looking really good so far. Some possible knit-picky points: Forearm with seems a little loose on your arms by your left elbow Left side kidney / ab plate does not line up at the top. Double check your strapping On the right side close up of your side, it looks like your belt is very loose. Seems like a big gap between belt and kidney plate. Sniper plate looks really level, so good job. It does seem to be pivoted towards the inside, so it is not centered over the cover strips. Not sure if this is a huge deal The black paint on the front of the helmet has some wavy and uneven edges. I know it's hard to get the edges clean, but some work with thinner, toothpick and cotton swab can help. D-ring on E-11 may get picked up for not having the proper shape. Once again, these are picking at details. Very solid build, and good luck!1 point
-
Excellent. I was hoping that was the case.1 point
-
More progress. With limited time last night I initially thought I’d just cut and prepare my snap plates for the arms. After cutting 10 1”x1” plates, burning the edges, and setting the snaps, I realized I had a little more time than I thought. I grabbed my my left shoulder bell, bicep, and forearm and tried to do some rough measurements. I can get the distance between 1 1/2” to 2” comfortably. Not sure if that’s okay or not. One thing that stood out was that the bell wasn’t really fitting over the bicep. Part of that is me needing to hot water bathe and reshape the bicep from an oval to a circle. Another part is the return edge. (See above). Should I take that edge down further to maybe 2-3mm? While trying to properly measure the complete arm I realized the until I knew where the bell was going to sit, my measurements were going to be off. So I took a final look at Tony’s AM build shoulder section and put the front and back of the armor on the work bench. Grabbing my ruler, a pencil, and the back plate with the should strap attached, I measured three inches on the white elastic and marked it. Next using painters tape, I wrapped the elastic at the 3” mark, and then using that marking attached the back plate to the front with more painters tape at the marking. 3”. I’m pretty happy with the result. Obviously I need to sand, trim and create the top return edge for the shims, but the fact that everything is lining up is pretty exciting. One thing that’s coming up is my kidney shim is legit, unbent 2mm abs. As such, it’s stronger and less willing to bend than the rest of the suit. Any suggestions on safe ways to bend the shim inward toward the ab plate would be appreciated. To to keep things simple and moving along, like going to use snaps for the shoulder bell connectors to the shoulder elastic. My understanding is that using snaps there won’t effect EIB or Centurion approval. It’s just a personal preference for canon accuracy. I still need to mock up the shoulder bridges at this length, so I’m hoping this fits the length of the bridge. Once the shoulder straps and bridges are confirmed in their final positions, I’ll do the setting and snapping along with the center snap for the shoulder bells. Once those are in place I’ll be able the gauge how much length I can squeeze out of the bell/bicep overlap. Getting close!1 point
-
@StrmTRPR85 thanks for reporting in! updating with your provided info now. oh the midwest... I lived next door in Indiana during my college years.... not gonna lie I'm glad to be in predictable weather California again1 point
-
Thank you so much @Navajo Bro!! This was exactly what I was looking for <31 point
-
Sorry I missed this, yes I did an entire build thread on our local forums here: https://www.501stner.com/members/index.php?/topic/11392-fem-7-armor-build/ Kevin helped me with a few questions, he's great with communication and tips. You can join our forums and see my thread no problem, send me a PM if you need any help I have a photobucket album here too, which I used for the build thread, no descriptions but probably still helpful as a quick reference. https://s199.photobucket.com/user/bro117/library?page=1 And lastly my fun armor building page on facebook hahaha! https://www.facebook.com/pg/BrodustrialLightAndMagic/photos/?tab=album&album_id=2578344784866201 point
-
Just arrived a week or so ago, and am lurking through threads. This looks simply amazing.1 point
-
Good job Glen!1 point
-
I'm based in the US, good old Ohio I also have a smaller fan size option as well.1 point
-
Good work on your armour! Good Luck!!1 point
-
Thanks for putting Troopduino on the list. I'll be updating soon.1 point
-
Home Stretch: Nylon straps and foam liner: Don’t ask me how because I fought with this thing and broke out a sweat and had to take a break and come back to it... I got the pipe secured with machine screws, washers and lock nuts: I have the wipes container secured with machine screws, washers and lock nuts and the siphon riveted to the oil pan base. Pain in the an impolite person but I finally got it and it looks like it’ll hold up well: The remainder of the boxes I’m just E6000-omg to the base, weights holding them down: All that’s left for this is a wash to weather it a touch and the enamel spray sealer. Sent from my iPhone using Tapatalk1 point
-
Thank all of you for the review and kind words. I’ll get going on all the improvements immediately and the only way my belt is getting any tighter on the kidney gap is to drop a few pounds so that will be the most difficult and time consuming part, lol [emoji38].1 point
-
C´mon Bro! It´s yours!!!!!!!!!!!!1 point
-
Thank you all. I should have been more specific when I said bespoke, I meant it has been built for me already (which I hope is ok?). I appreciate most people build them but I’m utterly hopeless at this kind of thing!1 point
-
I got my TK ID! TK-12929 I have a Quest Designs E-11 blaster. Can I go on to EI without weathering my blaster? I plan to do so eventually.1 point
-
Awesome idea! My small contribution - TK-Talkie is definitely US-based. Brent is in Texas Also, might be useful - the Aker 1506 (and knockoffs) as well as the Pyle Pro are probably the two most popular speakers in use atm. I would also LOVE to see a section with recommended battery packs for running all the electronics!1 point
-
Hey all, just poppin in for a quick update. Haven't made a ton of progress lately - unfortunately I've been having some health issues and am waiting on some scans to know how worried to be, plus it's been difficult to coordinate with our build group and I've just been busy personally (and SUPER tired all the time). Got my 50th troop with the Legion (37th FTE) in this past Friday though, so that's cool! Been a member for almost 2 years, so I'm right on track for my original goal of 2 events a month. Forums are cool, high five-ing kids is better tho haha I did start doing some test fitting and am so far very pleased with the fit of the suit and how comfortable it is compared to ANH. I also worked out the bicep issue and found the matching one in another trooper from our group order's kit. I'm still researching how to reinforce the kit before paint or final strapping, but I think I'm making this too complicated in my own head and just need to commit! haha Hopefully some progress and pics this weekend! Also, our group order from Imperial Boots is ready, so my T7s should be arriving in the coming weeks. We saved like $30 a person working with Vince! Awesome.1 point
-
Hey everyone! Although I have not gotten much traffic here,(which makes perfect sense as this forum is dedicated to stormtroopers, not mandalorians) I will continue to post updates on my thread here. I may end up moving this thread to the Bounty Hunters Guild forum. But for now, it is here to stay. So, onto the progress report! I have done a complete overhaul of the old pieces, as they were inaccurate and needed a change. I also made custom keyhole slots for the back of the helmet as seen here. I have also updated the forehead crest. And that is pretty much it. Soon I will be applying the first coat of fiberglass resin. Until next time1 point
-
Jose luis Delgado Saavedra TK 16790 A4 Sha Sha http://www.whitearmor.net/eib/certificates/16790-eib.png 2651 point
-
Hey Johnathan, I'll be pretty straightforward - odds are that unless you are an experienced prop maker and very proficient with vacuum forming already, you will not be able to "construct everything". The overwhelming majority of us purchased raw, pre-formed "kits" from vetted makers, then trimmed and assembled them custom to ourselves. Quality molds/bucks are few and far between and the people who have them don't just give them out. Often, they have spent dozens, if not hundreds or thousands, of hours sculpting them. It's not something you can just make your own of or find for cheap. Please look around in here and check out some of the links to find a maker that's right for you. Your very best bet will be to do a lot of research while you save - like Michael said, $600USD is about the bare minimum for getting into an ANH-S suit, and they go up from there pending quality/options/different costumes. The good news is - you're in the right place. You've found some of the people that will be HAPPY to help guide you along this journey. But let's set some reasonable expectations right out of the gate. Please post any questions you have up in here - we'll all do our best to help. Welcome!1 point
-
Hey cadet! Unfortunately armor doesn’t come cheap in most cases. Depending on who you buy from and what materials you already own (snaps, tools etc.) you may spend anywhere from $600 to over a thousand. It’s a big investment but well worth it, probably the best purchase I’ve ever made in my life Do some forum trawling to get started, find who you can trust and who you can’t. Look at supply lists people have put together and check how much you own versus what you need. Ask lots of questions and finally, order the kit! We’ll be here to help the whole way!1 point
-
Hey Jonathan welcome to the FISD1 point
-
Hello and welcome aboard, research is the key, good luck1 point
-
Welcome aboard Jonathon, check out the link and ask plenty of questions, it's how we all got started.1 point
-
Welcome to FISD Jonathan !!1 point
-
Welcome aboard! Check out Preston's link above it's a great start1 point
-
Hey Jonathan! Welcome to the FISD. Many members receive their armor on vetted armor makers. A list of those makers can be found here. Take your time, and do your research. What area/garrison are you part of?1 point
-
Fantastic job Jose, welcome to EI brother1 point
-
Welcome Don, looking forward to your build progress1 point
-
Hey Joseph I will be using CaBoots for my new build and just happen to have a ready to go photo. Sent from my VK815 using Tapatalk1 point
-
So that high-profile troop happened. My first outing in my Hero kit, and things went along flawlessly! Before rehearsal, backstage with the FISD's very own Scimitar and LTM! Rehearsal with the troops! Rebel scum spotted!!! After rehearsal, we were allowed to go out and mingle incognito among the Imperial Citizens until it was time to kit up. My "Dead Trooper Arm" was spotted! Final rehearsals (and I'm not the shortest trooper, just standing next to her). Lining up right before going on stage. That's Scimitar rocking out in the back. Waiting in the wings! On stage with Weird Al!!! Can you spot me? I'm the one with the comm link on my belt. Post-performance elation!!! Then Weird Al took pics with us. Supreme Nerd Leader!!! Yeah!!! I was fangirling out in a major way. Aside from finally completing this Hero kit, this will be the highlight of my year for sure!!!1 point
-
A few people have asked for some more details regarding my voice setup. I bought a set of LXT600VP3 Midland Walkie Talkies open box from Amazon, they were around $30. Midland makes a bunch of these at various price ranges, I went with the LXT600VP3 because it has a low power mode for short ranges (like 2 inches in my case), and it comes with rechargeable batteries. These are velcro'ed into my chest plate, with the speaker facing my body. With the ab plate on, it lifts the torso up high enough to prevent the walkie's speaker from being muffled by my chest. My ATA bucket is really cramped, but you could potentially shove the broadcasting walkie in there if you wanted the audio coming from your helmet. One of the walkies is plugged into a Midland Throat Mic, this is your broadcaster, keep the volume turned down/off. You could use a traditional mic, but a throat mic won't have any problems with feedback, or fan noise, and you're free to take your bucket on and off without wires getting in the way. The second walkie is your receiver, crank up the volume, and make sure both are set to the right channel. You can turn on VOX mode on the broadcasting walkie, or use push to talk (PTT) button that is built into the throat mic. The cord is a bit short but can reach your belt or anywhere on your torso or ab plate. PTT sounds a little better, as VOX can clip your first syllable, but being hands free is pretty damn convenient (just remember to switch off your walkie before complaining about the child you almost tripped over). My neck seal actually makes the mic sound better as it holds closer to my larynx, it's no more uncomfortable than normal.1 point