Leaderboard


Popular Content
Showing content with the highest reputation on 06/27/2019 in Posts
-
ROTJ belts are made from 57mm poly webbing, not canvas, and that equals approximately 2 1/4" wide. You might want to update the CRL.3 points
-
Hi bros, I bought a DLT-19 3dprinted kits from 3DpropsNL on Etsy last october, and finally managed to complete building&customizing&painting. First of all the kit, it came sorta like that (more red than black on mine): The kit is solid (two aluminium pipes inside) and surprisingly lightweight. Phase one was of course heavy sanding and glueing. I decided to keep it one piece to avoid paint scratching on connecting parts. (sanded parts are matte, unsanded are gloss) Phase two was the fun part: looking at tons of reference pics, I found out that the kit, although very detailed, is missing some stuff here and there; so I decided to add some details using some techniques I learned from the E-11 build. Some knurled patterns in a couple of strategic spots: A fatter, knurled handgrip: Viewfinder details: Another pattern for the bottom lever: Replaced both printed flaps with two plastic pieces, screwed directly to the pipe: Added a small tab and other details to the ammo load: Replaced the plastic tip of the locking stud with a long screw (secured into the pipe), adding a sculpted tip (that's for folded bipod stability): Carved the butt stock, adding pattern and a big screw: I also replaced the incorrect socket caps screws with flat ones neext to the handle and replaced all the moveable parts pins with headless allen screws. Phase three was a couple of layers of filler/primer: and a generous amount of gunmetal paint for the main gun, brown for the butt stock: Phase four was final assembly of remaining parts: Folded bipod was permanently glued to its locking stud: Flat black handle was added (also using headless allen screws, to be covered with round caps for accuracy): An accurate two pieces metal cover, painted flat black, was added to the ammo exit port: Phase five was final touch-ups with slight sanding overall, different shades of metal paint: Some good old rusty effect (also covering up for potential paint chip revealing the orange below): Accurate heavy weathering on the metal cover and round disc: Accurate round covers for the handle screws: And some brown patterns on the butt stock trying to simulate bakelite: Last but not least, I replaced the t-tracks that came with the kit with flat black PVC ones from Super6props, accurately shaped with knife: So here's the final result: I'm still undecided if I need the accurate (was it accurate for all used DLT-19?) metal wire around the t-tracks.2 points
-
That's exactly the way I believe the original helmets were painted and evidence proves it. No masking of the eyes or teeth. Just focus on spraying the outside of the helmet and don't worry about any overspray on the inside. Overspray can be seen on the inside the original helmets so that's something you want, ideally. If you're going for an aged look then go for an off-white gloss spray rather than bright white. Good luck2 points
-
2 points
-
Hi! Sick of photobucket being a slow, bloated piece of bantha poodoo (that now apparently charges you insane amounts for external hosting)? Wish you could just upload some images to your build thread to show off your sweet-an impolite person testfit of your armor after you've done all the strapping and not use 50% of that time closing popups? FEAR NOT! PSA: Keep a backup of your images! No one can predict the future, Imgur may not always be around (or may hold your images hostage like Photobucket). 1) CLICK THIS TO GO TO IMGUR.COM (Or you could click the mouse wheel, which opens any link in a new tab) 2) Make an account: 3) Fill in your stuff or use Facebook/Google whatever: 4) Go to your images: 5) Find your awesome picture: 6) Drag and drop your awesome picture right onto Imgur (or use CTRL C+V): 7) Click your newly uploaded picture: 8) Click the Copy button on the BBCode section: It will flash green and stuff, welcome to the future! This baby's almost ready for paint! Pretty painless! It also has albums, ability to auto-resize, you can even select several pictures from your folders and just drag them all onto Imgur. Pictures are hosted on imgur, and you are merely linking to them by posting them using this method. If you remove it from imgur, it will be removed from anywhere else you posted it using the link. Here's what all the sections do: Image Link: Links to the image, but on Imgur. [EXAMPLE] Direct Link: Links directly to the image, and nothing but the image. [EXAMPLE] Markdown Link: Formatting for Reddit comments, disregard this one. HTML: For embedding your picture onto your website. HTML Code. BBCode: For embedding your picture onto forums (like FISD and 99% of all other forums). Linked BBCode: Same as above but with a clickable picture that leads to the picture on Imgur. [Example below, click it!] HOW TO RESIZE YOUR PHOTOS FROM YOUR SMARTPHONE/CAMERA IF YOU HAVE BANTHA POODOO INTERNET CONNECTION (WINDOWS ONLY): If you're like me, you have a sub-par internet connection and a "regular" smartphone. Smartphones takes pictures with a large file size and it is not optimal for us with a bad connection wanting to upload it for web viewing. 3.5mb takes a long time to upload, so let's shrink those files while still keeping it high quality for the web. 1) Open up the pic in MS Paint Right clicking the image and clicking edit should open up the selected pic in Paint. If you highlight multiple images and do this, it should open an instance of paint for every selected pic. 2) Resize in Paint Click the "resize" button in MS Paint. You'll see this: Click TAB once and it should highlight the number, making you able to type into the field. I usually resize my pics from my Samsung S8 by 40-50%. Press OK (or just hit enter) and it should resize. Now you can go to File->Save/Save As.. or simply just press CTRL+S to overwrite and save to the file you opened. Now it only takes a few seconds to upload a picture, instead of a minute. Time saved that you can use on removing excess E6000 glue from your coverstrips If you have any questions i'll do my best to answer them. Ensi out!1 point
-
Hi All, Wanted to capture this build I am doing for my 5 year old that is a 3D printed FOTK. Now I have reviewed the 3D printed files and they are not 501st approvable without some modifications but the aim here is the kiddo wants to be a stormtrooper and the files are good enough that it will meet that goal and still look really good. The file is from CG trader https://www.cgtrader.com/3d-print-models/hobby-diy/other/stormtrooper-armor-first-order-from-star-wars I purchased it for about $30 as it was a good base to build for him and my 3D modeling skills are still far from being anything respectable. For my printer I have a Tronxy X5S that has been modified to linear rails in the X and Y axis. Heat Bed at 24 volts and a duet 2 wifi board. Most of the parts I am currently printing in Inland White PLA 1.75mm using a 0.6mm Nozzle and a 0.15mm layer height. I am also using Armorsmith program to get the scale correct to the kiddos frame. In Armorsmith, you get an avatar and with body measurements you can adjust the avatar to a decent model of your body. This greatly takes a lot of guess work out of scaling a print to size. Below you can see the forearms and biceps have been completed in the print. I'll update more as the build and print come along. Currently printing out the shoulders now.1 point
-
With a heap of thanks to previous build threads from multiple members, particularly "@Ruthar" "@ukswrath" and "@JAFO", thanks to jimmi for supplying an awesome kit, and thanks to my own blood, sweat and tears (literally all 3), I am super proud to have had approved my own TK after a reasonably accurate 270 hours effort over a 6wk window. Sent using Tapatalk1 point
-
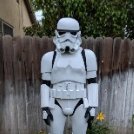
Thought I would add a picture of me having fun in the kit. It has held up surprisingly well!
 1 point
 -
Hi gang; guess who? Yeah, still tweaking my build thread as much as I'm tweaking my armor. Just did my 5th troop last week, and it was a blast. Not only was it a fun outdoor event with absolutely perfect weather, but it was the first time I used a sound system. Up till now, I've eschewed adding sound mainly because I wanted to focus on the armor itself in my first troops. Concentrating on walking without falling down, not trampling small children, and making sure all the armor stays where it's supposed to has been top-of-mind for me, and I didn't want any distractions caused by worrying about sounding good. I've had my sound gear for more than a year (got it way back during the build), and it consists of an Aker 1506 and an iPod with the outstanding TrooperTalk app installed. And, since I've had everything for so long I've had a lot of time to think about how I wanted to implement it. I didn't like the idea of mounting it into the armor itself, as I wanted to be able to adjust the sound and get it perfect before getting the armor on, so I finally decided to use a neck-hanging system. Here's what I came up with: I picked up some black plastic mesh at the craft store (the kind used for stitched needlepoint, or whatever it's called), and cut it to size to accommodate the Aker amp at the top, and an inexpensive folding iPod wallet at the bottom. The wallet is very thin, not bulky at all, but has slots for my driver's license and a bit of cash. The wallet folds closed with a magnetic tab. You can find the wallet here: https://www.amazon.com/gp/product/B07NY2G8S1/ref=ppx_yo_dt_b_search_asin_title?ie=UTF8&psc=1 I attached both the Aker amp and the wallet to the plastic mesh with E6000 slathered on the back of each, then just weighted them down on the mesh till dry. Then I just corralled all the wiring, folded it neatly, and bundled it into place with twist-ties along one edge of the mesh. The neck strap is the same one that came with the Aker amp, but I disconnected it from the amp and reattached it to the top corners of the mesh. It took some trial and error to adjust the strap to get everything to hang at the optimum level, but the neck strap is easy to adjust. The system worked perfectly on its first troop, and I found that the hanging system is fairly easy to reach inside and adjust by just leaning to one side so that it hangs closer to the side opening of the chest plate, allowing me to reach in and adjust as needed. The volume wheel on the Aker is at the top right (as you're wearing it), so all it really takes is reaching a finger in to adjust the volume level. A.J.1 point
-
Haha. True story. ;-)1 point
-
Pretty sure they weren´t in mint condition day 1 either1 point
-
hi Thanks for the help, pictures as requested pictures of the white shoulder elastic bridges glues on to chest plate butt and cod piece press stud paint removed Ammo knee belt rivet sniper knee plate alignment cheers Malc1 point
-
Hi Max and thank you for your EIB application. Before I can comment on any photos missing I need you to clean up the post as many of the photos are not visible, I need them included in the post and not as links - thanks I did however spot an item that needs to be fixed, the tab on the posterior plate needs to be cut roughly as indicated by the blue line and new snaps fitted, look forward seeing the rest of your armor1 point
-
Hiya, In my eyes, Anovos vs RS, RS would win hands down for me. Not only is it almost impossible to get any products out of Anovos, (apparently), anovos is also quite digitised. Many areas of the kit are TOO sharp compared with screen used. With so many good kits available now, such as RS and TM, those would be starting points if I were looking for a new kit. :-) Best wishes Dan1 point
-
To put it simple: RS delivers in weeks and Anovos delays for years. Depends on your liking but in my opinion, yes, RS is screen accurate to the bones. Anovos is a cleaned up version. I would buy it in Kit form from RS or TM (Troopermaster) Soft goods are easily sourced on it´s own.1 point
-
Thank you brother. I appreciate it. I would have done it early last week but I had some personal issues to take care of. But I was ready to go then. Thank you Mario.1 point
-
Oh for sure! That way it can be a visual reference of the 3D files then and show what is inaccurate for it for 501st approval1 point
-
All good, I meant perhaps just some photos of the parts and when done a finished product image1 point
-
Nice work Jeff, your boy must be so excited. We have a 3D section on the forums where you can also share this info if you desire. https://www.whitearmor.net/forum/forum/201-3d-parts-and-technical/1 point
-
Awesome start. I can’t show my kid he’ll want me to buy a printer. Sent from my iPhone using Tapatalk1 point
-
Congratulations Jason and welcome to EIB!1 point
-
Congratulations!1 point
-
Welcome to the Legion!1 point
-
Fantastic. Cant wait to see progress1 point
-
I did the velcro today and it feels solid. No more sagging because of the blaster. Thanks for the advice guys.1 point
-
Just like joseph told you, I also use velcro to repositioning my belt it already looks great bro !1 point
-
Looking forward to this build!1 point
-
Also, my friend Mike, who this is for, just got 501st approved as DZ-53084. I need to get him signed up for FISD to chime in in this build thread I made on his kit haha Sent from my iPhone using Tapatalk1 point
-
Thanks! That was the first either of us have worked with abs paste. He seemed to get the hang of it pretty quick. May try to see how much we hate sanding it this evening XD Sent from my iPhone using Tapatalk1 point
-
Anovos holds the license and copied the screen used suits, not a vetted seller though1 point
-
Pat, I would suggest to make the strap first to test mobility before fixing that part. looking great that abs paste filling cheers1 point
-
If I could make a suggestion before gluing the cover strips on I would trim down the tops as seen below. The reason is that those return edges can cut into your arms while bending them. Here are a couple of pics of screen used armor which will give you a better idea: If you decide to do this, I would highly recommend sizing them again afterward to make sure the openings are not too wide, which will make them too loose. "Also, apparently I have used my entire 512kb attachment allocation... How do people usually cope with this for threads with lots of pics"? I use Imgur. Free, easy to use and unlimited photo sharing capabilities! Here is a tutorial that may help: https://www.whitearmor.net/forum/topic/42381-howto-post-images-in-threads-using-imgur-easy/1 point
-
Most people store their photos on a hosting site, like imgur or Flickr, and link to them here so they appear inline.1 point
-
Minor updates. Received my S-snaps for the belt, so those will be installed soon. Both shoulder bells stand out from my bicep armor, so they won't sit flush with the chest armor. Before doing the hot water and bend method, on the advice of Joseph I removed as much of the return along the bottom edge of the bell. I'll have to wait until tomorrow to try everything on, but I think I will have to still bend the shoulders. The opening may still be too narrow. It needs to be more rounded to wrap around the biceps. Before: After. Still needs some minor sanding to clean up the edges: I also installed both latex hand guards from Joseph. Excellent products. I used E6000 to attach them to the rubber. They stick very well along the main part of the latex as they have a rough material. But along the edges there is 1/4 inch 'ish smooth latex border. The E6000 won't stick to this. I may have to try CA or something else for the edges. Not sure if it screen accurate to have to edges stick out slightly? I had some glue seep out, but this is easy to clean up. I also ground down the return edge on the left forearm in preparation for fitting, cutting and installation of cover strip. Does this need to be ground down more, especially in the corrugated area corners at the top?1 point
-
Thanks Tino. You're an artist !1 point
-
Good Luck! I'm in the same boat, I got lucky and found a local member to help me out. I was terrified to cut any of my armor for fear of wasting a lot of money. But once you get going, and get comfortable, it is very rewarding! Keep posting pix, the guys here love to help out! I was worried I would get called out for making mistakes. They all of been very supportive and give great advise and suggestions!1 point
-
Alright Branden looking forward to your build1 point
-
Looking good so far Garrett1 point
-
No worries. The hardest part right now will be changing the armor to butt joints and cover strips. Everything else is straight forward. Thanks for the help. Cheers!1 point
-
Thanks They will be glued once the ab armor snaps are installed. Just installed loose for now so I could insure they hang just below the belt. As a side note. I think I've decided to build straight to Centurion status. It will take me a little longer, but I didn't want to do something now, then have to adjust it later. I know I have to go for Basic approval first, but can I skip EIB and go straight for Centurion? Thanks1 point
-
Update: Received my 2 sets of rubber hand armor as well as the hardware set from Joseph. Awesome service, delivery and product! I'll use one set on the rubber gloves, and another set on some black Nomex gloves for hot weather use. Finally found some acetone, so I can do the repairs to the sniper plate screw holes I've Taken apart left forearm armor. It was overlap glued on front, and overlap velcro on back. This will be my trial piece for switching the entire armor from mostly overlap construction to butt joint and cover strip. The only parts on the SDS that are not overlap are the front of the thighs and shins. The glue was a real pain to separate... Belt is about 90% done. Still have to add belt to ab armor female S-snap poppers. They are hard to find here, so I had to amazon them. Should be here on Monday Attached ammo ABS belt to fabric bel with Chicago screws square dimple caps not glued on. I will have to remove the fabric belt to put the 2 female popper snaps for armor attachment Attached Line 24 female snaps to holster leather straps Attached Line 24 male snaps to fabric belt with rivets Attached 1" elastic to drop boxes with rivets. The elastic is not glued down yet, pending the S-snap installation. They do align with ends of the belt for Centurion requirement The belt is temporarily installed on my mannequin. There is allot of overlap on him as his waste is super skinny.... White elastic will be trimmed slightly My mannequin (nicknamed Mannie for short) is way to skinny. There is quite a bit of overlap at the back. The holster sits more to the side of my leg when I wear it.1 point
-
Chris told me it was a mistake. It used to be a mount point but it wasn't needed. I have to fill it.1 point
-
Metric (non-US), Standard (US) and yes they differ just enough to get most folks in trouble if they don't know any better lol. Keep up the awesome work1 point
-
i tryied to but sadly it makes it harder to wear but i might order some bigger shoulder bells to fix that1 point
-
Thank you all for these good advices ! I've wet-sanded it with super fine sand paper + water and after that I used a dremel with cutting compound. The result is better. But I'm not totaly satisfied. Will try to use novus (I've some for my TK helmets). Anyway, I've ordered another lens to Chris yesterday.1 point
-
Alright, just got my kit. Aside from a couple tiny cracks, everything looks good and accounted for. I'm currently giving everything a wash. After that, fitting/trimming, strapping and paint! Before I begin fitting to see what I need to modify, does anyone have recommendations on dealing with stray fibers on the armor interior? EDIT: For fixing the cracks, is there anything recommended that is flexible and strong enough for this?1 point
-
That really does look awesome!1 point