Leaderboard


Popular Content
Showing content with the highest reputation on 04/19/2019 in Posts
-
I came up with these some time ago and they work great keeping the butt in place2 points
-
Hi, The day has finally come, the Doopydoo's resin kit has arrived and I can start building. My current plan for this build: - I picked up parts of a real folding stock (mainly the buttplate) and some mold/resin kit to make a resin version of the buttplate. In addition to the parts from T-Jay and some trimming of the doopy stock, I should be able to get it working. Now I know it won't be as sturdy as a real folding stock, but I want to make it working and keep the lighter weight. - I'm going to add Arduino electronic, super bright led in the nozzle, speakers for sound, led bar graph for the ammo count in place of the Hengstler counter digits - There will be a working charging lever/bolt that when pulled back will actually trigger the reloading. I think this will be the hardest part for the electronics. Im still debating how to actually implement it. Do I make it so you have to pull all the way back and then it will fully reload, or do I make it incremental, so pulling back halfway only recharges have the ammo count, etc, perhaps steps at 1/4, 1/2, 3/4 and full. If anyone else has any additional ideas I'd love to hear them. I picked up a more accurate replacement resin magazine, but it hasn't arrived yet. Here's to a fun build, more to come. Brett1 point
-
You can also refer to the gallery section while building, sometimes it can be quicker than waiting for a response to a question1 point
-
Yes this helps a lot! Thank you1 point
-
Question: How much should I trim off the kidney?
 1 point
 -
This is my first time in the full kit. It’s as comfortable as I expected. You'd think he’d have centered the TD.1 point
-
#1 Clean the surface #2 Apply the plastdip in thin coats - don´t go for full coverage at first coat, build it up.1 point
-
Perfect that’s what I figured from your build post. Just wanted to make sure. Thanks again. Sent from my iPhone using Tapatalk1 point
-
So the key here is to leave roughly 1/2" gap between your arm and the armor. Starting with the sides with a flat section cut to spec leaving roughly 8mm from edge of the plastic to where the return edge crease begins. Afterwards test fit to see if there's more material that needs to be removed from the opposite side/closure of the armor, if any. If so remove it from the inner half of the armor.1 point
-
Word of warning, as much as I trust Walt I would encourage buyers to refrain from preordering until known kits are in stock, unless you can preorder without payment. This goes for any seller.1 point
-
PM sent. Thank you!! I can’t really pay you back, but I can pay it forward. I have 3 green acrylic lenses that fits a Black Series TK, free to anyone that needs one. I can’t believe I don’t have any pictures of my completed helmet, but I’ll get some up soon. I don’t know if they’ll work in other helmets. It’s the standard translucent green from TAP Plastics, much darker than the original lens. It will need to be shaped, and the softening temp seems to be a bit higher than ABS. I shaped it around a large glass container (think cookie jar). When you drill the holes, drill at an angle, matching the original. I was pleased with the way it fit.1 point
-
Here's another image from Social Media.1 point
-
Those proposed CRL changes seem to be causing concern across builds at the moment - however, there is consideration paid to the CRL guidelines that a trooper was following at the time of their build. So, stick to the current CRL for now. If you have complete photos of your progress, or ideally a build thread, we’d be happy to look over it for you. Best wishes Dan1 point
-
Alright, so I've only hit some main problem points so far. I'm actually taking some of my other parts to a con this Saturday so I can use them to show others how to repair/upkeep armor, but because I'm wearing it tomorrow here's what I've done. First I fixed the cracking spots. I found in the shoulders on the yoke where the cracks ended and drilled a hole through the end so it would end the crack point and prevent it from spreading. I then ordered some Devcon plastic welder as I heard that this was a little more flexible than just resin or fiberglass. So I mixed the two part Devcon and then filled the hole and the crack on both ends and after smoothed it out so it wouldn't require too much sanding after. I let it sit a day and then sanded it down. As you see in the above picture it still has a lot of chipped paint and problems. So I sanded to 400 grit and then applied some bondo filler over the areas that were rough. I let that sit a day and then sanded to 600 grit. I didn't get a lot of pictures sadly as I was rushing to get this ready for the con tomorrow. After sanding I was now able to spray again with paint I originally used, then the enamel clear coat to get it back to a good looking shiny white. Now it will cure overnight and be ready for tomorrow. another thing you might note from this picture is I've cut out the front section of the yoke that's under the chest plate. Why? Because it wasn't allowing me to move effectively and it made getting the yoke on and off much more difficult. It's the reason so much strain went on the shoulders and led to the cracking continuously happening. Now I can actually get it on and off at an angle that doesn't stress the armor and helps me so much more. I know a lot of vendors are building them like mine was built, but I'm going to say here that for guys like me that are more built in the shoulders, chest, and back, this is so much easier.1 point
-
So my helmet was a resin cast/fiberglass, but I'd also echo it's easier to do a basic sand to at most around 600 grit (don't want it too smooth that spray doesn't stick, then some plastidip does a great job at not only making it dark, but making it feel more sturdy like a real helmet.1 point
-
I just taped my butt on, and...wow. I see what must be done. Everything Christine said makes sense now. I have my work cut out for me, it should’t be too bad other than lost time. I’m going to have to redo the rivets on the kidney once I trim it. So, I’m guessing the kidney/ab rivets don’t take too kindly to being reused. And the Han snap - I have a package from Michael’s with no identifying brand other than “Loops & Threads”. It’s close, but not quite the same visually. Are they an acceptable Han snap replacement? Are the Tandy line 24 rivets the same thing? Where is your favorite place to buy hardware? I see Trooperbay has kits, though at this point I only need to replace 3 of the kidney rivets and the Han snap. Obviously RS will have them, but I suspect shipping will take a wee bit longer. Good info! Thank you!1 point
-
5’11” 135lbs1 point
-
I first washed mine with soapy water then gave a light rub with some 600 grit wet/dry sandpaper, it will help paint adhere.1 point
-
Nice work, looking forward to the test fit1 point
-
I didn’t do it to my AM helmet but I assume a real light scuff wouldn’t hurt if you wanted to. I used the brush on and it stuck very well. Sent from my iPhone using Tapatalk1 point
-
Yeah. The bottoms of the left shin halves are a bith! (and the left shin especially so...) Good news is that coverstrips should conceal all. I'm gluing the coverstrips on now, I've lined things up fairly well, and clamped/taped the heck out of things. Fingers crossed it all looks good once the glue cures.1 point
-
The birthing process of magnetic shins isn't always pretty... but it's progress!1 point
-
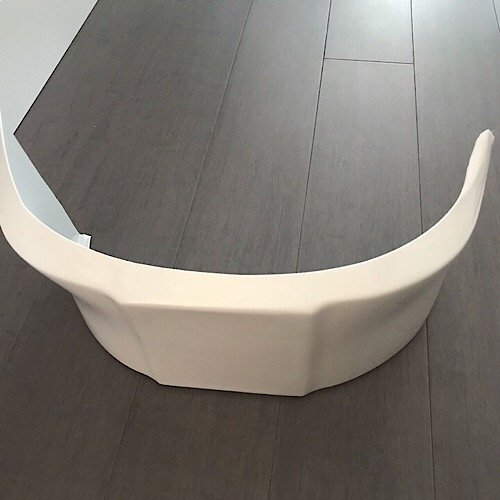
Hi Chris, Hmmm. It might be that the furthest out strapping from butt to kidney are not tight enough, however they seem to look okay. If the trooper butt remains an issue, you could consider shaping some ABS to glue to the butt plate, just below the return edge. If shaped and positioned correctly, this could prevent the butt from riding over the kidney. Here’s a rough idea of what I mean.1 point
-
Really cool stuff, nice job1 point
-
Hi All, I didn't get as far as I would have liked, but I had to get my workshops set up, and that took some time to organize. Its been 5+ years since I used my old jewelers bench, so a few trips to the hardware store, I got everything I needed to organize. CDO (OCD spelt alphabetically as it should be) has its advantages sometimes. At least I finally get to use my wax tools again. Once I got my model making setup done, It was time to organize the electronics setup. Between Amazon and eBay, I had electronic parts come in every day for 2 weeks (Yey for free shipping), so they all had to be organized and sorted. I may have gone a little overboard on the electronics parts, but maybe I'll find other stuff to build afterwards. I started by creating a blue print of the trigger and handle reference image. Once I had the template done, I marked up where I wanted to place everything. Thanks to @Dracotrooper for some of the inspirations. I am using the 3 position switch from @T-Jay's kit as well as adding a vibrating motor for the shot feedback, mode button to play the soundtrack files (thanks to @skyone), i.e imperial march, and finally a potentiometer to control the volume of the sound. I don't think I will be changing the volume too much, so I am hiding it as part of the bottom screw of the handle. I am going to attach the two together, so I will need to carry a small hex wrench or something to change the volume, but this should be the best and easiest place to hide it. I soldered 6" of stranded wire to each of the components except for the speakers which have 2'. I'm not sure where I am putting the speakers yet so I wanted to leave them as long unaltered lengths. Added heat shrink tubing to protect the solder joints. With all that done, I can start on the resin work. Created a template for the trigger. While trimming the trigger, I took off a little too much off the back of the trigger, so I had to add some more green stuff to the back and build the top portion. Next up was cleaning up the edges and joints, carving out the channels for the aluminum plates, switch and size screws. I used a drill press to drill out the bottom screw and a 8" bit to drill all the way through the handle. Once I knew where to drill from the top, I used a drill bit a little bigger than the potentiometer, to drill down to the bottom, leaving enough resin to keep the part inside the handle. Testing fitting the rotary switch and mode selection button. Well, thats all I have done for now. Thanks for reading. Best, Brett1 point
-
Thanks. I’m doing a series from each film. All colored pencil. Sent from my iPhone using Tapatalk1 point
-
Hello future Silver Sister!!! My lady is a KB Props and he indeed is all caught up from the past back order nightmare and making armor again for sale for new customers. I will personally vouch for this as I moderate Kevin’s KB Props sales page alongside him. I help Kevin and Jsin the best I can and see every message going in and out. They’ve done amazing and did not give up. EVERYONE that remained on that list DID get their armor. It’s very exciting to see that happen. We are trying to get him organized and premaking kits up for sale so he can join the vetted armorer list. You’ll not have any issue getting a set of armor if KB is where you hope to purchase from. As for your build, if you need any help or info, please do not hesitate to ask or message me. I will certainly do my best for you. If I can’t help you, I’ll find you someone that can. Good luck!!! Welcome to the forum! Build Sister build!!!! [emoji175] Sent from my iPhone using Tapatalk1 point
-
Without fail I always forget the neck seal and have to take something off to put it on Sent from my iPhone using Tapatalk1 point
-
Everyone does this different, but this is my order: Thighs Boots Shins Body (I keep this together clamshell style and put it all on at once) Belt/detonator Shoulders/biceps Forearms Helmet Gloves Sent from my Pixel 3 using Tapatalk1 point
-
Thanks for answering all of my questions I try to find as much as I can in forums before asking.1 point
-
Coming along...good luck!1 point
-
Awesome! Just so you know, the paint guide have been updated to no longer use the #48 blue1 point
-
Welcome to the world of white armor. I am looking forward to seeing your build progress. Take your time and measure and test fit a lot before cutting. When cutting cut a little less than you plan and test fit again. You can always take more off but putting it back on is almost impossible. Have fun!! Sent from my iPhone using Tapatalk1 point
-
Welcome and congrats on your BBB day!1 point
-
Welcome and as an AM wearer myself you’ll love the armor. Sent from my iPhone using Tapatalk1 point
-
Welcome, Dave! AM makes a great kit, and I am sure you are going to be pleased with the quality. Fortunately they do a lot of the trimming for you, but there is still a lot to go for the details. Ask any and all questions you have, post lots of photos, and I look forward to following your build!1 point
-
Goodluck on your build !! Looking forward to your build thread!1 point
-
Hi Dave! Welcome to FISD and happy BBB day! Looking forward to your build thread. Good thinking on aiming for Centurion...it’s not much more work and your armor will come out better. Yep, take your time and ask lots of questions!1 point
-
Happy BBB-day and welcome to FISD1 point
-
Good luck on your build. Post plenty of pictures. Can't wait to see your progress.1 point
-
Happy BBB day! That's a great kit. Good luck on your build!1 point
-
Congratulations! Nothing beats a BBB at the door.1 point
-
Congrats on your BBB day! AM is a nice set of armor. FYI your pictures are hard to see. If you are planning on doing a build thread then I recommend checking out this thread: https://www.whitearmor.net/forum/topic/42381-howto-post-images-in-threads-using-imgur-easy/ It will certainly make it easier for us to assist you in your build. Congrats again1 point
-
That is the same bin I use, and I LOVE it! It has the tray for all the small bits and tons of room for decals and such. I added a sheet of black craft foam glued to a sheet of display board inside the lid to display some of my patches and stuff.1 point