Leaderboard


Popular Content
Showing content with the highest reputation on 10/23/2018 in all areas
-
After 7 hours, yes, i checked the time, of labeling, soldering and measuring, i am now able to do this forum update. Thanks again to Darcotrooper, he provided the idea of a cristal tube for the barrel, to hold the led stripe. I spent some time in the hardware store and found something similar to the tube – a clear garden hose :-). This one is 2 cm in total (diameter). Because of the screws and the parts that extend into the barrel, the hose gets squeezed in, so that I do not have to mount the hose or the led stripe. This solution is protecting the electronics from water as well :-). To program and load the battery of the blaster, a mini USB slot is needed. I decided to add the slot at the back of the blaster. I think it is a good place for it. Just check yourself… The speaker is placed in the end cap clip… because of the amplifier in the electronics, it is still loud enough that you can hear it from a distance. As a small overview about how many cabling and soldering needed to be done, you can check the following picture... Thanks for reading and commenting!2 points
-
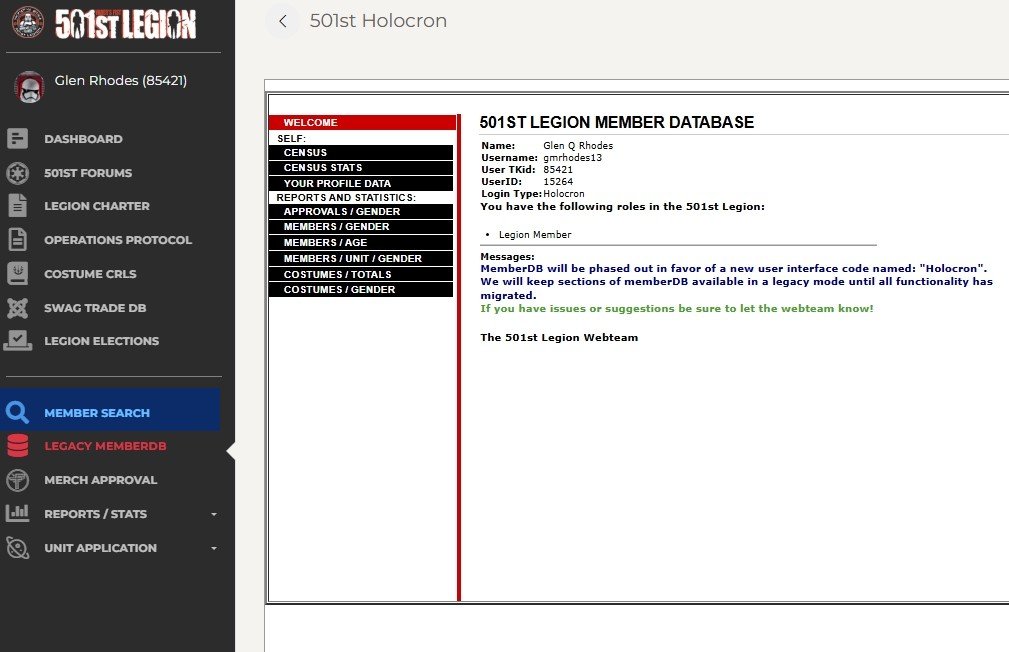
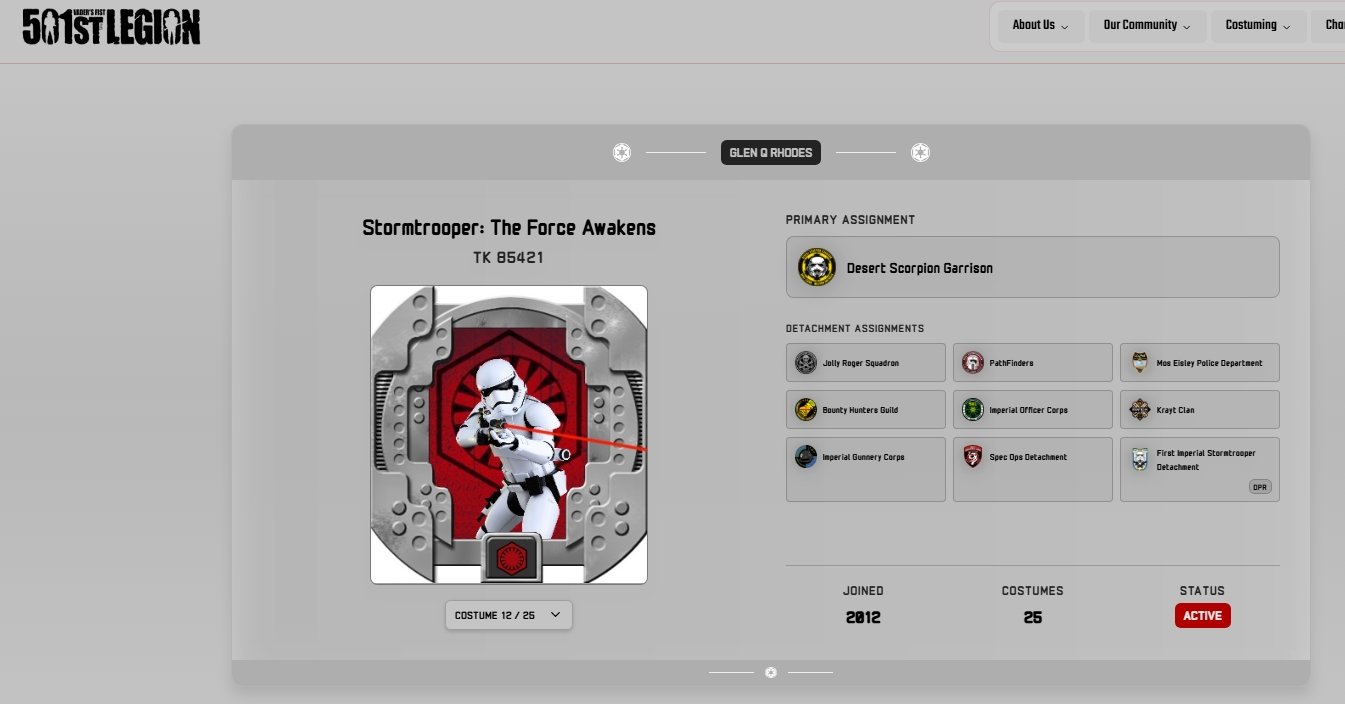
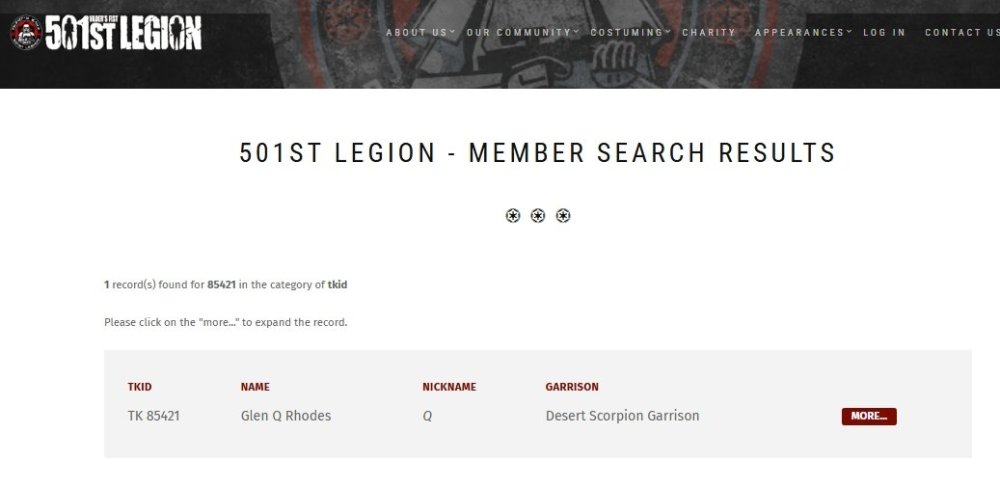
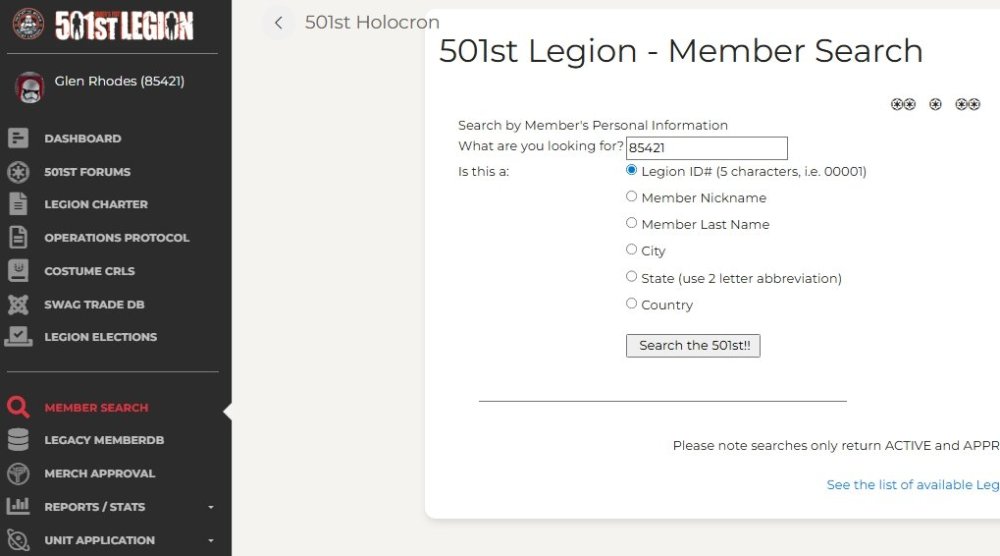
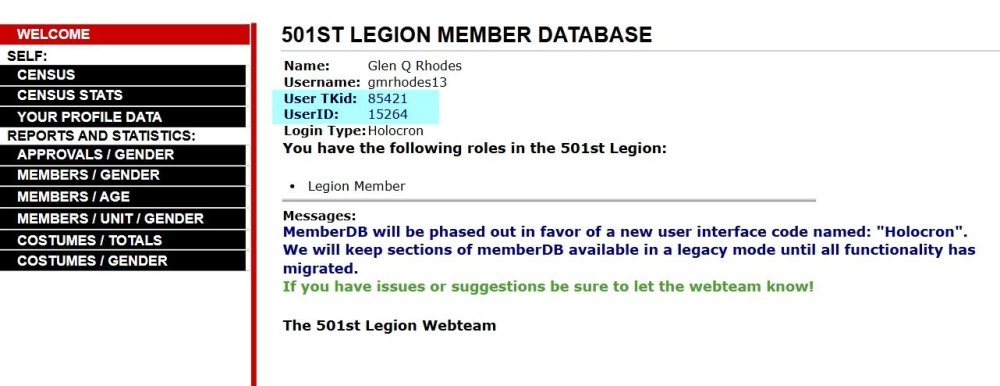
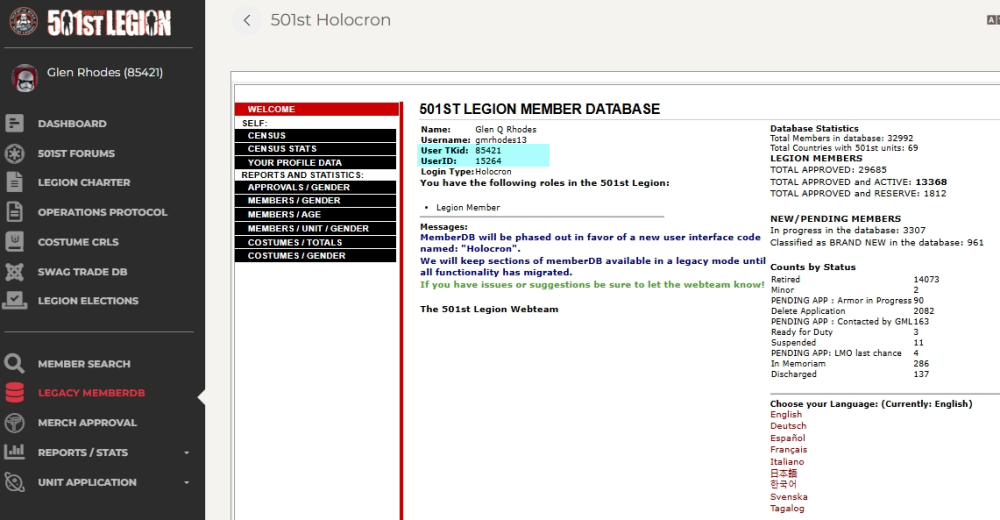
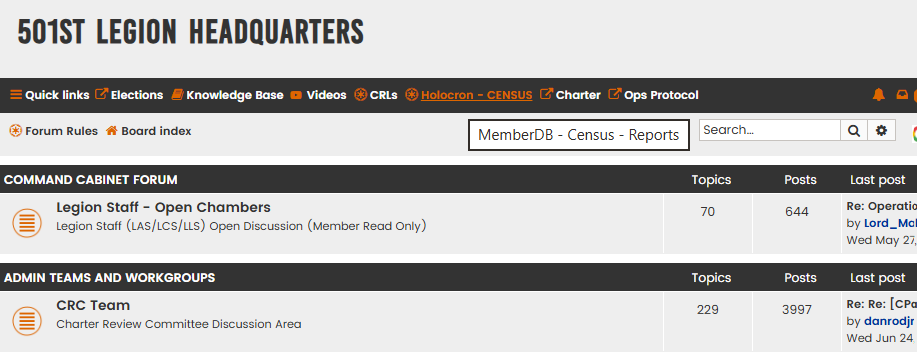
Request 501st status changes here. You must be an approved legion member with an official TKID to request higher forum access, or you can request TK higher access if you are an approved legion member with an approved TK version costume. NOTE: we (the site admins) will periodically check the list of people in this forums database against the list of 501st members as kept by the Legion COG. People will be added or dropped automatically, so it's a good idea to ensure that the email address you use for this board is the same you use in the Legion records. If you need your status adjusted in between database checks, please post here. UPDATE 05/04/2026 NOTE: You must include a link to your 501st record as per below, else your request will be ignored: With the recent legion website updates the link has changed. Please add both TKID and the User ID to your request, you can find this in the legion Holocron NEW INSTRUCTIONS There are 2 ways to find your membership profile: Go to legion forum https://www.501st.com/forum/index.php Click on Holocron/Census https://www.501st.com/holocron/login?returnUrl=%2Fmember%2Flegacy Enter your legion username and password then Login On the side menu click on Legacy/MemberDB and you should be able to access your USER ID OR In the navigation bar post this link https://www.501st.com/member/85421/ and replace 85421 with your TKID then click enter A.C. @NoVATie will then check the members costume list for TK costumes and update access accordingly **Please test your link when you post your request to make sure it goes to your legion profile page. We cannot use links for the Legion forum or Garrison pages.** Thanks to @gmrhodes13for pointing this out. Swapping your TKID into the link below no longer works http://501st.com/members/displaymemberdetails.php?userID=4733 Using the link below, replace 12345 with your TKID: https://www.501st.com/members/searchresults.php?searchfield=12345&criteria=tkid Paste that link with your status request post to have your FISD profile updated. Thanks to @revlimiter for pointing this out. 1. Go to https://www.501st.com/members/searchform.php 2. Input your TK number and "Search" 5. On the "Results" page click "More" to the right of your name 6. On this page that lists all of your costumes, copy the URL and paste it into this thread with your request.


 1 point
 -
Nice work, don’t forget a little white paint on those rivets1 point
-
In the future, you can spray it with hammered to get the texture, then go over it with a light layer of flat or satin so that it is dulled down.1 point
-
OOps. I would never blast anyone for being correct, Eric, and good call! I blame it on being 6 a.m. and out of Mountain Dew, lol.1 point
-
Thanks Glen, I was not aware of the hook (not mentioned in the CRL, like in TKC), but now you mentioned it is one of the detail I missed out. Indeed, no strap across the bells. Not on screen or the promo image.1 point
-
There are a few differences in the ESB and ANH helmets, Jake. The frown/teeth are painted black, (photo 1) as opposed to gray in ANH. Also, for Centurion the tube stripes must be decals as opposed to painted. The tears/traps must also be decals and not have the "hand painted" look as seen in ANH. 2 or 3 ear bumps must be painted black as opposed to one for ANH. The hand guards are also different, (photo 2) For ESB, the holster is worn on the right side and is held on via 2 black loops instead of being on the left side attached by rivets/screws.1 point
-
Took it for a spin to raise money for pink ribbon Best photo, but part of the front yoke popped out Might keep this one; Sent from my iPhone using Tapatalk1 point
-
I would suggest you put two abs strips at the hinge area, this will add strenght and prevent plastic to split in time. Mark (AP)1 point
-
Awesome job congratulations!!!1 point
-
Welcome aboard Alex!1 point
-
Work on the e11 continues... Sent from my iPhone using Tapatalk1 point
-
Two blue milks please! Congratulations!1 point
-
Congratulations trooper and welcome to the ranks1 point
-
My Wife has a thing for Orange . She makes it look good. Me not so much... I am getting the idea of what it means to be sweating in rubber gloves though. Thanks Tony!1 point
-
Congratulations !!!1 point
-
Congratulation trooper, good work! Welcome to the rank!1 point
-
Nicely done, congratulations!1 point
-
Officially Approved as of Friday! So excited TK-30733 reporting for duty!1 point
-
Big deal, mine has a gap as well. I used superglue along the top wher it meets the helmet but the bottom has the gap. Give me a few hours and I will take some pics. I’m fine with the gap however my beard does get snagged by it each time I don the helmet1 point
-
OK Results are in . Hot water bath was a success. For those worried about their first time doing this, as I certainly was , here's some details. Since my shins are the XL length and I don't have a pot or container big enough, I searched about for alternatives and found a rubber made tool box my Wife uses for craft paints that fit perfectly. I took the lid off, tested it to be sure it wouldn't give way with so much boiling water in it and away I go! I boiled the water for about 3-5 minutes to remove impurities before dipping my precious plastic in there (also boiled the twine I used to hang it) and set off on a number of attempts. This is a big container so I ended up boiling three large kettles worth of water to fill this thing with enough to submerge the calves. Because I was a bit nervous about the cover strip areas being effected by the heat (I had read a thread last night where he indicated he had to redo some), I only submerged them right up to - but not including the return edge for the cover strips. The first two or three attempts seemed to be working but only by a small amount. After the first round of water started cooling, I learned that I had to ensure the water was fully boiling and without delay, quickly submerge them. Additionally, I found the 25-30 seconds others has posted as being sufficient time, wasn't enough for mine. I'm guessing because TM is a bit thicker than some (1.5 mm), I needed to leave them in for about a minute or so before it started making a difference. Next step was to quickly remove, overlap the back calf ends by about 3/4 inch on both ends (tried a bit less at first but it was not enough), tape them in place and swing them over to the sink where I ran cold water over them. Here's the results. They're nearly touching now which is quite an improvement over the two inch gap they previously had! I'm pretty happy and relieved now. Whew... Thanks to Paul (TM) for the slight overlap tip and to Tony for the confidence boost on the hot water bath method. For those with similar concerns, it really wasn't that risky or difficult once I got set up and had a few runs under my belt. The biggest challenge was getting all that water to boil at the same time and smoothly as well as quickly transitioning through each step in the process. I think I'll reserve the heat gun method for a future build Onward to sniper knee!1 point
-
Looks good. Im always concerned by gaskets not taking up all the space in the forearms. Everyone makes them smaller the armour.1 point
-
Now that I have the right arm pieces assembled, I decided to try them on (with the proper gaskets and gloves as well.) I have to say that it doesn't look too bad in my opinion: And a test to see if I can touch my helmet Here's a side by side of now vs my initial fitting. I'm pretty happy with how I've managed to size things down, although the bicep is still pretty big: I also started work on the left arm pieces:1 point
-
Hey congrats Jose!1 point
-
Forgive me if this has been posted here or somewhere else, but I must say I am impressed with this kids composure... and his Star Wars fandom. I feel so bad for him. http://www.foxnews.com/lifestyle/2018/08/29/california-boy-refuses-to-hit-bullies-its-not-jedi-way.html1 point
-
Update 09: - armor in the box For those who are wondering, if and how the TK with standard strapping fits into that box, here is how I pack it for a troop. Tetris level 1 Everything fits fine into the 113 liters box, including helmet, boots, blaster and the voice amp. Between some armor parts, there is still space left for food and drinks, emergency repair kit and spare clothes. Because the box is pretty full, you can store it vertically without everything getting mixed up inside - always good when using an elevator. Maybe this helps a few other troopers here in the decision process…1 point
-
#25 - The Hengstler Counter Mod A: Sand down the front half of the resin counter to have a flat "face". Use the measurement diagram to create a recess for the new number window at the correct position. Get the "printed numbers" and make sure they fit into the new opening. Cut a piece of Plexiglas to fit into that and sand or file the window front to get the D-shape. Then patiently sand and polish it to get a clear view through it. Use sandpaper grits like 180, 220, 320, 400, 600 and 1000. The polishing wheel from your rotary tool (at the lowest speed) will help for the final glossy surface finish. Do not glue the printed numbers to the Plexiglas or into the recess. Only use very little glue to install the new window. Mod B: The original counters were available with and without a manual reset button. To recreate a reset button, take a piece of plastic (3mm thick) and work it to have the correct shape. It can be glued to the counter but will very likely break off. To avoid this, it can be made longer to rest deeper in a slot. For a moveable reset button you need a sheet of plastic, sized to match the "face" of your resin counter (25 x 50 mm). Create cutouts for the number window and the reset button by using the measurement diagram to have these at the correct places. Sand down the "face" of the resin counter according to the thickness of your plastic sheet. Transfer the opening for the button onto the resin body behind the sheet with a pencil. Make a recess for the hidden part of the button into the resin body and drill a hole in the center for a small spring from a ballpoint pen. Cut the spring to the required length and test fit everything before adding glue. When the new "face" has been installed, the remaining gap to the resin body can get closed with modeling clay or bondo cream. If your resin counter lacks the details on the bottom, these can be recreated with pieces from a 1mm ABS sheet. To get the correct dimensions, just see the top of your counter's bracket, as the original sockets were designed to be slot-fitted into each other. So, bottom and top are inverted. Mod C: If available, real parts can be added to the resin counter for a more realistic view. For example the little screw on top of the cover, the brass screw next to the Hengstler logo, the electrical connector block or even the soldering pins. Mod D: The "Conversion Counter" actually is the front half of a counter, very identical to the Hengstler 400 Series. It requires a resin counter, which is included in most available kits. Cut off the rear half of the resin counter and mount or glue it to the front half from the conversion kit. To get additional stabilization, the counter arm from the scope rail can be modified to support both, the front and the rear half of the conversion counter. Mod E: All previous steps can be ignored when buying a real Hengstler 400 counter. But be aware of the many different versions you might find: - 4 to 8 number rolls - sometimes the last 2 numbers are in a different color (yellow or red) - sometimes the last 2 or 3 rolls are in a different color (white) - with or without mechanical reset button - old Eagle-logo or the H-logo - gold-coloured metal socket or black plastic socket - with or without the 2 soldering pins - window in D-shape or flat - with or without small screws in the front cover - with or without "Hengstler 400" thermal stamp on the counter face You can examine some counter variations in chapter #33 - Gallery However, the screen accurate counter should have 6 numbers (all white lettering on black background), a reset button and ideally it will have the old Hengstler logo, showing the numbers 8, 9 and 0 flanked by two wings - the "Eagle Counter". A very useful "HOWTO" had already been created by Aaron (usaeatt2). The link can be found here. Mod F: Coiled wires between the counter and the cylinders were not used on screen, only on promotional pictures. There is also evidence of some counters being additionally supported by a wire, simply wrapped around the scope's feet (see ANH Leia's escort scene for reference).1 point
-
Love the weathering job Tino, and the little bits to improve the overall look. I like the fact that your picking a balance between screen accuracy and as if it was real life issued by the Imperial - ie; perfect placement of straps, true colouring across the armor pieces, etc.1 point