
Leaderboard


Popular Content
Showing content with the highest reputation on 05/24/2018 in all areas
-
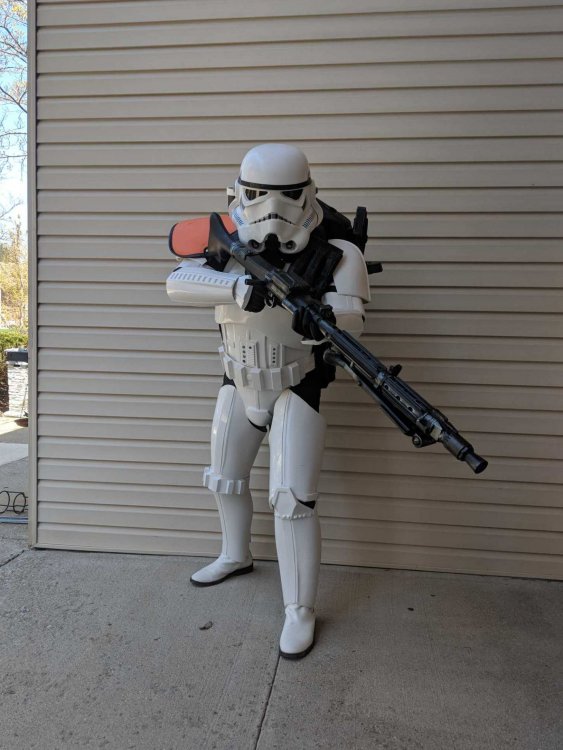
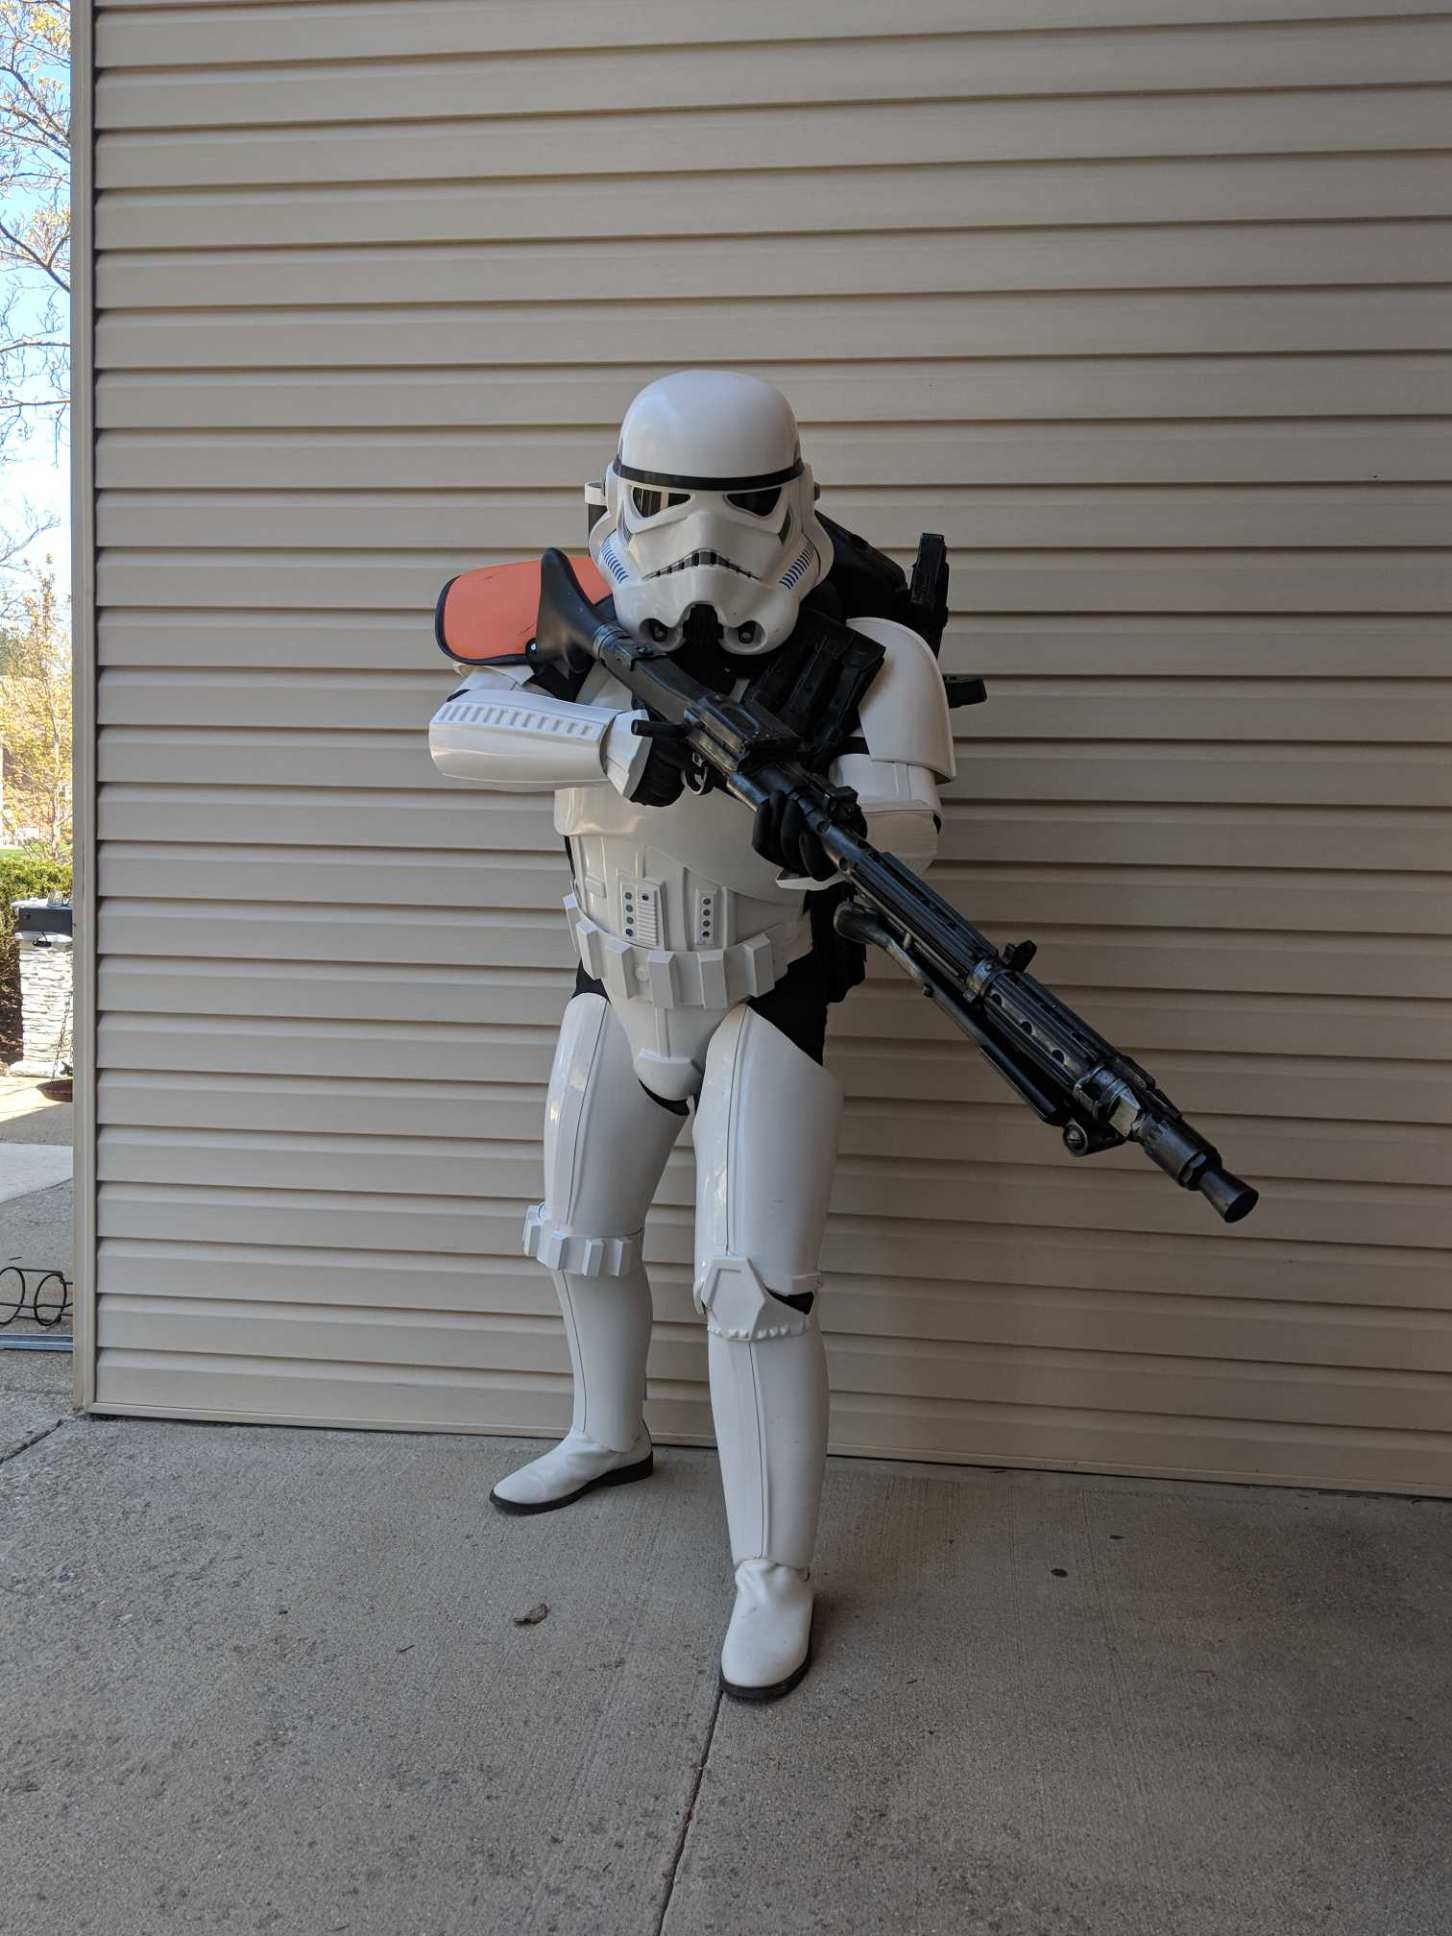
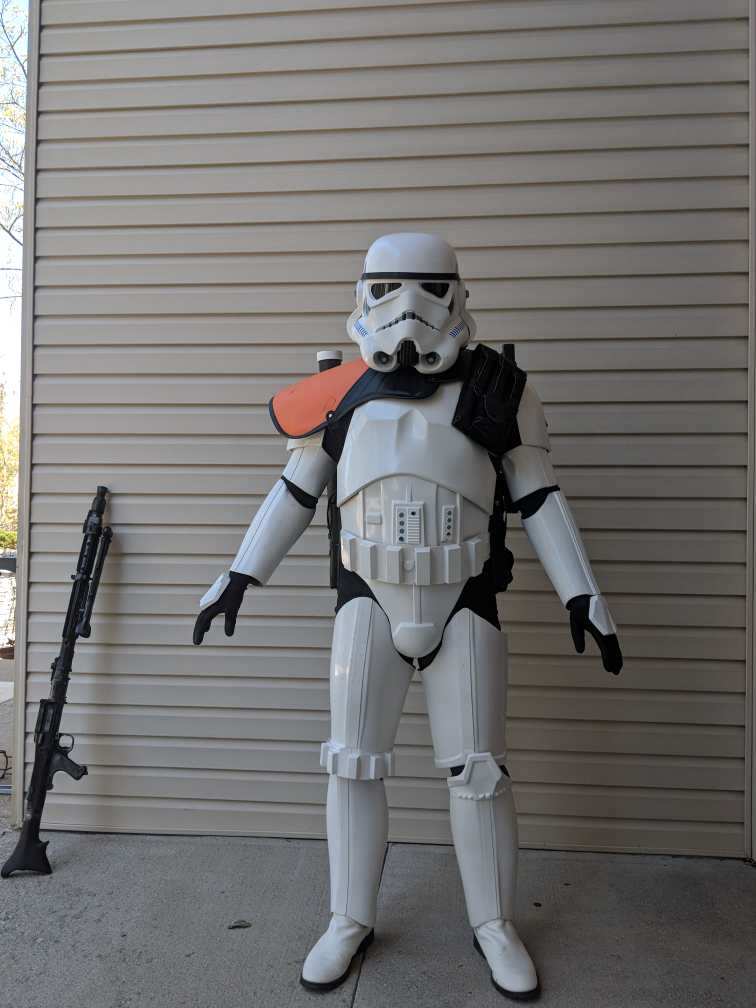
Took a break from building with trooping the Solo-Movie3 points
-
e11 trigger frame and guard preceeding3 points
-
I got my official Legion TK ID yesterday, and I am extremely glad to be part of that wonderful group! Thanks to everybody contributing to this forum - you are all so great and always helpful! I can't wait to troop and represent the Empire everywhere I'll be going. I have had a really great experience building my armor and meeting you all here on the FISD forums, and I pretty much think I'll be building some more stuff someday. For now, I've got a troop tomorrow for the premiere of Solo - what a great first official troop! So once again, thanks a lot to all of you and I hope you have as much of a great time as I've had! <32 points
-
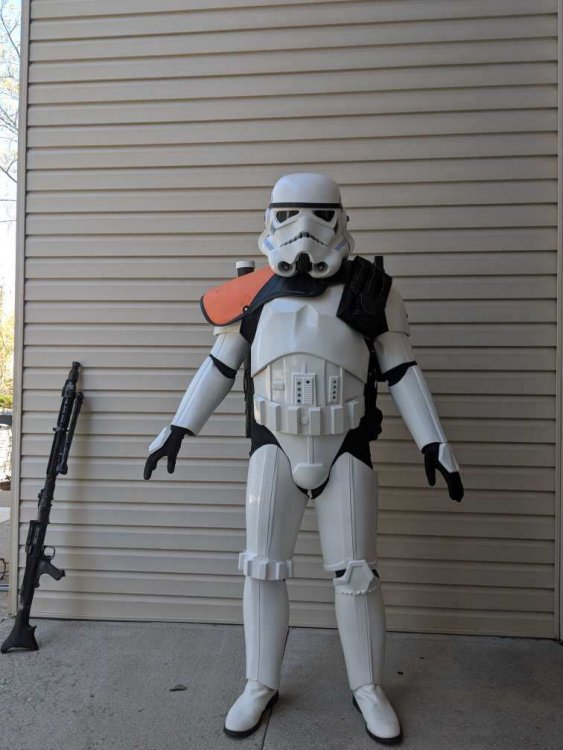
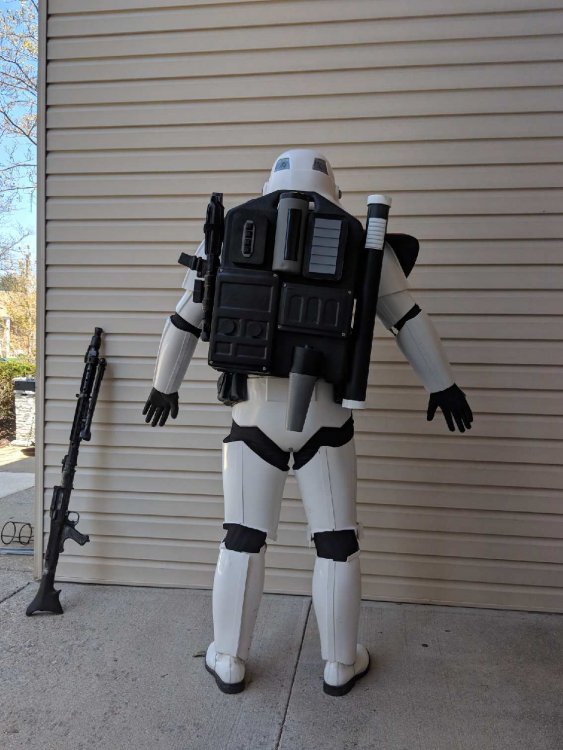
Name: David Ruel Height: 5'8" Weight: 136 lbs FISD Forum Name: hollowbodies Legion ID #: 41123 Garrison: Forteresse Impériale 501st Member Page: http://www.501st.com/members/displaymemberdetails.php?userID=28075 Armor: AP Helmet: AP Blaster: E-11 from QuestDesignCanada Boots: TK Boots Canvas Belt: AP Hand Plates: AP (rubber) Electronics: Ukwrath's Hovi Mic Tips with speakers and iComm; fans from TK421 Propstop Neck Seal: Darman Holster: AP Build Thread: https://www.whitearmor.net/forum/topic/43944-hollowbodies-first-build-anh-stunt-tk-ap/ Pictures: Front - Arms at side Back - Arms at side Left - Arms raised Right - Arms raised Right Side Detail - Arms raised Left Side Detail - Arms raised Abdomen Details Action Shot Cod and Butt Plate Attachment Interior Strapping Helmet - Front Helmet - Right Side Helmet - Left Side Helmet - Back Hovi Tip Detail Lens Color Blaster - Left Blaster - Right Blaster D-Ring Neck Seal Thermal Detonator - Back Holster Attachment - Front Holster Attachment - Back I think everything is there. I followed the EIB Photo Checklist and added all that is mentioned. My apologies if something else is missing; let me know and I'll add it. Thanks a lot for your time and consideration!2 points
-
Thanks. Interesting approach for the helmet. I'll be following that for sure. Yeah, the RS was meant for this kind of build. The ABS went on so well, I almost did a complete "paint" job of the helmet to get more random brush strokes and runs. That original helmet really is a mess... a beautiful mess.2 points
-
If get a bigger car you can bring more costumes with you2 points
-
Really depends on how you plan on strapping your armour. Obviously the downside of using webbing and rivets with washers here would be permanently joining the two pieces together. I have to use a smaller bin because I can't fit a 50 gallon bin in my car, so being able to separate the front and the back of the armour is beneficial in packing my costume more tightly.2 points
-
now that i got the guard i can start machining the main parts.... couple weeks2 points
-
1) Elastic if you want it to have some give, webbing to keep things in place 2) I would think this depends on how thick the plastic is where your E6000ing the snap directly on the ABS. You can always glue the snap to a piece of scrap and glue that directly to the armor part. 3) yes you can2 points
-
Thank you Mark for getting this to me so quickly! You don't know how much I really appreciate it. All of the anxiety over cutting, the smell of E6000, the crap all over my hands, plastic shavings everywhere and most of all, fulfilling a dream I've had since I was just a kid.2 points
-
GML gave me the verbal OK. I'm in the club! ** UPDATE ** Got the official approval email. I am now one of 113 HWTs as of today per my GML, an most likely the first in my garrison
 2 points
 -
Hey All! I was encouraged to start a build thread so I would have as much help available to me as possible. ;-) I have purchased and received a DoopyDoo resin kit and also just received my T-Jay Completion kit. My plans are to build this blaster while I gather funds to order my armor (ANH TK). It won't be a fast build as I know all too well life tends to get in the way. lol I'm also a R2, Gonk, and Mouse Droid builder so hopefully that will help me along the way with building skilz. My daytime job is stay-at-home Dad and I work part time as a Makerspace Technician at our local college teaching students, staff and community members how to use 3D printers and laser cutter/engraver. So here goes... Wish me luck! Kris aka Lumpy DoopDoo Kit - Tino's Completion Kit - All of the "little bits" from Tino's kit sorted - I was bored at work so I started on a prototype stand. I know a little ahead of myself. lol - Now where to start first? Hmmmph?!?1 point
-
Have you got a price yet Chris?1 point
-
Nice - looking very tidy. I think you’ll need a picture showing the inside of your thigh ammo pack fixings. You might also want to re-paint the outside of those fixings, too, as the white paint appears to be very thin. Great job overall. Best of luck with your application.1 point
-
Hey Gil, i will post more pictures tomorrow. At the top of the faceplate i cut a piece, maybe 2cm high and from side to side. Your advice to fix it more with tape helps me alot, so i can see more how it looks like. More to come tomorrow!1 point
-
...I have actually mentioned this to my wife when we've talked about the next car we buy - especially since we are now both 501st members!1 point
-
Congrats, man! Have fun at your first troop!1 point
-
Great job! Have fun at the Solo troop!1 point
-
Congrats and welcome. Now let the adventure begin.1 point
-
Looking awesome, David! Very nice job on the armour.1 point
-
i stand corrected yes that is doable. definitely will want to cut down the rivet1 point
-
Looking good David. Joseph or myself will be with you shortly. While you're waiting please post the following photo: Blaster "D" ring1 point
-
I just had a Future Trooper ask me a few questions about my Executioner so thought I would Post them on my build for future troopers as well. Some great questions asked. Hope these help but if not, pls ask for further clarification. - Can you list all of the spray paint you used I used Montana Cans Gold Series Universal Primer and Shock White and Black. Reason why i went Montana Cans is that its an Acrylic based paint that offers more flexibility than Enamels or Lacquers. I used Montana cans for all 3; Primer, Top coat and Clear coat. Clear was Gloss on white and flat on the black. Additioanlly i also used Primer from Rustoleum for Etching Primer and Rustoleum High build primer. - Can you List the steps you took to paint everything? Especially the helmet The paint was a lenghtly process, only cause i really like my paint to look like glass. But if you are not, you can certaintly skip some of the processes performed. Start - mix up bondo and run a skim coat over the helmet, this will start filling in all the low spots. Next lay a thin coat of filler primer and allow to dry. Block Sand the helmet with 240 grit carfully. Rinse with water and hold into the light reflecting the surface looking for high / low spots. if you see more low spots, mix up more bondo and repeat steps. Once level, spray ecthing primer and allow to dry. Wet sand with 400 and rinse and allow to dry. Spray 2 coats of Montana Cans Universal Primer. Once dry, using Bondo Spot filler, fill in any pin holes. Wet sand with 800 grit. repeat for any missed pin holes. Now your ready for Base Paint. Lay down 2 coats of White and allow to dry. Wet Sand with 1200. Lay down another 2 coats of White and allow to dry. Wet sand with 1500. Now your ready for Clear. Lay down 2 coats of clear and allow to dry., Wet sand with 1800. Lay down another 2 coats and allow to dry., wet sand with 2000. Now Very Important - Allow the Helmet to dry for 5 days before touching again. Since there is alot of paint and clear, it will take time to fully cure and harden. If you Dont wait and start masking off for the black, youll find that the paint is still soft and youll have tape marks left behind and will need to wetsand again. For the remaining parts - i repeated all above but skipped the 2nd bondo application. - Did you have to get any extra pieces to make the kit accurate? All the hard goods from Jim were acurate enough for lvl 1 approval. However when you want to achieve lvl 2 or higher approval, then youll need to outsoure a better belt, rubber gaskets. Youll want to reference the CRL closely: https://databank.501st.com/databank/Costuming:TK_TLJ_Executioner - Any areas you feel needed to be reinforced and how did you do it? Youll find that you need to Reinforce a few areas immediatly. Mainly the Yoke and Thighs. There are a bunch of build threads where the gents used Fiberglass Boat Repair to Reinforce the inside of the parts and others had used Devcon Plastic Welder. I would do either or. - Anything you wished you did now that your done? For the Yoke, I would recommend getting Ukswraths @ukswrath yoke supports. Really wish i used them as film acurate and fantastic option to reinforce the yoke. Wish i had also contoured hte back side of the thighs to allow more mobility and also countoured the upper thighs more to match the cod. - what glue did you use? Devcon Plastic Welder, Loctite CA Universal, Loctite Marine Grade Epoxy - How did you get the lens in? Epoxed Chicago screw bases to the inside of the helmet . then marked and drilled a small hole for each and secured with screws. - magnets or snaps? Both. Magnets on the Chest plate and snaps everywhere else. - Can you list all of the sand paper you had to use? 240 Dry, 400W, 800W, 1200W, 1500W, and 2000W - Can you list the extra pieces you had to buy on top of the kit? Undersuite from Stormtrooper Undersuit, Gloves and Boots from Imperial Boots, Belt from Belts of the FirstOrder @JAFO, Neck seal from Anovos Premeir Line, Cloth Gaskets from Jim, Canvas Belt boxes from TrooperBay, Helmet Sound and Fans from Ukswrath @ukswrath.1 point
-
Ah, good catch, thanks Lucnak! For some reason, I tend to mix/confuse nylon and elastic. In this case I meant nylon. Don't need it to pull just remain positioned right? Thanks gents for the feedback1 point
-
Mr. Cricket bought a wireless mic setup for me a few months ago that I keep forgetting about! Thanks for the reminder... I will be sure to rig it up in my Hero lid as I get closer to the end of that build.1 point
-
I switched to a wireless mic setup so I just keep the mic in the bucket now. Easier for me! I have enough cables running up into my bucket for fans and headphones as is (electronics won't fit in there because my head is enormous). A balaclava is definitely helpful! I had longer hair for the first while of trooping, but it wasn't that long...I would just tie in a low pony tail and it would just go down my neck and the neck seal kept it tucked in there. You'll have to try different things to see what works for you!1 point
-
Oh great idea for the cap - I have a couple of running buffs that will be much more comfortable than a full balaclava. Is your mic actually taped to your face? That doesn't drive you crazy? Fan battery - I assume the best bet is to velcro it to the inside of the chest plate? I saw a couple of troopers with their speaker hooked onto their belt but I like your idea of hiding it inside the armour. PS - You look adorable in that pic?? <31 point
-
Nice work on your bucket. Are your frown two middle teeth openings different sizes? It would be nice if they were similarly trimmed.1 point
-
Congratulations Greg! Best of luck on your EIB & Centurion applications! Have fun Trooping!1 point
-
Hello guys, Ok so last night I did a test fit of the abdominal plate with groin and posterior plates. Also not the “v” cut I did to the front top of the abdominal plate to hopefully allow the chest plate to sit closer to my body. The top edge of the posterior plate is not flat so the plate does not sit flush where it sits under the back of the abdominal armor. On the side picture you can see how the edges project up above where the back of the belt will be mounted. Is this correct or should I trip it to sit flush??? Also I removed the suspender snaps from the inside of the abdominal plate and added them to the inside of the chest and back plates. Lastly, I removed the bottom snaps from the shoulder bells and moved them higher to allow for the overlap of the shoulder bells over the bicep armor. I will not be doing any work tonight as I have a troop for the Solo premier but I hope to make some headway over the long weekend. As always thanks for the interest and I would appreciate some input about the posterior plate and should I cut it.1 point
-
Apparently I need to go buy a balaclava...1 point
-
Nice work on the bucket and replacing the T-Nut. Let us know how it works out. You are making great progress.1 point
-
Hey Rui almost there brother, we're still waiting for you. Just a couple adjustments, you can do it.1 point
-
Congratulations Peter1 point
-
Congratulations and welcome to the ranks trooper.1 point
-
Most armour makers would be able to supply you with one. The colour match won’t be perfect but so long as you get ABS not capped you should be close enough.1 point
-
Your shins are correct, the shorter swoop goes to the inside1 point
-
Glad you are asking, the answer to the bells are in Sean's build where he got the answer from TG. As to the shins, I have the same question. I am not even sure how you know which piece goes with which, much less which leg. Lets see if this gets Sean's attention @Seansull1 point
-
Thanks Jeff, I will do the plastic scrap for the armor (great idea)1 point
-
YOU CAN DO IT!1 point
-
I think Walt can do the Kessel Run faster than solo with the speed he sent out these new shins1 point
-
Bueno, Jose, thank you for your EI application, so let's take a look, mi hermano! CRL and EIB Application Requirements: All required submission photos have been posted and it appears that everything is in order, so I would like to be the first to welcome you to the rank of EI! Other-Armor Fit/Assembly: In this section we review observations made by your fellow troopers and ourselves. Some observations may lead to suggestions to improve the overall look of your armor. 1. The small ab-button plate could definitely use some trimming on the sides as seen in the photo below: Reference image 2. We noticed your rivet heads look a bit large... Please check that your rivets are the correct size. Thanks! The CRL states: Three rivets, approximately 5/16 ' (8mm) diameter, are present on the left side of the kidney plate. 3. The posterior needs to reside under the kidney with little or no gap.. I would suggest shortening or replacing the strapping Reference photo 4. Tube stripes should be approximately 8-9 cm from the face and consistent on both sides. Reference image 5. The stripes and outlines on the back of your bucket are absolutely spectacular, brother, but the ones on the tears are a bit thick. A few dabs of gray paint can easily remedy this! Reference image 6. Your left and right shoulder bells should be a bit closer to the shoulder bridge. An easy fix! Reference image 7. Quite a few of your coverstrips need to be trimmed down to where that are flush with the armor. Reference photo The gap of your ab/kidney connection on the right should be no more than half an inch wide at most. You may be able to fix this by tightening the strapping. There can be no gap for level 3. Reference image 8. Your blaster will need some work, brother. The Hengstler counter looks great, but the rest of it will require some serious sanding/filling to get rid of the 3-D print lines to get you to level 3. Reference images Reference photo Centurion Suggestions:In this section we prepare you the best we can for Centurion. If there are any areas of concern they will be discussed here. Great job on your armor, Jose, but in order to get you to level 3 there are a few areas that will need some attention. After seeing the time and care you took on this build I am confident you should be able to get there with just a couple of hours of work.! Reference photo The ab button pate will need to be replaced, as these are not acceptable for level 3 as per the CRL. "Abdomen buttons are integrated and painted directly on the armor. No separate buttons are allowed". Reference image For the rear of the shoulder bridges, you will need to pick up some white elastic as per the CRL. "The plastic shoulder straps need to be held down in the back via a white elastic band to the white fabric that connects/bridges the chest and back piece". Reference photo The outer edge of the drop boxes should align with the outside edge of the ABS belt acording to the CRL. "Drop boxes are vertically aligned with the end of the ammo belt with minimal gap between belt and box". Reference photo For level 3, there can be no gap of the ab/kidney on the right or left side. Again, this may be just a strapping issue and easy to fix. Reference image Congratulations on your EI achievement, Trooper! You have made the Spanish Garrison proud by reaching this level, and although you have some work to do, I am confident after that after it is complete I will see your Centurion application!1 point
-
Yeah. I'm going to paint them all. It'll look more authentic. I have the stencils here. I'll post a picture. Yeah I'm going to paint all of it. I have the stencils here. It'll look more authentic painted. I'll post a picture before I apply them.1 point
-
Here you go
 1 point
 -
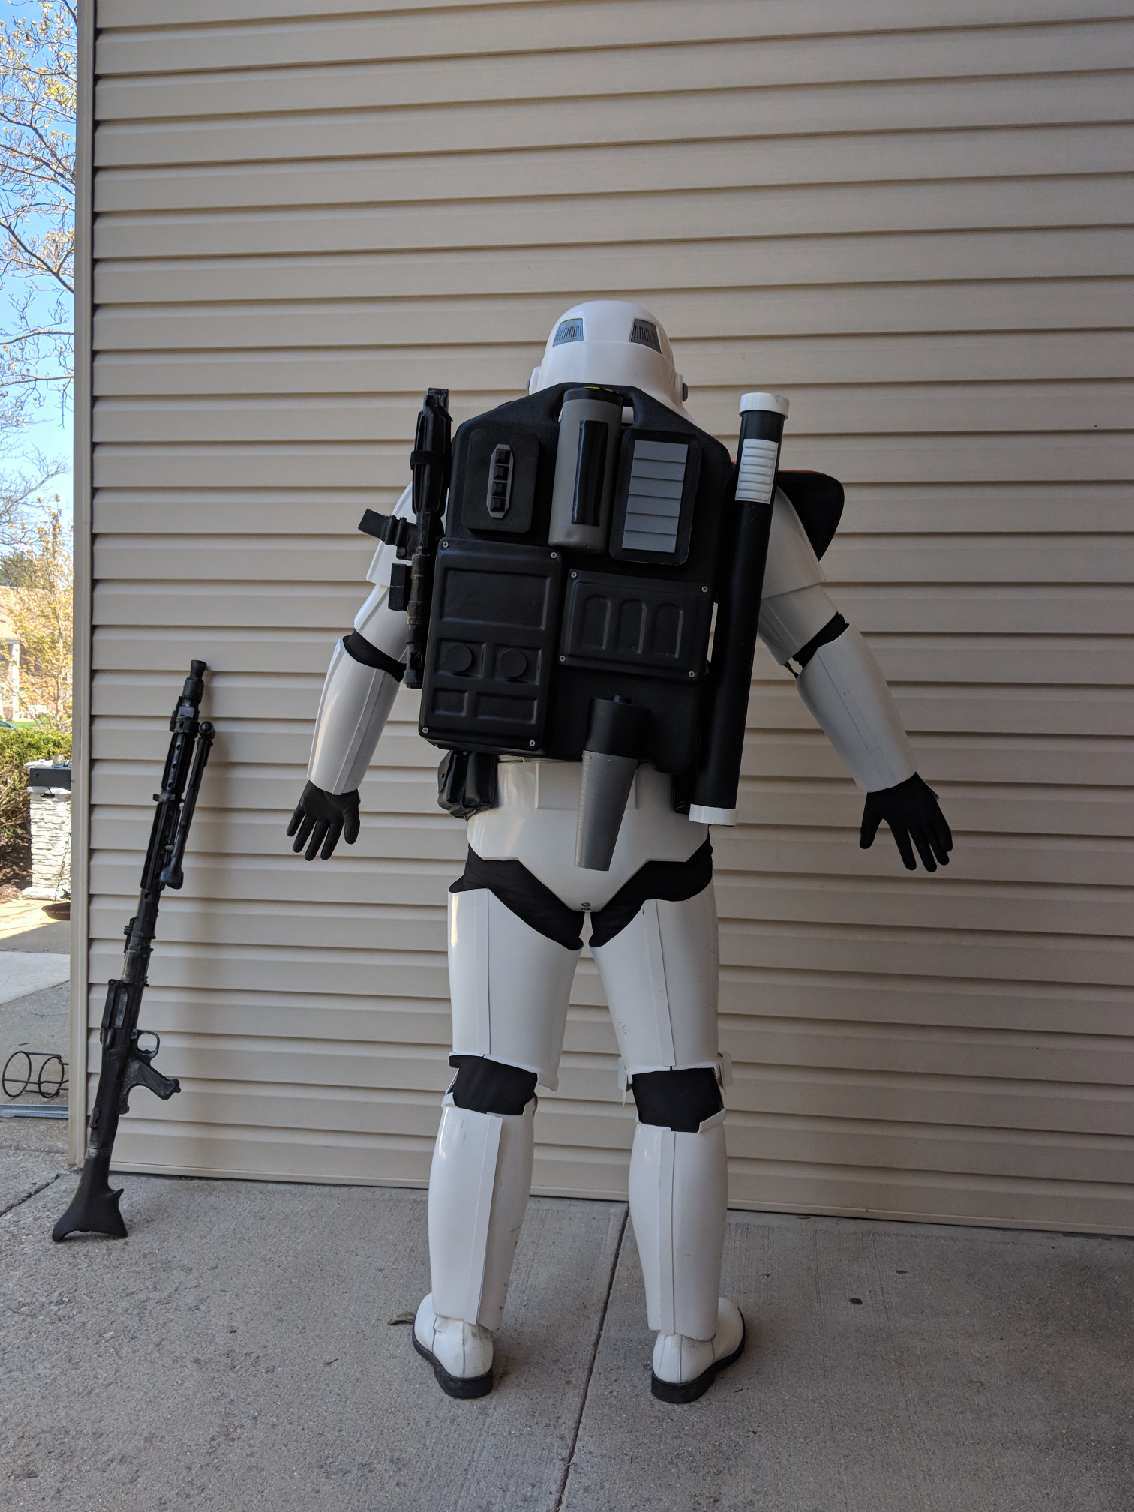
Well, I haven't been posting as much as I'd have liked last week, but it was because I wanted to really focus on finishing my costume before the release of Solo... and I did! I also wanted to be part of the Legion for the release, and so I just got my official approval and ID today!!! I am now TK-41123, part of the Forteresse Impériale garrison in Canada!! I will so be trooping with them on Friday at a cinema for the release of Solo and let me say that I am pretty stoked! I'm so thankful to everybody who contributes to this forum and who helped me throughout my build, and I am sorry for having been a little silent lately - too muc busy with life stuff and finishing my armor, but I should be back *for real* now and I'll try to help people as much as people have helped me. I will also be posting my EIB application very soon, as I have (hopefully) taken care to do all that is needed for the EIB and Centurion levels. Here is a little shot for now, before I post the rest of my stuff :1 point
-
Alrighty, my armor delivery is just around the corner and I'm getting pretty excited to get started. I've been trying to keep busy preparing with more research and assembling my equipment. To that end, one of the questions I had when I first started on this journey and one of the reoccurring comments for beginners like myself are, what will it cost? While I will not address armor costs for obvious reasons, I have been keeping track of what I've bought, where I bought it (links are embedded for online purchases) and how much it cost. Here is a compilation of all the things I've acquired in three categories; Tools, Accessories and Materials. I generally looked for quality, preference, what I felt most comfortable and informed on and the best price. I would not say I went overboard because I could have easily spent more but I also know one can do this on more of a shoe string budget so I'm not trying to discourage anyone. Hopefully this will be useful to some. Tools: (1) Lexan Curved Scissors (Amazon $10.40 USD) Not shown in Pic; I purchased Lexan Straight Scissors for $10.40 too since I saw evidence of curved leaving 'wave' patterns when cutting straight lines (less to sand?) (2) Small Clamps w Rubber Articulating Tips for outer glue clamp work (Harbor Freight $4.49 for 4) (3) Pencils for marking cut lines, 5B - slightly darker (Hobby Lobby $3.98 for 2 plus sharpener) (4) Respirator for paint, glue fumes, Acetone, etc. (Ace Hardware $34.99) (5) 3M Sanding Sponge - Fine, for light shaping and finishing edges (Amazon $5.44) (6) Folding Lock Back Utility Knife (Harbor Freight $5.79) (7) Qty 12 - Neodymium Rare Earth Magnets 7/8x1/8 N40 for inner glue clamp work (ebay $19.98) (Ref: Joseph's Magnet 101) (8) Blue Painters Tape (Already have a bunch on hand) (9) Set of 12 small files, various shapes - half moon, triangle, flat, etc. for Frown/Teeth (Harbor Freight $4.89) (10) Soft measuring Tape US/Metric for circumference and angled measurements (Hobby Lobby $1.99) (11) and (12) Tandy Leather Craftool Line 24 Snap Setter 8058-00 + Tandy Rivet Anvil - 20/24 (Amazon $8.54 USD) (13) Leather Punch Tool for creating holes in strapping and elastic (Harbor Freight $6.99) (14) Rivet Gun for helmet Rivets (Already had this on hand) (15) TEKTON 30812 Double-Faced Soft Mallet, 35 mm recommended as easier on snaps (Amazon $7.91) (16) Not numbered in pic (40 inch Aluminum Ruler US/Metric straight edge for measuring/cutting cover strips (Harbor Fright $2.99) (17) Not Shown in pic (Dremmel with sanding drums for helmet eyes and smaller rounded corners) (18) Not Shown in pic Popsical sticks for even spreading of E6000, toothpicks for cleanup of paint or glue. Various sandpaper 150, 180, 250 grit for smoothing edges and roughing up of glue surfaces. Subtotal: $ 118.88 Accessories: (20) TK Boots Size 12C ($84.00, $102.00 USD Shipped) (21) Correct TD Screws (Justjoseph63 $3.25 USD) (22) 5/16th Single Cap Rivets - set of 4 REPLACES HEAD SET RIVETS FOR AMMO PACKS (Justjoseph63 $3.00 USD) (23) Centurion Level Rivet Set of 10 (Justjoseph63 $2.50 USD) (24) Correct screws for TK ears (Justjoseph63 $3.75 USD) (25) Centurion Flexible Silicone Hand Guards (Justjoseph63 $25 USD) (26) Lavento Men's Compression Long-sleeve T Shirt, Large (Amazon $12.99 USD) (27) CompressionZ - Compression Pants Men, Large (Amazon $18.97 USD) (28) Trooper Black Latex Gloves (Trooperbay $9.00, $16.99 shipped) (29) Neck Seal (Trooperbay via Amazon ($59.99 +Shipping) Subtotal: $248.44 Materials: (30) Qty 100 Nickel plated Line 24 SNAPS (Joseph recommended) (ebay $32.33 USD) These will be for double snap method on 2 inch strapping. (31) E6000 220011 High Viscosity Adhesive - 3.7 fl. oz (Amazon 3.7fl.oz. $7.80) (32) Cosmos 2 Inches Wide 10 Yards Black Nylon Heavy Webbing for high tension areas if you are using the double snap method. (Amazon $6.98) (33) XFasten Adhesive Hook & Loop, White, 1-Inch x 10-Foot Industrial Grade Velcro (Amazon $12.97) This will be for back of calf closure although I'm not entirely certain I'm going with Velcro for this as yet. (34) Dritz Ribbed Non-Roll Elastic, 2" by 1 yd, White (Amazon $7.69) This is elastic between chest and back plate, under shoulder Straps (35) Dritz Nylon Strapping - Black - 1" x 60" (only need 8ft total) (Amazon $6.13) Additional nylon strapping as/if needed for additional areas besides torso-2 inch strapping. (36) 1/4 inch wide white Elastic (1 ft.) for securing rear shoulder straps (Hobby Lobby $ 4.95) (37) Performix 11203 Plasti Dip Black Multi-Purpose Rubber Coating Aerosol (Amazon $5.82) For coating inside helmet in black. (38 and 39) Gourd 1 Inch Heavy Knit Stretch Elastic 5 Yards White and 5 Yards Black (Amazon $9.99) 1 inch wide black for shoulder bells, etc. and 1 inch wide white for drop boxes. (40) Sugru Mouldable Glue - Original Formula - Black 3-Pack (Amazon $9.99) For attaching lenses to inner helmet (Ref JustJoseph63) Subtotal: $112.45 Total: 490.17 nylon (correction previously referencing elastic) Additional Consideration: I May go with 2 inch nylon (correction previously referencing elastic) on arms and 3 inch nylon (correction previously referencing elastic) to hold upper thigh to inner belt but I need to have the armor in hand, fitted and positioned such that I can determine what will better hold some of this in place. This is by no means an end all, complete list. I have numerous aditional items to obtain (helmet stuff, TK Belt (awaiting armor fitting to size it), holster, E-11 and probably things I haven't even thought of yet) but this was the minimal "base" list of things that I both; felt comfortable enough in my research to purchase and knew I'd need to begin and get through much of the build. Special thanks to Joseph for helping me to prepare for my build and getting me set up with many of the Centurion required components (absolutely love the Centurion Flexible Silicon Hand Guards). He is the epitome of Stormtroopers helping Stormtroopers. While I have a growing list of 36 links to reference as I build, below were excellent supply and resources references that helped me to fill in a number of gaps: Supply list for your TK build - by justjoseph63 (Extensive list of tools/supplies for TK build) TK Resource Thread - by bobojuice (Great TK Build Resource References)1 point
-
And more trimming. Torso and belt. Ab. There is no trim line at the ab to kidney seam. I put my cut line at the pencil mark. A lot of material to remove. I used the dremel and cleaned up with scissors. I rough cut the kidney along the pencil line. There is lots of extra material here if needed. I knew I didn’t need much and just trimmed off a bit to make fitting easier. Chest. Most of the trim lines were visible. I always trace them out with pencil. But I had trouble here. The pull was a bit rough here and at the shoulder bridges. Still doable. Rough area from the pull. Sized the ab and kidney parts and I only need 1cm from the edge of the kidney notch. Torso rough trimmed and sanded. I left a little return edge along the sides of the chest. The return edge along the shoulder tabs will help strengthen them. My left side had less return edge thanks to the dodgy trim line and me not paying close attention. Inner return edges are rounded so they won’t snag on things during fittings and what not. All torso return edges are about 10 mm to accommodate screws for original bracket system - but may reduce them a bit more once the screws are in. You really want to rough sand everything and make sure there are no sharp edges before the fitting and strapping process - this will prevent your undersuit from snagging and less chance of creating a tear in the armour. Belt and ammo belt took about one minute to trim. Turned upside down, scored the seam, used scissors to cut along the corners and snapped the edges off. Sent from my iPhone using Tapatalk1 point
-
Tips for newbies building an AP kit for the first time. Please excuse this massive post, but I tried to summarize some points about my build below. I wrote this summary up awhile ago but just got around to posting it now. This was my first build, and although I did some research before starting, I discovered a lot of other things while actually building – some of these things are just because I am new to this, and some of these things are particular to the AP kit. Most of these points are explained in detail somewhere in my build, but it is getting hard to find anything. And I’m sure for every point I mentioned below, there are two that I forgot. Again, this is the AP trimmed kit. Helmet: · The brow sat a little low and a touch crooked, so I had to raise the brow. I raised (trimmed) it about 4 or 5 mm (at the center of the front, the sides are kept in the same spot) – I could have gone a few more mm. · The ears needed some trimming and sanding to fit. The right ear was especially bad. A space between the right ear and helmet is screen accurate, but I wanted to reduce it as much as possible. After some trimming and sanding, I realized that the ear just wasn’t placed right. The bottom needed to be pushed inwards a little – but the all the holes were pre-drilled. So I expanded the holes (in the helmet parts) down a little with a soldering iron. This worked well – but when I finally put the helmet together with the brow in place, the fit wasn’t as good again. I haven’t gone back to fix this again – but it should be an easy fix – even having a third hand while I tighten the screws would help. · I hand painted everything. I tried to use the stencils from Trooperbay. They worked for the most part, but I only used the stencils for the tube stripes and the stripes in the tears and traps. I found it easy to just take a pencil and trace in the areas for the traps and tears along the return edge. Just make sure the area you marked out is big enough for the Trooperbay stencils. I mixed up the tube stripes – I put the right on the left side and vice versa. It was an easy fix – I just had to remove the front 3 stripes and redo with the proper stencil – trooperbay provides 2 of every stencil for these “oops” moments. · Cleaning up the paint. I used humbrol paint and found that it scraped off pretty easy with a toothpick. I did wipe it down with some mineral spirits first – that seemed to have weakened it a bit. It can leave a very, very faint stain, but for the most part it comes off really clean. This worked great for cleaning up edges and making things look pretty. · I installed s-trim (Centurion requirement). It was a bit of a challenge. You have to start and really work to open the rubber grove as you feed it onto the edge ABS. You have to keep pressure applied and just go a few mm at a time. I went around the whole helmet and trimmed some extra off – but left about 1 inch. I just worked the s-trim until I could get the extra one inch to fit. I’m told this helps hold the s-trim in place. I didn’t use any glue. By the way, I put it on this way (not my pic – borrowed it from Sean who is now Centurion): · Hovi-mics will not sit even. Let the OCD go. Paint the edges white · When locating the tube stripes, they should be a pencil’s width from the return edge. The left side edge is straight and this works well there. The right side is not straight and makes placing your stencil or decal a little trickier. Arms: · This was actually the first thing I worked on. Good place to start. I trimmed all my coverstrips to about 16-17mm. Mark has the trimmed kit trimmed for 20mm coverstrips on the arms, so I had to take off a little off each butt edge. The actual edge of the return edge can be hard to see in some places due to a lack of definition. I found that using the back side of the piece worked better – the lines are more defined. I just kept in mind that the front would have about an extra mm or so of width. · I used 1 inch black elastic (glued) to the shoulder bell to shoulder strap, shoulder bell around bicep (hook), and I used ¾” elastic for the forearm to bicep. I had used ¾” for most things (as per a number of threads) but switched up to 1” because it is screen accurate and works better for various reasons. The 1” shoulder bell to should strap elastic is not shown in pic below. https://uploads.tapatalk-cdn.com/20180121/b543ab19033983ac78404c1423d0949a.jpg · I originally used snaps with 1.5” elastic for the forearm to bicep attachment (as per the billhags diagram). I found this didn’t work for me. So I switched to the ¾” elastic glued directly behind the front coverstrip. Worked really well. Keeps the bicep and forearm lined up nicely. Thighs: · The right thigh gave me a lot of grief. The butt return edge was trimmed to 10mm per side, for a 20mm coverstrip. However, that 10mm got a little tight in places (less than 10mm). So I put a inner coverstrip on first to get the spacing right. Then, the whole seam is slightly curved. The best solution was to glue the lower half of the coverstrip fist. Wait to dry, then glue the upper half. I did this for both the inner and outer coverstrips. · I haven’t actually done it yet (as of time of writing this) but I will trim a bit of return edge away from behind the knee. · I ended up tapering my thighs a lot – and it didn’t seem to create any issues with gluing. · I found hot bathing the ammo pack made it really easy to install. I used the same split rivets used for the ab to kidney connection (as provided by AP). I didn’t worry about lining up the front “bump” with the coverstrip. I just made the ends look even where it is connected to the thigh – I drilled the holes 6mm from the upper return edge – that was the only real measurement I made. https://uploads.tapatalk-cdn.com/20180119/c06f287020555551e41e70006d013136.jpg Shins: · The sniper knee will not fit very well. Mine ended up crooked – as do a lot of AP kits. I tried to raise the outer piece of the shin a bit to help, but it didn’t help enough. The sniper knee plate will not fit on the shin perfectly – at least not with my skill sets. This is a good as mine got: https://uploads.tapatalk-cdn.com/20180203/159996fa67b1dc5bc212cac6c1ce63d9.jpg · I had to add a little bit of Velcro to the boot and inside of the shins to keep the shins from rotating on me. · I put inner and outer coverstrips on the front of the shins. I’m glad I did because these things take a lot of abuse. The rear coverstrip is 25mm – I used Velcro and it is working very well. Once I finished my shins, I taped them up to correct for the gaps (they won’t line up in the back). I exaggerated the correction (if I had a gap, I would tape it overlapping by an inch or so) and then took the heat gun to the shins – on low – and kept the heat gun moving. I heated up the shins so they were slightly uncomfortable to touch and then let cool. I did this a few times. It helped with getting the rear seam to line up better. Torso: · Aside from cleaning up some edges, there isn’t much I had to do for prepping these pieces. I did trim the return edge to about 5 mm. I wasn’t planning on using the canon brackets, so I wasn’t worried about using them (return edges) for anything and I heard that reducing them will help with comfort. The torso fit a little large on me so the comfort thing wasn’t an issue; however, by reducing the return edge I think I made it easier for the pieces to overlap each other. I don’t think I would trim them so much next time. · I had to hot bath the butt piece and tighten the strapping to reduce “butt flare”. The butt piece does tend to do this and it obvious on screen as well. · During the build, I lost some weight and the kidney / ab section ended up being somewhat oversized for me. This caused all sorts of issues when I tightened my belt. The pieces would overlap each other. I had to reinforce the left ab/kidney connection (the three split rivets) with glued in pieces of thick nylon webbing. I then created a tab and slot for the right side. https://uploads.tapatalk-cdn.com/20180203/671d5f8f33df3cf5589cd98eebd31285.jpg · Shoulder bridges – the ribbed abs parts that go from your chest to your back – these need to have the spaces on the bottom back filled with scrap pieces of abs and glue so they will stick better. I recommend hot bathing these so the very front part will conform to the shape of the chest and shape the back so it stays close to the back (they are free floating in the back and only held down with a little piece of ¼” white elastic. Also, the large bump at the back of the ABS shoulder bridges can be removed - I removed the large bump and one small bump as per instructions from Mark at AP. · Painting the ab buttons – I used a 7/16 circle template from an old drafting kit. I traced the circle on the button with pencil. Then hand painted – the pencil line can actually act like a dam and keep the paint in place – to a point. · Remember to trim the button plates enough. A lot of people seem to miss this from what I’ve seen in application pics. I hope mine are trimmed enough now that I think of it. Belt/holster: · Drop boxes – they are a little deep – I needed to shave off about 5mm. I aimed for a depth of 15mm. The references I found mentions anywhere from 15 to 10mm depth. · Elastics connecting drop boxes - use 1” elastic. Some threads mention ¾ inch elastic. One inch is screen accurate and will allow you to trim a little off if you need to get around a snap that might be in the way · My snaps on my ab piece ended up in the wrong spot somehow – they were shifted over to the left by a cm or two. The location of the left snap conflicted with a rivet that connects the canvas belt to the abs belt (ammo pack). I had to move the one snap on both the ab piece (male end) and the canvas belt (female end). · Removing snaps are not a big deal. If you use a drill, take your time because the snap can heat up. I drilled from the back of the male side – worked well for me. The female snap was easy, I just reached in with needle nose pliers and squished the post and the snap popped apart. · I ordered a holster from AP as well. I switched out the black straps that connect to the belt with tan coloured straps. I used ¾” 8oz leather strips. It was heavier leather than what was originally there but seemed to work just fine. AP uses Chicago screws for this so things are really easy to switch out. You do need tan holster straps for any level of approval (at least for now) – this is just a screen accuracy thing. TD: · The end caps as provided in the trimmed kit needed to be trimmed down a few mm (5mm was removed in my case). I couldn’t get these all the way on (I’m not sure if they are supposed to go all the way on). The control panel had to be trimmed down about 10mm in my case. · I had to trim the TD tube as well. I think I took off about ¾” or so. Can’t remember for sure, but I ended up with 7-3/8” total length. I believe ideal is around 7-1/4” · I also trimmed the metal just above the upper screw hole to be more screen accurate. Also had to replace the screws with slotted pan head machine screws - #6-32. The ones I found were brass, but they get painted black regardless. Strapping: · This is where you will probably have to improvise the most. · I used a single snap system with nylon base plates (and some elastic in key places for mobility). · Nylon base plates seem to work really well – they conform to the shape of the curved armor and E6000 holds them very well. · Use good quality nylon. I ordered some stuff off of Amazon – I used it until I ran out and then bought some stuff from a local fabric store. The stuff from the local place was almost twice as thick. Way better for adding rigidity to connections if needed (i.e. the spilt rivet connections on the left ab/kidney). · Setting snaps can suck. If you are not very handy and lack patience, you might want to think about getting a snap setting press. Roughly $75 on Amazon. I’ve never used one, but it has to be better than using the $15 snap setter you get at Tandy. · Choosing snaps: based on recommendations from other threads I used the nickel plated, Line 24 snaps from Tandy. Durability-wise they seem fine – but I’ve hardly used them. However, I had an issue of the armour deforming and discolouring in some locations. The worst case was where I used an ABS snap base, lots of E6000, and clamps to hold in place. This is an issue that has many builders puzzled. So, please note that the following may have contributed to the issue (none of this is proven): o E6000 may react with metal and, at the very least, create heat. o E6000 may create even more heat under greater pressure (strong clamps). o The Tandy nickel-plated snaps appear to be possibly prone to reaction with E6000. · So tips when gluing in snap bases (nylon or ABS): o Do not get E6000 on metal part of snap if possible o Do not use excessive amounts of E6000 o Apply very light pressure to hold the base in place while glue dries. You don’t need to keep the pressure applied for very long – E6000 will stiffen up pretty quick, it just takes 24 hours before it is strong enough to take any stress. o Use good quality snaps that are rated for outdoor use or professional use (marine grade – I think some people use Fasnap snaps) · Example of the reaction. https://uploads.tapatalk-cdn.com/20180117/679949ebef7613a86177d7a96ef3deec.jpg · When setting snaps – make sure they are set all the way (the post is driven down until the whole snap feels secure). · Locating the snap bases – there are a bunch of build threads that have very precise measurements for placing the snap bases. Don’t feel you have to follow any of this. Keep in mind that the closer the snap bases are to the edge – or one another – the shorter the strap and therefore the more stable that connection is going to be. So if you need more movement – you can move the snap bases away a little. I moved most of my snap bases after a few attempts at wearing the armour as it moved around too much. I originally used elastic in a few spots but replaced them for nylon. This is all dependent on how the armour fits you and what you like. I kept all my elastic connections so that I may use them during trooping for more comfort – time will tell. · For more support along some connections, I may upgrade to the two-snap connections. Single snaps can rotate and move around a bit. The double snap will not allow the play and keep things lined up. A two snap elastic system (2 or 3 inch elastic) I think would work really well. I think this would be very similar to the elastic and bracket systems used in the original costumes but you could remove the straps and you don’t have to worry about the brackets (they have to be screwed in and you need enough return edge to install them – and you will probably have to reinforce said return edge with strips of ABS). Soft Parts: · I got the flexible hand guards from AP. To attach them to the gloves (Gorilla Grip nitrile gloves) you are going to need Loctite Plastic bonding system. It contains a surface primer and superglue. Works great. · Undersuit – get compression shirt and pants – everything else just doesn’t seem to get tight enough. · Get thin cotton liners for your gloves – they get really sweaty and sticky. Fitting/dressing: · In case I didn’t mention it already – I really underestimated this part of the process. · I re-did a lot of my straps once I got the armour on. Take your time fitting pieces with the strapping. · Get someone to help – more than likely, you will not be able to get dressed by yourself. · If you are getting dressed for pictures – have a handler (someone who knows what the armor should look like fitted) there to help – that person will be making sure you look good for the pics – not you (for the most part). · If using nylon straps, pre-loosen the material by bending and twisting the nylon before measuring and cutting to length. It will loosen with use – my left ab to kidney connection really loosened up after a few fittings. · I did use a little foam attached with Velcro in a few places to keep pieces more stable (biceps for example). I would rather keep things a touch loose – incase I gain a little weight. · I put Velcro on the front of the boots and inside the shins to keep them from rotating. General building stuff: · Lexan scissors work like a charm for trimming most things. I got a set that included a straight pair and curved pair of scissors as well as a tool for boring out holes (I bought this on sale: Duratrax Body Scissors and Reamer Set, 3 piece). This worked very well for countersinking the edges of drilled holes for snap installation. If you don’t get the set, at least buy the curved scissors. Score and snap works best for the cover strips. · You get a generous amount of cover strip material. If you don’t make many mistakes you should have plenty to do all cover strips – inside and out. · Note that there is a good and bad side to the cover strips. One side is shiny and white, and the other side is less shiny and less white. Can be hard to see under non-ideal lighting conditions. · The cover strips are rough cut – so you will need to make sure the edge is square before trimming. Also, to make the most of each piece, you could square the piece on both sides – measure the width, and figure out what combination of strip widths you can cut. If the width is 55mm, then you might want to cut two 20mm strips (for legs) and one 15 mm strip for arms (or whatever widths you have decided on). My laziness overrode my OCD on this and I didn’t do it but it would have provided even more usable material (if I needed it – which I didn’t – so, nevermind). · Rough sand any areas that you are planning on gluing. Like back of cover strips, for example. I used a 100 grit paper and it worked well. Use E6000. · Use enough E6000 on cover strips so that the E6000 oozes out along the edges. This is a good thing. E6000 is pretty easy to clean up after it dries. · Humbrol paint is a pain in the donkey. Especially the French Blue – it needs a lot of stirring – at least mine did. Maybe it was an old tin. · I cleaned my armour with mineral spirits in the case of paint smears or drips. I also have Novus cleaner and polish that seems to work really well.1 point
-
So, a lot of people jump in with both feet not really knowing the cost ramifications of going 100% complete on their TK. We look around at armor makers and get their pricing and think, "wow thats a lot, but ok." Then they realize there are accessories to add to the suit, and tools to build the suit and strapping, snaps, bolts and so on. So my goal here is to help people by laying out a general cost reference for the stuff they will ned to buy. This way you can make an educated decision about your finances how you will make a TK work so it does not break the bank and have you selling it a few months later. This will be a range type pricing. There are parts that are more expensive and some that are lower cost. At the very end, to help you with the accessories and armor, I have put links to the ongoing accessories listing and well as the approved armor vendors listing. These posts help compile ways to contact the sellers who have the required parts. One little tip as well, just because something is a different cost then another doesn't make it worse/better than the next item available. When you read through the sale thread for the individual items, you can also read the reviews to get a feel for the quality of an item. People with a bad history or a bad product aren't allowed to sell here. So do the research and make an educated decision. The FISD does not dictate pricing to sellers, so you are the only one who can decide what price is right for the item you want, thats why there are multiple sellers for most items. To start, the most important bit: The armor (with helmet) - The pricing ranges widely depending on accuracy, type of scupt (fan vs screencopy) and quality. Some of the lower end pricing does not include a helmet! Keep this in mind when you do the research on armor makers and make sure that you get a helmet with the suit as well. Price range: $550-$1500 Any set of armor that you can find here on the FISD through the approved sellers will look great if you build it right. The suits on the higher end of the spectrum are like luxury cars. Do you need them? Not really, but it's so nice to have them and the attention to the finer details really sets them apart. The Rest - This is the part that people sometimes forget about. These are pieces like the boots, the cloth belt, holster and so many other little things that help you to complete the suit. These parts I am detailing aren't optional (with the exception of the blaster) so in order to get approval from the Legion and join us, you will need every single item I am detailing. Many of these prices do not take into account shipping fees, since I can't detail them all and they vary wildly between sellers location and your location. Most are very fair here on shipping costs though. I will detail the expected pricing for these parts and then will recap everything at the end. Boots - There are several options for these. There are sellers who have white leather bots that are made especially for stormtroopers. These are the accurate style and the leather is dyed white so you never have to worry about chips to the paint. The other option is to go with black Jodphur boots, get some white leather paint, prep and paint the boots. This is how they did it in the films and is likely to be cheaper then the white leather route, but involves more work, up front and in the end. So you have to decide on if you're willing to trade ease of use for film replica style. Price range: $60-$100 Neck Seal - This part is generally custom made to order from a few different sellers to fit your neck size. Zippers, velcro and other closure types are available. Price range: $35-$80 Rubber Gloves/Hand Guards - This is one of those parts that isn't 100% required. The gloves yes! However they do not need to be rubber for basic approval, they can be black form fitting gloves, just check on the CRL for the specific requirements depending on the level of certification you are aiming for. Most armor vendors will include a set of ABS plastic hand guards with the armor, so unless you're going for a higher level of accuracy certification with the FISD, the ones with the armor will do. On the other hand, if you want to get centurion LV3 certification, you will need to get rubber gloves and latex/silicone handguards. Price range: $25-$50 depending on options Undersuit - Easily overlooked, this is one of the most important parts of the whole setup! You will want a plain black suit either 2 or 1 piece construction and it should be form fitting with no excess fabric hanging around. The best is any type of compression wear made for under sports clothes/suits to keep the wearer cooler/warmer based on the weather and construction. The best place to find these are at any general department store like WallMart (US) or a sporting goods store. If you decide on a 1piece suit, make sure there is a zipper to go pee. It's hard enough to get out of a 1 piece without having to worry about bathroom pressure. Price range: $30-$120 for the top and bottom. Holster - Most times these are made from leather, but can also be imitation leather. Price range: $30-$70 Cloth Belt - This is the belt that the ABS ammo belt attaches to and goes around your waist to connect at your back and you hang your TD on. Price range: $30-$70. E-11 Blaster (Optional) - The blaster is optional for Legion acceptance. Not all countries allow for even toy weapons so the legion does not require them. The price ranges widely here because you can get these as kits or fully built. Most kits are pretty easy to put together and paint yourself if you have the time. Price range $80-$800 Tools - Now this is a hard to peg hole. You will need curved scissors for cutting plastic, a drill/hole puncher, a rivet tool, tools for setting snaps. Price range: $20-$100 Strapping supplies - You can go with screen accurate brackets, or you can use straps and snaps to put your armor together and hold it in place. You will need some skinny black elastic, skinny white elastic, wide black elastic, wide white elastic. For details on how skinny/wide and so on check out the replica section. You will need snaps as well. Price range: $20-$100 Recap! Here is the pricing once again, in one place with no descriptions: Armor: $550 - $1500 Boots: $60 - $100 Neck Seal: $25 - $80 Gloves/handguards: $25 - $50 Undersuit: $30 - $120 Holster: $30 - $70 Cloth Belt: $30 - $70 Blaster: $80 - $800 Tools: $20 - $100 Strapping: $20 - $100 In total: $870 - $2990 For my knowledge, most people will be right in the middle, around the $1200-$1500 range for a fully complete wearable Stormtrooper costume. Now here are a couple of this that aren't included in this list... Time required to build. Time is money. Time building it time away from your friends, family, dog, work and so on. Unless you find a way to include them! But it's not like you're working, it's a hobby and you're having.. at least you should be! You can bank about 40-50 hours of build time for your first build. This does not include time spent researching on the computer, waiting for glue to dry and so on. This is purely time sitting on front of a armor piece working. There are people who offer a build service for a price. Average cost.. ??? Not cheap. Lets break down these costs a little. An experienced builder will take 20-30 hours to build your kit, and make sure it fits to your body as best as possible. This is a specialized skill, in a niche market which means there aren't so many people doing it. If they were being paid by the hour... say $20 a hour, which should be a good rate for a specialized job. $20 per hour for 20 hours is $400 bucks. However, a builder who gets a kit done with a high level of quality and workmanship in this time frame will ask for a bit more, more like $30. Now these are just estimated. If you have questions about a builder for your armor, post on the forums, or do some research you'll find people who do builds for you and they can answer your question directly. Links: Combined on-going accessories listing Various types of armors and where to find them Good luck with your build and have fun!1 point


.thumb.jpg.ee449555c0122db250a94b412c07cd87.jpg)


