Leaderboard


Popular Content
Showing content with the highest reputation on 04/17/2018 in all areas
-
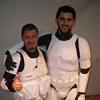
Hey all! Im about to take what i have heard is an incredible journey into the path of building and fixing my first costume build. I purchased a "Classic Storm trooper Armor" set from anovos.com about a year and a half ago. Big brown box day has come and gone. and i'm still in the middle of trying to find accessories to complete everything I need. I would love any help I can get. ive been reading my way through whitearmor.net and the forums here. but still would love for a lot of help through this awesome time! I have attached the first 2 pictures to start off my build thread. In one pic is my Brown box delivery, and the other is my wearing a anovos helm I ordered from disney a few years earlier which was built by them. Also Ill be updating on my weight loss goals so I can even fit into this armor lol. need to drop around 30 lbs id say. I also dont know if im going to linking the pics right so there might be a few edits lol Just got these great boots in yesterday.3 points
-
For the record the center Ab button plate return edge is not required at any level of approval. I know the accuracy nuts hate this but it is what it is. IMHO I would rather see a lower profile plate without return edge than one that appears too tall with return edge.3 points
-
Hello fellow troopers, I'm Brien from Northern Nevada (we don't have our own Squad/Garrison... yet!). My 501st journey started back in 2014 when one of my coworkers (TB-10620) joined and started suggesting I look into it. I did, and liked what I saw - a bunch of 'bad guys doing good'. I found the FISD and started looking into various armor kits... and then TFA came out and I fell in love with the FO TK's. I decided to hold out, and when Anovos finally announced the production FO TK kit I pre-ordered one as soon as I could. I then started working on procuring the rest of the soft goods and printing out my own blaster with Germain's excellent files. After several months of waiting, another one of my friends decided to off-load an Anovos ANH TK kit he'd picked up and never assembled. After two years of sitting in the box he decided he wasn't ever going to get around to building it, so I bought it off him in October 2017 and gave myself the goal of building it in time for the Battlefront II troop - which I did. I was approved on Thanksgiving Day, and since I planned on building for L3 out of the box, EIB and Centurion approvals came quickly after. I've loved every second of my time as an "official" member - I have handled off and on since 2015 - and the entire experience. Wearing a costume I built with my own two hands (I am not a cosplayer, this is all new to me), trooping with my fellow brothers, and hanging out and helping here on the forums. ...I'm still waiting on my Anovos FOTK.3 points
-
No pics, but I have been working hard on my build. Up next for this week - garters for thighs, second coat of paint, attach lens and mesh to helmet. Hoping to get some in person help to fit everything so I can start attaching snaps, etc. Questions: 1. Do you glue the brow trim and s-trim on the helmet? 2. Is it best to wait until the body parts are sized/assembled before assembling the belt?2 points
-
We know Jeff, we know Do NOT fail the empire! j/k2 points
-
In addition, the WTF ab button plates are very, very deep. On the ANH suits, the ab button plate is pretty shallow- and the four-button strip is flat. So if you're trying to emulate the ANH suit, you'll need to remove a lot off of them in order to flatten them out.2 points
-
Thanks, I’ve been taking my time on this, and I’m glad I did. Between you and Greg’s feedback, I think I managed to avoid messing up my thighs. Here’s to following the old saying: “Measure twice, collect advice, read every post ever written on this step, cut once.”2 points
-
1 point
-
I knew I could pull you to the dark side. Payback for pulling me to therpf.1 point
-
The helmet has stickers on ESB and the frown is black. The E-11 is different as well. And by gloves, I am assuming you are referring to the hand plates. My understanding is that AM's current kits are accurate enough to be approved up to Centurion.1 point
-
There's quite a bit of info on here about the difference between the TK suits. I won't go into ROTJ, as it is very different and your Anovos suit won't work for it. But the main differences between ANH and ESB are in the helmet and the hand guards. See this handy dandy diagram (not made by me) for the differences See here for the difference between the approval levels (basic, expert infantryman, and centurion) I definitely recommend you build toward centurion, as it is much easier the first time 'round, and will have you looking your best on troops! The different requirements are indicated by different font colors. Be sure to follow the CRL (costume reference library) to the letter as you build, as it is what you will be judged by for approval in the Legion. A great resource is the centurion approval thread here. You'll find a lot of great reference pictures of other people that have built your exact kit up to centurion standards.1 point
-
Here ya go mate. https://etsy.me/2vlpZuF Sent from my iPhone using Tapatalk1 point
-
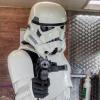
Discovered today that gaffer's tape holds much better than blue tape for temporary strapping when fitting! Yeah, it's more expensive than blue tape, but you don't use nearly as much gaffer's tape, and it can be re-used much of the time. I was able to use it to secure my shoulder elastics and shoulder bell elastics in these test fitting shots today. I'm still building and adjusting things- please disregard the missing items on the armor! Left side rivets all lined up. Ab/kidney meets level at the top. Right side kidney/ab connection is only secured with the Han snap elastic here. I'm working on the belt, so I don't have it on in these shots. Remember, the belt isn't necessarily there to pull things together; the armor should come together pretty well without it! I'll need my belt to snug up how the kidney/ab open up a little bit near the bottom of the connection when I move my arm like in the photo, but it's no biggie. It is ridiculously difficult to get a rear selfie shot in a mirror! My back plate looks like it's overlapping the kidney, but it's not. It's sitting right on top of the kidney due to a bit of foam that I have inside the back plate. Maybe I'll take a little off of the foam to keep it a bit closer to me. I still have to adjust the chest. I don't like how it's sitting a little lower on the left hand side, so I'll need to fix that. Shoulders seem like they're tight to the chest (minimal gaps) when my arms are relaxed, but I can still easily move them around. I'm happy with this. If anyone sees anything glaring about how things look, please let me know. The interesting thing about this kit is that I have not trimmed any of the length on the arms yet, and they seem to fit pretty well. I took about 1.25" off the bottom of the chest, and removed about 1.25" off the cod/ab connection. I trimmed about 5mm off of the sides of the chest where it meets the ab, but I've not removed anything on the chest around the arms. I don't think I'll need to remove much off of the thighs at all. (I'll be getting to the thighs next.) Overall, there has been much, much less to size down on this kit compared to the RS Props kit.1 point
-
I did the velcro in the front of the boot and it wasn’t great. The stirrups made a huge difference, now I have both. I also didn’t see the stirrups, I used e-6000, it was easier. As for the blaster issue that’s an amazing story. I’m sure it was rough at the time but that’s something you can tell at every troop. Sent from my iPhone using Tapatalk1 point
-
1. Some glue, some don't. It's something you can decide on later on. 2. You should size the kidney-ab/cod before you decide on the belt length. Are you referring to the ABS belt to canvas belt? Will shoot you a message to figure out when I can give you a hand!1 point
-
Hey Luc, I totally missed this! Congrats!!1 point
-
Rebel Scum!1 point
-
I got a price... pre order is $699 plus shipping otherwise its slate to be $780 plus shipping. pretty sure thats without a bucket... I want to see more of the BSP stuff but it looks great so far back to KB's stuff!!1 point
-
Was doing my preseason check last night so I had time for any repairs/changes, and noticed my helmet is starting to yellow. Womp womp. Nothing to serious yet, mostly on 1 corner of the dome and the ear pucks but it's noticeable. I suspect the Yaxley troop last year was to blame for most of the damage. I do have some changes to make for this year though. I've lost some weight so I need to tweak the fit a bit, and finally add the cuts to the legs for more movement and add a tether to stop them twisting.1 point
-
Aint that the truth of it all? I have had to tell myself during my build to stop sweating over the really small stuff as only I and who ever reads my forum post will know1 point
-
Oh, wow!!! You've already got a legendary trooper story, and you don't even have a TK id yet. Congrats! Make yourself some stirrups for the shins. They will teach those shins who's boss! Another thing I noticed has to do with your gloves popping out of the forearms. This is common, but can be dealt with easily! Attach a few strips of velcro to the outside ends of the gloves, with corresponding strips on the inside of the forearms. This not only helps to keep the gloves from popping out/sliding down, but makes it super easy to put on the arms in one fell swoop! I've trooped with this setup many, many times, and they have never failed.1 point
-
I thought that too but much easier to take more off later than add more later on. That might be where the 3-5 mm comes into play that I took from the image. Those are measured out to 4-5 mm. Once the completed kit is assembled ("Troopers Assemble!") I'll determine if a bit more should come off.1 point
-
Sorry Walt Didn't mean for you to make deeper bells. Outstanding service though! Hence since I caught the bug i'll need to save up for a scout, pilot or inferno from you next!1 point
-
ok cool thanks a bunch1 point
-
Congratulations trooper1 point
-
Top job, matey!!! Well deserved. [emoji1][emoji1][emoji1] Sent from my iPhone using Tapatalk1 point
-
Hi Daniel welcome back and thank you for your Centurion application. CRL and Centurion Application Requirements: All required submission photos are present and your armour meets all elements as set out in the lvl 3 CRL, with out further delay, Tony and I would like to congratulations and welcome to Centurion Other-Armor Fit/Assembly: Centurion is the ultimate level of accuracy and appearance. In this section we mention any finer points you may be able to achieve to make your armour as accurate and clean as possible. I would just like to mention the small gap on the rivet side of your armor. It appears you have a slight overlap on the opposite side that if you adjusted (shortened) the elastic connectors behind the rivets, you could close that side and alleviate the overlap on the other. We also think this opening may have only been caused from raising your arms and creating the separation. And one last thing. Shim work and ABS paste is never easy, and you have done a good job, but we think either adding a little more ABS paste to the small depressions and sanding back again to clean them up will give you a more even finish. Congratulations once again sir, head on out as a proud Centurion1 point
-
Alessio Miccichè 15128 EIB certificate A4 http://www.whitearmor.net/eib/certificates/15128-eib.png1 point
-
Ahhh how have I missed all the updates?? Looking great, Christine! I had no idea the WTF ab plates are nonstandard since it's the only kit I've worked with. Really fun figuring out the quirks of each makers' kit.1 point
-
It was a fun building it with you Brian. Enjoy brother.1 point
-
Thank you everyone ! I have Tony Jobe aka UKswrath to thank for helping me out togeather this kit ! Sent from my SAMSUNG-SM-G930A using Tapatalk1 point
-
1 point
-
Nevermind it's just loose. Maybe some velcro or tighten the belt will keep it in place more1 point
-
Nice work! Congratulations!!1 point
-
Congratulations trooper1 point
-
Hey Brian welcome back and thank you for your Centurion application. CRL and Centurion Application Requirements: All required submission photos are present. Thank you for making the suggested update during your EIB application. Beautiful job on your build . Tony and I are pleased to announce your armor displays all the elements as set out in the Lvl 3 CRL. Congratulations and welcome to Centurion Other-Armor Fit/Assembly: I have one small recommendation to help prevent any possible damage to your undersuit and your self. You could trim the areas circled in the below image and sand the edges smooth as they look like they could catch. Overall you have one tidy build and should be very proud. Time to head out and continue to make the Empire and your garrison proud1 point
-
That depends on the size of your chest and how high you want the chest piece to sit.....I recommend taping everything all up before you start gluing or cutting straps. Once you are comfy with how the torso armor sits on you....take the measurements and make your straps.1 point
-
Mmmm shiny white armor. Definitely do aim for centurion! It's easier to do the first time through, that's for sure. I just got my HWT approved this week, the nice thing is (assuming you do your weathering the right way) you can actually go back and forth between ANH stunt and HWT with minimal effort. I plan to get centurion approved on both stunt and HWT (just need to finish my E-11, it's taking forever!) Let us know if you have any questions as you go along, we're here to help!1 point
-
A note (Hopefully I'm not too late). Be sure to divide the amount you're trimming off the thighs between the two pieces, and only trim the back (the front is likely where it needs to be already). So for your 35mm on the left thigh, do 17mm on the outer segment and 17mm on the inner.1 point
-
First I reopen the shingate conspiracy, now I start Unsolved Ab buttons.......1 point
-
Félicitation1 point
-
I think I kept you all in suspense long enough. It still needs a little more love but much better1 point
-
+1 for Soulart/GPPG.....she is a wonderful lady to deal with, not to mention her mad craft skillz1 point
-
Congratulazioni Niccolò, spero di fare la richiesta anche io a breve Tony TK30977 Inviato dal mio iPhone utilizzando Tapatalk1 point
-
Picking away at things. I’m upgrading my TK right now for a big troop in a couple weeks, so not much time left for the TD. I got the ears rough trimmed and on for my first of many rounds of seeing where I need to trim. This guy has spaces, so I don’t need to close the gap. Here are the ears. The tape are reference markers for paint blemishes on the original. The original has a very roughly painted surface. I won’t be replicating every bump of course - just the ones that are seen onscreen or have been pointed out in previous SWAT applications. Of course, SWAT applications are notorious for becoming more strict every application. I did consider painting the helmet HDPE-like green and then painting over with white - but I didn’t want to do that for the whole suit. Plus, I want the whole thing to still look good in person to the general public. I want it to look like how they think they remember the armour looking, if that makes sense. I’m trying to test how I’m going to add the paint drips. Just using white paint doesn’t work well - it is a warmer white and just interacts with light differently than ABS. So I’m planning on using ABS paste. Really runny ABS paste as it turns out. Paint is on the right. My first attempts at ABS paste on the bottom. Final test on the left. Should work. You can’t tell from the pick, but I was able to fine tune the locations of the blemishes by overlaying pics in photoshop. Sent from my iPhone using Tapatalk1 point
-
Here you go Adam: Loads of inspiration waiting for you...1 point
-
Tubes are getting clean up and prep for ano....... so close now1 point
-
I love these little kits,,,, nothing replaces the real thing but still a lot of fun1 point
-
I put my armor on my dressform yesterday afternoon to see how it all looked together. It all looked good, shiny, white, no problems! This morning, things looked very different. Going into my office, I found my armor had been embellished by my kids. I think they're rebel spies. Something must be done!1 point
-
Yes (assuming you build it correctly to your body, and 501st specs). But they have some rather long delays on shipping products at the moment, and aren't known to provide spare parts in case you need any either.1 point