Leaderboard


Popular Content
Showing content with the highest reputation on 04/03/2018 in all areas
-
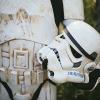
So I think I officially have a left leg that is 99% complete. Just need to add the suspension strap for the belt and glue down my shin elastic for the bra clips. I did clean up the glue after I took these. Sent from my VK815 using Tapatalk3 points
-
Thank you. At this point I was expecting 3 digit shipping from them...... I am looking forward to finally having it in hand and getting with my local garrison and finally getting this journey really started.2 points
-
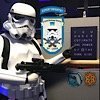
So I started with my helmet I trimmed around the ears but used a drill to avoid a sharp corner (I get nervous with sharp corners as they invite tearing). Then I scored and snapped the extra off. And then with reference pics in hand I started to carefully shape the eyes to match the original. Sent from my iPhone using Tapatalk2 points
-
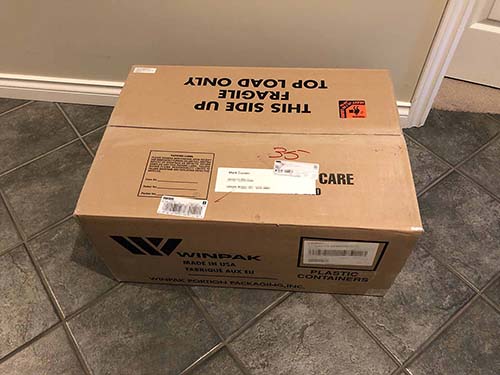
Ok, so it's Friday, three days before Christmas, and I'm jumping up and down like a school girl yelling: OMG, OMG, OMG, OMG!!!!! Santa came a few days early this year!!! Now I'm going to summon up ALL of my strength....I will NOT open the box. I'm wrapping it and putting it under the Christmas Tree. My daughter (age 6) will just have to deal with the fact that Daddy's Present from Santa is bigger than hers. Mark
 1 point
 -
So, I'm starting another build - much to my wife's chagrin. I got another AP kit a while ago (untrimmed with belt and flexible handguards) and I'm finally starting the build. The difference this time is that I'm building a Sandtrooper. The build is very similar so I'm posting the build here at FISD and I will post the more TD-specific stuff over at MEPD. The only real differences between the TK and TD are: TD is dirty TD has a pauldron, pouches, and sometimes a pack TD does not have plastic shoulder bridges or large button panel on ab. They also don't have the 4 button panel - they have a three button panel (not painted) TD is dirty TD does not have the black lines on the traps or tears of the helmet Sniper knee plate if different shape. TD is dirty TD does not have holster or TD (or drop boxes) on the belt I think that is pretty much it. I thought a TD build here might be good for new troopers who are debating a TD build. And I know a lot of people here have completed a TD as well as a TK, so I'm sure I will get pointers on either site. The fun part about the TD build is that one is encouraged to build a specific onscreen trooper. There was no question for which trooper I wanted to build. This guy: The captain that talks to Garindan. The first shot above was one of the most memorable trooper scenes for me back in '78 (didn't get a chance to see the movie until '78 - longest year ever). The best part about this trooper is that the helmet is still around (it was recently at auction - I think it went for $250K, but don't quote me). Anyway, there are pictures of the helmet floating around. Starwarshelmets.com is a good place to see these images. Here is an example: MEPD has a bunch of additional reference. They have also broken down all the different sandtroopers and what equipment they have. This is an example of the graphics created for reference. There is one snag to the whole process. For basic approval in to the 501st as a TD, you need at least two pouches with one of those being a proper shoulder pouch. So I will need to add a shoulder pouch in addition to the belt pouches. For level 2 (PO), I need a backpack. This trooper does not have one - so If I want to advance to level 2 I need the pack (and from what I understand, I don't need said pack for level 3). To put together a proper pack takes some time - so I won't be doing that right away. My plan is to build the actual armour as close as possible to what would be expected at Level 3 (SWAT) and just go for basic approval for now. I'm still waiting for some more pouches to arrive, but I should have a variety of pouches so that I will be able to emulate other characters - most notably the Cantina Captain who wears the exact same armor as the Garinden captain. He also has a pack - so this might be a Plan B. I'll post some pictures of all my collected gear later.1 point
-
Ordered a FOTK from KB props and after some delay they made an annoncement that they entered a partnership and that they will supply different plastics at a much faster rate. I jumped on the Pet-G version and it will be pulled on a live stream on thursday - should be interesting Shared with permission: Hello all! My name is Hal and I own The Sandbox: A PixelArts Studio in Las Vegas. This is where Kevin moved at the beginning of the year and I will be partnering with KB for his Armor Builds going forward. I understand he is a little behind and after talking with him for a bit I have come up with some solutions and an update for all of you. -I will be handling fulfillment from now on. Messages will still go to the KB Props page, but payments will go to the Sandbox paypal and I will be giving shipping dates when payment is confirmed. -We will institute a “Runs” system here at the shop. We will spend a week pulling parts for a particular suit. Then move to the next style the next week and so on, on a month long rotating schedule. -We have access to a new, bigger, Vaccuform so there will be less waste, but ordering plastic will now come in bulk. Up till this point Plastic has been ordered on a needs basis and going forward it will have to be ordered a pallet at a time. This leads to the second part of my announcement. We will be offering a couple different tiers of suits. #1 ABS- This is the most common and unfortunately the most difficult plastic to get. Most bulk suppliers make smooth/haircell. We don’t want this as it leaves a rough texture to the plastic and requires a lot of sanding to make smooth. Smooth/Smooth (Virgin) is most commonly “Special order”. It requires me to order a pallet, the factory then resets to make the specialty plastic, and means I have to wait roughly 4 weeks for the factory to make it, then ship it to my local hub and me to pick it up from there. This is currently the longest wait, as I have to wait until I have a stockpile of plastic here to offer it for same day shipping. (Meaning I would order more plastic before I run out never effecting my ability to provide suits.) #2 Polystyrine- This is a little more “brittle” but comes with amazing detail. Detail I have a very hard time achieving with ABS. It does not like to flex as complex shapes, but in almost all cases if you take off the return edge it is as flexable and durable as ABS. This I can ship Vaccuformed in literally 1-3 days. #3 Pet-G- This is a newer form of plastic. The ABS Kevin has used up until this point has been .093 ABS and Pet-G will come in .060. It comes clear. And with a film on both surfaces. This is the plastic all major manufacturers are moving to as it is Food safe and Vaccuforms as cleanly as PolyStyrine with the durability of ABS and nearly 1/3rd lighter than ABS. This I can ship Vaccuformed in literally 1-3 days. With these new plastics and the new schedule what you will see is a much quicker turn-around for suits from order to shipment with the goal being no one orders a suit and then it is pulled. From now on the goal Kevin and I have set is that we will have a stock of suits and when one is ordered it will be pulled from inventory and sold and then stock being replenished when we get to its “Run” week. Kevin has worked hard to build his business and I am not interested in taking it over. Kevin and I will be working as a team. Kevin will no longer have to pull suits. With this new partnership he will be more able to focus on making new suit styles and will leave the production of your suits to The Sandbox. I will be making a list of all outstanding orders. Should anyone want to take their order right now in PolyStyrine or Pet-G I will happily pull the order and ship it immediately, for all those who wish to get their suit in ABS, The Sandbox will be placing a bulk order on Friday the 6th of April and 4 weeks after that should receive our shipment and begin filling your orders. If I find anyway to order this plastic faster I will. Thank you, everyone, for your patience in this transition. And I look forward to working with all of you!1 point
-
I use elastic straps with double snaps on both ends (in case one comes off) a snap plate is glued inside the shoulder and snaps attached st elastic shoulder strap, if you have this a little further forward on the strap it will help bring the shoulders inward after you move your hands. I like to use snaps as over time the elastic ban stretch and its easy to swap out. There are many ways to attach them, some glue the elastic, some use Velcro, it’s really what ever works best for you. Good luck with what you decide1 point
-
Congrats and welcome to the ranks1 point
-
Popcorn is ready. ;-) Sent from my iPhone using Tapatalk1 point
-
You'll probably still want to polish. Once it is applied and dried, you will probably want to sand the pasted area back down (wet sanding with fine grit sandpaper) so it is flush with the rest of your armor. The fix will be far less noticeable that way. Once you're done sanding you will want to polish the area so you get the nice gloss back. Novus polish is great for that phase.1 point
-
Congratulations! And welcome to the501st! You're gonna have fun Saturday!1 point
-
Great closure for a great build (It should be pinned)1 point
-
Hello and welcome aboard1 point
-
That moment when you see yourself as a Stormtrooper and say to yourself, "OMG! That's me!" (That's me on the far right in my RS Props kit.) I don't really look all that short out there, do I? This is currently on the Atlanta Braves website, promoting Star Wars night at the Stadium for May 4, 2018. The photo was taken at last year's Star Wars night, which happened to be my very first big troop. I was excited, nervous, and proud to represent the Empire! And here is what they told us just before we went out on the field... I had no idea that they expected us to levitate across the field. #troopergoals This will be my last update to this particular thread since I'm not building on it anymore (I'm over working on my WTF Hero Build right now, so I'm still around!). This kit is destined to become a Sandy in a few months. Building my RS Props TK was a great experience for me, and I really hope that I've helped other vertically challenged individuals along the way. Long live the FISD and long live the Empire!1 point
-
Ah yes, drop boxes! I knew I forgot something I'm going to add that to the first post. Thanks for the warning! I can barely get my melon in my current TK AP helmet, so anything that reduces the size is probably a no-go for me too. I was hoping to trim enough away from the brow area to get the proper look. Might be a careful balance of the two so the side traps' alignment with the ears and brow still look OK. Good luck on your build as well! See you over at MEPD.1 point
-
I just priced out a RS helmet with shipping to Canada. The Canadian dollar is not very strong... apparently. another belt, holster, handguards, and blaster (I just ordered another ANH E-11!). This is like one of those cults where you give away all your money to the "cause" - but in this case, I'm sending it all to various stormtrooper-related vendors. At least here I end up with something tangible and totally cool and not just a paper cup of Kool-Aid. I sure hope my wife does not read this thread. Or look at my VISA statements.1 point
-
Damn you, Daniel. Now you've got me thinking. And me "thinking" usually results in my wife getting annoyed.1 point
-
Looking good and now you got me thinking to have the same approach with my Sandy-build (UPS says my RS will be delivered tomorrow *yeey*)1 point
-
Great, I'll have to check this out! Good luck on your build! ^^1 point
-
Heck the length shouldn't even matter only the return edge. Sounds like the GML is misinformed.1 point
-
Rub some dirt on it already!!1 point
-
You need to do EIB first before you can go for Centurion. Contratulations, and good luck with EIB.1 point
-
It’s official Thanks to all for your guidance ! Question now do I apply for EIB or can I try straight for centurion since I built for centurion from the get go?? TK-524171 point
-
Well I trimmed up the second bicep. All went well. And then I cut my first cover strip. This is beginning to feel pretty natural. :-) Then onto the forearms where things got a little more difficult. Here are the untrimmed forearms as they came from AP... And now the forearms "roughly" trimmed.. (I say roughly trimmed because I've left enough material for 20mm cover strips) At this point I was fairly surprised. The biceps fit quite large on me but the forearms are quite the opposite. I don't think a 15mm cover strip is going to work for the forearms. Luckily the biceps were only "roughly" trimmed so I've still got a few mm to play with if I want to go bigger with the cover strip. It's weird, the left forearm feels tighter than the right but they're both a little tight. Particularly closer to the elbow where your arm muscle is. The armor fairly round in shape (at that point) whereas your arm is kind of oval. If I squeeze the armor into an oval shape, it's not tight anymore. I wonder if I'm going to have to do a hot water bath to get the shape a little closer to my arm shape? This is something I've been really dreading. I've read too many horror stories about hot water baths and heat guns gone "wrong". Here's a pic. It's digging in a bit right where the blue tape meets my elbow area on the right side of this photo. You can see the blue tape even wrinkles there as the armor is pulling the tape downward there too. As I say, if I put a bit of pressure in the center of the forearm, causing the sides to flare out when it takes more of an oval shape, then it feels fine. Now a few things come to mind: 1) It's not that bad. Live with it. 2) Maybe cover strips will pull that area out more as the armor does have more of a curve to it there. The rigidness of the cover strips may pull that area out naturally. 3) Swallow my fear and hot water bath those suckers. Thoughts? Mark P.S. - As I mentioned before, I don't have big muscular arms. I wonder what people who do have more muscular arms would do? 20mm to 30mm cover strips? :-)1 point
-
Got one person quoting me ~$35 for their OT TK kit, so I going to say below $50 for us US people...1 point
-
Fist bump to the OCD mate - your attention to detail will pay off [emoji869][emoji38]! Sent from my iPhone using Tapatalk Pro1 point
-
Ohhh this promises to be good - grabbing popcorn and... subscribed!!! Sent from my iPhone using Tapatalk Pro1 point
-
I'll be picking up a shiny new Anovos OT TK kit soon from a local Wampa Clan merc, and I decided to build it as one of these Force Unleashed troopers. I have a pretty good handle on how TFU and ROTJ troopers are put together, so this one should be a walk in the park. Kashyyyk Trooper: Phase III Stormtrooper: Both armor sets are identical, so I will have two costumes from one armor kit and two helmets. A Hasbro Black Series helmet will be used for the KTK. For the $26 I spent on it (due to a non-working speaker which I was gonna tear out anyway), it will serve as a good base and a fun project. I filled in the tube stripes, battery compartment, and speaker holes with ABS slurry. I also started extending the bottom of the neck opening with some plastic "for sale" signs and more thick ABS slurry. It's kind of rough right now, but it'll look flawless and seamless once sanded down. The vocoder is also pretty tiny on this helmet, so I chopped off the bottom part of it and replaced the void with... you guessed it -- ABS slurry. Going to put down a few more coats of that before I sand it smooth. The frown is also gone. Filled in with slurry almost to the point where you can't even tell it was there. It's completely different on this helmet so I'm going to carve out a new one. Just a couple progress shots to show what general direction this helmet is headed in. I will need to carve out the sunk-in details on the back of the helmet and work material back in to get that 3D look - there, and on the faceplate where some holes are already carved out. The black marking under the lens will also have to be sunk in a little bit and painted 1138 grey. Once assembled back together, the seam between the cap and the back will be filled in and the whole helmet will be sprayed a khaki color and masked off for paint chips.1 point
-
You're fine Jeff. Once your arms are connected they'll be tugging on the strraps anyways.1 point
-
I think @Sly11 and @ukswrath should chime in before we make that call.1 point
-
First, I can recommend that you go to Lowe's or Home Depot to get the acetone. Yes, nail polish remover has acetone in it, but it is not nearly strong enough to melt ABS. Wet sanding is exactly what it sounds like, sanding with wet sandpaper. I would HIGHLY recommend using 3M's silicone sand paper https://www.lowes.com/pd/3M-SandBlaster-Pro-12-Pack-7-in-W-x-4-5-in-L-150-Grit-Commercial-Ultra-Flexible-Sandpaper-Sheet-Sandpaper/1000065611 This product will last danged near forever, and is available in several grits. I did an entire TK build as well as a resin E-11 build and only used 2 sheets.1 point
-
Moving along to modify the belt and knee ammo pack a little... They are flat and need some shaping. My waist line is so small and curved that it necessitates adding some bends to the belt. If I don't add some curving to it, the plastic ends of the belt will flare out and ruin the nice profile that the belt should have. If you have a wider torso than mine, then you won't have to deal with this kind of thing. Lucky you! And adding some curve to the ammo pack just makes installation easier. Here you can see the belt before the hot water dip. I use chemical gloves to protect my hands from the boiling water and to easily handle the hot items as I shape them. I also use a pair of paint stir sticks taped together to help clamp part of the belt flat while I bend it. So, at the end of the belt I want it to curve a little, but just where it meets the box, and I also want it to keep kind of a flat shape. So I clamp the belt with the stir sticks next to the last box (like in the photo below) after I've dipped that section in the hot water to soften it. )You can do this same process to the middle sections as well if necessary.) Then I just apply gentle pressure and bend it where the box and the clamps meet. The stir sticks are wide enough that they just fit between the boxes of the WTF belt. After a few minutes of shaping, I ended up with a gentle curve in my belt and ammo pack without any warping or loss of detail. If you don't like how your bends are coming along, just redip the part of the belt you don't like, and let it sit in the boiling water for several seconds. It will return to its previous shape without any coaxing. Try again from there until you end up where you want.1 point
-
As Brien mentioned, the OT TKs were right at the 5'10 mark, but I have seen Troopers ranging from 5' 4" to 6' 6" and from 100 lbs. to over 300. Some kits are designed for larger Troopers, (like AM) but can be effectively cut down to size. (I am 5'10 / 155 and my AM armor fits perfectly). Whatever size you are, we can help you reach your goal of joining the 501st and get you out there trooping! Just remember that becoming a TK will take some time... consider this a marathon, and not a sprint. "Hurry up and wait" is a phrase we sort of live by, but there are things you can do in the meantime that will help you get prepared for your BBB day. I suggest getting all the supplies you will need in order before your kit arrives. I have a list here that may help: https://www.whitearmor.net/forum/topic/31404-supply-list-for-your-tk-build/ If you are looking to save some money, you can order a blaster kit from Doopydoos: http://www.doopydoos.com/stormtrooper-e-11-complete-anh-e-11-blaster-kit-offer-2685-p.asp The thing with them is that it may take 6-8 weeks to arrive, and their communication is awful, but you will receive it, and it can be built to Centurion level, especially with one of Tino's (T-Jay) awesome E-11 finishing kits, which will take it way beyond the "next level" of accuracy. https://www.whitearmor.net/forum/topic/28444-fs-completion-sets-for-e-11-resin-kits-with-worldwide-tracked-shipping-and-paypal/ You can also purchase your undersuit, boots and such beforehand. If you need any sources for these just PM me.1 point
-
Another small update - to show I’m still maintaining momentum, albeit at sloth rate[emoji1] Right forearm was shortened by one dimple. I was fortunate to troop with my (new) GML over Easter and get some feedback on both forearm and bicep. In addition to some great tips, it’s reassuring to know I was on the right track. Tonight I glued the back cover strip down. I’d intended to do both but engineering-wise it wasn’t going to work. Having brought the forearms in a bit, the parts are a bit “springy” (its late: words escape me [emoji23]), and it took a bit of MacGyver’ing just to get them to this point [emoji1] Why the back strip? Because if I’ve stuffed it up at leave it’s at the back, and not as noticeable [emoji12] Sent from my DH77 using Tapatalk1 point
-
I love the Post’s Parts List idea. Your OCD is commendable. looking great!1 point
-
Who likes cracked shoulder straps? No one? So let's reinforce some shoulder straps before installing them, shall we? A strip of stainless steel, 3/4" wide is measured for the strap first. One package is enough for two shoulder straps. e6000 glue applied to the ridges. Then the strip is cut to length and bent a little to conform to the shape of the shoulder strap. It's set on the e6000, and then covered with even more e6000. I cover that with some super thin white styrene. Here you can see how thin and flexible it is. Then all that's left is to sandwich things together really well with a mess of clamps and magnets, and voila! Reinforced shoulder strap that should be able to take an extreme beating.1 point
-
All that's left is to paint it weather it and distress it!1 point
-
OK.......lets start this..... I'll update my parts list as I go: (placeholder post) Name : Suspend Height : 6" 1" (185 cm) Weight : 195 lbs (88.5 kg) Armor : Authentic Props Boots : Imperial Boots Hand Guards : JustJoseph63 TD Clips : Ukswrath Holster : Darman Props Neck Seal : Darman Props (but I might still change as I'm not overly happy with the bib closing in the back) Dark Green Lens / S-Trim / Rubber Gloves : TrooperBay Nomex/Leather Flight Gloves : EBay E-11 Blaster : Doopydoo's with T-Jay's Completion Kit + Suitcase Props Parts Undersuit : Currently, Pathfinder/Kodiak Thermal Underwear from Walmart That's my parts for now. I'm holding off on the belt and helmet electronics until later. Mark1 point
-
Wow. I never win anything.1 point
-
Hey, lookie at what I finished! No, that's not my WTF kit. haha... I built a PVC mannequin last week and dressed my RS kit on it. I think my kit is much happier here than in my bin. My helmet is displayed on my wall, so that's why the mannequin was headless. I've since added a foam head, complete with a beret and aviator sunglasses. Anyhow, if you've got an extra $35 bucks or so laying around, and you want to display your kit, I highly recommend picking up some PVC pipes and fittings, and building a PVC mannequin. I'm still building the platform base (to hide those ugly pipes and to properly display some 'display only' boots), but it'll be an easy assembly once I get time for it. And now, back to the build! I tried on the torso last week and discovered that the right side of the kidney could be trimmed about 2 cm to better fit my frame. I hadn't trimmed anything off the sides of the kidney yet, and glad to realize that I didn't need to take much off in that area. In fact, the 2 cm only needed to come off of the right side! Yay! I used my compass tool to draw my cut line on the kidney. I removed the gaffer's tape and traced again before cutting. And I measured about four more times after this to ensure that everything would be even on both sides if I did this little trim. But before I could cut, I needed to remove the kidney tab from the inside. See, I told you that it's important to use e6000 for this! Okay, I can't deny that there is immense satisfaction when you can peel a whole section of e6000 off at one time. It's as good as popping bubble wrap, am I right?! Okay, with that tab removed, I removed the brackets on the right side of the butt plate and kidney as well. I have to move the brackets due to the loss of that extra 2cm of material. Here's the outline for the new kidney notch. The return was so strong that I couldn't cut through it. I had to cut along the corner, then score/snap the return first. This allowed me to then easily cut the ABS of the kidney. I'll patch up the extra holes left from the previous placement of the brackets, then install the brackets in their new location once everything has cured. I did some minor hot water bath shaping on the chest to curve it in a little more and fit the ab better. And glued the ab buttons on. I'm currently waiting for glue to dry on the chest/ab elastic connections. I've glued just the ab parts first, and will follow up with securing the chest part later. I think I'll tackle the shoulders next. I don't want to get the ab/chest fully attached just yet because I don't have the shoulders properly fit at this point. Once I get the torso fully dialed in, then I'll begin sizing down the legs.1 point
-
Just a tip, not sure what you did with that forearm part, but don't chunk it. you may run into a situation where you need extra material (small parts) and don't have anything left. you might be able to use that forearm part for something, never know. But of course im the type that never throws anything away and end up with a ton of crap lol. but there has been times were I was like "man I need this (insert item)" and after 20 minutes in the garage found something I forgot I had. Keep up the hard work, and im sure part of that pep talk was about the right of passage as a TK to build your own armor. you will love it so much more when you finish. your blood, sweat, tears will be worked into that armor and you will wear it proudly!1 point
-
Couple of things so I will put in bullets: The angles cut on the ABS belt are much too large. The hand guards look too large as well. The TD clips look a bit small, but you will probably be able to make them work. The buttons on the ab plate look quite big as well. Painting them smaller should help with the appearance. Kidney plate's top side should swoop upwards. Hard to tell in the photos if this angle is present on either side. It's definitely too large as per your observations. The notch should be cut where you pencilled it in, but note that it is not a requirement. Your butt plate is also too large as you have already observed... ...but before you go trimming these, you should cut keeping extra material to reform a return edge on these pieces.1 point
-
Thanks a Lot! Fingers crossed:-)1 point
-
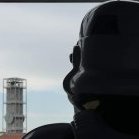
Hey guys, I have finished one of my helmets as a birthday present for a good friend of mine. He requested severe battle damage... so i went a little crazy... On closer inspection, the snout would have needed more sanding before painting it. But time was running out.1 point
-
I made 5 heavy weapons vests last year. Your best bet is to get a Flyye Law ENF vest via ebay, take it apart and convert it. I can send some instructions if you're interested - it is a little time-consuming but it's not hard to do. Just some measuring, sewing and riveting. Here's a photo of me and my vest. I've upgraded it with side pouches since this photo was taken.1 point