Leaderboard


Popular Content
Showing content with the highest reputation on 03/04/2018 in all areas
-
Thanks, Jose. The armor recently got approved to Centurion level. As you are aiming for that same level, you can always send me a PM in case of questions. Good luck with your build and great work on your black helmet interior.2 points
-
And a quick kit up Dont think im far away now Just waiting on some more e6000. new shoulder webbing . New under suit from xtreme racing and a sniper knee I may change Sent from my GT-I9505 using Tapatalk2 points
-
Got lots of things left to do still. But I'm at the point where parts are starting to look like a HWT pack! Thanks to everyones amazing tips and build threads! ---------1 point
-
I didn't know where else to put this, but I just wanted to show off my newest wall decoration! I liked my Centurion certificate so much, I engraved it into wood so it would look like a plaque. Its so awesome!1 point
-
I do not see an issue with it. Whatever works for you trooper. The strapping (thankfully) is not in the CRL. Some troopers prefer the traditional strapping from the movies, but most of us (me included) find different ways to keep our armor together when we troop. So NOPE. I see no issue with it as long as it works for you!1 point
-
Looking mighty fine trooper. Mighty Fine indeed.1 point
-
I noticed in your gallery that you plan to close your drop boxes with flat covers. Note this section from the CRL: "Drop boxes must have full inner drop boxes to close the back. Flat covers are not allowed." This is a centurion requirement, so for basic you're fine, but this is one of the simple things that is pretty easy to get right the first time, and will save you the stress of redoing it if you want to go centurion later. Sent from my SM-G950U using Tapatalk1 point
-
End caps are now on the cylinders. I got some red cord and some small resisters for the detailing at the back. Filling. sanding, filling. Dremel time for the flashing. I made the rail from some steel rail (Bunnings) 2.5mm thick and 20 mm wide. With the angle grinder, using a cutting disk, i scored along the front bend to give a nice sharp bend.1 point
-
R & D, You can find him on FB. Based in Australia. Even with postage, with the exchange rate it might be a good deal for you?1 point
-
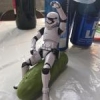
Great work! The painting on that trap is really neat! lol - I know what you mean with the kids. My five year old wears my old lid and walks around saying “move along, move along”. Btw, that looks like a beautiful collection in the background.1 point
-
Hi Dave. Just out of interest, what width are you going for on those coverstrips? If you’re aiming for screen accurate, the sizes are usually 15mm for the arms, 20mm for the legs (except for the calves 25mm). Looking at your pics, I’d guess yours might be around 40mm? Also, the thigh cover strips don’t run the full length of the thigh - they stop at the lower ridge. Hope that helps. :-) Sent from my iPhone using Tapatalk1 point
-
I'm going to have to get creative with the placement of everything inside the helmet, my head isn't exactly small either. lol I've done a test run with the speakers and they're awesome, I'm looking forward to getting everything in there though. FWIW, the speakers aren't much heavier than the AP Hovi Mics, I think mainly because the attachment hardware is all nylon/plastic vs. the metal on the originals. Speaking of which, I solved the spacer issue with the Hovi Speakers (in this case) to my satisfaction, I tried a few different ideas and this is the one that was the simplest and worked the best in my opinion. I bought 9/16" x 1/4" rubber grommets and 1/4" nylon washers from Lowes (there were no washers included with the Hovi Speakers, so I was going to add them anyway). Note that the sizes used would be different for the AP Hovi Mics: I put the grommet directly on the back of the Hovi Speaker: And then I attached it to the helmet using a nylon washer under the nut. On one side the grommet bottomed out before the Hovi Speaker did, which is what I wanted so it could compress against the helmet. On the other side the speaker bottomed out first, so I added two nylon washers between the speaker and grommet and then the grommet bottomed out first. Everything is then firmly finger tightened: There will still be a gap on one side of the speaker and this is normal/unavoidable due to the shape of the helmet recess. But the speakers are firmly in place, oriented well, and the pressure is evenly distributed against the grommet on one side and the washer on the other: After doing that I painted the first trap (helmet came back apart so I could paint under the brow trim and so I could touch up the plasti-dip on the inside): Parts list from this post: 9/16"OD x 1/4"ID Rubber Grommets - x2 (Specific sizing for Ukswrath Hovi Tip Speakers) 1/4" Nylon Washers - x2 Minimum - Extra may be needed as spacers ------------------------------------------------------------------------------------ And right before I had taken it apart, my 21 month old daughter put the helmet on herself and ran around the room yelling "HELLO" because that's what I was saying to her when I was testing the speakers out. This is why I get nothing done quickly. Haha!1 point
-
I REALLY like this thread !!! Kudos and SALUT !!! Sent from my iPhone using Tapatalk1 point
-
I just bought slotted pan head screws today. It's always bugged me. I was going to message you about where to get them. Ha! Good luck on your Centurion application...don't need it though.1 point
-
Here's my finished Heavy F11D (minus the black dot on the ammo box and the stickers). I used the Rustoleum Painterr's Touch 2x gloss white and satin black. I'm in the middle of building a new standard one now and I'm adding the sounds and lights modded from the E11 Arduino project here. Here's my progress on the electronics). I've already changed the weapon-select sound to include a "click-click" then F11D power up sound so you know it changed weapons (in the video it is the same sound for start up, reload and weapon select):1 point
-
I hear you Shawn. It can get confusing for a GML who isn't familiar with the HWT. Shame on them for that but that's a different story. Put all the Centurion in a hat and pick one. All great examples. Can't lose1 point
-
I have RT-MOD and love it. Rob is out on business often so I don't know how long it's been but give him time. TM would be good option also. Looks like you're on the right track Goood Luck Future Trooper!1 point
-
For the gauge press or rub down the raised area of the gauge using a smooth plastic/wood piece then wet sand area using 1500 grit then polish to bring back shine using novus or any car polishing compound, Lucky you that area will be covered 95% by the shoulder strap. Mark (AP)1 point
-
Tony and Andrew have a bit of a backlog to work through right now, so please be patient! You'll get a heads up of sorts once they get to your application.1 point
-
What an idiot! Jk. Your not an idiot your like the rest of us. Use an app like tapatalk (I use) or imgur. Sent from my iPhone using Tapatalk1 point
-
Bummer..but not to worry - it`s all fairly easy to fix Option one: remove cover strip and check length, from the looks of it it could come down a few mm at the bottom so maybe the lenght is right, otherwise trim and put back. Option 2: trim the top of the coverstrip were it sits using a dremmel (that`s how I would do it) or some other tool of your choice. The gap: glue some scrap abs on the inside and then abs-paste on the outside and some patient sanding your good to go1 point
-
Any updates. Love the idea of a vision system. That is actually something I've thought about in the past.1 point
-
Corrections made... 1. Straightened my lines , fixed bells and the shoulder strap.. 2. Hovi mic tips white all the way to edge (waiting on paint to dry to replace screens) 3. Turn my magazine around.. 4. Drop boxes flushed with edge and edges 45* hard angles1 point
-
Ah, yes. The hearing assist system. I did see the holes earlier and forgot - that makes sense. I did use the original Hovi Mics - so I can certainly see your concern with a heavier Hovi Mic. You may want to add foam or rubber behind the Hovi Mic and under the washer in the back - just to distribute the stress from the tightened bolt as much as possible . I'd be interested to hear how your helmet electronics set-up works out for you. I was very tempted by Ukswrath's system - but decided to take a more cautious approach due to my large melon not fitting into buckets very well.1 point
-
Well done Julian. Great looking armour!!1 point
-
Congratulations Julian .... Centurion next [emoji4] Sent from my iPhone using Tapatalk Pro1 point
-
Congratulations and welcome to the ranks trooper1 point
-
That's why the CRL states "Ideally there no gap between the abdomen and kidney armor."1 point
-
Congratulations Julian! That's a great looking kit you've got there [emoji3]1 point
-
Congratulations Julian! That's a great looking kit you've got there [emoji3]1 point
-
1 point
-
For anyone wondering what the various logos, bars, and titles to the left of posts is all about, this is the thread for you! User Ranks Found above the avatar, rank is determined either by post count or other criteria: Private: 0-24 posts Corporal: 25-49 posts Sergeant: 50-99 posts Lieutenant: 100-149 posts Captain: 150-199 posts Major: 250-499 posts Colonel: 500-999 posts Commander: 1000-1499 posts General: 1500-1999 posts Field Marshall: 2000-2999 posts Grand Moff: 3000+ posts Expert Infantry: Users who have received an EIB Award Centurion: Users who have been granted Centurion Status There are also special ranks given to Command Staff and Extended Staff, such as Detachment Leader, Deployment Officer, Combat Photographer, Hall of Fame Curator, etc. Achievement and Service Awards The FISD Achievement Award is granted for exemplary service to, or outstanding achievement for, FISD. Tradition holds that persons currently serving on staff cannot be granted Achievement Medals (or else it can become too self-serving). Thus, if you see a staff member with an Achievement Medal, they've all earned them prior to joining staff. To date only two people have ever earned a second medal, and no one has ever earned a third. Award Levels FISD Achievement Award (1st Award) FISD Achievement Award (2nd Award) ... FISD Achievement Award (6th Award) (and so on) The FISD Service Award is granted to recognize the contributions of Command Staff for their commitment to keeping the detachment running. Each award represents a full year of service. Additional awards are denoted by a star (1 Gold Star = 5 Silver Stars, 1 Silver Star = 5 Bronze Stars, etc.). A frame denotes fifteen years of service, with additional stars for further years. Award Levels FISD Service Award (1st Award) FISD Service Award (2nd Award) FISD Service Award (9th Award) FISD Service Award (10th Award) ... FISD Service Award (16th Award) (and so on) 3D Contributor Award This program, as with others, is an optional Detachment-only award incentive. It recognizes members who have gone above and beyond in contributing to our 3D forum section. The Silver award can be earned numerous times over the years. The Gold award is given to those that have contributed at such an astounding level that it is deemed appropriate. All awards are given at the discretion of Command Staff. Award Levels Silver 3D Contributor Award Gold 3D Contributor Award For more information please refer to this thread. Attaché Outstanding Achievement Award This award is bestowed to those who consistently exemplify the meaning of an Imperial Attaché and have gone above-and-beyond in helping their fellow troopers for at least one full year: For more information and a list of recipients please refer to this thread. FISD Master Armorer The FISD Master Armorer program is an optional, detachment only incentive award to recognize individuals who have directly helped another 501st stormtrooper to achieve Expert Infantry status. Some people spend countless hours helping others, and want to reward their results as well as incentivizing new people to help as well. Award Levels FISD Armorer (5+ "wins") FISD Senior Armorer (15+ "wins") FISD Master Armorer (25+ "wins") Centurion Badge These are awarded to those who have reached the highest levels of costume approval for FISD. These are awarded only once, to the person, regardless of costumes: Expert Infantry Badge (EIB) These are awarded per costume, thus a person can have more than one EIB award. Stars (like the awards above) indicate multiple awards, and appear above the EI badge (1 Blue Star = 5 Gold Stars, 1 Gold Star = 5 Silver Stars). Award Levels Expert Infantry Badge (1st Award) Expert Infantry Badge (2nd Award) Expert Infantry Badge (3rd Award) Expert Infantry Badge (4th Award) Expert Infantry Badge (5th Award) Expert Infantry Badge (6th Award) Expert Infantry Badge (7th Award) Expert Infantry Badge (8th Award) Expert Infantry Badge (9th Award) Expert Infantry Badge (10th Award) Expert Infantry Badge (11th Award) Expert Infantry Badge (12th Award) Expert Infantry Badge (13th Award) Expert Infantry Badge (14th Award) NOTE If you are approved with a "2nd Version" of a particular costume that you are already approved with you do not receive an additional award, there is only 1 award issued for each costume version ie: only 1 x Hero, 1 x Stunt, 1 x HWT, 1 x ESB, 1 x TFA and so on. If you have a second/additional version costume approved you will see "2nd Version" and [APPROVED] added to the thread title, no additional profile stars For more information on the Expert Infantry and Centurion programs, please refer to this thread. EIB and Centurion requirements can be found in the corresponding costume CRLs (as Level 2 and 3), additional information on how to apply is available here for EIB and here for Centurion.1 point
-
We should also consider the option of a sling. Below is a pic of a Shoretrooper display from the movie, where the e-11 has a sling. How it attaches to the front is unknown. Granted it's not seen anywhere else, but the fact it's there on this e-11, it could be an option. Like how in TFA, Daniel Craig's FOTK blaster had a sling, however granted that he was the same as all other TK's, not a special variant.1 point
-
Here is a Nov/2017 update on how bad Jedi-Robe is.... I unfortunately purchased the horrific Jedi-Robe kit before knowing about this website. I gave them my sizes and it took about two weeks to arrive. They somehow managed to send me a Ready to wear outfit. I pulled it out the package, unwrapped it so that I could take a look at the material, and immediately I noticed how horrible this armor was. It is so cheap and thin. It’s recasted from a non-movie accurate armor. I tried returning it before the 14 day period, but they ignored my email. Since then, the head of the NY Garrison that I live by, has managed to find me an AP2 armor for less than $550. I paid over $1300 for the crap I got from Jedi robe. It was put together with no effort, no care. It had scratches on it. Thermal Detonator is completely garbage. Uneven glued parts. Helmet/speaker system is so funny that I literally have to laugh it off. I learned my lesson. My AP2 is on its way!!!1 point
-
Update 07: - a mannequin to display the armor After a long research, I recently purchased this dummy. It consists of seven pieces and came with additional metal base and a chromed support for the lower leg, but so far I did not use these parts. Plug-and-play all the way. Now here comes the reason for buying exactly this mannequin: Bringing all armor pieces onto the legs, meant these had to get „modified“ heavily. A step by step process began… While permanently cutting and cutting I had asked myself if this would ever work. But when I finally had all armor parts on the mannequin, I was quite happy with the result. Tried to add a blaster, but even the 1.1 kg resin version requires some kind of support in the arms. I am also thinking about using a rubber blaster – just in case the E-11 drops accidentally. Time will tell… Thanks for reading and have a nice weekend1 point
-
Brilliant! Fantastic effort Tino. Welcome to our wonderful world. You know you want to join that local garrison of yours <br><br> And hey, if you don't want to damage that superb armour of yours, there are one or two other costumes in the Star Wars universe you could build....1 point
-
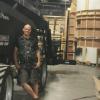
It's been a while... Time for a new picture. Just for fun (# 3) Seems like the Emperor has recently infiltrated the FISD to see, what his troopers are doing here. He does not look pleased...1 point
-
1 point
-
Your obsession with having everything the same white is odd. Plastic, leather and canvas materials will never match perfectly in colour. Having different shades of white makes for a more believable costume in my opinion and is strived for in the Biker Scout and Snowtrooper community. It's odd the same cannot be said for Stormtroopers1 point
-
Update 03: - weathering the armor People might wonder why an "idealized" armor should get any weathering at all. Well, some color deviations between armor, hand guards and boots forced me to do this. Weathering will hopefully conceal or at least reduce these. But first I concentrated on the armor itself. Decided to go for a weathering which I had seen on the TK from Stefan (Turrican). Old newspapers got soaked with water for a few minutes, then rubbed over the armor. This transferred some black ink and highlighted the edges. It was done on all parts, increasing from the helmet to the boots. It is water resistant, but can get removed with some mild plastic cleaner or with ultra-fine sandpaper. Enough words. Pictures: And the rear side: In case you haven't already seen it, here is the inside view with the standard strapping. I preferred this, because the original strapping has some visible screws in the torso. Unfortunately the camera's automatic mode changed while shooting. This caused some pictures to have warmer colors than others Any comments and critics are welcome. Please let me know, what you think of the weathering so far. Thanks in advance.1 point
-
Your tip about "Sonax Reifen Pflege" is very good! I was also not satisfied with the"blackness" of the gloves ... Very nice work so far! I know that "idealized" is frowned upon, but I like the armor to look as good as possible and the original handplates just don't do the job, sorry ... But I have a question about the "fingerprints" and lines on the gloves: I thought the gloves are supposed to be completely smooth? Smooth gloves are still available without much hassle ...1 point