Leaderboard


Popular Content
Showing content with the highest reputation on 02/26/2018 in all areas
-
Thanks Jesse! I’m really pleased with how it turned out. Armour next [emoji4] Sent from my iPhone using Tapatalk2 points
-
As I understand the Shins have a tendancy to be wrongfully marked by Anovos, but can also be correct? UKsWrath says what numbers usualy belongs, but I have tried to look around for how to identify for sure. I also understand that a "correct" setup is not needed for any Level of approval, but I would like to get it right. And I think mine were wrongly marked by Anovos. What I found out was that the inner halves are a bit longer, down towarss the ancle, then the outer once. The outer halves seem to have a bowon the middle, and the inner once have bow further up and og in towards the leg earlier. Left side Shins have less raised return edge on the top at the T then the right one. So looking at these things I think I have found the lefts and the rights. I'll post a Picture later.2 points
-
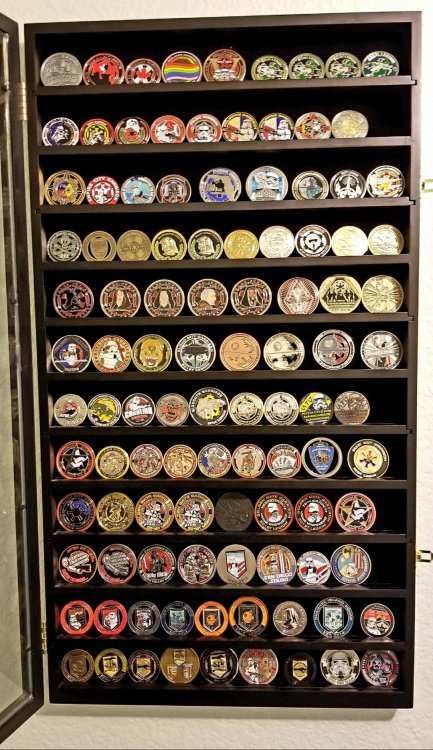
30% of my coin collection. Close to 600 coins. 1.5yrs In the Legion. No chance of stopping.
 2 points
 -
Woo hoo. EIB approved!! Still over at MEPD these days trying to figure out this dirt thing. Did my detail pics for Centurion and I hope to have that posted in the next couple of days. I'm still picking away at the electronics but I think I have things figured out. I have my first chance to wear my armor in public on Wednesday - so I'm sure a number of changes will be on the to do list after that.2 points
-
Good evening Troopers, it's time to hit the forum with a bigger update again: the scope is pretty much finished! After my work with the car surfacer a couple of weeks ago it was now time to take the next try and drill that thing out properly! First, after sending down any outstanding surfacer with a metal file I started drilling with this forstner bit here: This was what the scope looked like afterwards: Then, as the hole was about as deep as the lens and the plastic casing around it (I decided to keep the casings of all the lenses I used on which would later make it a lot easier to fit in and glue), I switched to this massive thing here: Also notice the aluminium rod + bit construction that we had to build because the drill would not have reached far enough into the scope.. I guess every Chadra-Fan out there would have been proud! Anyway, afterwards the scope looked like this: After a couple of rounds with a rotary cutter (God, I am learning so many new technical terms, it's actually amazing what a blaster build does to your vocabulary ), it was time to get the smaller side done. For this side, we used a "countersinking cutter" (at least that's what my trusted online English dictionary spat out when I punched in the German word "Senkbohrer") because it had just the right diameter for the hole we needed to fit in the smaller lens including its casing. Obviously we also had to free the lens first: Turns out I could be very happy with the result! Finally we only had to connect the two holes we drilled by first drilling a very small hole and then widening it with bigger and bigger holes. This is what it looked like: For my final trick, I put in the lenses to see what it will look like after painting and glu(e)ing: The bright orange will probably disappear a little bit after I painted the inside of the scope black, but I am still very happy with the result and cannot wait to finish this (probably most complicated) part of my blaster! Cheers, Freddy2 points
-
Ok...all put together now and I’m really happy with it. It’s not perfect up close but I never expected that and I’m sure it will be good enough for trooping. Just one thing Dan pointed out to me...the D ring...do I need to paint that black for clearance or can I get away with it? Sent from my iPhone using Tapatalk2 points
-
Hey all, Super excited about receiving my RS Props armor from a fellow Garrison member on the 24th! I unpacked everything to get a good look, and I'm thoroughly impressed with what I got. http:// http:// Just went out yesterday and bought some plastic scissors, Rare Earth Magnets, a Dremel sanding attachment, and (of course!) the staple E6000 craft glue! I can't wait to begin building, but I need to do a bit more research before I dive in!1 point
-
This will be a pretty short build thread because of the most awesome build threads already out there. I will be doing some basic mods to my R & D resin blaster. For those wanting the bible of blaster builds check out this reference guide. Part authored by one of our very own Garrison Troopers "Sith Lord".https://www.whitearmor.net/forum/topic/32111-fisd-e-11-blaster-reference/The R & D blaster below. I have already removed the top rail that the scope will sit on. The cast has good detail and is pretty light compared to a droopy version.I decided to start with the mysterious power cylinders. Its about the only part from the E11 that cannot be decisively identified. Last guess is they are from old WW2 radars.https://www.whitearmor.net/forum/topic/17306-e-11-power-cylinders-research-thread-renamed-from-3-central-fuses/Sheet aluminium- nice and soft to work with.Three central capacitors from tube aluminium and melted rubber and caps. The final bracket bent into shape.Slots were cut into the tubes for the wings to insert into for additional strength. Tubes were then hot glued with a brass wing detail added. For the end caps i heated some styrene and pressed it over the tube.1 point
-
Out of the box. So this is how a kid feels at Christmas. Got some work to do…after I’m done shaking with excitement. I feel ridiculous.1 point
-
Excellent work yet again I like the "hook-elastic" as per movie but you can`t beat that sleek closure1 point
-
Thanks, I’ll do that. I’m in southern Ontario, Canada and I’ve been in touch with a couple people here. Turns out there’s a group right in my hometown of Oshawa that’s run by a guy who went to school with my younger brother. We became FB friends and I’m waiting to find out from him who can approve my entry to the garrison. I can’t seem to complete my profile without a garrison to enter. Small steps I guess.1 point
-
Magnetic shins continued. (Almost there!) Now that the e6000 has had lots and lots of time to cure, it's time to attach the other halves of the magnets. Make sure that the halves are super clean and free of extra dried glue. It will prevent the shins from closing well. You can do this by touch. Rub all of it off where you feel it. Once everything is cleaned off, close the "hole" half over the "magnet" half. Your shin should be closing correctly at this point. The "holes" should lock around the magnets and prevent the shin from opening at all, even without the additional magnets at this point. If the "hole" strip is not fully engaged over the magnets, you won't have a very strong bond between the magnets to keep the shin locked. Easy part next! Apply e6000 around the prepared ABS button. No need to go crazy with the stuff. You don't want it oozing all around in there. And stick it on! This part goes really quickly. For additional strength, I add some extra magnets on top. Check those clean closures! Left shin. Right shin. I will open these up in a few hours just to make sure that there isn't any extra e6000 that has spilled out and might lock those shins closed where I don't want them locked. Now to allow several days to dry, and these shins will be good to go!1 point
-
Thanks again, guys. I'm excited to see it painted but not excited to wait for paint to dry. Update - Assembly / Primer Slowly things are coming together. When I order the other 3D Printed parts from Shapeways (Suitcase Props) I also picked up the flash guard / ejection port guard. The Doopydoo's version is kind of thick. I sanded them down a little to remove some of the 3D print texture, hit them with grey primer and sanded them again. They were then glued on using CA glue and later I went around the outside with green stuff to further fill in the seams. I started doing a bit of weathering on the spring and end of the bolt. I need to complete the painting before I permanently install this as once it is glued, it's not coming out. But here's an "in-progress" shot... Next I hit the handle with some primer and got it attached. I was going to completely paint the handle first before attaching, but we seem to have quite an issue in my area with getting descent spray paint. Humbrol Spray Paint is completely out of the question. After weeks of searching I decided there is no Humbrol Spray in Canada. None. I would have liked to stick with Humbrol because I know it has worked with other builds. Tamiya spray paints are readily available which is what I use for Primer and the black of the power cylinders and Hengstler Counter. I'd like to use a different black for the matte black of the gun itself so I'm trying to track down some Testors Matte Black. It's also enamel so they should play well together. Anyway, after striking out with the Testors I decided I would just attach the handle and mask it off later. I'll try some other stores for the Testors spray later in the week. The front and rear scopes were attached. The end cap clip was attached. Seams that didn't look completely tight were filled in with green stuff and sanded after they dried. Then, finally, the whole gun was hit with Tamiya grey primer. (I shoved a few paper towels into the receiver tube so that the inside wouldn't get any over-spray) And here's the close-up I promised of the bolt/ejection port.... I've also been doing a ton of reading about paints. Very interesting. I'll do a separate post just for paint. Mark1 point
-
Thanks guys. I’m not taking this as criticism. I bought this kit as it was in my price range and knowing that it is a kit and will need mods. I’ve shimmed the kidney plate to join with the ab plate and it’s a less than 1/2” gap now. I need to get more snaps to join the right side and then take pics with me in it. I’ve also raised the ammo belt to the correct level. This really helped with the overal fit around back as well. The hanging boxes are not set as of yet. The webbing that came with the kit kit is all Velcro and I’m not keeping it. I’m building my own adjustable webbing that will snap in once done. Also, you may have noticed, all the snaps are on the pieces with Velcro pads. This will also be changed once I have the kit fitted and hung properly. I tried putting more more pics in here but it seems I’m out of space for them. Must have done something wrong when posting.1 point
-
Congratulations on reaching the finish line! Amazing job you've done here Wayne1 point
-
No, not at all. Some makers, like RTMod, only provide a two piece (already cut) ab and cod.1 point
-
Congratulations on a great kit, RS is cast from an original suit so it should be impressive - best of luck with your build (now I want a RS kit...oh the rabbit hole that is Stormtrooper armor...well, you can`t have to many right..)1 point
-
Congrats!!! As if there was any doubt.1 point
-
Welcome Nicole, and congrats on your kit! It can feel a little overwhelming at first, looking at all those pieces! But building a TK is just like eating an elephant- take it one bite at a time. (Not that I eat elephants with regularity...)1 point
-
Holy cow, Daniel. You have that armour fitted very well. Looks amazing. That’s a really good idea - pictures are one thing but seeing yourself kitted up and moving around really shows how the armour fits. Sent from my iPhone using Tapatalk1 point
-
Helmet is looking awesome! I had the exact same issue with the ears. I have a second AP kit and I was going to try drilling the bottom hole as you described above. Fantastic bday gift, btw. Sent from my iPhone using Tapatalk1 point
-
Awesome as always! Great video!1 point
-
Great job so far on the helmet, keep up the good work! I, too, am, waiting for some stuff to arrive from TrooperBay - can't wait to get them (I ordered some of the same stuff as you ) ! Sent from my LG-M470 using Tapatalk1 point
-
Top job, Greg. Well done.1 point
-
Thanks for the input. I will try trooping in it with the overlap and see how it goes. I finished the first phase of my disney blaster this weekend so I could use it for my action shot. Paint was a rush job and I just used whatever I had laying around the garage. Going to resand, repaint and weather after I upgrade the scope. I am planning on taking my submission photos tomorrow after work.1 point
-
I’m actually very proud how my bucket came out !!! Sent from my iPhone using Tapatalk1 point
-
Looks Great! Congratulations!1 point
-
Congratulations Greg! Looking sharp!1 point
-
The ultimate accuracy is up to you, they are not a requirement, just a nice to have. Well done mate beautiful work. Sent from my iPhone using Tapatalk1 point
-
Fits like a glove1 point
-
Accuracy suggestion at the moment. Highly encouraged though! Congratulations on EIB!1 point
-
Last weekend's Planet Comicon in KCMO saw a bunch of TKs in full glory. If you look closely, you can see a Rebel in their midst...! Rex and Kanan have infiltrated the Empire!!1 point
-
Hi Greg, welcome and thank you for applying for EIB. Let's have a look your armor. CRL and EIB Application Requirements: All the required submission photos have been posted. Without further delay, your armor displays all the necessary elements to qualify for Expert Infantry. Ukswrath and myself would like to welcome you to Expert Infantry. Congratulations trooper . Other-Armor Fit/Assembly: In this section we review observations made by your fellow troopers and ourselves. Some observations may lead to suggestions to improve the overall look of your armor. If any suggestions may affect the application process, it will be listed separately in either the above EIB or below Centurion requirement sections. What a fantastic job you have done with this kit, so clean and aligned, wow we love it. If there was anything to suggest it is only the small gap opening between your back and kidney plate. Perhaps a thicker piece of elastic or slightly shortening the strap you have in the center should fix that. Also the screw types on the Thermal Det. These are a Pan head slotted type as opposed to the dome head we see below Reference Image Centurion Suggestions or Requirements: In this section we prepare you for Centurion. If there were any areas of concern they would be discussed here. As Centurion requires more of the finer detail photos, unless something stands out in those, there shouldn't be anything standing in your way to achieve level 3 Congratulations on a very well deserved Expert Infantry award, and we look forward to seeing a Centurion application from you in the very near future.1 point
-
But....it doesn`t look as good so I would avoid that unless absolutely necessary1 point
-
Congratulations on this superb looking blaster, Wayne! You rocked this build including many parts from the completion set in less than a month (wow!) and yes, it is absolutely good enough for trooping. And more... Regarding the ring on the end cap: depending on how clearly your application photos will show this area, you might get away with it like it is now. If on the other hand you have a few minutes, I would suggest to paint it black too. Anyway, I wish you a really good time with this blaster and a lot of events to use it on.1 point
-
Congrats and welcome to the ranks1 point
-
Almost there now....just waiting for the gloss on the grip to dry then I’ll get the rail etc fitted. Sent from my iPhone using Tapatalk1 point
-
Few more pics from the painting.... Sent from my iPhone using Tapatalk1 point
-
Bit of weathering on the counter... Sent from my iPhone using Tapatalk1 point
-
Getting there...[emoji4] Sent from my iPhone using Tapatalk1 point
-
I always heard chicken cookie jars and plaid table cloths were expensive.1 point
-
Took a few pictures. I have 2 display cases and a binder with coins. There are more pages in the binder, but you get the idea. I am small time compared to some other guys. Sent from my Pixel 2 XL using Tapatalk1 point
-
I currently have seven with two more on the way (including that awesome silver bullion coin)!1 point
-
When I joined the legion I told myself I wasn't going to collect coins or pins. Since that time I've collected around 20 coins (although several of them were bought by my wife who is also in the legion). Rather than have them sit in a drawer I wanted to display them, so I got a display box and put it on the wall. I still keep a coin in my wallet and another in my helmet, always ready for that challenge.1 point
-
What I'm proposing would NOT ban FX armor (or moncal or any other that was MEANT to be constructed as overlap) at Basic. I think I'm being misunderstood. What I'm saying is that the current CRL seems to allow for let's say an Anovos kit to be built with overlap construction at Basic. This is my only issue. The kits that are SUPPOSED to be constructed with cover strips should be required to be constructed that way AT ALL LEVELS. What I'm proposing is actually not a change to how any GML should be reviewing TK right now, it's just not spelled out. I'm simply saying we need verbiage in the CRL that somehow states that you can't construct an Anovos or AP or WTF or any other kit that is SUPPOSED to have cover strips with an overlap construction. People try to do overlap on Anovos and then use the CRL to justify that overlap is "allowed" at Basic and L2. It's actually ONLY allowed for FX and MonCal and other kits that have the cover strips moulded in. So I'm proposing language that somehow just reinforces the fact that you can't construct an Anovos kit with overlap construction at ANY level and be approved. FX and MonCal and others with cover strips in the mold would not apply. That's why I tried to word it very specifically. I think Paul gets it and says it's in the works so we're good to go. This is just a clarification to how we are enforcing builds but where the CRL could use a clarification so there is no misunderstanding. Thanks!1 point
-
I got 1 can from Amazon I think. Either that or Troopermaster. The rest came in bottles. I usually shake the little buggers for 60 seconds, then when I open them, I stir them with a toothpick, about 10 ccw spins then 1 cw spin, for about three cycles of that. Never had any issues. If its old paint there isn't much you can do about it.1 point
-
Welcome to the 501st, Greg. You’ve deserved it. :-) Sent from my iPhone using Tapatalk1 point
-
Just wanted to mention this thread that was very useful to me when I built my ATA kit! http://www.whitearmor.net/forum/topic/33175-an-ata-for-tampa-bay/1 point
-
Shins are looking good Christine [emoji3] Don’t you just love kids..... lol.... they are only messing with you.... if they were real rebel scum you wouldn’t have any armour left .... Enjoy them, they grow up far far too quickly.... but then you get grandchildren.... and it all starts again.... the good news.... you can hand them back to mum and dad..... that’s priceless [emoji3] Grandchildren are priceless Btw.... my abs paste repairs to my butt cracks seem to have worked..... will know more when I troop..... hopefully my crack will remain closed ..... [emoji3] Sent from my iPhone using Tapatalk1 point