

eqdizzle
-
Posts
342 -
Joined
-
Last visited


-
The way the CRL is written, you can use a standard ANH one for basic approvals. It is a different design from the ground up though, so it wouldn't be entirely accurate. Someone with a tad more sculpting skills than I would likely need to mock up one to pull plastic in a vaccuformer.
-
Remember that the movie TK pauldron is different than the Rebels one.
-
Correct. I'm on the Command Staff with a different Detachment, so our policy is to first make the prop and provide references, then submit it to the Command Staff for review. You're looking at a separate part, so it shouldn't be that hard. Are you doing a stencil to paint it on or are you looking at a decal? Also check the reference photo thread I posted a bit back to see if any are of use. If you have more to add, please do so for the benefit of the other Rebels costumers.
-
Last weekend's Planet Comicon in KCMO saw a bunch of TKs in full glory. If you look closely, you can see a Rebel in their midst...! Rex and Kanan have infiltrated the Empire!!
-
 Had a little fun with our Rebels friends:
 -
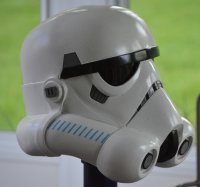
and for comparison to the original bucket: Huge improvement in size over the original (dad pun intended)! Hope this WIP has helped you be successful in finishing your own Rebels Stormtrooper helmet!!
-
Step 19: Tube Stripes Pretty basic! Cut your two halves out, and trim parallel to the ends to get to fit better into the space. Measure out your placement. I put these at 3.5cm from the cheek crease. Dry fit, then place and press..!! You now have yourself a COMPLETED REBELS STORMTROOPER HELMET!! The only thing left is to troop the heck out of it!
-
Step 18: Padding (needed) and fans (optional, but recommended) ACH/MICH pads attached using adhesive velcro. These can be removed and washed if they get too stinky. This bucket is a tad front-heavy just based on the physics of it, so I added some thinner pads at the cheekbone area. The whole bucket sits very securely without being constricting. Since this is a resin bucket and therefore has a lot more heft than an ABS counterpart, I would not recommend star foam with a chin strap. Play with positioning on the military-style pads until you're satisfied with the results. You can also see where I added an elastic pocket to hold my SLIM battery for my fan kit. 2" non-roll elastic glued using E6000 and sized to give a *tiny* bit of tug when you insert the battery. Too much, and it will eventually snap off the bucket. Too little, and the battery will come out. Full disclosure: Yes I build and sell kits. Contact me via PM for more info. Fans placed in the aerator cups pointing upwards. With the pads on the cheeks, there really wasn't a way to have one blow across the eyes like I normally would. This seems to do the trick in tests, however...! I'll test at a troop soon and report back if I'd make any changes. Wires are managed by placing the fuzzy side of adhesive Velcro over them. This will prevent accidental snags and yanks that could ruin your wiring before or during a troop! Tube stripes are in the mail as of a day or two ago, so this will be ready to rock very shortly..!
-
Step 16: Adding mesh behind the teeth (hot glue gun) Cut out a piece of screen material (found at the local hardware store). I used the type for heavy-duty pet protection, as it is a coated nylon and has a rubbery feel to it. I will typically cut out a wide rectangle, and then cut areas to better match the frown shape. Using hot glue, I put a vertical stripe directly in the middle of the center tooth, making sure to keep the glue away from the edge of the tooth. At this point, I push the mesh into the glue, holding tight at the top and bottom until it sets. I continue to glue one side, then the other, starting at the top of the frown area, and finishing the bottom, being sure to wrap it to the curves of the helmet as much as possible. Ideally your mesh should be in line with the teeth, with the square openings parallel to the teeth, rather than at an angle. Step 17: Adding the lenses (pencil, paper, tape, sharp scissors, hot glue gun) There are a ton of different tutorials out there for adding lenses. If you like any of those, awesome. This method is easy and does the trick. It is, however, a more permanent method of attachment but I haven't found the need to remove lenses from any other bucket as of yet. Using a pencil, create a rubbing on paper to get each lens opening cut this out, and tape it to your welding screen cut 1/4"-1/2" around the outside of your rubbing line test fit glue it in place with hot glue, making sure to keep the glue away from the opening edges as much as possible use lots of pressure while the glue hardens, 2 minutes or so We're getting really close!!
-
Step 15: Gloss Topcoat (respiratory protection) I taped the black areas off so they would not get the gloss clear coat. From what I can tell, the brow strip and vocoder look more matte than shiny. Bottom side first, followed by the upper. Step 16: Adding the aerators (gloves) I ended up coating the aerators with a Matte finish spray. Sanding the bottom, and a little bit of the center of the tube opening, add 1 drop of CA glue per side in the center. You'll have to work pretty quickly, but drop each aerator in the opening and twist to spread the CA glue. I like to do this with the bucket in my lap and the tube openings pointed straight up. The grab should be pretty strong in about 30 seconds, so be quick about making sure the pieces are centered correctly. Let it rest and check on what else is going on in the forums!!
-
Step 14: Prep the Aerators (respiratory protection) Prime and paint with the black semi-gloss. Flat black is also acceptable here. After this has dried, I used Testor's Flat Aluminum and hand-brushed the center area. These don't need to be perfect, as they will be weathered and the hand-brushing helps to mimic that look. DON'T ATTACH THESE TO THE BUCKET YET!!!
-
For the tears, I like to use a pencil to mark my stripes first. Begin in the middle, with a line parallel to the right and left sides. Then add two lines on each side as close to equidistant as possible, for a total of 5 lines. If you have the decal, you can also use this as a guide to where each line should go. Complete touch ups with gray (if necessary), and gloss white to clean up any bleeds or oops spots. Step 13: Edge lighting the teeth (thin detail brush, respiratory protection) Use your detail brush in a "Dry Brush" method. At the edge of each tooth, run a line of a lighter color gray just at the edges. When you dip the brush into the paint, wipe most of it off on a paper towel, and massage it into the edge surface. If you're a little too thick, use a piece of paper towel to wipe it out while still wet.
-
Step 12: Touch ups and black details (detail brush, respiratory protection) I like to touch up the gray first, touch up and apply black details second, and do final touchups with white third. For the detail lines, apply tape *just* outside the gray trap areas. Use your thin detail brush to bias towards the tape line...to keep all the mess on the tape. Peel your tape, and you should be left with a nice, thin line. If you have an oops, we can always touch up again with gray to clean that up.
-
Step 11: Masking for black detail areas (lots of tape and respiratory protection) I wanted to show this a bit more in detail than on the gray areas, mainly because I didn't show it earlier...! Use your best tape around the areas, and cheaper tapes further out..! Mask the eyes from the inside also to keep the spray from going in the interior of the bucket. I like to use a box to hold this in a face up position. The black areas have a lot of underneath areas that the face-up position gives you best access to. Paint with gloss white first, then overlay with Rustoleum Semi-gloss black. After some hours, pull the tape and gently rub any bleeds with a fine sandpaper. This needs to cure a bit and we'll do the touch up paints.
