Leaderboard


Popular Content
Showing content with the highest reputation on 02/01/2018 in Posts
-
So, I have made som changes and submitted to my GML. Dropped biceps and fore arms a little to get a more reasonable distance from the hand guard. Tigthened the elastic between back and kidney. Reduced the thickness of the drop boxes and adjusted the position of the hip. Thanks for the help.3 points
-
new kit3 points
-
Biceps cut and taped2 points
-
Oh, and I also picked up some new 1" wide nylon webbing on Amazon. It cuts really nice and the edges can be melted really clean and uniformly with ease. The stuff that I was recycling from the Anovos kit is junk compared to this stuff. I'm going to go back and remake those 3 small connector straps for the side of the Ab/Kidney plate connections. Mainly I had bought this webbing so that I would have enough to try making flexible snap plates to see if they would work better on the Anovos armor and resolve the warping/hump issues I was getting with my 3D printed ABS snap plates: I also ordered and recently received a batch of Fasnap stainless steel Line 24 snaps at @ukswrath's suggestion. These are marine grade and supposedly should not have any corrosion or reaction issues to the E6000 glue so that may eliminate another factor. By switching all of these components up, it may be harder to tell which single aspect of my original attempt was the flaw. But the other thread on this issue will be where I talk more about that. And a comparison shot of both snap manufacturers, Tandy on the left and Fasnap on the right: I hope to put together a sample nylon plate with Fasnap snaps and glue it to a test piece of Anovos ABS scrap tonight. -Dana2 points
-
If it's any help this is what a 'chopped up' doopy's looks like. In my opinion it's not worth the extra work to have a working bolt unless it's for electronics, that's just me though[emoji4] Sent from my SM-A310F using Tapatalk2 points
-
Lid’s looking lovely. :-) As has been said, the brow is up to you to a certain extent. Just check out some screenshots and see which one you like best. (Probably wouldn’t go any lower than you have it). :-) Sent from my iPhone using Tapatalk2 points
-
Your armour looks fantastic Matt, now for EIB and then Centurion:) Sent from my iPhone using Tapatalk2 points
-
brow looks great, its mostly about personal preference if you want it low or high, they were all over the place in the movies2 points
-
I used the short , long, assembly. The sniper knee seems to fit best that way , assuming you correctly place the long side on the outside.2 points
-
I’m so EXCITED !!! Any and All info is highly WELCOMED Sent from my iPhone using Tapatalk1 point
-
Hi Lou, Making steady progress by the looks of it. :-) If I may, it might be worth double checking some reference pics before you cut too much more off of your main ab buttons. Whilst the smaller one has no edge, the bigger one does have a slight border to it. Here’s yours and a reference from the archive; Not sure exactly how the WTF armour is designed in this regard, so ignore me if this has to be done to fit the armour. :-) Best wishes, Dan :-) Sent from my iPhone using Tapatalk1 point
-
Will this work?1 point
-
Moving now!1 point
-
Congratulations! Welcome to the Ranks!1 point
-
Shoulder straps rough cut Trimmed and hot water bath bent1 point
-
Congratulations trooper1 point
-
Congratulations Danny1 point
-
Oh no! That one is mine1 point
-
1 point
-
Yes It gives a much meaner look, especially from the sides1 point
-
Like this I guess. In which case I answered my own question. Sent from my iPhone using Tapatalk1 point
-
You can use foam padding on the inside to "bulk up" and or use the "tab-and-slot-method" to prevent overlap (that`s black flexible ABS) Check this thread for more info:1 point
-
No but I´m starting a chant: RAIS THE BROW! RAISE THE BROW!! RAISE THE BROW!!! RAI....hmm I think I have made my point - carry on Trooper It shouldn´t, you can paint any, several or no bump for basic and EIB for Centurion only one bump (says nothing though that it HAVE to be a painted bump. I left mine unpainted so we`ll see shortly, no mention of it during my EIB)1 point
-
Front of shins cut at 20mm1 point
-
Haha, lol - thanks for the review I'm sorry to disappoint you, but I won't clean that helmet head-bump. It's my distinctive mark on every photo and everyone of my squad knows exactly that this is my helmet. I've got a white sharpie, so the screws are a 5 minutes fix Same for the eye trimming. I'll have my first troop in that armor on saturday and will have a look on the posterior and shoulder strapping. Afterwards, you'll get new pics for centurion application!1 point
-
One other thing comes to mind that I thought I’d share — don’t be too paranoid about screwing something up, because in the end it’s just plastic. It’s not that hard to make up a solution of ABS paste, fill in your blunder, and sand/polish it back down to a level surface. ABS paste is just a mixture of PURE acetone and ABS scraps mixed together in an air-tight jar (I use small canning jars). It takes a few hours for the acetone to melt the ABS into a paste — you want it about the consistency of white school glue, maybe even slightly more liquidy because it dries/cures so rapidly. I had to do a HUGE shimming job on the backs of my thighs (filling a 40mm gap) — and though it took around 60-80 hours of filling/sanding/buffing, it looks pretty damn good for an amateur. You can do it! Just take your time, measure three or four times first, make your cuts slow and deliberate, and enjoy the process. Stressing out about it makes it a chore. Instead keep your eyes on the “prize” and persevere. You’ve got this, trooper! Sent from my iPhone using Tapatalk1 point
-
@ukswrath — I totally understand your paranoia and fear of not being able to cut the straight lines. I’ve got a bit of a tremor condition, so that poses a challenge. A few things that have helped me out: • Don’t stress out about being perfectly straight if it’s going to be hidden by a coverstrip. Just get them reasonably straight so there’s not sweeping gaps between the two halves of armor. • If you don’t own one, get one of those flexible, transparent plastic rulers/straightedge — preferably something that is about a half meter or thereabouts (in America, I have one that’s a “two foot” ruler, which is roughly a half meter). Use that flexible ruler/straightedge — held in place with clamps — to mark your lines. • When it comes to trimming armor, I prefer using lexan style scissors — I use both a curved and straight scissors. To me they’re much easier to manage than using a shop knife. You can make your trims slow and deliberate and still get a pretty clean edge that doesn’t take long to sand down to a smooth edge. I just use a flexible bit of 220 grit sandpaper to go back over my trimmed edges to make them smooth and clean. • On some pieces — particularly those that have level surfaces and require an even trim/cut (like the ends of the thermal detonators) — you can just prop up your pencil in place up at the appropriate height, and just turn whatever it is you’re marking without moving the pencil. I did this for the thermal detonator and some of the other armor pieces, making it really easy to ensure a level surface or straight line. • I have used shop knives and exacto knives on my trimming, too, but generally just for taking off really small snippets. I don’t trust myself with making longer cuts. • If you’re trimming your cover strips make sure you clamp down the ABS plastic and your metal straight edge on top of it securely to your work surface. You don’t want the ABS or your straight edge moving at all when you’re marking, scoring, and cutting your coverstrips. And as others may have mentioned or you’ve probably seen in videos, the first two or three passes with your shop knife should be pretty light, and SLOWLY increases in pressure/depth with each pass of the blade. You really only need to get down to about half the depth of the ABS before you can bend and snap your coverstrips off. Hope this helps a little! If you have any questions, I’d love to help as well. I just finished my first build about a week ago and learned a LOT from the process. Sent from my iPhone using Tapatalk1 point
-
Ahh, thanks! I keep forgetting that you have a bunch of different build threads that tackle different problems and show off different approaches! Here's a shot of the right shin rear seam without the tape holding it shut. This is the resting position of the two halves. You can also see the vertical offset I was talking about where the angle edge and upper return edge are offset from each other by about 3/4" or so. I'll report back with whatever I try next, -Dana1 point
-
Congrats and welcome to the EIB ranks!1 point
-
Cheers Chris...appreciate that...way more hassle than it’s worth for the fairly basic build I’m planning Sent from my iPhone using Tapatalk1 point
-
Talking to Rocky, there are larger thighs and ab plate.1 point
-
Wow. Super happy! thank you very much!!!1 point
-
Hi Paul thank you for your EIB application. CRL and EIB Application Requirements: All the required submission photos have been posted. Beautiful job on your RS build This armor fit you very well. Looks like everything is in order. With that Andrew and I have confirmed your armor displays all necessary elements as set out in the Expert Infantry CRL. Welcome to EI trooper, congratulations. Other-Armor Fit/Assembly: In this section we review observations made by your fellow troopers and ourselves. Some observations may lead to suggestions to improve the overall look of your armor. If any suggestion affects any application, it will be listed separately in the above or below sections. You have a few minor areas we'd like to mention, and I say minor is because the overall look and uniformity of your armor is excellent however, since our goal is to help you to look your best there are areas worth mentioning. Starting with the bell to chest gap. There should be minimal gap here. This could be a simple photo issue being the back is basically touching the back plate. Simple adjustment and you;re good to go. Reference photo Next up the upper back plate digging into your left shoulder. Not sure how much it bothers you but it looks like could stand some adjusting. My only solution would be to give it a hot water bath to straighten it out a bit. From the photos couldn't tell if the right has the same issue but worth looking at. Reference photo And finally the waist belt is sitting a little low on the Ab. Could stand to be up a 1/4-1/2" (10-12mm). Reference photo Centurion Suggestions: In this section we prepare you the best we can for Centurion. If there are any areas of concern they will be discussed here. At this time we see nothing from holding you back for a clean Centurion application if you so choose to apply. Excellent job Paul, hope to see you at Centurion1 point
-
Thank you Tony. Today I am at work but only thinking about coming home to my forearm armor. The second one is all cut and I will glue it tonight. Spirit is rising again! Was afraid a while that i would have to cut my thumb of to make it fit Sent from my iPhone using Tapatalk1 point
-
Hi Matt, Your armour looks amazing, you have a beautiful set of RS armour. The photo check list for EIB is below Good luck mate Sent from my iPhone using Tapatalk1 point
-
I wasn't aware that there were two different size ab's. I'm currently working on shims between the ab and kidney. I feel like I'm just poking along with this build. It's fun , I can't complain.1 point
-
Nope. I'm talking to the Legion web team now. If they can't do it the right way, I'll just ask them to bulk approve everyone. It is not possible for us to reconcile this manually anymore.1 point
-
And terrifying.1 point
-
Nice work! If I had anything to add it would be to build your armor in such a way you're not too dependent on a handler or anyone else for that matter to help you get dressed, or insure your armor is installed correctly. Yes, it is very nice to have an attentive and educated helper however, I can't tell you how many times I've trooped with something out of sorts and no one said a thing, even after I asked someone to check. On a more positive note hopefully there will be Centurion or Specialist level troopers with you who actually care about what everyone around them looks like, because they want everyone else around them to look their best.1 point
-
Nice Build! Keep it up, trooper!1 point
-
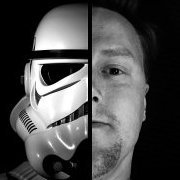
So here's a photo of a set of shins I'm building, forget the sniper knee it's for a TD. Though I have no idea if Anovos has fixed their numbering system, note the contour of the inner shin halves vs the outside. The inside has a more defined curve compared to the outer. I've also included a canon reference photo. Though the Anovos armor shape is considerably softer then the canon you can still the shape I'm referring to. Finally you can also see the inner halves tend to be longer than the outer on the Anovos.
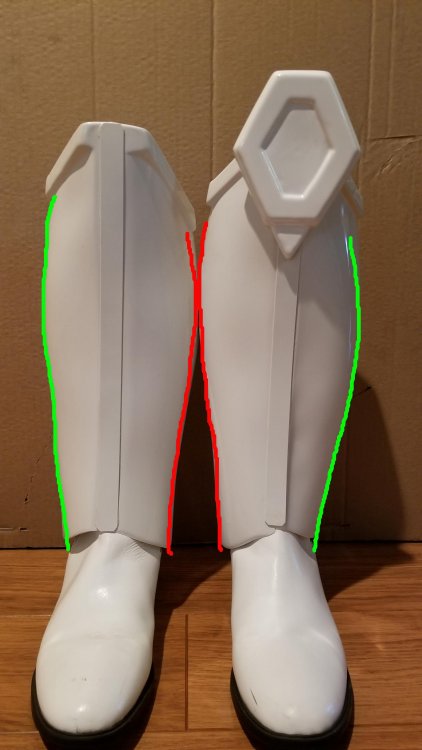 1 point
 -
You're basically the ideal height/size for TK armor, I'd imagine it should be smooth sailing.1 point
-
You know, I looked at the shape of the backplate and I really thought about the wing stubs.....but then a little devil appeared on my shoulder and said, "Don't forget you have a full set of AP armor sitting in a box in your bedroom just waiting to be assembled..." Ugh, I may have to go back tonight and revisit the power cylinders... Mark1 point
-
That looks awesome. I tried a similar thing for an entirely different costume project, a space suit. I sewed black vinyl onto the backing material in stripes about an inch wide, then stuffed strips of foam rubber inside. Hemispherical strips would work better than the rectangular strips I used, but since it had to curve around shoulders, elbows, hips, and knees, it tended to bunch up. Probably real elastic material would work better. How did you you get the sewing machine foot consistently close to the rope? You'd have to sew with the rope on the narrow side of the foot, but that still limits how close you can get.1 point
-
Today I had time to create my neckseal! After trying some techniques I`ve found the best way to get a really nice shape. I`ve put a fabric lining of cotton fleece in it, which gives softness and volume . To get a good looking shape I used a 4mm rope. Here you can see my result:1 point
-
What follows here is probably my least favorite part of the build: shaping the torso all around my slender frame. I seem to recall that this part felt like it took forever to get right. I had lots of trial and error with my RS kit, so I was expecting problems. However, with many mistakes comes knowledge, and I managed to get through this part with not many new gray hairs. I always see the plastic of the armor pieces as a big puzzle. When the pieces are the correct size, the whole kit fits together without much effort at all. You can use a belt to cinch things in, but you really don't need it if the plastic is the correct shape on your frame. I began with strapping my torso together temporarily with industrial velcro to see how it fit before modifying. I didn't strap my back plate to my kidney at this point. The back plate is unaltered in the photo below. I needed to see how the shortened kidney/butt assembly would fit first, then I added the back plate to see where I would need to cut it at the bottom. You can see how the back plate overlaps the kidney. The back plate is too long. I attached all the velcro and got some pics. Pics were taken in a mirror, but I've flipped them so that the orientation doesn't look weird. That back plate needs some major trimming! The chest plate needs to be adjusted upwards because it's sitting too low. And I've got typical new-armor-diaper-butt going on, too. Remember that I have not trimmed anything for size from the sides of the kidney, ab, or butt plate. You can still see the flashing on the butt plate where I need to clean things up still. There's still a tiny bit of flashing left on the kidney as well. I noted where most of the overlap on the back was happening and marked it. I cut where the mark was along the bottom of the back plate and attached it with more industrial velcro. With everything together, I was able to better see where I needed to shape my armor to my body. The back shoulders definitely need to be curved downwards; they stick up a lot. And the ab could use a little bit of curving in at the sides. The butt plate actually fits well on me, so I don't need to shape that around my body (I'll be shaping that at the bottom tab later). And then there's the kidney. Ugh. It pops out on both sides. Clearly too wide. Instead of cutting it to fit, I'm going to shape it inwards with a hot water bath. I think I'll be able to get the kidney to fit well without trimming the sides at all. Here you can see how much of a disparity width-wise there is between the front and back halves. If I put the permanent strapping on at this stage, I'll be putting a lot of stress on my brackets and the plastic, and repairs will need to take place sooner rather than later. No need to stress them out if I don't have to! The kidney is key for this. When a kidney is well-shaped, it makes the entire kit look so beautiful, just like a well-tailored suit. I began with focusing on one side of the kidney at a time. I like the flat middle part of the kidney, and I want it to stay flat. So the middle stays out of the water. I was able to dip 1/3 of the kidney into boiling water, and gently apply pressure to curve it (running it under cold water after each round of shaping). It's okay if the returns get a little warped- you should expect it. Those warped areas are easy to flatten out later. (NOTE: do not trim your returns until after you've fully shaped your armor to your size! The warping that can happen to returns can sometimes make some areas of the return narrower.) Here you can see what my kidney looked like before and after shaping it as compared to the butt plate (which was not sized): I shaped the ab to make it more narrow around the sides, then continued to shape the kidney to fit the ab. It took a bit of time, but I am happy with the result. Photos were rotated so it's more like how it will be worn. Kidney/ab left and right side connections. Keeping Centurion in mind, everything lines up at the top. Like I mentioned before, for me, the armor is a bit like a puzzle. The challenge is to get all the pieces to not only fit together but also to fit to your own body. Here you can see how I've made my TK puzzle fit nicely together. You're looking from the cod upwards, with the kidney on top. After heat shaping, the sides of the kidney and ab now meet together well without any additional strapping or support. When I install my side rivets and brackets now, there won't be any unnecessary strain on those connections. And yes, it fits me as well- I simply ran out of steam today to take photos of it all on. Time to take a break!1 point
-
LOL from what I can tell Shingate will never ever settle down1 point
-
I think if your building your own armour then building the Prusa i3 MK2s or 3 kit is going to be easy. The only advice I would offer is that you take your time building the Y-Axis, that’s where tolerances are important so having a very good set of measuring calipers and checking everything twice; especially then tightening the nuts then you’ll be laughing - the instructions are very easy to follow so really I can’t see how anything could be out.1 point
-
1 point
-
It´s prefered to use Canon size cover strips, 15mm arms (front/back), 20mm thighs (front/back) and shins 20 front/25 back. That is not always possible and then the size needed to make the armor fit is the right size and then it`s prefered to use a smaller size close to Canon in the front and go bigger in the back. When sizing up your armor start on the front and see if Canon size is right for you and the cover strip idealy hides the raised edge (all of the flat surface) but not going over it. So..if you can use a 15mm cover strip then you cut 7.5 mm from each edge. To conclude - If you follow trooperbay you`re in good hands1 point