Leaderboard


Popular Content
Showing content with the highest reputation on 12/02/2017 in all areas
-
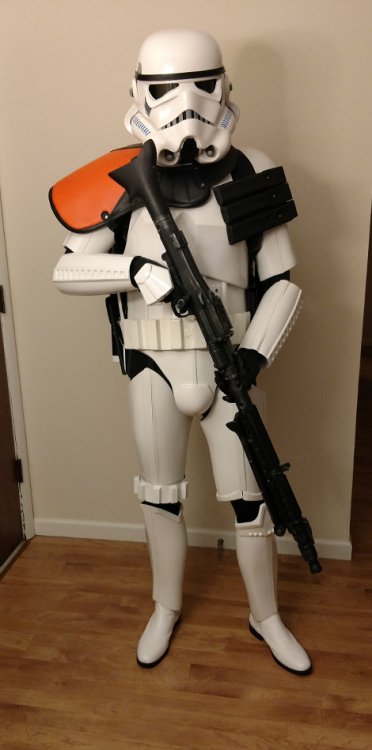
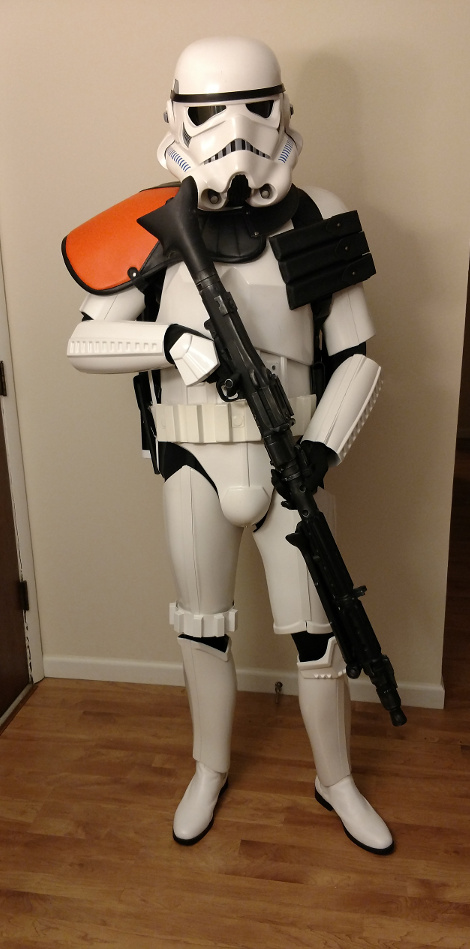
Got my this (my second costume) approved 2 days ago! I know that I'm not a battle-worn since I'm switching between this and regular ANH Stunt, but I plan on either making this worn when the armor gets older or going commander. I have another stunt set of armor on order, so waiting on that to arrive. The pack is from Shawn, he did a great job! DLT-19 is from HFx, and pauldron and pouches are from Trooper Bay. Also working on a shadow stormtrooper now for Spec Ops and this is all starting to get more and more addicting!
 2 points
 -
What do you mean?2 points
-
I'm still alive! And still working on this guy. I got the cover strips on the forearms and biceps, an easy step (simply measuring and cutting 15mm strips). This did wonders for covering up the uneven-ness of the top of the left forearm. I'll work on removing a bit of the cover strip ends once I'm done with everything else. Next I began sizing the thighs and shins, something my girlfriend graciously helped me with. Unfortunately I don't think she knew exactly where to place them, so I decided to put these off until the torso is done: that way, I can size them in relation to distance from the hips. I'm glad I waited because sizing the various torso pieces was fairly stressful, especially the back piece. But I'm fairly confident so got it right and I'll post some taped up pics once I feel I'm ready to move onto strapping. I did however strap the abdomen and chest, since those are pretty self-explanatory fitting wise. They're probably a bit uneven, but once it's on the body this won't be an issue. That's definitely a benefit of using elastic: the piece kind of "melds" right onto my frame. I went with double snaps not only for strength but because my snap setter (the poundy hammer kind) makes some wildly inaccurate snaps. I got my helmet fans from Henry's and taped those in; I'll use a more permanent solution once I know I'm comfortable with their placement. I even found a cool battery charger to power it. Next I will be doing the shoulder straps and lining up the front and back of the torso armor. Then, figuring out and cutting the thighs. Sent from my SM-G955U using Tapatalk2 points
-
I'm guilty of not posting myTD build. It was a little challenging for sure. I used the same reference pic for building mine. I found out quickly that the provided pipe walls were too thick to push the end caps in more than 1/4"-3/8" after I trimmed their thickness down to 3/4". Now I'm going to trim the TD belt clips so the ends are around 1/4" from the screws, like the reference pic. ...I would have left the blood, probably even put a clear coat on to protect it.2 points
-
No it doesn't matter what it looks like on the inside. We're just confirming the correct rivets are being used. Cap (either type) or split head rivets are acceptable.2 points
-
Congrats on joining the tanks of the HWT's Ryan! If you want to give your armor a "battle worn" look, I have something that I will mail you (no charge) that you can use. It is pretty easily removed for when you want to go shiny TK when you need to. PM me for more info. if interested.2 points
-
That's a pretty set of armor there - looks great.2 points
-
Thermal frickin' detonator. As I read through other people's builds, I've noticed that there are always part of the builds that caused the person some grief. If not grief, they tend to go over somethings in detail while other things, well, not so much. Most of the builds I've read there is like one post that shows up saying something like "while I was waiting for the E-6000 to dry I put together my thermal detonator". The text is then followed by one or two pics of a beautiful, finished thermal detonator. Easy. That was not the case for me. Well, it wasn't that bad - I just like to complain. Anyway... One of the reference pics I used. The other one (which I dont' have handy) had very similar measurements. So the gong show started with the painting - the provided tube is black. It needs to be grey. So... I grabbed a can of Testor's gloss grey spray. I always use a filler primer and sand smooth. sand paper I use - habit from the 3D print kits I've put together. Since I am spraying enamel I decided I would do it in the garage - where it is winter. I assume the cold weather messed with how the paint went on because I had all sorts of issues - I had to strip the paint and redo... twice. I got bubbles the first time around. And then the paint ran the second time (for various reasons). Anyway, I finally figured out the best approach for spray painting in a room at freezing temperatures. But then I decided to mask off the ends so that the caps would slip on easier. I masked way too much - the caps were not going on far enough. The provided caps and plate (the white part that gets glued to the tube - does it have a name?) were a bit too big according to the reference pic. The caps were about 5mm too wide and the plate was about 10 mm too long. So I trimmed. Turns out that my marker sits exactly 5mm off the table when laying horizontal. Perfect. I put masking tape on so I wasn't marking up the ABS. Hold the pen still and spin the cap. I just used curved lexan scissors to cut. Sanding and perfectly sized So, the issue now was that I couldn't get the caps on far enough to get the right overall length (7.25 to 7.5 inches). The tube was too long. So what do I do... I insist that I'm going to get the caps to fit on all the way (why, because I'm a stubborn idiot). I hot bathed the caps - no go (I felt like I was going to bend them out of shape). I carved down the edges of the tube by hand - useless. I then took out the Dremel and tried to resize the tube thickness - just made a mess with no results. So, plan B... just cut the damn thing. Doh Anyway... 7-3/8" Then I managed to put the plate on lopsided. Pulled it off to adjust. Managed to bugger up the paint job AND cut my hand somehow. I was going to leave the blood on the TD - I didn't - but I'm sure I'll have another chance to bleed before I'm done this kit. So, spot painting , a band-aid, and rum later... I'll deal with the clips tomorrow.2 points
-
Took you alls advice, screwed out the rivets, adjusted the face Much happier with the placement.2 points
-
Hi FISD, Few weeks ago, I’ve finished a long overdue project I debuted a while back, and wanted to create this thread to share with you all about the whole creation process of this First Order backpack. I truly love this backpack. Whoever designed it did a fabulous job updating the OT pack while keeping its spirit intact. First of all, using only reference pictures, I modeled the backpack. I finished my 3D model the third of March 2016, so quite a while back and didn’t realize I kept this project lingering for so long now. 3D modeling WIP. Finished 3D model. The 3D model was then split into several printable pieces and 3D printed in PLA. The side panels could have been printed in fewer parts but I chose to break them down into three different sub-units to ease the smoothing job: outer frame, inner frame, and greeblies. Right-hand panel. Same process for the left-hand panel. First side panel smoothed out. My face when I realized I had to do it all over again for the left panel. Two close-ups of before and after smoothing. Second side panel done. I initially intended not to bother, but in the end I reckoned I had to clean the junction line between the outer and inner frame for both side panels. Next on the list was the bottom panel. This bottom panel was then welded to both side panels to create the backpack frame. The backpack frame. After that I smoothed the junction lines between the three different parts to blend them into one. Once the frame was done, I moved on to the back panel. The holes, letterbox openings, and vertical slits are matching similar ones present on my backplate so the backpack can be secured and the harness straps fed through them. Close-up of the twenty-two ‘piano keys’, as I like to call them. Last of the main parts to smooth was the front panel. Once finished with the body of the backpack (frame + rear and front panels), the only things left were the various greeblies starting with the top cover. To make sure I would not glue this top cover out of place, I designed a tooth on each side to help me aligning it with the backpack frame. The ‘exhaust port’. And finally to finish with the greeblies, and the tedious smoothing job: the two clasp greeblies, various buttons, switches, vents cover, etc… Test fit of the left panel. Before starting with the paintjob, I decided to join together the backpack frame and the rear panel. The whole weight of the backpack was going to pull on this junction point, so to make sure the bond would be strong enough and withhold the weight I welded them together. If you ever wondered how those backpacks were generating heat to keep their trooper warm, there’s one like that into each unit. Once ready I hung up all the parts with wire, prepped them, and laid on the white. After the white was dry, it was time for quite the challenging masking job. Fortunately I know few masking tricks that made my job much easier than what it could have been. Still I wish I had had a vinyl cutter to let the computer do the job for me. Once everything masked, I airbrushed the gloss black. Left panel: Same process for the right panel: And again for the front panel. The front panel also has small black squares and one rectangle that I believe are made out of vinyl instead of paint. I’m leaning toward vinyl because on reference pictures the black doesn’t seem to have a gloss finish but rather satin, however I’m far from being dead positive about it. These are so small, they were very hard to cut. Once again the vinyl cutter would have been most helpful here. With a brush I painted the inside of the pill openings in the four side switches with gloss black. And then glued all the greeblies with e6000… …except the ‘exhaust port’ which is secured from the inside with two M4 screws. The black inside the exhaust port is also satin vinyl instead of gloss paint. Finished right panel, and nearly finished left panel. Strangely, the two top buttons of the left panel aren’t painted black but dark grey instead. The large black areas of the rear panel are also cut pieces of satin black vinyl. Final step was to glue the top cover with e6000. The finished First Order backpack. Of course this backpack I made is nowhere near perfect and it has plenty of kinks and defects, but the experience I gained at every level with this project is massive and I’m thankful for that. On another matter, I would also like to thank all the guys who take pictures of the exposed original costumes, and then take the time to upload and share them with us. To be honest, without them it would be impossible for me, and all of us, to push the limits of accuracy always farther. And as always thanks for reading. T5H.1 point
-
2,953 km. Sorry we hijacked your thread Greg.1 point
-
You guys work on the same bits, I´ll just copy and paste1 point
-
ha ha. yeah, thanks! I was just reading this on Sean's thread.1 point
-
Thermal detonator done. After reading Sean's thread, I decided to trim a bit off the clips as well - the screws are 1/4" on center from the edge. And I rounded the corners of the clip where it rides up next to the armor. The provided screws are actually small bolts with nuts. I couldn't get the end caps off to attache the bolts, so I just drilled a hole a bit smaller than needed (reaming out the top part of the hole a little) and just threaded the bolt like a screw. Hopefully it will hold. If not, I guess i will glue it. Done!!1 point
-
"I cut it three times and it's still too short!" - every woodworker ever1 point
-
Found a small eagle counter at a old repair shop in a box of hengstler parts parts1 point
-
I'd err on the side of caution. Much harder to add than remove.1 point
-
Let's make snaps! ... and done!1 point
-
Couple of extra bits done, got the big grub screw in, working on the magazine and a spring for the mag release button. I hate springs, I don't know why I'm doing this to myself lol Sent from my SM-G925F using Tapatalk1 point
-
very slick.1 point
-
Incredible work! The pre-painted version looks good to go for a Sandy.1 point
-
Great work! Now I have yet another item to add to my FOTK shopping list.1 point
-
Done. Wish it was all that easy lol Sent from my SM-G925F using Tapatalk1 point
-
Haha thanks Dan, probably couldn't be further from the truth though lol. I've gotten away with a few things so far, just hope my luck holds out! Sent from my SM-G925F using Tapatalk1 point
-
One step closer on the e11 trigger frame...1 point
-
This is what I’ve got so far. The under armor is not what I’ll be wearing but it’s what I use for work. Shoulder bells need to still be attached and the photos were taken by my daughter. Constructive criticism appreciated!1 point
-
Checked the thread, found some really interesting stuff bit didnt find what I was looking for. I also found from the link you posted the main person that offers R1 TK costumes. Got in touch with him, lets hope it goes well1 point
-
Great work as always Germain.1 point
-
Beautiful. I love HWTs. Joseph, can you PM me the name of that stuff?1 point
-
Update: Tino, you're a genius! (I'm sure everyone already knows that) So, I've shaved a bit off the top of the trigger (where it would pivot) and sunk the trigger deeper in. This couldn't have worked better for me as there's now a good amount of movement on the trigger while still using the Doopies trigger guard. Next I've done the spring... this was a fiddly little nightmare and involved lots of frustration lol finally got it all in though, and by some miracle, the trigger actually *clicks* now when pulled. This was a complete and utter fluke (I'll take it though!) And is caused when the pin on the back of the trigger flicks off one of the rungs of the spring. Only worry is: not sure how it will hold up in the long run. (Also, the spring isn't actually glued in yet, hope this will still be there after gluing!) Sent from my SM-G925F using Tapatalk1 point
-
Dan, what would I do without you!?? Sent from my SM-G925F using Tapatalk1 point
-
That sounds like a good plan to me. And as Dan's picture below shows, the original trigger indeed rests deeper into that section and with a different angle. As a last option, you could also contemplate to shorten the front end of the trigger to get the required space between it and the guard.1 point
-
Cheers buddy! Will have a look through that today, it'll probably help in some other areas too by the sounds of it! Sent from my SM-G925F using Tapatalk1 point
-
Nice! Well done. Yeah, when the armor gets beat up, just change out a few parts and go sandy.1 point
-
Awesome! Enjoy!1 point
-
Now the fun begins!1 point
-
Thanks for the lead on the Scorpion helmet liner! I've wanted to add something like that to my Anovos lid for a while and that works perfectly. I used Scorpion's website and determined a large would fit my noggin better and fortunately those are still readily available. It also fits in the helmet just fine. Thanks again! And great work so far!!1 point
-
Thanks for the imgur info Greg. I got it working. Thanks Daniel.1 point
-
Not sure if you came across this resource yet - it's the FISD E-11 Blaster Reference photo compendium of SMG parts. Click here to access the PDF. You can find it here: FISD E-11 BLASTER REFERENCE along with the Blaster Reference itself. See page 18: You can see how a real trigger looks like and design accordingly as you work to get it to fit just right; hope this helps some.1 point
-
When you review the list of new posts, say like this: https://www.whitearmor.net/forum/discover/unread/?&before=1512144203&latest=1512081205 I wonder how hard it would be to add a like button directly on the feed?1 point
-
Sweet that it's pretty much trimmed. Painting my first helmet was harder than I thought. That vocoder can be tricky *, though IIRC someone made a sweet template. * In the end my wife did it - she has better hand/eye coordination.1 point
-
My belief is that innuendo, side accusations, complaints in other areas, etc. is not conducive to the mission of a detachment, which is to provide a place where all members can feel comfortable and that the boards are drama free. I would prefer that if there is a disagreement that it be discussed on the 501st only area so that we can hash it out openly, and everyone has a chance to weigh in and clear the air. I don’t know when thing changed, but these days so much 501st business – and this isn’t just FISD but other 501st forums too – seems to be done via PM, private FB group, etc. whereas in the past I had a lot less PMs/emails about Legion business. Life is too short to stay in a place of bitterness, resentment, and negativity.1 point
-
very soon just got the side plates done.. i will start machining the internal parts in week or so..It is a complex part i have several switches, mounting hard points, and a functioning safety switch i am still working out...1 point
-
If you choose to, ABS paste is your friend.1 point
-
TK-92802 reporting for duty! Need to address a few issues now: 1). velcro/glue ammo back in proper position on thigh (done!) 2.) thighs are not the same length, need to trim the right and shim the left for equal amounts of black showing 3.) my posterior plate likes to flare out and ride up the kidney plate, some MrNoStripes brackets should solve the problem, hopefully... then off to EIB and Centurion!1 point
-
Great work Taylor! You’re ploughing along [emoji106] Sent from my iPhone using Tapatalk Pro1 point
-
I added some weathering to my armour recently. I think it looks pretty good1 point
-
There is no brand on the dental putty... updates on the armor i will post soon!1 point
-
After just squeaking in as a 501st TK and HWT within the past few weeks, I did my first troop last night. It was at the Star Wars night at a Florida Marlin's baseball game (v. the Braves). There were about 20-25 501st members from a variety of detachments including about 10 TK's. A few Rebel Legion folks were there as well. I was the only HWT so I really stood out from the other shiny white TK's (LOL). We were suited up by 5:30 PM and started rotating groups making trips to a variety of locations including the ticket entrances, photo booths, walking around, the press box, the announcers booth, the first pitch on the field, escorting the umps to the field, the 7th inning stretch on the field, etc. I even did a "dance off" with another TK on the jumbo-tron. I jumped in whenever they requested "characters" as I much rather be out and about than waiting in the press conference room where we were staged. All in all it was a blast. The troop lasted until about 9:30-ish. Not bad for my first troop. Here are a few comments and observations: I was afraid to drink a lot of water because I didn't want to have to pee! I discovered that standing for all that time wasn't bad at all - even though I was jealous of the Tie fighter pilot and others that were able to sit. My helmet fans lasted the entire time (THANKS UKSWRATH) as did my Hovi mic system. Wearing my helmet for the lengths of the rotation wasn't bad at all either. I got used to it fairly quickly. My padding, etc was perfect. Visibility was "OK" as I could see down from my mouth screen though seeing little kids next to me was challenging. I was obviously very careful with my DLT-19 the entire time. I could hear most everything that was said except when other TK's were speaking to me... that required a bit more leaning. I Learned that most folks TAKE FOREVER to use their phones to take pics. Dad's want to take pics with Stormtrooper almost more that their kids do! My amor and gear performed flawlessly for the most part and was fairly comfortable. I do need to tweak a few items such as my shin armor and I need to make a chest strap for my pack shoulder straps (as the straps sometimes wanted to pop off my shoulder). No snaps, etc. came undone the entire troop. I saw a few other "newbies" have constant issues here and there. I sweated my an impolite person off!! I need to add a small towel to my kit Chicks dug me. As few especially wanted to "use" the binders in some way... The HWT pack started making itself "known" on my left shoulder at about 9:30 PM. Not sure whether the position changed a bit or it was fatigue. Learned to become more "aware" of my pack walking through door ways. Surprisingly nothing popped off after a few hits in door frames, etc. I could dance in Stormtrooper armor! You guys are a great bunch! I already can't wait until my next troop!1 point


.thumb.jpg.fe734c2874fe147a5789e833ad00772e.jpg)