


Sly11
-
Posts
13,367 -
Joined
-
Last visited
-
Days Won
278
Content Type
Profiles
Forums
Gallery
Articles
Everything posted by Sly11
-
 You need to use to use a photo share service that allows you to use links. This will allow you to add as many photos as you wish. many use Imgur which is easy once you know how.
 -
Screen caps, Screen caps, Screen caps
-
Dead Post Links & Broken Photos, How You Can Help
Sly11 replied to Sly11's topic in Forum Help & Support
https://www.whitearmor.net/forum/topic/41252-unruly-fans/ restored Sly11 https://www.whitearmor.net/forum/topic/132-applying-decals/ Restored Sly11 https://www.whitearmor.net/forum/topic/304-the-ab-cut-mod/ Restored Sly11 https://www.whitearmor.net/forum/topic/277-chest-plate-and-spacing-questions/ Restored Sly11 https://www.whitearmor.net/forum/topic/680-velcro-method-question/ Amended Sly11 https://www.whitearmor.net/forum/topic/471-rt-mod-armor/ Archived as images unrecoverable Sly11 https://www.whitearmor.net/forum/topic/594-finally-done/ Archived as images unrecoverable and link no longer exists. Sly11 https://www.whitearmor.net/forum/topic/627-first-pics-of-me-in-armour/ Archived as images unrecoverable and link no longer exists. Sly11 https://www.whitearmor.net/forum/topic/1134-my-ap-to-esb-conversion/ Archived as images unrecoverable and link no longer exists. Sly11 -
Logo request. The FISD has long had a logo. can we have it on top?
Sly11 replied to TK bondservnt's topic in Off Topic
Logo is now back at top of Forum header -
Very nice, I love seeing helmet internal set ups.
-
Congratulations! Next stop Expert Infantry. Make sure you use the guides for photos and the finer points the DO's look at for level 2
-
Congrats Shawn and Happy Birthday.
-
Indeed You can’t beat injection molding with flex materials, TFA TK’s onwards have used the same type materials in construction. Screen used FO TK chest plates lay almost flat if you put one on a table top due to the PU. Sent from my iPhone using Tapatalk
-
TK42057 Requesting ANH Stunt Centurion Status (RS) (479)
Sly11 replied to Rob .T .'s topic in Request Centurion Status
Good luck Rob, looking very sharp sir. Sent from my iPhone using Tapatalk -
MV's ANH TK Stunt [ATA] 1st Build Thread for Centurion
Sly11 replied to MaskedVengeance's topic in ANH Build Threads
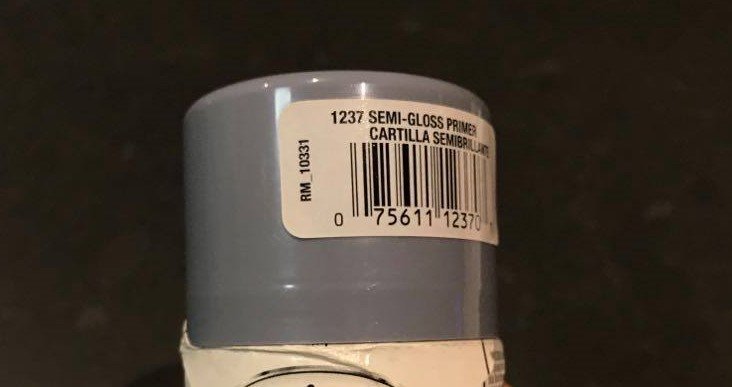
This is the Testors spray can I used. The colour is very similar to my tears traps and frown paint. It is a semi gloss and I guess batch to batch may have some colour variance too. This is the Primer as opposed to Aircraft gray which I definitely find too dark, I think I have that one somewhere as well lol. Hope this helps.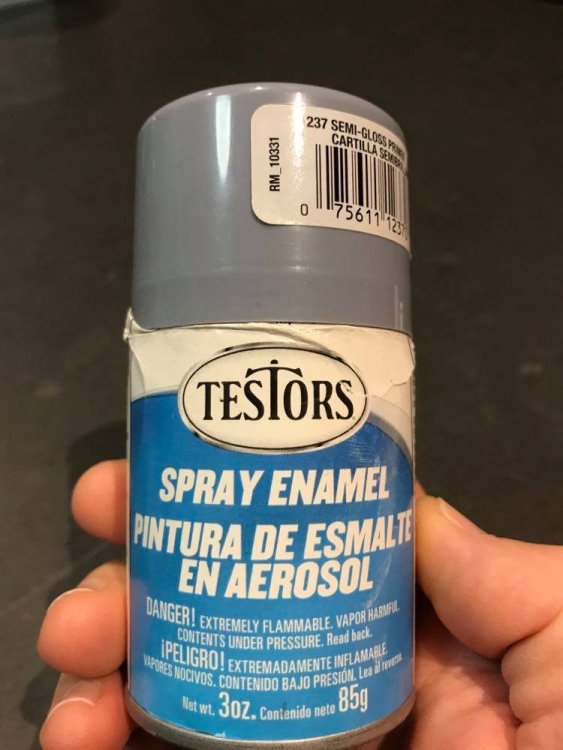
-
Congratulations Colin and welcome to Expert Infantry. Sent from my iPhone using Tapatalk
-
The helmets were injection moulded parts and then assembled,
-
Steam rolling it now, and such a clean build, very impressive Ryan and keep up the good work.
-
You are making great progress David, nice work. Best advice I can give you is this. Take your time. You are getting plenty of fantastic advise from those here who really know what they are talking about but take your time. Don’t feel rushed or pressured. This is an exciting time in your journey, one that involves you to learn new skills and prove that you can do a fantastic job. Savior it as much as you can specially if it is the first accurate costume you have built. Keep posting plenty of photos, ask loads of questions and keep up the great work. Sent from my iPhone using Tapatalk
-
Welcome to FISD Dan As mentioned on the phone today, please see below some links to various parts of the detachment were you will find great information. This is the most friendly and by far the largest Stormtrooper resource in the galaxy, and not only will you love being a member of the Redback Garrison, you are going to love this place as well. Plenty of stuff to get your geek on and more information than you can imagine. You're already off to a start with an armour kit and most of the accessories so wont be long before we see you approved and at Centurion rank. https://www.whitearmor.net/forum/forum/38-getting-started-read-this-first/ https://databank.501st.com/databank/Costuming:FISD_CRL
-
Sharkbait's TFA Captain Phasma Build
Sly11 replied to sharkbait's topic in Captain Phasma Build Threads
Congratulations at long last, you must be very pleased, and you look great. Well done Rebecca! -
Great to see you striving to achieve Centurion, and with the excellent progress you are making with your modifications, you should easily reach your goal. Keep up the great work Ken the 500 is in your sights.
-
Hi Garrett and welcome to FISD, you are going to to love this new journey you have embarked on, ask plenty of questions along the way and the answers will flow. Sent from my iPhone using Tapatalk
-
TK-26306 Requesting ANH-S TK EIB Status [Anovos] (1006)
Sly11 replied to Lord Q's topic in Request Expert Infantry Status
Congratulations Daniel, now onwards to become part of Centurion 500! Sent from my iPhone using Tapatalk -
markgambino Requesting Pre Approval Review (AP)
Sly11 replied to MightyAtom's topic in Request TK Pre-Approval
Nice, nice. Nice! Good luck Mark. Sent from my iPhone using Tapatalk -
Great to hear Brian. We have been sitting on this for many months lol, obviously eager to launch it but in no way did we want to dilute the March to 1000 campaign and Victory celebration. When we ran the numbers and did some background due diligence I think we were all surprised at how close it was as well. It'll be touch and go, but we may actually make this by years end,. If not, it will be a great way to round out this term for the Detachment, specially in such a trying year for so many.
-
Not only that, overlap method of construction, edge trim around chest and ab armour, pinched in shoulder bells, clam shell hand plates, and the wrong helmet for the set of armour. 100% RotJ minus the bucket. Bit of a Frankenstein Sent from my iPhone using Tapatalk
-
Sorry to hear of your loss Paul. there is no rush, and we aren't going anywhere so get back to it when the time feels right for you sir.
-
The BigJasoni's ROTK 3D Print Build Thread
Sly11 replied to BigJasoni's topic in Rogue One Build Threads
Definitely the most epic R1 build thread we have on FISD. Unfortunate about your cracking issues with the chest plate, but it is something I have seen on almost all 3D printed armour, some far worse than others. Hopefully this one small crack is the worst of any issues you may encounter along the trooping journey. Looks fantastic and I am thoroughly enjoying your build thread and all the fine details. -
MV's ANH TK Stunt [ATA] 1st Build Thread for Centurion
Sly11 replied to MaskedVengeance's topic in ANH Build Threads
AP TD was also of the smaller diameter pipe, not sure if Mark has changed that now days, but it is also still approvable. I'd agree the colour looks too dark in your photos (maybe lighting , not sure) but it should match the colour of the tears, traps and frown paint of the helmet.

