Leaderboard


Popular Content
Showing content with the highest reputation on 05/24/2021 in all areas
-
Hello, Troopers! On behalf of the Command staff I am proud to announce that we have a new member of the team! Chemi (TK 30173) from the Spanish Garrison will be moving from his position of Imperial Attache to Deputy Deployment Officer. As a Centurion level TK (and one heck of a nice guy) he will be working with Mario and I and using his TK expertise to approve costumes at the higher levels. I'm sure he will be a great addition to the Staff, so please join me in welcoming him to his new rank! Way to go, Chemi, and I look forward to working with you, mi hermano!5 points
-
It's an older thread, but it struck a cord for me. I've put on quite a bit of weight over the past few years, and my old ATA suit doesn't really fit like it once did. I picked up an AM kit and plan to use it for motivation... rather than sitting around moping that my suit doesn't fit, I'll build something that does and get out and troop more Any progress lately?3 points
-
News to me, but I guess if you pour Jello mix into a chest plate and let it chill then serve, technically it would be like Tupperware2 points
-
Here is how it came out. Not great, I didn’t get the wrinkles I was looking for. I think I need to try using this paint in a wind free environment. Purposefully left the magazine housing masked off to keep the text visible and create a worn tapered off look. The power cylinders will be mounted on top anyway so I guess it really doesn’t matter too much. I will paint a little more on the sides of the housing, the sight guard and the sides of the rear sight.2 points
-
Concur 100%. I've been a little disconnected from the FISD for a few weeks as I've been "cheating" with ICAT, Mudtrooper and Shoretrooper builds. However, I'm definitely ready to jump in on this again. So nothing new, but I've mentioned several times that I think we're going to get a healthy dose of the New Generation TK armor in future Disney+ shows. I'm not sure why I didn't pick up on this previously, but I think the Andor teaser gave us a little something. First, look at this healthy stack of E-11b blasters: Then there's the concept art: Yes, it's art, but make what you will about the TKs in this picture. Ready to get back into this conversation.2 points
-
Well.... After speaking with several others and having to file a grievence against them myself via paypal, I think Head Shot Props needs to be removed from this list of vendors. Or at least a warning needs to be posted. I haven't spoken to anyone that has gotten an order from them in a while. One person told me they were purposely strung along in order to miss the 180 day time frame to file a complaint through PayPal. Thankfully, I kept messaging them nearly daily until I simply asked for an answer: will you be shipping out my helmet, yes or no. A week went by with no answer and so I escalated it. They eventually gave me my money back with no explanation. I was lucky. Some people have been waiting months and have gotten nothing and heard nothing. The first excuse was something to the effect of "Well.... the pandemic hit us hard. But I'll get a really nice helmet cast for you." Anyway..... it's unfortunate because there are so few vendors for R1TK armor. I'd avoid this one at all cost if I were you.2 points
-
Until we have better sources, please use the below as the paint guide.1 point
-
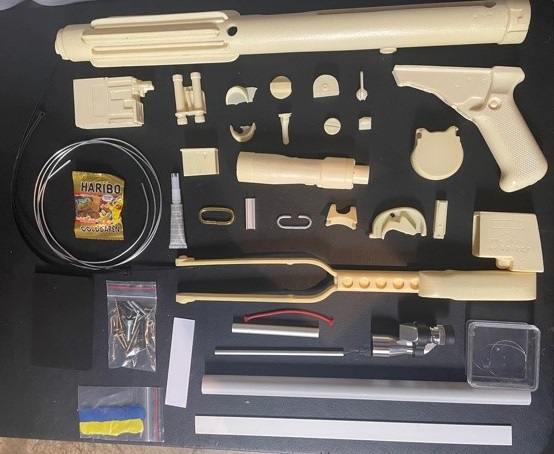
Hey all -- Very excited to start my first-ever build thread. I'm a total beginner to this, so please feel free to chime in with any suggestions/corrections as I work my way through this. I bought the Doopy's kit and the @T-Jay completion set back in 2016, but unfortunately life got in the way. I'm finally finding the time to tackle this after doing quite a bit of research. I've really enjoyed @Altair's build seen here, as well as the overall guidance from the @FISD E-11 Reference Team seen here and hope to base mine off of their work (with a few additional mods). Below are all the pieces I'm starting out with. Despite having been with me for several cross-country moves, all of the pieces are miraculously accounted for! Resin freshly rinsed and ready to roll!
 1 point
 -
Name: Tom Brown Future Garrison: Knightfall Garrison (VIC, Australia) Armor Maker: matt gauthier Helmet Maker: matt gauthier Cloth Belt: self-made Neck Seal: self-made Holster: matt gauthier Boot Maker: Imperial Boots Blaster: (none presently) Height: 5' 10" Weight: 60 KG (132 lbs) Type: ANH Stunt Photos below:1 point
-
Yeah it does look more like this part is missing on the back more so on the front. And I guess it would only be for keeping the belt in place on the front. My armor has a tall 3 inch lip on the bottom of the ab piece almost as tall as a belt. I'd like to take that down some to maybe an inch. Are people gluing their belt there or velcro or snaps? Or does it just stay in place because of the teeth on the top of the belt? I had planned on getting to my belt later this week, so I gotta figure this part out. Thanks for the additional info and screenshots.1 point
-
1 point
-
Hey thanks for passing this my way. Going to try this when I post tonight!1 point
-
Welcome Chemi1 point
-
Your first picture where it's missing is from a Hot Toys figure. The front of my belt attaches to that part. Sent from my SM-N986U using Tapatalk1 point
-
Bienvenido al equipo !! Welcome to the Team !!1 point
-
Long overdue update. Painted the receiver and most of the parts with a black coat of surfacer paint. Did a test of the wrinkle paint I purchased. First attempt after quickly heating the paint to reveal the wrinkles. This unfortunately creates tighter wrinkles and not exactly what I was shooting for. Second attempt: The wrinkles appear more accurate to the original wrinkles on a sterling but only when I slowly let the paint air dry. After a few months of waiting to paint the blaster. Freshly applied wrinkle paint in 3 layers. I made the mistake of leaving the paint drying in the direct sun so the wrinkles appeared faster than I had planned. I did't have any real space to dry it so it could not be helped. Plus this paint gives off a very powerful odor so not recommended to keep in doors while it dries. Even the test parts gave off an odor for weeks. I will post the result later. The wrinkles are okay but not as nice as the second test piece. I plan to weather it lots as the DVH kit parts were quite rough to begin with.1 point
-
Congratulations!1 point
-
Congrats!1 point
-
Hey Nick just checking in to see how you are going with this build. looks like we will be the official home for this costume after discussions with Spec Ops Detachment, so let us know when you are ready and we can start work with you on creating the CRL.1 point
-
I've only had one resin helmet with a thin area, I added some fiberglass resin and matting to the area, NOTE only add a small amount of hardener as during the curing stage it can put out some heat. You could also use JB Weld or some other type of kneadable glue or even bondo (automotive filler) but again with any 2part system watch out for heat transference1 point
-
I think one strap with 4 rivets would do just fine, but due to the size of the rivet heads you may have to offset them a bit. Hint: When using rivets, always use a tight fitting washer around the upper part, especially when working with leather or nylon.1 point
-
Congrats Chemi! You’ll be a fine addition to the excellent DO team, and hopefully you all will get to see my submissions in this term! Sent from my iPhone using Tapatalk1 point
-
I am pretty quick and detailed in builds, and have actually created, and modelled on a CRL, so no problem to help any of the various builds that are already in progress as needed. I have purchased the armor and helmet, and backpack and thrower, just waiting to start receiving stuff and will open a WIP. I will contact Romain from the FG and I think there is another active build, to see where they are at. Thanks for letting us know, would be great it have it in FISD if SOps are overwhelmed.1 point
-
Congratulations Chemi, welcome to staff.1 point
-
Thanks!!!! A pleasure to work with you and Mario. A lot of work ahead, I know. But I will do my best to make the detachment much bigger (if possible). I know that you will support me, and if I need help, you will be there (as it has been since the day I registered at the Detachment ), so I am not worried. Thank you brothers.1 point
-
It’s possible! My Anovos ANH bucket developed a crack near the left mic tip at a thin spot. Many of us reinforce the insides with, basically, plastidip (or truck bed liner) and cloth.1 point
-
Sorry, back to make some more trouble... Super. I totally understand that, but other detachments have set the example of not requiring a specific film in their CRL titles. I think "/Anthology, "/New Generation", or "/Non-Saga" amended to Rogue One are among the most popular suggestions for an alternative. What do we need to do to get that going? Shall we start a poll and let membership vote on the name change before submitting to the LMOs for approval? Let's make it happen! Originally, but we've grown! Not being "shiny white" is a different reasoning than "no one is prepared to make the costume". We have folks prepared to make the costume, but who are understandably hesitant considering the uncertainty of an approvable CRL moving forward. I would argue that the "Remnant Stormtrooper" belongs to FISD, on the documentation from LFL alone - it's a "Remnant STORMTROOPER", not "Sandtrooper". The weathering is distinctly different from previously seen Sandtroopers (the black chipping alone), and none have been seen with backpacks (I'd argue Jedha Patrol is a different scenario). There should be sufficient documentation of the angles, if not in their entirety, enough to piece together a full view of the costume. As previously mentioned, we've seen CRLs approved on less. One of us will plan to submit a more formal post in the near future (hopefully with additional input from @BigJasoni, @11b30b4, and some other key stakeholders), to show with certainty that the same armor has been used across multiple properties, warranting amendment of the "Rogue One Stormtrooper" CRL to an updated title, as well as the various required angles and differences for a NEW Remnant CRL to be developed, and once tentative approval is achieved, someone will move forward with building and submitting an example of the costume. Let's keep this going!1 point
-
Back in August life threw me an unexpected curve which required me to shelve this project for a bit. But as life would have it, then tossed me another curve to help bring back balance. I haven't forgotten about this project. I'll continue working on it soon.... I hope.1 point
-
BARREL JACKET BASE I decided to start with the right side of the barrel jacket base, which has a rather smooth and rounded shapes, verse the left side with straight lines and mechanical levers to unlock the barrel. The rounded part will be based on 1/2 inch PVC pipe about 2.5 inches in length. On the actual MG-34, this part appears to be a hinge used to flip the barrel jacket out of the way. The front side side of the hinge seems to be open on several of the reference pictures I used. So I decided to use a hex nut that was a snug fit. The back side of the hinge is smooth and solid. For now I started with plugging the hole with Apoxie Sculpt. Next I needed a flat base where the hinge is to be mounted on. I used to pieces of scrap PVC foam board and used plenty of crazy glue and expanding foam glue to hold in place. Then packed in the back and nearby openings with Apoxie Sculpt. The hinge was tacked in place with crazy glue, globs of expanding foam glue and the packed smooth with more Apoxie Sculpt. Then added several layers building up the general shape needed, just eyeballing it for now. This is unsanded rough early stage, just used my fingers to smooth it out with excess water (spray bottle) to make it less sticky. Used some scrap PVC foam board to squish in the sides where the face need to be flatter. The back side of the hinge is closed of and flat with a slight bevel. Again no sanded, this is just done with fingers so far. Next I'll be sanding and shaping to get it a bit better before moving onto the other side.1 point