Leaderboard


Popular Content
Showing content with the highest reputation on 05/11/2021 in all areas
-
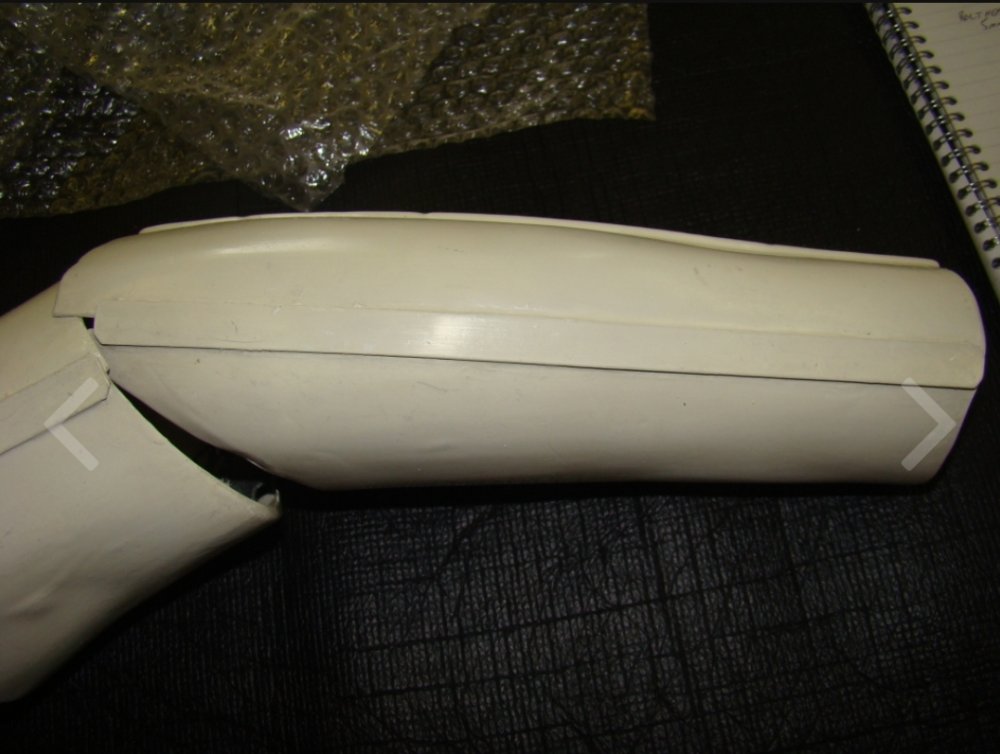
Thanks everyone! Was hoping to get these glued up, but I will take your advice and hold off until I have the rest of it to compare to. I will also take your advice @gmrhodes13 and probably be adding at least a little bit of foam to the forearms, but that will be at the very end. Since I am following the RS build videos it's on to the thighs! M2 points
-
Hi Marc. Any chance for a sale thread here on FISD? (for the non-Facebook people)2 points
-
Having skinny arms they can look large, having some foam inside to centralise them can help to even out gaps so they don't look as big. As my first ATA kit had one oval and one round I heated the round one a little to make it more oval again helping the overall appearance. I would wait until you have the rest of the armor on and check the look, you don't want to make them too thin or they may not match the overall appearance. Here are a few references showing the forearms.are larger then the biceps at the elbow.

 2 points
 -
Starting to look like a storm trooper. Up to you if you want to trim down the elbow side of your forearms more. They do look a little wide. Sent from my sorrosuub C1 comm link device using Tapatalk2 points
-
2 points
-
I'm sure most of you has seen the image below. These Billgrams have become a bedrock on which many TKs have been built. However this image, and 1 very similar, has a colour on it no longer deemed correct. Rather than carrying on explaining it I've made a new diagram, sorry no catchy name this time, with just the correct colours. The images show the Humbrol colours, but the Testors equivalents are shown too if that's easier to source. All this was built upon Billhags work, so it would be wrong for me not to thank him for it. He's also my GML so he has had a hand in me getting this far in more than just billgrams. I already owe him a pint, so Bill if you see this and the opportunity presents it's self, make that 2. ANH Stormtrooper Paint Colours by Christopher Pearson, on Flickr Click through to flickr to get access to a full resolution version, and feel free to share this if you find it helpful.1 point
-
My local hobby shop tells me that Testors/Model Masters paints are being discontinued. Permanently... Sent from my iPhone using Tapatalk1 point
-
You definitely want enamel paint, rather than acrylic, though it shouldn't actually impact approval. Trooperbay has French Blue for sale here, as well as on their eBay page I think. The enamel will be more resilient and last longer.1 point
-
It never ends1 point
-
Awesome build thread Dan, and a very nice blaster kit too. Great work as always1 point
-
That overlap is pretty normal, but you shouldn't have to force anything. Depending on where/how much tightness you have, imagine it this way... do you think you could hold that pose (arm bent) for an hour or more? If so, no problem, but if you have any discomfort, some trimming/adjusting may be needed. Looking great so far, sir, and nice taper on those forearms!1 point
-
Yes, Dan. I am taking orders via FB now. Lead times are around 2 to 3 weeks from ordering[emoji846] Marc Sent from my SM-G950F using Tapatalk1 point
-
As Gmrhodes said you can definitely hold off until later before trimming then any more until you've got more done. If you were to do it you just figure out how much you need off the elbow end and taper down to nothing before the wrist. Sent from my sorrosuub C1 comm link device using Tapatalk1 point
-
Thanks, Trooper. :-) The blaster was officially released back in March, I believe. All sales are done through his Facebook group. https://m.facebook.com/groups/300153641472608/permalink/310426037112035/1 point
-
While I am waiting for my RS kit to arrive sometime in July, I am ordering the below listed additional equipment: 1. BlastFX - will go into a 2nd E11 I will put together - I can then alternate between that and the RSProp E11 depending on the troop requirement. 2. UKSwrath - Stormtrooper Audio System w/Voice Modulation. 3. UKSwrath - Stormtrooper Hearing assist Kit. Bought this the same time I bought the Deathtrooper Audio Assist kit a couple of years back, never installed it and will use in my TK bucket. 4. Nomex Flight Flyers Gloves [Black] - Will alternate between these and the RS gloves depending on the troop requirement.1 point
-
1 point
-
Looks amazing! Did Marc happen to mention when the kit may be available to the public?1 point
-
When all your magnets and clamps are in use you can still find something to do.1 point
-
Ab and buttons update. Here's a quick shot of the Han snap I installed. Below is the process I went through to fix the ab button plate. There was just enough scrap left around the ammo belt button that I could use to create a plate. I careful removed the ammo button and rectangled? squared it off. For stability, I took some more scrap abs and built up a stack to create more surface area to glue on. I didn't want to rely solely on abs paste! Then I attached the two sides together. ABS paste time! I used a toothpick to spread it around the seams and after it dried, I went through the riding grits of sandpaper to smooth out the edge. In hindsight, I definitely should have just left the edges around the original pull and filled in the dents with abs paste. Would have been much easier. But at least I got that sweet sweet abs paste experience.1 point
-
Hey -- yeah, I'm using Doopydoos with the T-Jay completion kit. Got started this past weekend and was taking pics the whole time. Build thread incoming : )1 point
-
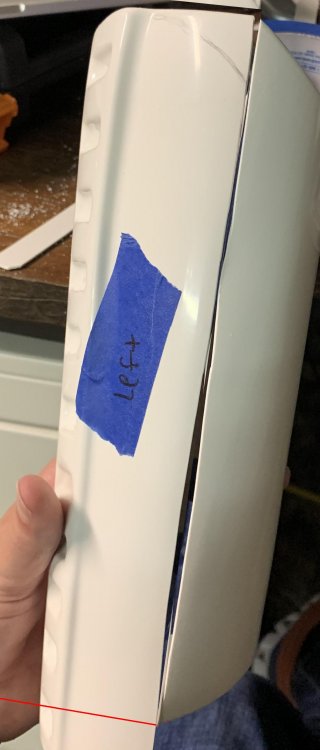
I would post up a photo of how it looks before gluing the cover strip on.1 point
-
Hey folks, Drawing closer to finishing this blaster. In this little update, I have; Added D-ring Added lock/free screw (actually just a resin cast) Added hex bolt on bottom of grip Added spring Prepared charging/cocking handle This certainly doesn’t look pretty, however, it looks okay once in the barrel. I used a child’s garden hoe as the correct diameter to coil my spring. And now some photos of where it’s up to.1 point
-
The forearms should have just enough room to get your ungloved hand through (you can tuck those in afterward). If you have the extra ABS (think scraps) I suggest using them on all your seams. Like I mentioned, they don't have to be pretty, just functional.1 point
-
Are you using the Doopydoos kit, Thomas? If so, he may have meant how much is removed from that area in order to fit the metal bar in. The less you can get away with removing the stronger that area will be. Are you using one of Tino's finishing kits like this? (I swear by them and wouldn't do a build without one). It may help to start a build thread in progress, post up some detailed photos of any issues and ask all the questions you want to... We are here to help!1 point
-
Thanks guys. I appreciate the options but think I will just cut from the top as I don't want to mess up those outer dimples. M1 point
-
You have to be careful doing this as you can run the risk on the front of trimming too close to the inset squares on the sides. If you look at this image you can see exactly how far it would bring the front down so I'd stick with trimming the rear.
 1 point
 -
I have no issue with the taller piece sticking up, as the shoulder bell will cover it when wearing your armor, but I would suggest rounding it out as seen below. That point on the return edge could cause some discomfort.1 point
-
Looking good1 point
-
In case you're interested, I used t-nuts found at my local Ace Hardware, but those linked standoffs also look good. Having the base on the nuts I used enabled me to (I think) mount them well to my bucket.1 point
-
So I've procrastinated long enough, back to the build! My last post was finishing off the exterior of the helmet. This post: 1. Helmet interior 2. Biceps (with potential issues) 1. Helmet interior Nothing spectacular or ground breaking here, installed padding and fans. For padding I just used a basic helmet padding set from Amazon and supplemented it with a 1" strip of "high density" foam from Joann's, as my eyelashes were hitting the eye lenses so I needed a bit thicker padding along my forehead. Below pictures show the foam before and after wrapping it with some black cloth. All are simply velcroed in place. I picked up fans, fan bracket and battery pack from Ukswrath, and used velcro to mount those as well. 2. Biceps (uncertainties ahead Requesting opinions and advice please!) So started off by cutting the excess flash, molding etc. using a combination of lexan and utility blade (sorry, got carried away and forgot to snap pics of the process). As this is just a preliminary trimming, I left quite a bit of return edge on the biceps parts. I was just aiming for enough to tape them together to get an initial fitting done. As you'll see in the pics below, when cutting the straight edges along the butt joint surfaces (the flat surfaces the coverstrips will mount too), I only cut to 15mm on both sides. This gave me 30mm total coverstrip surface, double the "standard" 15mm for the biceps. As you can also see in the photos below, as has been noted in many other ATA builds, the shapes of the biceps are much different from one arm to the other at the elbow end. The right is circular, whereas the left is oval, almost squared. I took a rough measurement of the outside circumference and came up with about 37cm for the right, about 35cm for the left. And then came first fitting. As I mentioned above, I cut to where the needed coverstrips would be 30mm, which I thought was plenty conservative. And....that's what I get for thinking. As you can see in the photo below, the smaller left bicep didn't even make it past my forearm. Below is the right bicep, the more rounded one. At least I was able to get this one up onto my bicep, it's a snug fit. Here are my initial thoughts and would LOVE feedback as always: 1. I left a good amount of return edge. I'm thinking the first thing I need to do is go to ZERO return edge on both biceps. This should give me a little more room. 2. I think I may need to shorten the biceps lengthwise (top to bottom) a little bit. Taking off ALL return edges should shorten them a couple mm's. But I think I'll wait on any other "shortening" until later when other arms parts are fitted? 3. The goofy left bicep will at the very least need a hot bath treatment after I remove the return edges, I believe. Hopefully, rounding out the elbow side will help, but I'm doubtful it will help enough. Worst case, maybe contact ATA and see if I can get another set of biceps and try going with two "right" sides? I believe this would be acceptable, since the biceps are interchangeable from what I understand? 4. Coverstrips. I figured I would probably have to go with wider than 15mm coverstrips for the biceps, but did not foresee needing to double it to 30mm. But I'm not sure I have a choice? Will this be an approval issue for any levels? And I'm guessing this will have a ripple effect on the rest of my coverstrip widths. It will probably be necessary again on the forearms, but then would it look funny if the leg coverstrips are narrower than the arms? I don't think I'll have this same issue with legs, as my legs aren't very thick. Aaaaaaaaaaa! On a less stressful note, just wanted to end this post by sharing the Imperial goods I received for Sithmas: Hey Caleb (@MaskedVengeance), I got one of these too! Chrome plated plastic decals:1 point
-
Try to use a little fine sandpaper too before painting, will help the paint to adhere to the plastic1 point
-
Yet another great point. Durability! Thanks.1 point
-
Thanks!1 point
-
Correct, same as ESB1 point
-
Are these the same colors for ESB? I know the frown is black and decals are used on tubes. I'm collecting my supplies I want to make sure I get the right ones Thank you1 point
-
I used this when painting my TK. I suggest that if you are considering taking it to a paint shop to print out the colors so that they can scan it, because evidentally the color scanners can't do it off your phone1 point