Leaderboard


Popular Content
Showing content with the highest reputation on 03/08/2021 in Posts
-
@justjoseph63 As requested. Joe here is my fix for the little gaps. There is some cover strips on the back. I filled the fronts in with a little white E6000. When fully dry I will remove the tiny bit of excess.3 points
-
Many thanks for your kind words, Dan. Coming from a real helmet expert , this means a lot to me. Thanks Brian, we will soon get to the weathering... Yes, if I was doing a full armor, it would surely come with a backpack - and of course a very badass weapon, Mario. However, my collection is just for helmets. I have no space, time and money to make a full armor here. Sorry guys. Maybe (and this is a big maybe) I can draw a picture of how the full armor would look like. Unfortunately I have no skills with digital drawing tools and only limited skills on paper... Thank you very much, David. Wow, many thanks Andrew. I am out of words. The good thing is, there will be two more updates before this project is done. Next one coming on Friday.3 points
-
Well Tino, the term "Blown away" is not strong enough for the remarkable job you have done on this project. I am sure there will be plenty of members inspired by your build and ingenuity with this thread. Personally I am above and beyond impressed by your workmanship and attention to details.3 points
-
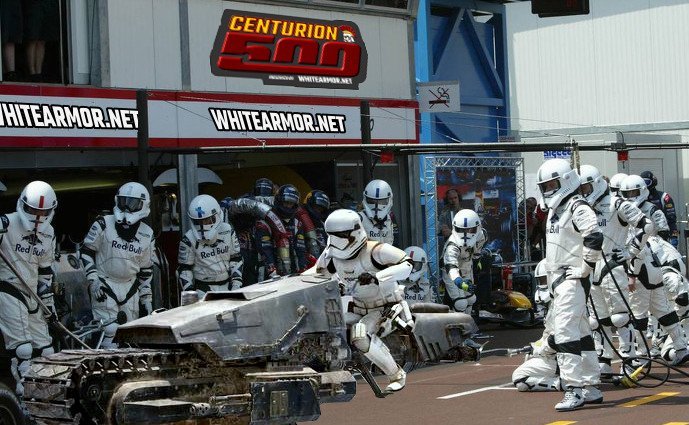
NEW In Memoriam Detachment Leader Executive Officer Centurion500 Merchandise Hall of Fame Just For Laughs In the Media Election Results INFORMATION & AWARD PROGRAMS Common FISD Acronyms and TK Glossary Pre Approval Forum 3D Section Field Exercise Award Imperial Attaché Program Fire Teams EIB & Centurion: What do these terms mean? Advanced Tactics Awards Public Relations Staff List 2020 Follow FISD On the 28th of November, 2020 Michael A. Huggens (TK-77049) passed away. Michael was an eager member of Garrison Carida and he hit the ground running. Upon joining he learned that a recent event was understaffed so he signed in to make his first troop. Friendly and encouraging, Michael was the “cool dad’ to all. He loved working with wood and repair work was his passion. Michael is survived by his wife Sherry and daughters McKenzie and Tayler. Our condolences go out to his family, friends. "Buckets Off" On the 22nd of December, 2020 Benjamin J. Berry passed on. Benji (DZ-20153) was a much loved member of the United Kingdom Garrison. Be it in the role of a mischievous Jawa or the web-slinging superhero Spiderman, Benji brought smiles to all around. Benji was driven to inspire joy in the lives of others with his children's hospital visits. Once, Benji created the Little Heroes Fund to support children’s bone cancer research. Benji was committed to making our World a better place. Our condolences go out to his family, friends. "Buckets Off" On the 6th of February, 2021 we lost another Star Wars actor, Harry Fielder passed at the age of 80, he portrayed Corporal Grenwick in Star Wars: Episode IV A New Hope Our condolences go out to his family, friends. "Buckets Off" On the 1st of February, 2021 Dr. Robert “Dad” Yetman Perinchief (SL-7082) passed away. ”Dad” was a much beloved family member of the The Florida Garrison and the Makaze Squad. Bob served in the US Airforce, received his Doctor of Education in Music, taught music for fifty-nine years, loved mission work, and authored several children’s books. Bob met the charity opportunities in the 501st with enthusiasm and inspired all that met him with his portrayal of the Emperor. Bob is survived by his wife Dawn (TR-7084,) and children Karen, Jen, Jessica, Glen, Paul, and Timmy (TB-7079.) Our condolences go out to his family, friends. "Buckets Off" On the 21st of February, 2021 Kelly Jerome Roberson passed away. As the Tusken Raider Sogad Sigg, DZ-20604, Kelly claimed membership to both the Rebel Legion’s Dagobah Base and the 501st Legion’s Rancor Raiders Garrison. Kelly was regarded as a true team player. He was known to call off work if the opportunity arose for Kelly to suit up and make a child smile. Kelly shared his interests with his son, most recently by helping his son to complete his own Shore Trooper. We look forward to seeing Kelly’s legacy continue with Kylie. Our condolences go out to his family, friends. "Buckets Off" On the 18th of April, 2019 Russell J. Sniezevage (TK-7649) passed away. Russell costumed as the iconic Star Wars Stormtrooper with Garrison Carida. Russell was motivated by the joy others expressed when he suited up in the name charity. When not laboring to enhance his costume, Russell could be found enjoying detailed model work and the culinary arts. Russell is survived by his brothers Albert (SL-3865,) and Stephen. We apologize for the late inclusion into the Eternal Legionnaires Our condolences go out to his family, friends. "Buckets Off" On the 25th of September, 2020 Thomas Ryan Sachse (TB-5779) passed away. Ryan was a truly dedicated member of Garrison Carida, and he loved his bonus family dearly. Ryan’s frequent troops earned him 501st Trooper of the Month in June of 2007. Ryan took on the other roles in our community by serving as a Garrison Membership Liaison and Commander of the Guard. Ryan was proceeded in Life by his wife, Courtney Sachse (TI-9305.) On the topic of "Buckets Off” (taking helmets off as a show of respect for those who passed,) Ryan advocated to keep Buckets On. Ryan believed that the best way to honor a fellow trooper was to keep our helmets on, keep trooping, and continue to bring magic into the lives of others. Our condolences go out to his family, friends. "Buckets Off" Greetings fellow members Legion elections are officially complete with all new teams ratified and officially in place. Garrisons, Squads and Detachments will all now settle in for the term and things will move forward across our great club, lets hope 2021 brings a lot more fun and heads back to a more normal and stabilized life for everyone. We got the ball rolling early activating new sections of the forums with our in house merch trading section and visible galleries. You can now easily peruse the detachments merch back to version 1 of our coins and patches. Don't forget to check theses out in the501st detachment members section TK Trading Post FISD Challenge Coin Repository FISD Patch Repository As we did last year, your staff are working to a detachment plan of which I laid out details in my introduction post for the year. The above checks one of those off the list, but there is plenty more work to do across the forums. I like to make this kind of information visible and up to date for all to see because it keeps myself and the staff team accountable to the membership. If we say we will do something, we certainly take all possible step to make it happen and that is why it is important we work to a plan. Look out for further updates on how we are traveling in a coming edition of the news letter. The DL's blog is also back in full swing for more frequent updates on what your Detachment staff team are working on, so please take a look when perusing the forums. The DL's Blog There is a big year ahead of us, with a few things to celebrate along the way. We have Centurion 500 on our door step, and of course our 15th anniversary come July, so have at a guess what your staff are currently working on Stay tuned, get on the forums and be a part of our wonderful community and I'll see you there. With Unquestioned Loyalty Andrew Franke TK11469 "Sly11" Detachment Leader Greetings FISD Family! As Andrew mentioned above, it is truly an exciting year that we have ahead of us, for many reasons. Personally, I am excited about events beginning to open up for us again here in Texas, and indeed, across the United States as a whole. There are some big holes in our normal event calendar - no Celebration, or San Diego Comic Con this year - but there are conventions and events beginning to happen. I will be attending ICCC i(Imperial Collector's Comic Convention) n Nashville, Tennessee in just a little over a month - 16-18 April - and am greatly looking forward to traveling and attending a Con, meeting new people, and doing some truly great work for the convention community - I'll have more to share about that statement later though. In the meantime, be sure to engage the Staff if you have questions about anything going on in the Detachment, or just to get to know us better if so inclined. This group is truly inspired by each of you here on the forums, as at one time we too were new, wide-eyed, and afraid to think about cutting ABS. We love this Detachment, and we love meeting and interacting with our fellow members. We love to see you grow and learn, and we love to learn from you as each year, new members join and bring new ideas and new levels of excitement to the Detachment. Thank you, for everything that you have done so far, and will do in the months and years ahead for the global Detachment, and your fellow members here as well! With Unquestioned Loyalty Tim Waychoff TK51878 “Dark CMF” Executive Officer Hot off the heals of our Victory1000 celebrations, FISD are proud to bring you our next target event. We are fast approaching another milestone and another chance to celebrate victory as we hit 500 Centurions approved. This miles stone will also come with another special Centurion only piece of merch for the first 500, in the form of a pin to match the Expert Infantry exclusive. Our very own gmrhodes13 (Glen) has outdone himself yet again and put together the perfect introduction for this milestone event so without further adieu, FISD brings you. THERE ARE ONLY 7 POSITIONS ON THE GRID, SO IT'S TIME TO HIT THE ACCELERATOR, SHIFT INTO HYPER-DRIVE AND HELP US BLAST ACROSS THE LINE! Now that we have reached 1000 Expert Infantry, It's time to once again become part of FISD history and enter the "Centurion500" We are aiming to have 500 approved Centurions by the end of the year. We only have 7 to go, so in order to reach that goal we are asking that you read over the CRLs for your particular armor, (this thread will help) make any necessary adjustments and post up your submission! Photo Checklists - Link here Apply here Questions: 1. Not sure if I have what it takes to reach Centurion- You don't know until you try, and you have not only the D.O. staff but an entire Detachment to help! 2. I need some repairs/fixes first- This is why we are here! We honestly want you to succeed and are here to help in any way we can. 3. I am happy with the way my armor looks, so why bother?- It not only makes you look more screen accurate, it instills a sense of pride and "esprit de corps"! 4. What if I don't make it? No worries, we will provide detailed suggestions on how to reach your goal! Benefits: 1 Bragging rights for being one of the "Original 500" 2. You get a cool badge under your name here on the FISD (full forum version) 3. Access to Exclusive Centurion500 pin for those in the original 500. 4. Certificate for your accomplishment. 5. You will have a more screen accurate looking set of armor. Now that the entire Staff and those who have reached Levels 2 and 3 are here to help in any way we can, you are more than welcome (and encouraged) to ask any and all questions you may have on this thread, or contact one of our Deployment Officers Joseph, Sha Sha or Mario. Let's get up to speed, push that throttle and prepare for lightspeed, you can do it troopers Your Deployment Officers, Staff and the whole detachment crew are standing by ready to assist If you'd like to show your support on FB here is the link to the Centurion500 profile frame www.facebook.com/profilepicframes/?selected_overlay_id=331320651285964 INTEREST LIST OPEN - CENTURION500 PINS We are almost at the finish line, 9 positions left on the grid for the Centruion500 and as promised we will have another amazing prize for this milestone, available ONLY to the first 500 approved Centurions: Another beautiful metal pin to match the Expert Infantry exclusive, commemorating this historic event! Our very own gmrhodes13 (Glen) has outdone himself yet again and put together the perfect introduction for this milestone event so without further adieu, FISD brings you... You can find the interest list here 11" Victory Patch Refund After all supplies and costs were figured in, the actual cost of the patches turned out to be $11.67 per piece instead of the $12.47 we charged.. a difference of $399.36 which breaks down to .80 cents per patch. At this point we would like to offer you 2 options: 1. Refund- You can receive 80 cents back for each patch you ordered. (If opting for a refund, I will PM you). Please allow up to 3 days for this. -or- 2. Donation- Your difference can be donated to the 501st Legion Make-A-Wish Endowment fund. Info. here. All funds donated will be tallied up and sent to Make-A-Wish at one time** in the name of the FISD. For transparency, that transaction will be made available for viewing afterward. Please post in this thread IMPORTANT **The thread will close in 30 days (April 3rd, 2021). If you have not responded by that point, we will assume you would like your difference to go to the Make-A-Wish foundation. Please welcome TK - 22423 Jonas to the Stormtrooper Hall of Fame for this sweet photo!https://www.whitearmor.net/forum/topic/49239-7-tk-22423-troop-log/?do=findComment&comment=702332 With Unquestioned Loyalty Aaron Gibson TK-99725 "Pyrates" Curator Hall of Fame Fire at RS Props For those of you who may not know, RS Props have sadly had a fire on their premises earlier in February. Thankfully their contingency planning has protected their molds but most importantly, everyone at RS Props is safe and unharmed. They have posted this update on their YouTube channel on how this will impact orders. That crazy time of year "elections" has come to an end, thank you to those of you who participated in this years legion wide elections, please join me in congratulating our ongoing Detachment Leader Andrew Frank TK-11469 "Sly11" Also congratulations to our new Legion Commanding Officer Ingeli Hedberg TI3893 "3893" INFORMATION & AWARD PROGRAMS For a full list of FISD awards head here Are you new to the FISD and wondering what the heck all those abbreviations and strange sounding terms mean? To help you @justjoseph63 has started a list of the most commonly used ones that will give you some insight. If you have ANY questions about a particular term that is not listed or suggestions for new ones please contact Joseph. You can find the list here Pre Approval Forum allows future Troopers the opportunity to submit photos of their completed build to be reviewed by the Staff, Imperial Attaches and others in preparation for forwarding it to their GML for approval. Any and all advice/suggestions given will be specific, constructive, helpful and respectful. Please note that this program will NOT take the place of your local GML, as Detachments are not chartered for costume approval and can not override a GMLs decision, but is instead a peer review program designed to help you look your best and offer guidance and positive feedback. For more information on this program, please visit the link here Don't forget to visit our 3D section when next surfing the FISD forums, there is plenty of useful information to potentially help you on your next TK adventure. You might be feeling may generous and share with our community a new TK related 3D file and maybe win yourself a 3D contributors award so check out the details below and be part of the in house 3D community. Here is a link to the FISD 3D Contributor program. Don't forget to create a troop log here on FISD and get awarded for your adventures The list of accomplished troopers keeps growing, so get on board and register your troops today Simply start (or update!) your troop log, keep the running total in the title, and post (at least!) a date and name for the official 501st event where you wore your TK! Once you've hit a milestone count, go over to the "Field Exercise Awards -- Post your milestones here" thread to request your profile be updated! Simple, right? Award Recipients February - March TK37423 "GoofTrooper" Eric - TK72179 "jamihal" Jim - TK20177 "Cybergrunt" Bill - Are you an approved TK that spends more time on the boards than the average Trooper? Do you enjoy using your knowledge to help out future and existing Troopers? If so, we would like to invite you to join the Imperial Attaché program! Members of the I.A. team are chosen to help out not only those here on the boards, but on a local level as well. Our aim is to have at least one in each and every Garrison, Squad and Outpost in the entire legion to be the eyes and ears of the FISD on a local level. For a complete list of Imperial Attaches, go here Some of the benefits: Access to exclusive Attaché merch., including patches, IA patch , IA Rocker For a complete list of Imperial Attaches, go here You may also be in the running for an Imperial Attache Award Imperial Attaché Award for those attaché's who have gone above and beyond [minimum 1 year of service]. You can find a list of prior recipients here Attaché Ambassador It's time for another attache check in, could everyone active please check in on this thread With Unquestioned Loyalty Frank Peranteau TK75139 "Frank75139" Attaché Ambassador Want to setup a "Fire Team? the Fire Team program is completely optional, and is intended to help form a common identity and spirit of camaraderie among 501st Legion stormtroopers in the same geographic area/garrison that troop together. Fire Teams are not officially recognized by the 501st Legion nor the FISD, although they will be able to access a Fire Team sub-forum on the detachment website. You can find more information here So what exactly are and levels? These programs were designed for those who choose to take their armor above and beyond the minimum requirements for basic 501st Legion approval. It gives you the chance to show a level of dedication and pride that takes your armor closer to being as "screen accurate" as possible, without as much extra work as you may realize! You can find more information on the programs here This area lists all those who have gone above and beyond basic approval toward screen accuracy and obtained EIB or Centurion or both. FOR February - March the 1st Imperial Stormtrooper Detachment would like to congratulate: Expert Infantry Badge Award: Glen "gmrhodes13" TK85421 EIB TFU - 7th Award Craig "Harder" TK91918 EIB 1017 Brett "Cleantrooper" TK9593 EIB ANH STUNT - 2nd Award Guillermo "Starkiller_2021" TK22021 EIB 1018 Ardeshir "equuspolo" TK42128 EIB TFA - 5th Award Ken "TK88667" TK88667 EIB ESB - 2nd Award Greg "Greg S" TK25034 EIB 1019 GREAT job on your approval, now on to Level 3! Request your free EIB certificate here --------------------------------------------------------------- Centurion Badge Award: Glen "gmrhodes13" TK85421 Centurion TFU - 7th Award KC "KC Grim" TK57899 Centurion 493 Outstanding job on reaching Centurion, Troopers! Request your free Centurion certificate here If you see any of these Troopers around your Garrison or Squad, be sure to congratulate them! Newsletter This month I have condensed the "Info and Awards" sections so the newsletter is not as long of a read, just use the links in those sections for more information. If you have any interesting stories or photos or something you think newsworthy please send them to me via pm. With Unquestioned Loyalty Glen "Q" Rhodes TK-85421 "gmrhodes13" PRO Newsletter Staff List 2021 Detachment Leader (DL): Andrew Franke (Sly11) TK11469 Executive Officer (DXO): Tim Waychoff (Dark CMF) Chief Deployment Officer (DCA): Joseph Pedigo (justjoseph63) TK-10963 Deployment Officer: (DCA): ShaSHa (ShaSHaChu) TK-19233 Deployment Officer: (DCA): Mario (TKSpartan) TK-48117 Lead Provost Marshal (DCOG): Steven Sheades (starsaber25) TK-10466 Provost Marshal (DCOG): Chris Pearson (themaninthesuitcase) TK-10911 Provost Marshal (DCOG): Dan Branton (CableGuy) TK-42911 Personnel Officer (PER): AC (Novatie) TK-5597 Fire Team Relations (PRO): Mark Ryner (Captsafe66) TK-4584 Content Editor At Large (PRO): Christoph (Danny) Lauber (Ripper_L) TK-55550 Content Editor Support (PRO): Tony Jobe (ukswrath) TK-10116 Content Editor Awards (PRO): This will be handled by the XO Newsletter Publisher Forum Clean up Director (PRO): Glen Rhodes (gmrhodes13) TK-85421 HOF Director (PRO): Aaron (Bronx) Gibson (Pyrates) TK-99725 Attaché Ambassador (PRO) Frank Peranteau (Frank75139) TK-75139 Social Media Relations (PRO): Teresa Nuthall (Soulart) TK-41307 Social Media Relations (PRO): Jim Ferrell (Rat) TK-95970 Systems Administrator (DWM): Eric Brager (Darth Aloha) TK-9674 Systems Administrator (DWM): Mathias (Locitus) TK-2959 Detachment Founder (DF): Paul (Daetrin) TK-8020 Trading Cards Content Support (IPM): Eric Ho (Hoda) TK 77520 Imperial Propaganda Machine (IPM): Brien Edick (Harbinger) TK 92802 Imperial Propaganda Machine (IPM): Jeff Salt (wingnut) TK 50297 Facebook: www.facebook.com/whitearmor Facebook Group: 1st Imperial Stormtrooper Detachment (FISD) Official Twitter: www.twitter.com/FISD501st or @FISD501st Instagram: www.instagram.com/fisd501st On behalf of the 1st Imperial Stormtrooper Detachment Command Staff and the Imperial Propaganda Department

 3 points
 -
Another update! I'm admittedly surprised and frustrated, but my GML kicked back my ROTK submission over the posterior plate issue. While I agree that it needed addressing before EIB or certainly Centurion, I was pretty surprised that it was a concern at Basic. Luckily, I had already addressed the issue and planned on retaking my photos since I wanted to pursue higher levels, but... man, after the hundreds of hours I've put into this suit, it was pretty upsetting to be told it wasn't good enough. Kind of has me rethinking submitting here either, but we'll see. I know everyone is just trying to help us look our best... Anyways, here are some updated pictures after trimming down the posterior panel and messing with my strapping a bit! I'll swap these in when it's time for EIB submission soon, then have a couple more small details I know I need to address before shooting to be (I'm pretty sure?) the first ROTK that will be submitting for L2/L3 under the new CRLs. To my knowledge, Jeff is the only one who has achieved these awards, then had a hand in rewriting the CRL to be much more accurate, and also demanding. We'll see if I can make it, but I'll keep posting up here and there as I fix a few things and shoot for it! Have a great week, everyone!2 points
-
As requested. Here is both sides with out the belt and a close up of the rivets.2 points
-
First of all, thanks for your concern. As I was writing a response, trying to figure out what was happening (since I thought I could see quite well) I realized that since taking those first photos I have added some electronics to the inside of the helmet, which made me change the padding setup. As you can see (sorry for the quick crappy photo lol), it sits much better now. Most of the padding is on the brow and cheeks, which makes for great visibility, or as great as it can be, as well as hanging much lower.2 points
-
And a very Badass weapon!!!2 points
-
Thank you very much Glen @gmrhodes13 and Mario @TKSpartan Before continuing with today‘s update I just have to mention three minor corrections to this build. Daniel @CableGuy has collected some very good information about ANH helmet building and painting in some of his YouTube videos. Watched these just recently and then found flaws on the eyes and the paint job on vocoder and the HOVIs. See the following photos for the corrective actions: Okay, now to the update. Looking at the helmets from TIE-pilots and Magma Troopers, I found tubes or hoses to somehow look pretty cool. But adding them means they have to end somewhere. On a full costume you can run them to a chest box or a back pack. In this case it is just a helmet – with a classic RS Prop Masters helmet stand. So I started figuring, if just one tube could be fitted somehow… In this place it looks like supplying the flashlights or some other hidden electronics. By the way, that painfully reminds me of an aiming device I had planned for the right eye, just below the blast shield. Would be nice but unfortunately I did not manage to find anything suitable for this. Okay back to topic. It was time to run the other ends of tube and cable somewhere. The cable was easy, I just tape-glued it to the inside of the helmet. But that tube, oh boy … The diameters of tube and that chromish metal piece exactly matched. Would have been nicer to see one fitting into the other. However, I am pretty glad it still looks good this way. The next topic is ‚helmet personalization‘. Seems like there is a long tradition of individual drawings on various military vehicles and equipment. Even customized helmets seem common and can be spotted in the Star Wars Universe, too. Found different colors and sloppy lines to look more real than having everything perfectly lined up with just one color. While doing this, I thought about something like a slogan or motto from that trooper, hand-paint onto the helmet. But not with the letters of our alphabet, with letters in Aurebesh… Thought an officially looking military marking (white on NATO green) would be a good addition to this. Instead of sloppy lines, I now needed something that looked like being made with a stencil or template – in Aurebesh of course… The last photo shows the TK-ID is a bit crooked and the black slogan has an offset. First I was a little frustrated, then found it to look more real because such inaccuracies can happen with hand-made things. Anyway, it‘s the rear side which soon can‘t be seen in the display case. List of modifications so far: 1 - Blast Shield 2 - Black Interior 3 - Two-tone paint job 4 - Antenna and radio 5 - Utility belt 6 - Universal supply box 7 - Bacta canister 8 - Helmet flashlights 9 - Breathing tube 10 - Kill marks 11 - Aurebesh letterings Two updates to come - next one in a week.2 points
-
WARNING: The following content may be controversial! DISCLAIMER: These are my opinions from years of experience, pure and simple. Over the years I have noticed many future Troopers doing an OT (Original Trilogy) TK ask about return edges before, during (and after) their build... If this is a subject that you are curious about, grab a cup of coffee or a tall glass of frosty blue milk (this is a long post, lol) and read on.... QUESTION: "What are they, what do they do, and should I leave them, trim them down some or remove them"? ANSWER: Return edges are part of the molding process and provide strength in certain areas on the edges of your armor. They also provide a heftier look to some pieces. To help you decide whether or not to keep them is why I started this thread. Here I will attempt to go into a few details about them. Know in advance that as mentioned I personally am NOT a fan of them in many areas for several reasons (listed below). Some people love them and some may disagree with my opinions... many of you may trooped for years with no problems which is AWESOME, but many folks have had issues and questions. 1. In most areas they are not screen accurate- In looking at the screen caps and film used armor photos below you will notice their scarcity. 2. They can (and in many cases will) get very uncomfortable- Many folks like the "thicker" look it gives their armor, but they can cut into you, especially in the area where your arm bends ("armor bite") and the groin area (chafing). As Troopers we do a lot of walking and arm bending carrying a weapon, so keep this in mind. 3. If aiming for higher levels they can cause fitting issues- Examples: A. If you leave them on your forearm openings and glue on the cover strips, they will need to be completely removed at the wrists for Centurion level, making the opening too wide. This can lead to you having to remove the cover strips, reduce the sides of the forearms and re-attach the strips. Quite a pain in the posterior plate to say the least. *** See EXAMPLE 1 below. B. If they are overly thick on the bottoms of your shoulder bells, they can prevent them from lying snug against the biceps. 4. They can cause splits/cracks- Especially on some armor areas. ABS is designed to flex, and in some cases a small amount of return edge is fine, but too much can cause stress on those areas. *** See EXAMPLE 2 below Over time that stress will take it's toll somewhere, and that is usually the return edge. Anovos armor is especially prone to this on the sides of the chest/back plates and neck openings. I suggest shimming these on the rear with ABS strips and E-6000 to prevent it. Let's start with the chest plate: Note how the ones below (including the back plate) have either no or minimal edges with no cracks or splits. Now here is a screen used one with a pretty prominent edge, Notice the stress crack. Now, onto the ab/kidney/back plate: To keep them in line and prevent them from overlapping, it is suggested that you LEAVE a fair amount of the edges on the top/bottoms of the kidney and bottom of the back plate, especially if using the "classic" strapping method. Yes, these can split/crack as well but not normally. Shoulder Bells Trimming off the entire edge on the bottoms is not only screen accurate (first two photos), it allows them to rest close to the bicep (bottom photo). Third photo shows "suggested" trim lines (red) of an untrimmed bicep. My recommendation is the blue line. Biceps/forearms For sheer comfort and a sleeker look, I recommend removing ALL of the top and bottom edges before fitting/gluing them. First, no one sees the tops (covered by the shoulder bell) and the bottoms can cut into your arms (armor bite). Suggested cut lines in red. Again, if you do get armor bite you will have to take them both completely apart, remove the edge and re-fit. Better to think ahead. Some (myself included) like to leave a bit of the return edge on the outside of the top of the forearm for a thicker look. However, I highly suggest removing all from the inside part (the "scoop") where your arm bends. Again, an armor bite issue. This should also be done BEFORE final fitting. Here are some screen used examples: For level 3 (Centurion) all of the return edge on the wrist opening must be removed, including the area inside the "hump" as seen below: Posterior (butt) plate: Again, it is suggested that you leave some of the return edge on the top (and bottom in most cases) to keep it from riding under/over the kidney. Now, the BOTTOM of the posterior plate is where we often find splitting issues. Should you leave some return edge? Sure! BUT(T), when trimming the corners, (see below) be SURE not to give it a sharp angle... this is where the trouble usually starts. Instead, give it a slightly rounded angle (as shown in green). Thigh tops The tops of the thighs are where we see a lot of questions. I recommend removing all the return edges from the entire upper parts, and here is why: As mentioned above, you will be doing a lot of walking. If you have the edges (or at least a large portion of them) intact, the friction and inside facing angles can really chafe the heck out of you, especially on the inside of the groin area. (Ouch). If there are sharp edges/points on the tops (below) these will poke into you. When trimming these, just follow the existing line. Also, if you do your final fitting, glue everything together and find this out afterward, you will have to take the entire thing apart, remove the return edges, trim down the sides and then re-build/glue them back together. The reason is that afterward the opening will be entirely too large and you will have a giant gap all the way around. Not a good look. Easier to do it beforehand, trust me. As seen below, there were no return edges (or at least minimal ones) used in the films. Sniper knee plate The bottom of this piece is an area often not trimmed enough. To allow it to sit flat (or very close to flat) against the top of the calf enough for the glue to adhere properly I suggest removing most if not all of the bottom edge. Note how in the first and third photos how the sniper knee is parallel to the front of the calf. Last up, a photo that best illustrates my point about return edges and how they were not really present in many places on ANH armor. *** Example 1. of what happens when you have to reduce the return edge(s) after attaching cover strips. NOTE: For the example below I am using an ATA bicep (first 3 photos). Be aware that ATA makes the "suggested" cut line on their return edges pretty slim (a GREAT thing in my opinion). As seen on the armor in the 4th photo, if followed, the "suggested" cut line makes the return edges much wider (red line). Top view Bottom view For the purposes of this tutorial, we will assume that the ATA has those wider suggested return edges. Okay, let's say you really like the thicker look the return edges give your armor, so you left them pretty wide during fitting and then glued on the cover strips. Enough to get your arm through with a little extra room. Should be good to go, correct? BUT, you find that after having your arm bent for a while they cut into you (armor bite), so you find you have to reduce or remove most or all of it. No biggie, right? Just break out the Lexan scissors or Dremel and cut away, leaving the cover strips attached. Easy! So you remove it and then you run into the fact that the opening is now enormous. This is not a good look, and can result in the piece(s) jangling around and not being approvable at higher levels (or even Basic depending on your GML). What I am getting at with the above info. is that if you decide to remove them, it's better to do it before final fitting/gluing. Side note: Many biceps have an unusual shape at the tops (in red, below) normally located on the inside. This can be completely removed. Doing this will not affect approval at any level, and is screen accurate. It sits under the shoulder bell so no one sees it anyway! Screen used bicep USELESS TRIVIA: Many have asked about the "thumbprint" that many armorers have on the left bicep (screen used example below). Some think it is so you can tell them apart, but I was speaking with Brian Muir a few years ago (he sculpted the original armor used in ANH) and asked him about it: "To be honest, I have no idea... it was not in my original sculpt, and must have been a mistake in casting". There you have it. *** EXAMPLE 2: What causes cracks/splits: ABS bends pretty well, just as it's designed to. BUT, when there are return edges involved that changes the game. For the below example I used a 2 inch wide strip of ABS with a 1/2 inch "return edge". Looks pretty solid, right? That's because the edge provides stability. Now I am bending it up/in to simulate use over time. (More than it normally gets bent in many cases, but only to prove a point). That stress has got to go somewhere, and it's the return edge that takes it all and gives way, again causing cracks/splits. The red arrow shows a weak area where the stress in concentrated and cracks can form. Even if trimmed off afterward that area will be prone to splitting, so a small shim behind it is suggested. To sum it up, return edges are not meant to bend a lot. I suggest inspecting your armor occasionally to spot any existing/potential cracks/splits so that you can catch them before they get worse. I hope this helps answer any basic questions you may have, and always feel free to ask more detailed ones here or offer differing opinions.1 point
-
Hey troopers. My first shadow build. Started with this BBB here. Got some rough trimming out the way All pieces cleaned and rough trimmed1 point
-
Hi guys! im new in the forum. Last two months i have been using my weekends to assamble my shadowtrooper kit. At first it has been difficult to find help, here in my country, we were under lockdown and couldn get much help from the peruvian members at that time. Any way now i have made some advance: My problems started with two parts, one in the leg and another in the arm. First ill show you the arm This type of cut i dont have it the "good part". What should i do? just cut it? Then the leg, oh the leg. It was a huge problem, it wasnt correctly molded I use that white paint to reference how it should look, the i started using a heat pistol and trimming Im not sure if its to far damaged to be used... PS: Big thanks to this forum, without your help i couldnt have even started1 point
-
Name: Greg Schlueter Username: Greg S TK-25034 Southern California Garrison Orange County Squad Height: 6 ft. Weight: 210 Armor Maker: AM Helmet Maker: AM Helmet Electronics: @ukswrath Boot Maker: Imperial Boots Canvas Belt: Trooper Bay Rubber Hand Plates: @justjoseph63 Neck Seal: Darmans Props Holster: Darmans Props Under Suit: 2-piece lycra EIB Link:1 point
-
Fantastic job Arthur, congrats on #41 point
-
Anovos just the bucket1 point
-
Anovos shadow kit bucket1 point
-
You da Trooper!!1 point
-
Thank you! Ugh, those photos are only there to show the side connectors under the arm, so I didn't retake them... but I "fixed" it for you!1 point
-
Congratulations Arthur1 point
-
Congratulations Trooper !!1 point
-
Congratulations Arthur1 point
-
1 point
-
Congratulations once again Arthur1 point
-
Nice I am going to be starting my shadow trooper build soon also. Good luck.1 point
-
Agreed! That is for sure. Okay Tino, the project is there for you to challenge! Armor and blaster! Get this completed and submit to LFL and maybe we can see it in a TV show or movie!1 point
-
Updated the pics from the back after trimming my posterior and fiddling with my strapping!1 point
-
Nice work trooper, could you also post a close up photo of your side ab/kidney rivets (without belt) Good luck with approval1 point
-
So after a very long hiatus on the boards; I’ve returned. I picked up a 3D printed shoretrooper helmet kit off Etsy for relatively short coin and it finally arrived the other day. This place has been nothing but helpful and encouraging for past builds so it was almost instinctive to log back in and post. I’ll attach pics of the bucket after unboxing. https://postimg.cc/gallery/vHXxWVM1 point
-
Or why wait? I spent a good part of the day trimming the ears again. I think they both look a lot better. For the left side (looking at) I really trimmed it done. For the right side, I moved it up as far as I could and trimmed it down. I'm really glad I didn't have to break out the second set of ears.1 point
-
With any warped pieces I use a heat gun (use a hot water bath for the unexperienced) and blocks of wood, once heated sandwich the plastic with the wood and move around, this works better if the wood is shaped to the deserved curve of the plastic. Can be a tedious process as the plastic will try to settle to it's original shape so you have to keep moving the blocks around until it's finally cooled.1 point
-
Great job. Looks amazing.1 point
-
Progress is being made. The 3d printer is setup and working. I think my workspace is well stocked for the build and just needs a little more organizing before it's ready. In exciting news, ATA informed me that my armor is being made this weekend. Since most of my prep work is done, and I've gone through what was a miserable time setting up the 3d printer, I haven't done too much build related until this morning. Right now the E6000 is drying on the flexible guards for me gloves. I also started the mannequin stand early in the week and hope to have that finished and painted today.1 point
-
received new orders with proper information here https://www.501st.com/members/displaymember.php?userID=31767&costumeID=326 THX1 point
-
I haven't tried that because I had no idea what his profile was lol. Thanks for showing me!1 point
-
The aurebesh came out great! If you are looking for a more worn look I guess you could do a little chipping to the letters, but I like it as it is. The hose idea is another cool mod for this helmet. I think this helmet needs a full set or armor and backpack to go with it.1 point
-
This is a superb project, Tino. An, as always, brilliantly documented. :-)1 point
-
4 years later... I've finally started making progress! I think the arms are done. I've taken them apart several times to adjust the fit (E6000 is great!). They still seem pretty big, but I feel like I've already removed a lot of plastic. Return edge has been removed from the wrists. No hooks on the biceps yet. Pauldrons: Elastic scavenged from Anovos strapping, per ukswrath's build thread, with size 10 snaps. Hands: Latex Trooperbay handguards, superglued to stock Anovos gloves. I orginally tried using E6000, but it didn't stick. I'm having some problems with the latex tearing near the thumbs, but it sounds like that is normal. Thermal Detonator is complete. Tube was painted with Testor's 1923 Gunship Gray. The screws are #4 Pan Head Slotted, painted semi gloss black. The brackets are stock Anovos, for now. I have also started on the shins. I think I have them correctly matched. Sniper knee is above the one that I think is the left shin. The back of the shins will be challenging.1 point
-
In the last update the brown MUJI box got added to the 'utility belt' and I thought about what it could be for. A red cross came in my mind but we all know there is no 'First Aid' in the Star Wars Universe – there is Bacta. That made me think of something else - and that belt looked so empty with nothing else attached to it… Looks okay, maybe I change it later because the canister wobbles a little and the wires can be seen... In the opening post I mentioned gaps between face plate and blast shield. These needed to get filled. Did that with some black foam - plus something to hide the foam… The original plan was to have cable ties also on the rear ends of the flashlights. But they perfectly fit between the ear caps and the blast shield, additional cable ties aren't needed for that display piece. List of modifications so far: 1 - Blast Shield 2 - Black Interior 3 - Two-tone paint job 4 - Antenna and radio 5 - Utility belt 6 - Universal supply box 7 - Bacta canister 8 - Helmet flashlights Next update comes in one week. Thank you for reading.1 point
-
Looks Amazing Justin.1 point
-
More work done, here is the progress. And then things got weird... Next update probably comes next Friday. List of modifications so far: 1 - Blast Shield 2 - Black Interior 3 - Two-tone paint job 4 - Antenna and radio 5 - Utility belt 6 - Universal supply box Have a nice weekend.1 point
-
Okay, today we will finally see the color on that last unpainted piece of the helmet. But first to the teeth... Before painting the teeth, I first had to do the lower face. The two-toned paint job on this helmet helps to make it look like the lower section is a removable part that can be changed if damaged. I wanted this to have a metal-like appearance to give the impression of a new unpainted part and that these helmets are being made from Durasteel. A simple silver paint was not sufficient, so I checked my cans of Humbrol Metal Cote but 27001 was too bright and the rest was too dark. More weathering (later) will help to darken the silver. Hard to see on these photos but the brush strokes and the 2 layers of polished Humbrol Metal Cote really worked good. List of modifications so far: 1 - Blast Shield 2 - Black Interior 3 - Two-tone paint job Have a nice weekend Troopers and Cadets1 point
-
Welcome to the FISD! Good luck on your build.1 point
-
Welcome aboard future trooper !1 point
-
Welcome aboard Chris, look forward to your build thread and following your journey.1 point
-
Welcome to the FISD! Can't wait to see your build thread. I love my ANH ATA kit, it will be cool to see an ESB build.1 point
-
Hello Chris, Welcome to FISD.1 point
-
Welcome Chris. Can't wait to see your build brother. Good luck and reach out if you need any help. Welcome to FISD.1 point
-
Hello and welcome to the forums, I have ATA and they are a great strong kit. Looking forward to seeing your BBB photos and then your build.1 point
-
Hey Chris welcome to the FISD. Look forward to your build thread.1 point
-
Hey guys. I've started making black TX belts out of a cotton/polyester blend fabric with the plastic insterts the whole length of the belt (between the velcro ends). Check out the details on the "Ongoing Projects/Runs" belt thread. Rob "TKittell" Kittell $30 US, $35 International1 point