Leaderboard


Popular Content
Showing content with the highest reputation on 01/07/2021 in all areas
-
Command Staff added 8/1/2021

 2 points
 -
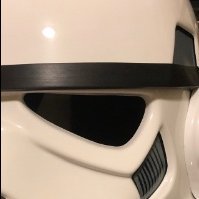
Hi folks! I've had lots of people ask about various details regarding how I did my helmet interior. So, I thought it may be wise to just summarize it all so others may learn things or try to replicate some/all aspects of what I did. My goal was to have all my electronics systems embedded inside my helmet, with individually switchable systems, whilst all being very clean and hidden along with a blacked out look. No problem right? For reference, this is what the interior looks like. Note that inside there I have 3 battery banks, four fans, a powered condensed microphone, the iComm unit and an Aker amplifier, all attached to a switchbox: Ok so I quickly found out that it would take quite a wall of text to summarize how to do this build, so I decided to throw a video together to summarize it all instead! https://youtu.be/eYeUpAHOSHM The basic gist is this: 1) Black out your bucket as you desire, I used 1/4" thick neoprene to line it. 2) Create a junction box by leveraging your hovi bolts onto a custom backplate which your switch box also get screwed into. 3) Refine your project box so it has the right size and number of switches for your application (I have 3 subsystems, others may have more or less). 4) For every one of your systems make a custom harness where the electronics run through your switch to its power source, ensure that the switch is the only mechanism to turn it on (so if the electronics had their own switch keep it stuck in the on position and let the switch you use at the project box be the one that controls it). 5) Using high quality velcro, mount all your electronics up at the top, and/or your fans at the bottom. 6) Route all of your wires that need to run from your electronics down to the switchbox in a clean loop, and everything else tied down neatly at the top. Use tubing to wrap the wiring with the least amount of wire and tubing required. 7) Add velcro to the bottoms of your electronics at top and add black padding to hide it all and make a comfortable fit. 8) Use any extra helmet padding as necessary to ensure you have a solid and snug fit. 9) Optional step: You may want to do this at the start but have your eye lenses done up in a manner that will work well with the clean look of your interior (see my other howto to check out how I did mine). Here are some helpful detail shots that highlight some of what I was referring to within the video. One shows all the bare electronics before any lining or hiding was performed at the top. Another shows a detail of the swicthbox at the bottom to show how the hovi bolts and the project switch box mount into the backplate. Here are some links to the more unique or non common materials I used: Project box: https://www.amazon.com/gp/product/B0002BBQNM Flip switches: https://www.amazon.com/gp/product/B001JT7D0G Neoprene lining: https://www.amazon.com/gp/product/B00488DB10 Helmet padding: https://www.amazon.com/gp/product/B00A4TNQ8A 12V fans: https://www.amazon.com/gp/product/B015S5XFJE 12V battery box: https://www.amazon.com/gp/product/B00VE7HBMS All right folks, enjoy and I hope this helps you with your own helmet builds. Post any questions or your own interiors!1 point
-
Hi gang ! So my good pal @stevechewbacca finaly pushed me over the edge and I am starting to get things in order to make a mando episode 8 incinerator trooper. I am not the crafty type, so I will need a lot of help. EDIT : I have added a bit of formating and color coding so that it may be of some help for others (also helps me keep track of stuff). On to the parts : Imperial boots - boots : ordered 09 january 2021 (154.90 USD / 130.69€) + 43€ for customs Added to production backlog by IB on January 10th Received January 20th / wrong boots, got regular TK instead of R1 TK Sent a contact form inquiry through IB website. (Not sure if worked) 20/01 Sent an actual email to IB for inquiry with picture of the wrong boots on 21/01 22/01 : IB replied that the issue would be resolved next week Received February 3rd thanks IB for promptly fixing my little issue Endors finders - gloves : ordered 10 january 2021 (72 USD / 61.52€) Shipped 13th january Received January 20th Darkside closet - underwear : Pauldron : Found my grey pauldron, wife is confident it can be painted red Now the hard part : the armor and helmet. Steve mentioned jimmyroquai and 850armorworks but more advice would be appreciated. In particular I would like to have a helmet that match the armor. I don't mind painting the red strips, but going full automotive paint on the whole armor to have a matching white is a path I rather not go. 24/04/2021 : I went with Jimmyroquai in then end, couldn't be happier. The armor is super crisp, the details are amazing. Still needs painting, but it's pretty well finished already, I am less concerned. I am still looking for a pro to do the painting, because hey it's a 1000 euros worth of armor, better have it done right if possible (depending on the cost obviously). Armor from jimmyroquai 40% Downpayment sent on january 21th - 293.29 euros Rest of the payment sent on 07th April + shipping : 629.14 euros Scheduled drop on Tuesday 20/04/2021 : 107 euros for customs Dropped on thursday 22/04/2021 total cost : 1029.43 euros Zippo from Marko Makaj STL Files Delivered in minutes ! (30 USD / 25,88 EUR) 3D Printer : Artillery Sidewinder X1 Ordered on April 12th (357.45 EUR) Received on April 16th Thank you gals and guys for the help, looking forward to flaming away1 point
-
the last supper Oath of the Horatii1 point
-
I didn’t even think about it being PVC... that would explain the slight difference in translucence and thickness too. We’ll see I guess!1 point
-
You will find quite a few shore troopers and death troopers have been 3D printed and legion approved. Hardest part if finding an accurate set of 3D files, they are becoming more common for newer costumes and 3D modeling has really been taking off in the last few years. There are OTTK (ANH) 3D files available to purchase here (although I'm not aware of anyone completing them) You can find other 3D files in this section1 point
-
At some stage I will have to check a few areas as at first I was only updating photobucket watermarked images and not updating links, until tackling full areas. Added what I believe are the completed areas that Andrew and I have been through not done yet in progress completed (Command Staff) (Extended Staff) Communications Center Announcements Forum Help & Support New Recruits Getting Started - Read this First! FISD Guidelines 501st and Detachment Access Requests New Member Introductions Newly Approved Members - Sound Off! Enlisted Barracks Off Topic Field Training Exercises 501st & Detachment Members 501st General Discussion 501st For Sale/Trade Detachment Only - General Discussion - Election Archives - Poll Archives Detachment Merchandise - Trading Cards Events Fire Team Area Advanced Tactics TK Pre-Approvals - TK Pre-Approval Questions & Discussion - Request TK Pre-Approval Expert Infantryman Program - FISD Expert Infantryman Badge (EIB Requirements - Request Expert Infantryman Status FISD Centurion Program - FISD Centurion Requirements - Request Centurion Status FISD Master Armorer Program The Replica Section Imperial Commissary For Sale/Trade (Personal Items Only) - For Sale - Archive Ongoing Sales & Project Runs eBay Armor Armory Hard Armor (General Discussion) /Glen & Andrew Assembly, Mods, and Painting - Tutorials, Tips and HOWTOs - Templates and Blueprints Boots, Soft Parts, and other Accessories Electronics for Helmets / Blasters 3D Parts and Technical - 3D File Depository - 3D Printer owners - 3D CAD Designers and Tinkerers FISD 3D Contributor Program The Foundry - Armor and Prop Making Costuming And Builds Original Trilogy (501st Approved) Rogue One - Rogue One Build Threads ANH (Stunt and Hero) - ANH Build Threads ESB Stormtrooper - ESB Build Threads ROTJ Stormtrooper - ROTJ Build Threads First Order Battle Group Costuming and Builds First Order (501st Approved) - TFA Stormtrooper > TFA Build Threads > Garrison Titan FOTK Build Area - TLJ Stormtrooper > TLJ Build Threads - TROS Stormtrooper > Rise of Skywalker Build Threads - Captain Phasma - TFA and TLJ > Captain Phasma Build Threads - Captain Cardinal > Captain Cardinal Build Threads - Commander Pyre > Commander Pyre Build Threads CRL's and check lists Quick access Weapons of the First Order Quick find resources Gallery & Research Costuming and Builds - EU (501st Approved) Heavy Weapons Trooper - HWT Build Threads Stormtrooper Commander - TKC Build Threads Incinerator Trooper - INC Build Threads Sky Trooper - SKY Build Threads Death Trooper - Death Trooper Build Threads Battlefront DICE Shocktrooper Star Wars Rebels - Rebels TK Build Threads Concept Armor - MQ Build Threads Legacy Stormtrooper (Joker Squad) - Legacy Stormtrooper Build Threads Weapons Locker General Weapons Discussion BlasTech E11 - ANH BlasTech E11 - ESB BlasTech E11 - ROTJ BlasTech E11 - TKC BlasTech E11 - R1 BlasTech E11 BlasTech SE-14R BlasTech DLT-19 MiniMag PTL Missile Launcher, T-21, RT-97C (MG-15) BlasTech DC-15A and DC-15S TK Lightsabers Flamethrower (Plasma Rifle) Recon (non TK 501st approved) Kasyyyk Stormtrooper The Force Unleashed Stormtrooper Other 501st Costumes Other Non-Approved Star Wars Costumes Non Star Wars Costuming Imperial Embassies /Danny Ayuda en español Unterstützung auf Deutsch Praesidium Italica 银河帝国中华大使馆 Section Française 日本語 Kiosk Русскоязычный форум Recasting Discussion Recasting Discussion TO BE DONE "Dead Post Links & Broken Photos" Threads too big contacted authors page 3 & 4 Also a majority of members signatures with watermarked photobucket images have been removed, members can fix those themselves1 point
-
And I’m IN!!! Newly minted TK-16900 reporting. Thanks for all the help and encouragement1 point
-
Thank you Tony and thank you for the amazing pieces for my helmets.1 point
-
Thank you brother appreciate it.1 point
-
The helmet interior is looking a lot messier already, but i'm not quite done yet. The mic and speaker cables are still missing, I'll have to remove the ears to put them in. I'm leaving out the wireless reciever for the TK-chatter entirely, since the mp3-player is just about the same size anyway, and it fits perfectly next to my fan switch. The mic needs to sit uncomfortably close to my lips for it to trigger the icomm, but I got it all to work for now. Perhaps i'll get another mic some day. My blaster from imperial warfighters is now coming, it should be here in a couple of days Meanwhile the German Garrison is still having massive troubles with their e-mail servers making it impossible for them to process my application to the 501st.1 point
-
There are also post that were rectified as we discovered them. Before Glen went to a systematic approach. I think we will need to review some of the sections to make sure we get the bulk of the useful ones covered.1 point
-
Hi Jeff! Posting up a photo would help immensely. Have you removed all the return edges from the bottom(s)? If not, this will help and is screen accurate. There are ways to loosen them, but they will more than likely require removing the cover strips (not as difficult as you may think).1 point
-
Thanks! I may have to order from Trooperbay as my selection here on Maui is pretty small and in short supply.1 point
-
I know you can find paints on ebay or trooperbay stocks them https://trooperbay.com/catalogsearch/result/?q=humbrol1 point
-
I'm kinda tip-toeing through it hoping things will ease up and we can have a costume party, where I can actually see a finsished product and ask questions.1 point
-
I'm just getting started and more than a little overwhelmed by all the decisions. So far I built the thermal detonator, and I cut out the eye holes and teeth from the helmet. Every time I start on anything else, where to cut and how far to trim gets really vague as the YT video guys zoom through their 22nd build and don't seem to agree with each other. With RS Props armor, I don't relish the idea of having to order new pieces from them. Also, measure once, cut three times.1 point
-
There are different versions from Doopy Doos Hasbro add on https://www.doopydoos.com/stormtrooper-e11-hasbro-blaster-conversion-skin-kit-mk2-2636-p.asp Pipe build https://www.doopydoos.com/stormtrooper-e-11-pipe-blaster-base-detailing-kit-2068-p.asp Full build https://www.doopydoos.com/stormtrooper-e-11-complete-anh-e-11-blaster-kit-offer-2685-p.asp Completed https://www.doopydoos.com/ultimate-stormtrooper-anh-e-11-blaster-1742-p.asp1 point
-
I ended up using questdesigncanada on Etsy, I’ve seen lots of guys with his blasters and the communication between him and I have been fantastic. It’s taken a bit longer than originally expected but he’s kept me in the loop and I know exactly where it is currently. 10/10 would recommend1 point
-
Looking forward to seeing that finished helmet1 point
-
Small update to get the new year started! Currently in the process of taping off and getting ready to paint the brow, teeth, and neck rim. After that it's the 501st marking and tube stripes. Also the past 2 months I've gotten 2 new blasters for my collection: A DC-15s for my Clone build, and a E-11 (which does have lights for blaster and stun settings) for my StormClone! In reality the in-game model uses the ANH version, which I did own at one point... till it broke at a con and I always liked the RotJ version the most, so for now that's my stand-in. Hopefully next post will be an almost finished painted helmet1 point
-
Update: I have not died nor have I forgotten about this, even though it seems like it. I’ve just been busier with the holidays and other, more pressing things than I was expecting. Also it’s difficult to work on anything substantial at my mom’s apartment since there’s not much space at all, inside or outdoors. I go back to school on Jan 14. We’re going back later than normal, so I won’t have a spring break. In other words, the next time I’ll be able to begin working on this is May... Ugh. That’s it for now, just giving a quick update with where I am irl and why this page hasn’t been updated in some time.1 point
-
I think Doopydoos has left the stage on producing E-11's, sad to say. I LOVE their kits and have built a few of them, but I have been on the waiting list for almost 5 months with no reply. I have emailed them several times as well to no avail.1 point
-
Built this custom e11 with real vintage gold back eagle Hengstler counter, mag , power cylinders and M40 sherman tank scope1 point