Leaderboard


Popular Content
Showing content with the highest reputation on 10/01/2020 in Posts
-
The shoulder bridges are now finished. I may trim the front tab a little more to give it a 'Han look', but very happy with the reinforcements. They are SO sturdy. After glueing in internal strips, the forearms are now being glued together. At this rate I should be able to do one last fitting on the weekend them begin glueing cover strips. I am also wondering if you can ever have too many magnets...?!3 points
-
We have finally started strapping this TK. For the strapping you will need some tools, some of these you can work around like using the soldering iron to seal the ends of the webbing; however, having the tools makes everything easier. Sewing machine with nylon thread (preferred-straight stich industrial sewing machine with #69 bonded nylon thread) Old soldering iron (to melt holes in the webbing for snaps) Hot knife (to cut and seal the end of the webbing) Snap setter die and a hammer Exacto knife and straight edge to cut Velcro For some reason, I run into a lost of people who do not know how to sew or are too intimidated by sewing. Honestly is very easy to learn and if you into cosplay and costuming, it’s a skill you really should learn. There are a ton of videos on YouTube on how to sew. For the strapping, you really only need to know how to start and end a stitch (back stitch/ lock stitch), sew a straight stitch, and sew a box stitch. https://www.youtube.com/watch?v=rnTwT-ifLkU Corset Zipper Closure. We used black neoprene fabric, a 9” 2-part zipper (that means it comes completely separated when un-zipped, like a jacket zipper), and some 2” wide Velcro. After all the measuring, cutting and sewing here is the corset closure. Apply the soft Velcro inside the abdominal armor and simply attach the corset closure. This is very similar to how the actual screen used ROTKs were done. The brilliance of this method is that the neoprene is elastic and expands and contracts as you breath and move. Additionally, the attachment method to the armor is stupid simple and adjustable up to 1” in each direction. Unfortunately, it will be almost impossible to close this zipper without the assistance of an additional person. Shoulder Harness for the Abdominal Armor We used 1.5” wide black nylon webbing for the harness. So, you would need at least 3 yards of the webbing, 4 plastic 1.5” loops, 4 four-part #24 snap sets, and 2” wide Velcro. Start by making the 4 attachment points. Although ours are not all the same size, it really does not matter. Start with 4 straps 5” long. Fold in half around the plastic loop then stitch along the edges in a square. Do not sew a box stitch (a crisscross x pattern inside the square) since you will be melting a hole in the webbing for the snap. Melt the hole large enough for the snap stem to pass through with the soldering iron. This is what you should end up with. Next, you need to measure how long the shoulder harness will be. I had Kyle put the abdomen on and then I marked where all 4 attachment points will go. Then I measured from the top of the armor from one of the back attachment points to the top of the armor for the corresponding front attachment point. Keep in mind that the straps will crisscross in the back. For Kyle that was 33” so I added 3” to each end and cut two straps at 39”. Next, we cut 4 pieces of hard Velcro at 3” x 1.5” and 4 pieces of soft Velcro at 4” x 1.5”. Since we were using adhesive backed Velcro, we stuck it directly to the strap. If you are using sew on Velcro, you can use some hot glue to hold the Velcro in place until it is sewn. You will want to apply the hard Velcro to the ends of the strap and the soft Velcro about ½” past the hard Velcro (see picture below). Next, using a box stitch, sew the Velcro to the webbing. Next, attach the #24 snap cap and socket to the webbing attachment points that have the loops and melted holes. We used scrap ABS strips to attach the other end of the snaps to the armor. In this picture you can see a piece of ABS that I heated up with a heat gun then using gloves I formed it to conform to the inside of the armor where I wanted to mount it. NOTE- do not use a heat gun on the armor or you will deform it. Heat the ABS away from the armor and only until it becomes flexible then quickly lay it inside the armor and hold it in place till it cools. Since the place I am mounting the front snap is on top of a recessed section, I cut an additional piece of ABS to fill in the gap a bit. Drill a hole in the ABS that is large enough for the snap stem then set the eyelet and stud in the ABS with the die. Lastly glue the ABS to the armor with CA glue and clamp in place of use a CA glue accelerator like we did. Next, I did a similar process on the inside of the back of the armor, except there was no need for the filler piece. Next, snap the attachment points in place then run the straps through the plastic loops. I had Kyle put the abdomen on then adjusted the straps at each attachment point. Since the straps have Velcro, you should be able to adjust them several inches at each attachment point. And that is where we are currently.2 points
-
Ok, so i used some alcohol and bought a dremel tool to carefully remove the old glue and it worked! [emoji16][emoji1303] ive applied some E6000 and will not let it rest for 48 hours. Also recieved and applied some screen mesh “raam hor” for the mouth piece from marcel (Darthmarcess) big thumbs up for everybody and especially marcel for helping me along the way of making this prop legion ready! See pics for result. Verzonden vanaf mijn iPhone met Tapatalk2 points
-
Progress Report - 9/30/20 So that extended piece on the spats connector wasnt working out after all. There was too much force wanting to pull them apart and on the left shin the spats were still coming apart even though on the right it was barely making it. So I decided to bite the bullet and cut into the spats to extend them. I cut them in the front since the spats come together at an angle there and put an angled shim there. Going to go over it with ABS paste to make it seemless later, but now with this extension the spats are no longer an issue. Going to need some velcro to keep these in place when they are finished. Got one of my blasters in the mail! Very exciting! Seems like a nice quality print and it already came in the right colors which is nice. Just need to clean them up, smooth them out then hit them with primer and paint and throw them together. Also on the fence about adding leds to this one. It's mostly just going to hang out on the holster, but it would be nice if it lit up like the F11D. Still waiting on that bad boy to come through the mail. I think I need some metal mounting hardware to go on this too if I'm right. Assembled my biceps. I was worried about my cuts at first but once they were put together things seemed to line up ok. And yes! I remembered to overlap the insides! My mobility definitely took a hit though, taking the helmet on and off is gonna be a challenge LOL Can barely do it with just this on, with the chest armor and everything else that will eventually be on me I think it may be impossible. I may have to admit l need a helper here xD I think I'm going to trim the insides of this forearm a bit more. The edges are really cutting into my hands and its uncomfortable, not to mention I dont want them to damage my gloves over time. With the extremities mostly put together its about time to take the chest stuff out of the bin and get back to work on those.2 points
-
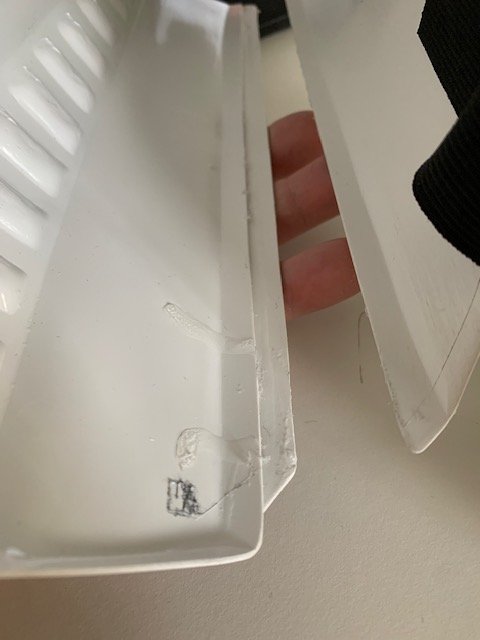
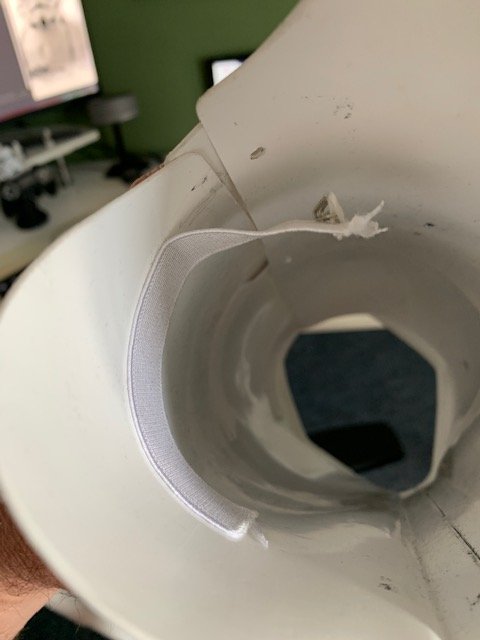
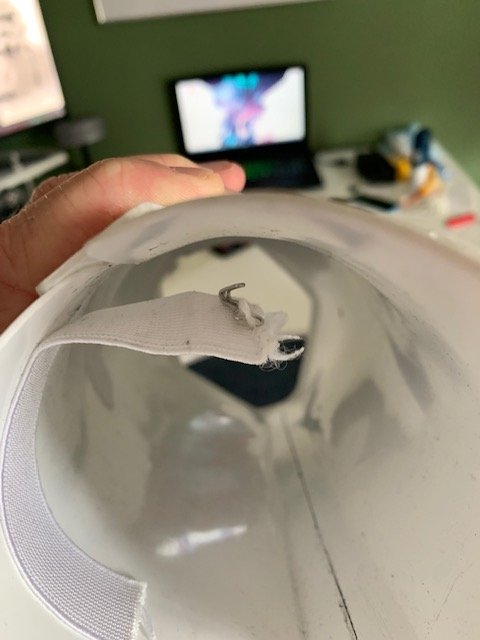
Hi All, Let me introduce myself, i am Dennis Zaan from The Netherlands, almost ready to serve the empire I am a Star Wars fan since i was just a little boy. And also me and my dad thick as thieves when it comes to Star Wars. Unfortunately my dad past away a month ago, 2 days after the Prop came in Too bad he could not see me wear the Prop. So that's also a reason i want to make the prop perfect as possible. Now i have received my full commission of a Stormtrooper ANH Stunt, i know that the prop should be ready to wear but still i have to do some mods to make it movie like before trying to enter the legion. now i have some questions regarding the prop. 1. What kind of solution can i safely use for removing old glue and for de-greasing it? Reason why i ask this is that the strip let loose (see picture) after wearing it one time, the glue you see on the picture is the glue being used by RSpropmasters not sure about the solution used. I am a beginner at this so i will be using magnets and E6000 glue for re-attaching it. 2. What kind of material can i use for the Vocal (Mouth piece at the back)? (see picture) 3. I want to re-attach the clip for the lower leg piece that came loose after wearing it one time and maybe use a thicker elastic. What kind of elastic can i the best? Hopefully you can answers my questions, and sorry upfront if my English is not that great. PS. reason why i have not send it back to RSpropmaster is because i want to learn to repair it myself and not wait a long time before receiving it back. Kind regards, Dennis Zaan

 1 point
 -
Hello my name is Mike TK 99332 . I just joined the 501st big family few weeks ago. I am based at the french garrison as a stormtrooper ESB. I am ready to serve the empire and being a bad guy doing good ! May the Force be with you all.1 point
-
Maybe I'll consider E6000 as my backup, since it'll be just as permanent as rivets (unless the paint rips off).1 point
-
This is why I went off Rustoleum paints, the consistency has never been good, you can go a few cans and no issues then you use another can and disaster, I'm not sure if it's shelf life, mix or not enough shaking but was just too inconsistent to keep using. For difficult pin holes that keep popping up I use something sharp and open the hole a little more, then add some bondo (automotive filler) sand and usually that fixes the problem E6000 is pretty strong and if left for long enough should work fine, keeps cover strips on OT armor so I don't think you will have any issues. Normal drying time can vary, I like to go 24 to 48 hours before putting any pressure on. You can also clean off any excess by rubbing it off. The magnetic sheets I've seen here are not very strong so I don't think they will work for you. There is also double sided tape but you would need to go for a thin industrial type, not sure how easy that would be to find.1 point
-
So far its been a pleasure communicating with them. I was able to get a status update today in fact. Helmet is finished. Chest is finished. Back is finished. Remaining pieces are being formed now, and are expected to go to assembly next week. If all goes accordingly, I should have the armor in my possession by my birthday. What a gift!!1 point
-
i just tested the new pcb board where i replaced the led drivers with 3 small transistors and it was working fine if there wasn't an error on the original scheme (i used a differente transistor schematic) so i have to reprint another stock1 point
-
Welcome to FISD! Body type plays a large part in the selection process, there are armors that are better suited for "husky" and taller troopers as well as "aren't you a little short to be a stormtrooper" versions. Ask questions before you buy, you wallet will thank you. Looking forward to a BBB day!1 point
-
A quick update on parts collection. Looks like everything fits well so far. The radio box doesn't overhang as much as the photo suggests.
 1 point
 -
I would say yes, as long as it is comfortable, even try a combination of adjustments. lower the Ab/cod, take a photo and see how it looks. Lower the chest plate slightly, again take a photo and see how it looks. Work out which feels the best, vs looks the best. Don't be too concerned about your helmet not resting on your chest plate, everyone is different shape and size so it's not going to be a decider in any approval.1 point
-
I have been growing my hair for two years to donate it to the Little Princess Trust who make real hair wigs for children with cancer. I now have the required length to make the donation and will be getting it cut this month. However as with the COVID restrictions stopping any sort of trooping/charity fundraising I am going to get my beard and head shaved after the donation to raise funds for the Macmillan cancer nurses trust. So if you want to see me change from looking like Chewie to looking like Yoda while raising funds for a great charity please donate using the link below. Donation link1 point
-
I haven’t been able to work on my armor as much as I’d like to but I am a decent way through painting the armor. I have the DT built and screws painted. I’ll be getting a spare TD built with more accurate panel and brackets for the future. Next up is progress on my helmet. I’m pretty happy with the frown and chin, tears are a wip and I’ll need to completely redo the tube stripes for a third time. First time I used the wrong blue and used the button panel dark blue, so I cleaned that up. Second attempt I didn’t apply the paint correctly and still turned out wayyy too dark. Here is a pic before I clean this up. As for progress on the belt... I messed up big time trying to heat form it. I have a spare ABS belt that comes with the kit but I need one extra button. Everything else is fine though, and I should be getting the parts I need soon. Next up is the button panels. They are all painted and ready to be glued. Not sure if you can really tell from the picture but I was trying to ensure the paint doesn’t extend beyond the bottom as per the CRL. Gonna glue them on probably tomorrow. Oh, also got the ears painted. All that’s left for me to do is finish painting the helmet, finish assembling the helmet, fix the ABS Belt, and do the strapping for the arms. Hopefully I can get pictures of the final fitting once the belt is fixed.1 point
-
Thanks brother, appreciate it. Always.1 point
-
Excellent thank you Brian1 point
-
Just to let you know I am slowly working on my Bulldog44 links. Page 1 of my blaster build is almost done. Will try to make more progress on the other pages and scope topic soon.1 point
-
I have not and will do so thank you1 point
-
Have you tried contacting the maker of the armor. Just be careful getting one from another make of armor as shades of white can vary quite a lot.1 point
-
There are never enough when you want to build quickly1 point
-
Foam on the inside can definitely help to stop rotation on the forearms and biceps. Good news on the paint arrival1 point
-
I finally got to strap my forearms and greaves!! Each forearm has elastic straps velcro'd on. This is working pretty well at keeping the sides together while also giving a little stretch to don. I can slide them on, then put my gloves on, and slide them down a little to cover the wrists. The forearms rotate a little with my wrist, so I'll probably stick some foam padding near the elbow to hold them in place (but I'll wait to do a proper fitting first). I figure a small patch of velcro on my sleeves could help, but they might just rotate too. Any suggestions to stop the forearms from rotating? I used the same method on my shins, but just have a strip of hard velcro and 2 patches of soft on the calves. This lets me open the greaves clamshell without cracking (so far), so I can slip in my leg and press together those 2 velcro'd spots. I ran out of time and couldn't fully don my armor but my gloss white arrived so I can finish the thighs (hopefully) tomorrow! Then a few days and I'll fit them with the greaves and everything else.1 point
-
Heyhey and welcome! I definitely would not say definitively that "RS is the way to go" - they're one of several excellent options, but far from the end of the discussion, especially if you live outside of the UK and plan to troop frequently in your suit. You're definitely paying extra for the name, "lineage", and shipping. As to the ABS vs PVS debate, ABS armor is more accurate to the films and by far the most popular material currently, though it can yellow from UV unlike PVC. If you go RS, there are several threads floating around with info on what changes will be required before approval and higher level submission. ANH-Stunt is also by far the most popular TK variant, but there is something to be said for ESB (mine is growing on me and it's the 40th Anniversary!). You'll need all of your soft goods most likely, so have a look around at the vetted vendors and we can always make suggestions as well. I prefer to get my boots from Imperial Boots, holster and neckseal from Darman's Props, canvas belt from Imperial Issue, and I wear a Nike Pro compression suit with thin running gloves for trooping. They make a resin blaster, but I love my rubber blaster for trooping - check out Praetorian and Hellhounds if interested. Hope that info helps!1 point
-
RS are usually pretty good to go out of the box for basic (and not much for L3 even), and it seems like you've done solid research into many of the common things that need fixing/improving (kudos!), so you're off to a great start. I always say that RS are accurate to a fault though, and there are several things that can be done to improve them specifically for trooping vs display. Some things to watch for if not mentioned above: - I'd replace their thin (often wrinkled) acetate helmet lens with a more substantial plastic lens, as well as replacing the starfish with more comfortable padding (airsoft tactical pads work well or motorcycle or hardhat liners) - I personally use a black truck bedliner spray to black out my helmet and add a tiny bit of extra strength instead of Plastidip, which can peel and velcro/glue doesn't stick well to - I want to say their suits use the bracket assembly method by defaut, which can be prone to cracking your return edges and difficult to adjust - I'd leave the brackets themselves but switch to a velcro or even snap-based elastic/web strapping system personally - their Han and posterior snaps often come painted white, which we require to be removed to a natural finish - I always add some fuzzy velcro or craft foam to a couple key areas to prevent rubbing and damage to my armor - places like the back of the TD clips, the backside of any metal bits on the holster, the backside of the canvas belt attachments, and I add a little craft foam to the backs of my belt drop boxes to keep them from clattering quite as much You hit on many of the other common ones in your OP, so that's awesome. Even with a commission build, I'm stoked to see your enthusiasm and attention to detail! I hope your kit comes out awesome and of course, keep posting up if you need any help or feedback!1 point
-
Ok, I think I need to work on the shins before I take these further.1 point
-
Jeff, Thanks again for the insight; this is great. I probably should have gone with smaller buckles. I've ordered some for the thighs, but I really like how these 2" buckles feel. I did tighten them up as far as they would go, so unless I lose a lot of weight, I'll stick with them for the time being. Also, I saw @TheRascalKing's zipper enclosure and loved it, but ultimately leaned towards something I could cinch down. I've 3d printed all the parts for an E-11, but was experimenting with my settings during the print, so there's some horrible print lines. I haven't put up any pics of this build yet, because I kind of tossed them to the side. Here's a few: Despite the print quality, some parts came out great (grip, bolt), but some came out horrible (folding stock, top rail). Also, the barrel looks awesome, but it keeps breaking apart every time I bump it, that's why there's some pretty shoddy seams in the pic. The three sections of the barrel are kind of butt jointed together which creates a very weak link. I did pick up a 3 foot section of the correct size PVC pipe, so when I have a little time I may try again using that as my main tube. Also, if I ever get around to purchasing a resin 3d printer, blaster parts are some of the items I definitely want to make. Regarding a rubber blaster, I'm guessing it's similar to the rubber M-16s we had for training in the Marine Corps. If so, that may be a good bet. Finally, this weekend, my squad in Garrison Tyranus is hosting a virtual convention https://inferno-con.com/ (I'll be sitting on the 3d print panel Saturday at 1200). On Sunday, they're having a "socially distanced" photoshoot about 5 minutes away from my house. So, I'll be heading out there to meet everyone and see how the squad is trooping during these COVID times. It should be fun, plus I'll take the opportunity to check out everyone's blasters. If anyone's interested, check out the programing page here: https://inferno-con.com/programming.html1 point
-
Wooooooo! Go Ardeshir, you got this!1 point
-
Wow Ardeshir , One Man Army again !!! Great work mate! one of us will be with you shortly.1 point
-
Just catching up, but welcome Craig. RS you wont be disappointed at all, it's a very nice kit and it's great you have family also wanting to get involved.1 point
-
It's not so much the return edges as it is the lack of a gap between the butt plate and the top of the thighs, and it's not just an ESB thing, it was the same in ANH as seen below. In your ANH Stunt pic (4th photo) the return edge is present (not a biggie) but there is no overlap. This is not a huge deal for EI, but since I'm sure you will be headed for Centurion this may be mentioned. I honestly would not worry about buying a new plate, but I appreciate your enthusiasm!!! ANH references Photo 4 "Per ESB Helmet, this helmet copies the three stripes on the right ear and two stripes on the left ear" Not all of em'.. .1 point
-
Just a heads up - the use of elastic and hooks for closure of the shins is only an accuracy thing and not required for any level of approval.1 point
-
Gonna try that to see if I can improve the shape. In my panic, I added a shim where the 2 halves connect which may have solved my main issue. They still dont connect very pretty, but at least now they are not trying to come apart and they can actually stay together with masking tape long enough to get a few shots in. I need to find a way to connect these together, the neodymium magnets are too big to fit behind the greeblie clip that goes where these 2 halves connect and I feel like velcro is still too weak to hold these together while trooping. I'm very animated while in costume So I dont want parts coming off when I bust a pose. Gonna add this strip to the other spat and then gonna go see if I can reshape these with a heat gun I got from Ace Hardware. Last time I played around with heat with an iron it didnt go so well. Maybe this heat gun will go better.1 point
-
Thinking of trimming it to this point. Any thoughts?1 point
-
I think this looks much better1 point
-
Just found your thread - you are blazing through this build! Really exciting to see you make so much progress. Re: EIB 1000 unfortunately it is going to be too late for that, but please don't feel deterred - the L2 and L3 approvals are an honor, no matter what your number is. Agree with what the others say to not make any irreversible decisions until you have your undersuit and gaskets. I'm also jealous of all of the changes KB has been making to his kits - I have a v1 that is a much more complicated build. But at the end of the day, it's all excuses. Can't wait to follow your progress.1 point
-
Hi Jay, welcome to FISD. Read a lot...Ask a lot...It is not a problem... My wife didn't like SW very much at first ... But now, with the help of my kids, we've turned her to the dark side...Now that she doesn't hear me, I think she's Palpatine's sister Regards...1 point