Leaderboard


Popular Content
Showing content with the highest reputation on 09/25/2020 in Posts
-
Hi folks, Checking in today and I’ve just noticed I’ve reached 3000+ posts on this wonderful forum!! Wowza... For me, this all started back in 2017. I wanted to renovate my yellowing SDS helmet and stumbled across “whitearmor” on google. I followed some excellent videos by Mike of Trooperbay and resprayed that helmet. Following that, I read more and more on white armor and, not too far down the line, I bought my first helmet kit from Ross at RWA. I documented that here on FISD and received excellent support and advice. That was a big part of the build, helping and supporting the build. After finishing the build, along with the armor kit, and clearing it up to Centurion, I was asked if I’d like to join the Imperial Attaché team - “HELL YES”, I said. :-) I later joined the DO team, helping troopers reach THEIR goals of EIB and CENTURION. If it weren’t for the changing of the guard that year, I’d have likely carried on in the role, along with the legends that are Joseph and Tony. Alas, things changed, however, this year the FISD is back on track under the exquisite leadership of Andrew. Anyway, enough waffling from me. I just wanted to say a huge THANK YOU to the FISD community. I won’t get into shout outs as I don’t want to exclude anyone, however, I’m pretty sure many of you know who you are - people that have made this forum, this community, so welcoming, supportive, and knowledgeable. Keep up the great work, everyone.---------- Best wishes Dan / CableGuy2 points
-
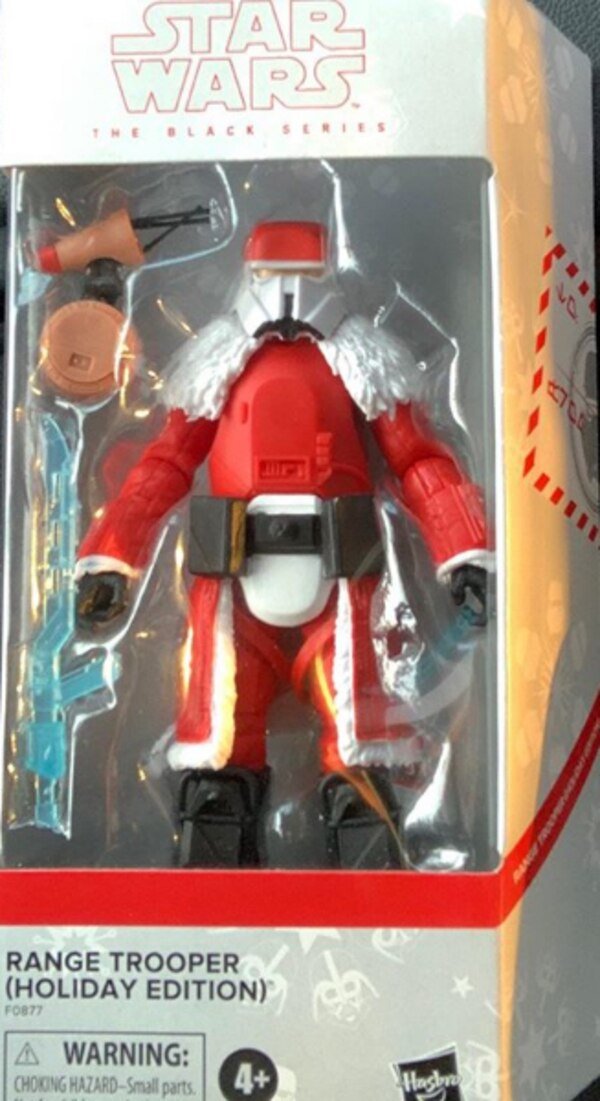
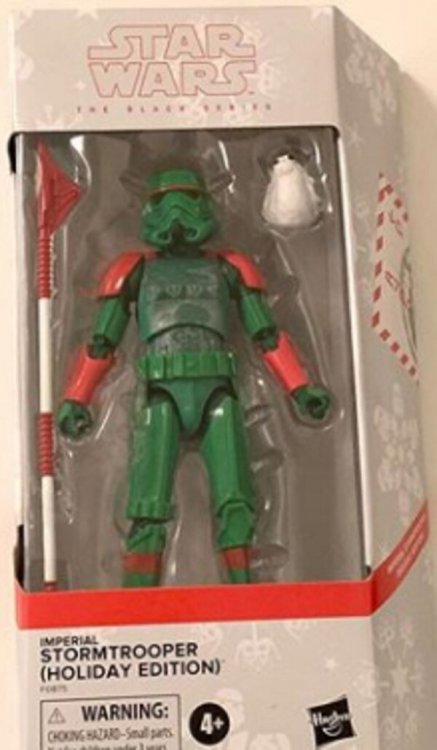
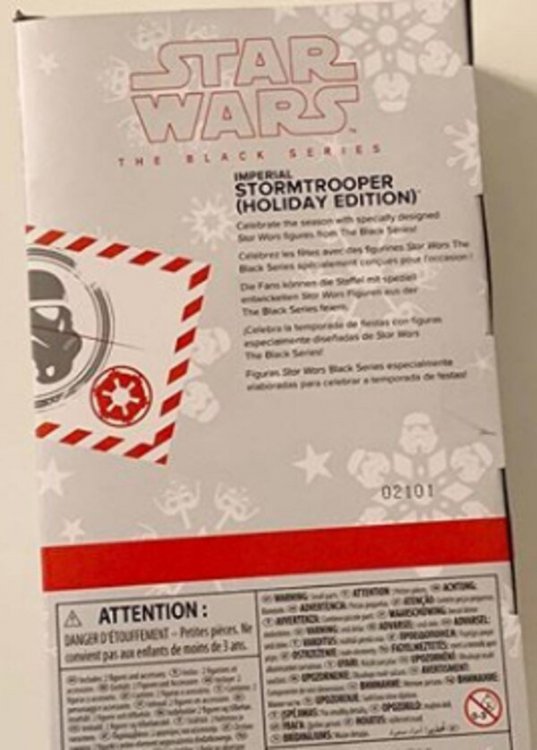
New CRL anyone, holiday version Stormtrooper. Not sure why he'd know what a Porg is, wrong era Imperial Stormtrooper (Holiday Edition) This festive trooper is wearing an ugly Christmas sweater featuring an AT-AT and include a porg and vibro-axe. A range trooper too
 1 point
 -
With the warmer weather coming up and cabin fever well set in I thought it was time to break open a box and get to work cutting up some ABS. This build was going to be a TFU Commander but since there has been work on the CRL for a standard TFU Stormtrooper I thought I'd start here then convert it to a Commander later. I've had a couple of ATA helmets sitting around for some time so I'll use one of those and also have a set of RS armor which was part payment of a commission build. First up tape the outside ready for some satin black, I like the interior dark, helps stop light reflections inside the helmet so people have no chance seeing your eyes. Now let's see if I remember how to do this, let's tackle the helmet first, everyone loves ears Get the basic trimming out of the way and start aligning. ATA helmets are a bit of work to get sitting just right, the right side is a little shorter and the backplate higher so it takes some wiggling. I normally throw a couple of screws in to get everything sitting right. On to everyone's favorites, ears. Rough trim done and adjusting to suit. Getting the angle just right, we know how these DO's love their angled ears Happy with that, time for some screws I won't bore you with the other side, brow trim fitted. I like to run a pencil inside the lenses and teeth, helps as a guide when trimming. Small file bit on the dremel, then files and sandpaper First light coat of paint on the teeth, I find if you go too thick it can craze. Mic tips are painted, forgot to take a photo of those and that's about it for today, I'm just easing into this build, still getting over some medical issues and ongoing problems but should get there in the end.1 point
-
Hey folks, First post here on FISD and I'm excited to announce this is my first every 501st build! I'm building a TK Stunt with my sights set on Centurion certification. May as well gun for the top from the get-go! I'm from Melbourne, Australia, and looking to join the Nightfall Garrison here. The folks there have already helped me this far, but now I'm inviting the larger community for your opinions and help. I actually ordered my armour in February, but the pandemic has played all sorts of havoc worldwide and I received my trimmed kit from AP only a few weeks back. I may not make the first 1000 (maybe I'll be 1001!), but I'm sure I'll have a lot of fun regardless. This delay also meant I've had a stack of time to research builds and acquire tools and mods to get me to Centurion. Thanks in advance for all your help. Kit details: TK Armour: AP (Mr No Stripes brackets) Helmet: AP S-trim: Trooperbay Visor: Trooperbay HOVI Tips: Ukswrath speakers Helmet VOX: iComm or Arduino (See: Arduino Based Voice Changer thread) Neck seal: Darman's Props Belt: Canvas (AP) Centurion completion kit (Joseph) Gloves: Ansell Heavy Duty Hand guards: Latex (Joesph) Boots: Imperial Boots Undersuit: Extreme Racing E-11 Blaster: Premier Props BBB Day! The trimmed kit I've actually begun the build on small pieces first, to build up my skill and courage to move onto the larger pieces. I'll post progress pics below.1 point
-
Obviously the thighs needed touching up, based on how much putty I applied! I also wet sanded the ammo boxes to 220. They feel so delicate...I hope I don't crush them or bump into anything down the road! Once I get a 3D printer, I might look into printing these myself with a sturdy infill... On good painting news: my 1st pass on the forearms looks great!! Maybe leaving quite a bit of primer on there helped, maybe sanding with 220 did it, I don't know! I'll check them out tomorrow, but I don't think much will need touching up!1 point
-
Hi Mark, They look great, good work. if i can add a suggestion. If you plan to go for the upper levels, which we hope you will, you may want to check the amount of paint on the buttons. According to CRL for level 3. : Ab button paint shall not extend beyond the bottom of the actual raised button. It is a quick fix, you can use a non-acetone paint remover , or if you have surgeon's hands, you can use a pointed tool or cutter. (I have done this last) Reference images Cheers1 point
-
I've also positioned AB plate buttons. How do these look?1 point
-
As Kyle has eluded to, I sold him my 850 AW ROTK kit. As I will be helping him on this kit, I had already done some work on the kit prior to selling it to Kyle. Here is a breakdown of what has already been done: When I started work on my Jimmiroquai ROTK, it was suggested I start with the abdomen and work away from the center since most of the armor is tethered to the abdomen. For the 850 Armor Works kit I have decided to do the same thing. Additionally, I did considerable cutting and modifying of the Jimmiroquai kit to be more screen accurate and although the 850 AW kit will be a Sandtrooper, I will need to modify some parts. I will endeavor to cover in detail the strapping and any modifications since these seem to be the type of questions, I still get about my Jimmiroquai kit. Lastly, I have never built a set of vacuum formed Stormtrooper armor like the OT stuff. My only Stormtrooper experience is with my Jimmiroquai kit so as unfair as it may be, I can only compare the 850 AW kit with the Jimmiroquai kit. I will make a few comments about comparison as the build progresses. First, I trimmed the three parts that become the abdominal armor. The Front (C), the side extender (B) which must be cut in half, and the back (A) which also must be cut in half. There is also a back-cover plate that is not in this picture. Next, I measured and glued the parts together. I used super (CA) glue along with a CA glue accelerator. I will strap and continue to work on the abdomen as I move along with the build. For now, it is on hold because I have decided to 3D print the detail parts. The 850 AW kit comes with several cast parts that are fairly rough. Here is an example of the two horizontal blocks that go to the back plate. It appears to me that 850 AW 3D printed these parts then cast them. The print lines are still visible in the casting. I really did not want to sand all the parts as much as would be required so I built my own 3D models of these parts and I am printing them on ultra detail with my Prusa I3Mk3 so the cleanup will be considerably less. One of the other issues I have with the supplied parts is that the cast parts have bubble holes in them and those would need to be filled so printing my own parts removes this issue as well. I do not think less of the kit or 850 AW for these parts. This kit cost 400.00 and all the cast parts are still very usable for someone who does not have the ability to recreate them. I will most likely shar my 3D files for free on my Thingiverse page once I have finished printing them and verified, they are good to go. Next, I began to work on the belt. The first thing I noticed about the 850 AW kit belt parts is that they were smaller than the Jimmiroquai parts. All the boxes are smaller and the two supplied strips of ABS to use for the belt is smaller as well. The tallest box that mounts on the belt is 2 ¾” and the belt is 3 1/8” tall. This presents an issue since the RO belt has teeth that protrude across the top and lock into the abdominal armor. There is very little room above the boxes to cut the teeth out. Therefore, I will be making the belt from something other than the supplied strips. I do not have any HIPS or ABS laying around so I will make my belt out of Sentra; however, I do not know how well this will hold up so I may need to remake the belt at a later date. Another thing different from the Jimmiroquai kit is that the boxes for the 850 AW kit are 2-part boxes, a front and a back for each box. This is a good thing because of how I plan on attaching the boxes on the belt. Anyway, here are the parts before cutting. And here are all the boxes cut. I still need to trim the edges. Next, I have printed the greeble parts and they came out great so here is the link to download them for free if you want them. https://www.thingiverse.com/11b30b4/designs The weekend was very busy, and I did not get as far as I wanted but I did make some progress. First, the 29 hours 3D print turned out great. Once these parts were sanded and cleaned, I used CA glue to adhere them to the abdomen. I also realized that the extension under the abdomen detail (where the belt would go) was angled and did not provide a good base for the belt to lay on so I cut most of it off the armor and used one of the 3” tall pieces of ABS to make a new mounting surface. I shaped this piece with a heat gun and a large metal (60qt) pot to get the basic shape. Then I used CA glue and applied the 3” strip to the overhang and clamped it in place. In this picture you can see the side by side comparison with my Jimmiroquai abdomen. Next, I bit the bullet and purchased a .125 4’ x 8’ piece of HIPS (Black) and used this to make the belt. I was not sure the teeth on top of the belt would hold up if I made it out of Sentra. The front belt started out 3.5” tall and 27” wide. Once I had all the greebles in place I could figure out where the teeth needed to go. To be completely accurate, there should be two additional teeth between the two side greebles and the front center ribs but there is not enough room, so I omitted these teeth. Next, I cut out the teeth and this removed most of the top ½” of the belt. Using the heat gun and large metal pot, I shaped the belt and clamped it on the armor to figure out where all the boxes would go. As I said previously, the 850Aw kit comes with box inserts but I have decided to mount the boxes differently. Using ½” thick Sentra, I made tight fitting inserts for each box. I then drilled them and mounted T-nuts in them. I used #8-32 T-nuts along with #8-32 x ½” round head screws. The T-nut is counter sunk after using a spade bit. Next, I mounted all the inserts on the belt and test fit the boxes. Next, because the round head screws would protrude on the back side of the belt, I needed to cut away some of the abdomen to allow the belt to lay flat. Also, I knew I wanted the belt to snap on the armor, so I mounted some 4-part snaps in the belt and abdomen. For the armor I used more abs glued from the inside for the snaps. Next, I test fit everything together. You can also see that I used the center rib from the cast center greeble to finish out the piece. Once I was sure how everything would fit, I used CA glue and baking soda to glue in the T-nuts so they would not back out then glued the boxes over the inserts. These boxes can now be removed from the belt and then re applied after painting. Next, I decided to modify two of the boxes. In this picture you can see the boxes that are on my Jimmiroquai kit. The boxes from 850AW are close but not as close as I wanted. So, using a ½” acrylic rod, I cut and glued the rod in place then added some PC-7 to give it the correct profile. (I later changed this profile) While the PC-7 was curing, I started work on the Thermal Detonator. The 850Aw parts are two end caps, two halves of the tube, one cover detail part and one cast part. I cut out all the parts and assembled the tube. I suppose I could have I used a piece of PVC pipe for this but I wanted to keep the weight of the Thermal Detonator down, so I stuck with the included armor parts. After I got the correct circumference, I glued the tube together and filled the seams with Bondo. Most likely, I will do some modification to the round protruding part on the detail plate for the Thermal Detonator, Possibly a 3D printed part. If I do the 3D part, I will add it to for download on my thingiverse page. I did model and print the greeble part for the TD. I have added the file for free download on my thingiverse page. It is embedded with the ROTK Greeble 01 files. I have also been re-working my T-21, updates to follow here: http://forum.mepd.net/index.php?/topic/16557-11b30b4s-ro-t-21-version-2-build/ As far as the armor is concerned, like I said, I have printed the TD greeble, so I needed to cut the existing part. Here is how the part looks from 850 AW and the 3D printed greeble next to it. So after some cutting and some gluing, this is what it looked like. Next, I sanded the cast buttons and glued them in place. I cut out the “D” hole and sanded everything. Next, using two blocks of ½” thick Sentra, I made a mount for the TD. It was not necessary to hollow out the center, but I did it before I figured out how I would mount the T-nuts. I mounted them the same way I did the belt boxes. Once it was constructed, I glued the mount and the cover plate on the TD. Lastly, I needed to cut down the end caps to get the proper spacing between the end caps and the cover plate. Unfortunately, super glue is fairly instant and one of the end caps got **** eyed. So, I will need to figure out how to fix this issue before I paint the TD because the contrast between the grey and white will really make this issue stand out. And that is where I stopped and sold the kit to Kyle. More to come soon.1 point
-
I got this link to share for Jon. First Order Snowtrooper Build Group and he suggested using FB Messenger to contact him. Jon Watson he also does runs of a nice trooper backpack when there is enough interest.1 point
-
What I was hoping to hear!1 point
-
Are you serious? I expected nothing less from you. Congrats on basic approval - again...1 point
-
It may have been restricted by the member as-well. You can archive it Glen I tried to fix it myself but same deal. At least it will still reside on the boards just in archive section.1 point
-
Account deleted as requested.1 point
-
Awesome Dan, these are great observations and of excellent help to those building this costume.1 point
-
It’s here. I just finished unwrapping all of the packing material off of it. I noticed my faceplate had a weird bubble under the left eye. But it will be replaced with a new one. More pics to come soon. I’m very excited to start putting it together, and begin another armor building journey. Sent from my iPhone using Tapatalk1 point
-
Hi Dennis, A future Garrison brother here of Dutch Garrison! At first my condolences with the loss of your father. Sad to hear he will never got to see you in full Stormtrooper armor. But we can help you out here to make him proud! I have a RS Propmasters PVC commission myself for 2 years now, but never had an issue with it after wearing it several times. I'm not sure what glue they use, but I would advice you to get in contact with the costumer service of RS and let them know abouth your problem. They are very kind and 'I'm quite sure they are going to help you out with this one. I know you want to repair it yourself, but the armor commission didn't come cheap....and trooping is mostly on hold so enough time for repair. The material behind the teeth most troopers use is called mesh. I use screenmesh (raam hor in Dutch) in all my helmets. I can send you some if you want. The elastic in the shins in my RS do not have really have a function. The shins closes like a clamshell around my lower legs but it's screen acurate and a must for higher levels of aproval here on FISD. I hope to welcome you soon in our Garrison!1 point
-
Hey troopers, Just an update on this thread - this suit is now CLEARED for 501st trooping. :-) May as well go for EIB and Centurion with this one, too. :-)1 point
-
1 point
-
Update: Sigh. One more thing. It’s been a year since I cut these out, so I don’t remember if thats the way the plate came or if I got overzealous. But since I got this kit from the UK, and matching the abs isn’t exactly gonna be easy, I figured the best thing to do is to fix the problem. I grabbed a scrap piece of abs from one of my bicep cuts. The piece was 190mm long and flat for 28mm wise before it curved. The thickness was only 1mm, so it fit the bill. I cut it into 8mm strips that were 180ish long. Then turned them into strips to match the length and width of the ab plate. Next, I grabbed some abs, acetone and a glass jar and made some abs paste. I used plenty of acetone to get the abs soft enough and used a metal flat head screwdriver to whip it up nice and fluffy. I applied a thin layer of the abs paste to the edge of the plate and the corners of the abs strip box. It set pretty well. With all the strips adhered I used my finger nails and a razor blade to strip off the excess abs. Then I grabbed a ruler and cut off the excess abs strip on the outside. Looked good but needed some work. I used 120 grit and 800 grit sandpaper and sanded this bad boy down. The end result turned out great. Based on the reference photos above Glen supplied, I’m hoping this cures the ab plate issue. I also made progress bringing in the thighs. Hoping my e11 shows up tomorrow!1 point
-
So I am done here are my pictures, fingers crossed and the rest1 point
-
There is a 2 part CA glue solution for gluing hard to stick materials like latex. It has a pen which you use to put a coating on the surface, then the tube of glue to apply. Same stuff many use to bond the latex hand plates to rubber gloves and it works very well. You could do a test with a similar product to give the added reassurance that it will work.
 1 point
 -
Don't you just love the sanding, NOT. Coming along nicely1 point
-
Shame KB hasn't updated the clip recess alignments, I know it's pretty common. Coming along nicely1 point
-
Hopefully before this weekend. I plan on working on this over the weekend. Wife is out of town so I have plenty of time...plus I am working on 2 FOTK commissions at the same time. Sent from my iPhone using Tapatalk1 point
-
Awesome, thanks. The weekend will be spent in my undersuit, then! [emoji23] Sent from my Imperial Communicator1 point
-
Totally! I also learned my lesson in using 20% infill on small one too, it's heavy! Perfect for displaying.1 point
-
Look in the merch section https://www.whitearmor.net/forum/topic/49998-march-to-1000-pins-open/ https://www.whitearmor.net/forum/topic/49999-victory-1000-11-inch-patch-open/1 point
-
Thank you for all that you bring to this community, esp. as you provide quality posts not just the "nice" type comments to bump the count. Here's to the next 3000 :pint1:1 point
-
I've recently submitted for Centurion (pending approval) with my SDS armor. Yes, gasp! SDS!!! Hold the gunfire please. There are many issues with it and the company that I won't go into here, but I was told SDS would never be accepted for EIB or Cent without ALLOT of work. Well, I did it and am almost there. Just takes some mods, patience and perseverance.1 point
-
The TPU was a bit of a surprise. I mean, I researched it before I ran out and bought some, but after running a few test prints, I realized that this particular brand was way too rubbery for anything I wanted to build. However, if I can figure out a good paint/ dye method there are a few items that this may be a no-brainer for. Immediately I think of clone pauldrons, and ammo belts. Good call on the acrylic paint. I'll see what I can do with these things this weekend.1 point
-
We both went for Centurion and joined the ranks of IA around the same time (and staff too), so I’ve always considered you my FISD twin. You have been a great asset to the detachment, cheers to 3k more posts.1 point
-
Amazing work !! , Thank you for your service. Fix It Glen !!!1 point
-
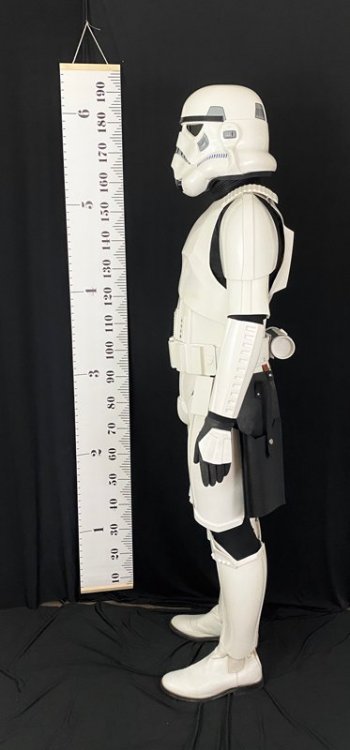
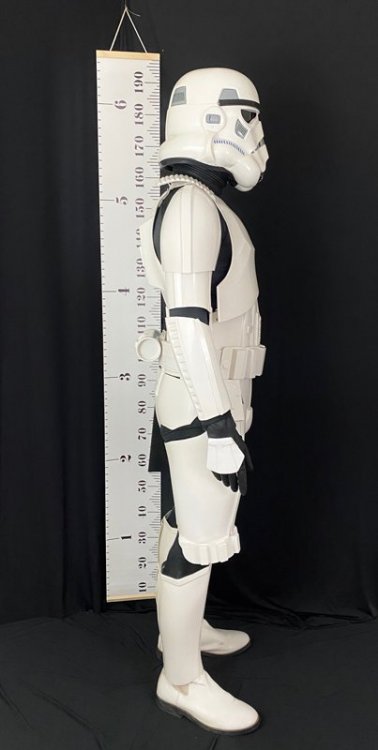
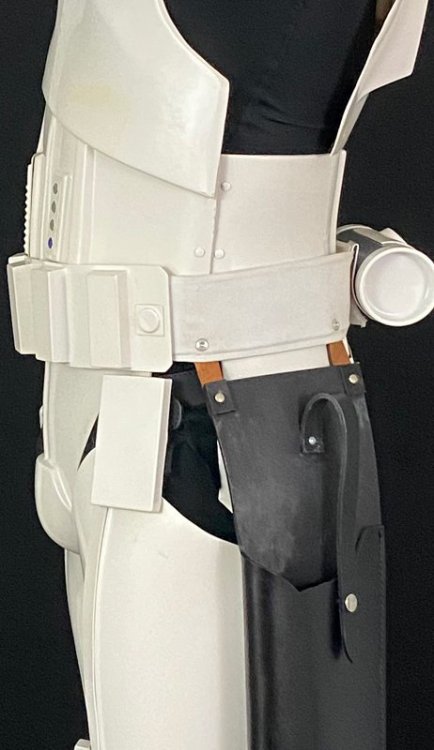
Hi there, folks. Well, this kit is now finished and my clearance photos are in. Here’s a couple of the latter bits of progress, then some finished shots of the armour. :-) Belt inspired by the RS belt, down to the cutting of the drop box elastics and the white gaffers tape on the rear. Holster attached. Gap from the edge of the plastic ammo belt to the first fixing is around 40mm.1 point
-
Hi there, Trooper, I did a whole video series on building a TM helmet, if it helps. This covers basic trimming, ears, construction and painting. Here’s how it turned out.1 point
-
Belt adjusted some:1 point
-
Keep up the great work man! Your hard work and dedication will pay off, and I’m sure your suit will be AMAZING. Magnets FTW. Sent from my iPhone using Tapatalk1 point
-
I'm glad you're back at it, but wish you didn't have so much trouble... Getting my helmet details crisp was a big pain too! I had some trouble getting the fine point paint marker into some of the crevices around the rear traps. I ended up taping a little on either side of the line just to keep the black paint in line. So far, I haven't really had issues getting my suit on/off, which parts are you referring to? I used velcro in a few spots to hold each belt half up and they seem to work fine. Now that you mention it, I think some shoulder bridges might be good to raise the bells a little. I might try some fiberglass scraps shaped like Paul's bracket. Glen (gmrhodes13) posted some pics on my thread that point out the straps holding up the thighs from Star Wars Celebration. It looks like one strap hangs straight down and another is angled more forward. I'm hoping that holds them somewhat steady. Can't wait for some pics!1 point
-
Hi Mark, here a couple of reference images that may be helpful. Keep on doing a great work.1 point
-
Hey Dan, that's awesome, and thorough, thanks very much. I'll make adjustments once the paint has dried and touch base again. My can of Goof Off arrived yesterday, so it will get swift use. Thank you! Sent from my Pixel 4 XL using Tapatalk1 point
-
Hey trooper, Neat work so far - well done. [emoji1303] For the vocoder, I’ll like a thread I put together a while back; https://www.whitearmor.net/forum/topic/48252-anh-tk-vocoder-examples/ As per the thread, the vast majority of ANH stunt stormtroopers has the “fuller” vocoder paint. As such, I’d consider extending your 2nd and 6th bars; Approximate example below: For the frown, recent changes to the CRL ask that frown paint does not leave the teeth area. As such, you might consider bringing the paint back a touch in certain areas. Appropriate example below; Keep up the good work. :-) Dan1 point
-
Yay!! You finally made it here how many weeks after I suggested it? Lol Great to have you here, Mark. I’ll be following your build both here and on KFG [emoji6] Btw, I see you’re going for the Mr No Stripes brackets. Have you already bought them? If not I’ve got an unused set I’m happy to sell on.1 point
-
Appears it's common with AP, here's a Centurion passed set which look the same as you have, you should be good to go1 point
-
I have a question about my drop boxes: the inner drop boxes do not fit snugly inside the outer drop boxes. Is this something to worry about? Or, can I hit them with the heat gun and massage them out a little to fit more snug?1 point
-
I'm after a little feedback before I begin assembly and painting. How do the eye and teeth holes look here?1 point
-
Love BBB photos, looking good so far1 point
-
I've begun slowly building my helmet so I can get each step right before final assembly and painting. So far I've sprayed the interior with Plasti Dip and fixed the helmet suspender clips. I'll then line it with black Neoprene foam and glue in velcro to hold the electronics. It's truly an act of Zen to tape up and spray these pieces. Next I'll clean up the eye holes and teeth, then begin positioning.1 point
-
The first piece I built was the Thermal Detonator. After digging around the FISD, I found dimensions and details (Billgrams!), then followed Ukswrath's build advice. Here's the tube after taping and spraying. And here's the finished TD.1 point
-
“All the ones...legs 11” [emoji23]1 point
-
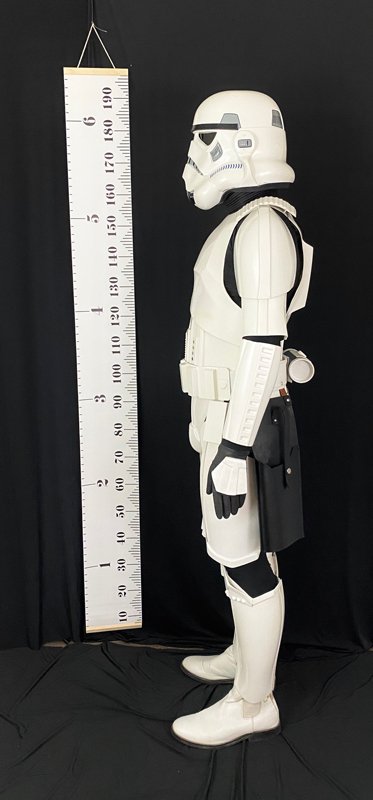
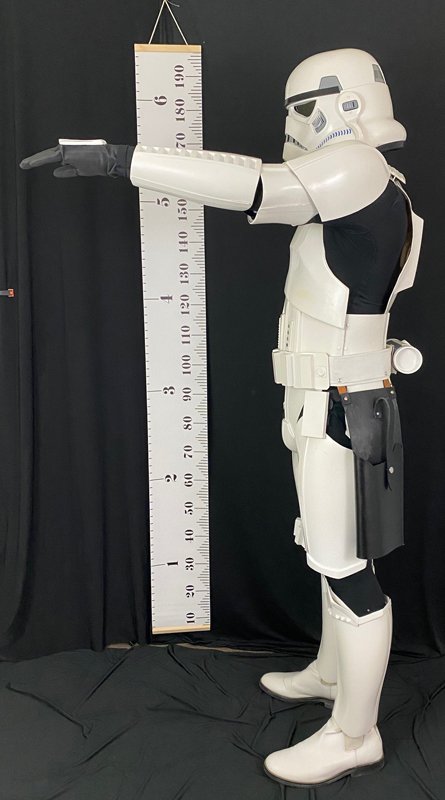
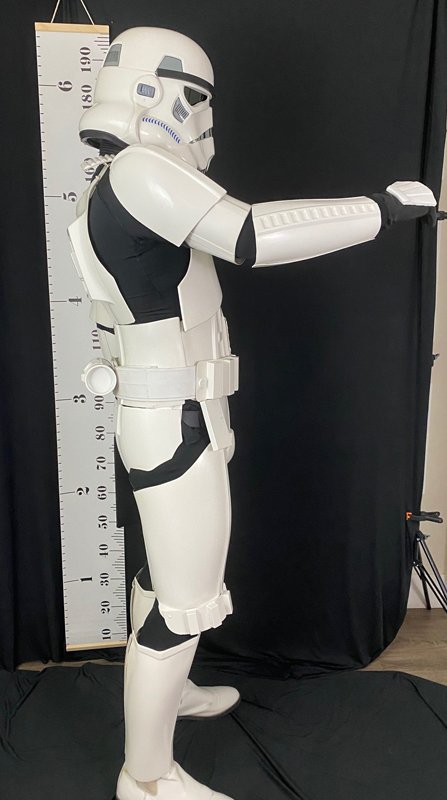
Mandatory Information Name = Todd M. TK ID = 42077 Legion Profile = https://www.501st.com/members/displaymemberdetails.php?userID=24616 Garrison/Squad = Southern California Garrison, Orange County Squad Forum Name = thebearded1ne Armor = Anovos Helmet = Anovos Blaster= Hyperfirm (highest one they make) Optional Height = 5' 11" Weight = 175lbs Boots = TK Boots Ammo belt = Anovos Canvas belt = Replaced Anovos, don't remember, the same guy we all get them from Holster = Anovos Hand Plates = latex, justjoseph63 on FISD Electronics = wired mic into Aker amp, two fan system Neck Seal = anovos attaching pics as multiple sections due to size. First up: Front - arms at side Back - arms at side Left - arms at side Right - arms at side Left - arms up Right - arms up Left Zoom Right Zoom


 1 point
 -
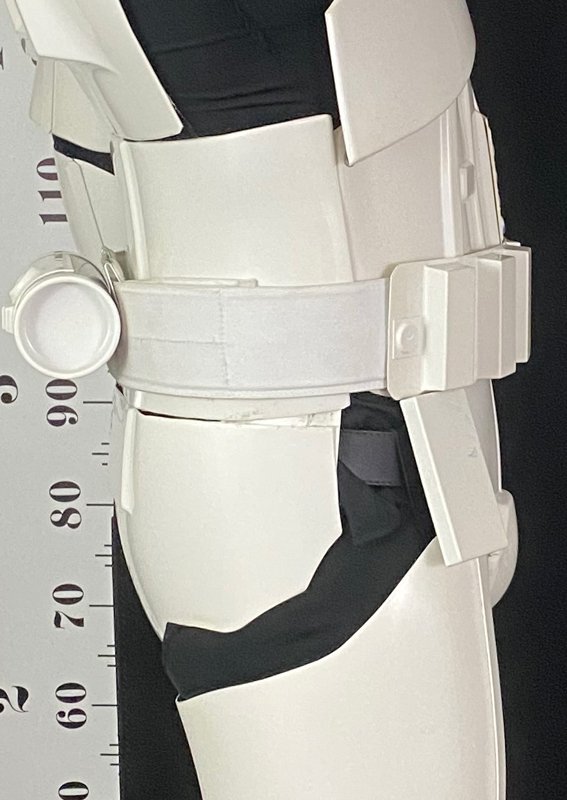
Hi Todd, and thank you for your EI submission! In the following review I will be going over a few items pertaining to your current submission, as well as those that will be required for Centurion level should you choose to apply. (Hint- You should)! That being said, let's get started! CRL and EIB Application Requirements: All required submission photos have been posted and I am very pleased to announce your armor displays all the necessary elements to qualify for ANH Stunt Expert Infantry. On behalf of myself and the entire D.O.Team, Congratulations! Other-Armor Fit/Assembly: In this section we review observations made by your fellow troopers and ourselves. Some observations may lead to suggestions to improve the overall look of your armor. Note that we consider both text (CRL) and pictures (screen caps/reference images) when reviewing submissions. First, let me say SUPER nice job on this build, and don't be alarmed by all the photos below! Most are just simple dressing issues, but there are a few small concerns that need to be addressed. The ears on your bucket should ideally line up as the ones seen in the reference images, where the screws follow the line of the rear of the trap above them and allows the bottom of the ear to sit back a bit more. I know Anovos sends their buckets pre-built (so I know it wasn't something you did) but they usually do a much better job of lining these up. The left one looks pretty good, but the right could be moved back a bit if possible. Reference images The shoulder strap on your left side is raised pretty high in the back. Some gentle heat-shaping should give you a better arch that will allow it to lay much flatter against the tab on the back plate. Reference images The front cover strips on your left line up fairly well, but your right forearm is twisted out, causing the cover strip to roll outward. Moving the strap would help tremendously and give you a better look. Clever idea by using gaffer tape on the posterior/kidney connection, but I would really suggest adding a strap there instead. We would rather see a small gap there instead of the tape. Reference image The top of the calf on the left needs to be lined up like the one on the right. Again, a simple dressing issue, so not a huge deal. However, it may be the photo, but it looks like the cover strip on the right extends too far down. If this is indeed the case, 5 seconds with a set of ABS scissors would fix this. Reference images Centurion Requirements In this section we prepare you for Centurion. More photos may be requested in the future that allow us to make better decisions on possible adjustments. If there are any areas of concern they will be discussed here. Because Centurion photos show much more detail than EIB, items to pertaining to Centurion might be seen there and not here. We try to point out all that we can from what is seen, but the final accuracy is the responsibility of the trooper. As with all Anovos buckets, for some strange reason they use the correct ear screws (V-head slotted) for the top 2, but for the bottom ones they use the pan-head style. Those will need to be replaced (which I know you are working on). Reference image The left side is spot-on, but the outer edge of your right drop box needs to alight with the outside edge of the ABS belt. A dab of E-6000 between the box strap and the canvas belt will knock this out in no time! Reference image Although the CRL states that the top of the ABS belt should sit "...just at or above the bottom of the central and vertical abdomen button plates", we are asking that you bring it up at least 1/4 to 1/2 inch or so. It's a small fix, but it will definitely make a big difference toward screen accuracy (which is what Centurion is all about). If you need any help, just PM me (I had the same issue)! Ideally, the top of the ABS belt should touch (or even overlap a bit) the bottom ab button(s). Reference images The gap below the cover strip on your left thigh front needs to be either filled with ABS paste or have a scrap of ABS glued to the inside of the ridge. Easy fix! Reference image A few issues with your arms that should be pretty straightforward to fix with some strapping adjustments. The right shoulder bell should be dropped a tad to where it is even with the left. You have quite a gap between the end of the forearm and hand guards (especially on the right), and dropping the forearms an inch or so would greatly reduce that. Again, twisting that right forearm in would certainly help, Last up, the ab-button paint. You did a CRAZY nice job on fixing those teeth, but the paint on the buttons could use some more of that talent. They should have a more rounded shape and should not extend all the way to the bottom of the raised part. Reference image That's it, trooper. I have every faith that you can take an hour or two and get these small issues fixed so that we can see your Centurion submission right after... chalk up yet another great looking EI for the SoCal Garrison!!1 point