Leaderboard


Popular Content
Showing content with the highest reputation on 07/16/2020 in Posts
-
Wiring the switch, had to make sure it didn't interfere with the spring. Went for a 1/4 inch pull to activate. Wiring goes out the top Also worked on the front light switch. While this is manual turn on/off, in the future I will wire it up with a momentary switch.2 points
-
Agree. Thank you. Tonight I return to upload the links with "direct link"2 points
-
Forum does not use BBcode, use "direct link" option2 points
-
You want to use the "direct link" option2 points
-
He would need to be 501st and then EIB approved for it to count to the program. You also need a minimum of 5 EIB approved which you have helped for the first award to be granted.2 points
-
As I've mentioned previously in a couple of other threads, my son and I are beginning our journey to 501st approval. I think we're going to be following the 80/20 rule. I'll end up doing 80% of the work, or more...lol. We ordered the AM kits from Dave at Dave's Darkside Depot and should be receiving them very soon, along with our boots from IB. I would like to give Dave a shout out. He's very responsive to questions and seems like a super great guy. I've also ordered my E11 from Quest Design. Only thing left for me to purchase will be neck seals, holsters, belts, and my son's E11. I may take on the belt project myself, although its been a while since I've had my hands on a sewing machine. The holster project looks doable as well, but I have to weigh the cost of material and time versus purchasing them completed. Another thing that I am torn between is building these simultaneously or focusing on mine first as an attempt to get into the first 1k EIB and then using that expertise to build his. I'm not sure what I'm going to do yet, but I imagine I will start with both and let my rate of progress be the deciding factor. That being said, in preparation for BBB, I got a start on some snap plates. I put together 20 for each kit per UKWrath's AM 1.0 TK build. I started out using a punch for the holes in the 1" nylon, but quickly learned that using the soldering iron was not only faster, but also gave me a nice cauterization around the hole. This is also the E11 I ordered from Quest. I have read that they make a good product. Does anyone know what, if any modifications I will need to do to it to be lvl3 compliant? E-11 Product Listing1 point
-
At the encouragement of @ukswrath, here is a post I originally made a year and a half ago on the Anovos FB build group, which is handy for all makes of armor, not just Anovos. ABS Paste?!?! WTF is THAT? I've seen variations of this question over and over. So perhaps this will be helpful. ABS paste is homemade glue for your ABS plastic. It literally melts and reforms the plastic into a solid piece, so it's more like welding than gluing. But as the warning phrase "it literally melts..." foreshadows, you should be careful. Making couldn't be easier. Get a GLASS jar. Don't be that person who makes it in a plastic cup. You know... the one that puts plastic melting stuff into a plastic cup. You've met that guy. Don't be that guy. All you need is a jar, some ABS scrap, and some construction grade acetone. Nail polish remover is NOT strong enough, even though it has "some" acetone in it. Pick up a bottle at Home Depot or the like. (For people in other countries, like the UK, where Acetone is not readily available... you have my sympathies) For containers, I feel a glass baby food jar is ideal. It's just the perfect size (unless you doing something epic!), stupid cheap (if you don't already have one somewhere), and easy to work with. I'm going to assume baby food jar, so if you choose a 2 quart mason jar, scale as needed. In general, ABS paste is practically free, other than the price of a tiny bit of Acetone and maybe a buck for a jar of baby food, if you don't have a suitable container already, since your source material is scrap from your own build. (never toss that armor scrap!) A NOTE ABOUT FUMES: Pure Acetone is nasty stuff. You really don't want to be breathing Acetone fumes. A whiff here and there likely won't cause lasting harm, unless you have existing pulmonary issues, but still, do your best to avoid breathing a lot of the stuff. At a minimum, you can end up with a NASTY headache. At worse, you can actually cause damage to your lungs. Use your own level of protection that feels best for you... some want to wear a full respirator (with a volatile organic cartridge), others, like myself, are content to work outdoors and minimize breathing it. (Once the jar is capped, it should be fine to bring indoors.) FILL the jar with the tiniest scraps if ABS you can get. I literally used the curly-que and powdered scrap from under my belt sander, after all my rough cuts, in addition to cutting up a few pieces of scrap into 1/4" square pieces, with scissors. And now the magic. Add approx 1 teaspoon of Acetone (and remember, I'm assuming a baby-food size jar... scale accordingly if you're trying to go big and make enough for your entire squad to build with!). Cap the jar, wait 15-20 min (or more, no worries) and then check on it. Poke it with a stir stick. (You can literally use a stick. Although IMO, a wooden coffee stir stick (free at Starbucks!) is ideal, and Popsicle sticks have their proponents, too, as does the toothpick crew, for detail work.) If you literally do not have a stick, a strong piece of scrap you don't care about will do, just be careful where you set it afterwards. But poke at it. Get an idea where it's going. Then add about 1 tsp more Acetone. Re-cap it again, wait 15-20 min, then check again, and this time, stir it a little more seriously. Note the consistency. You'll probably want to add some more, perhaps 1 more tsp, perhaps less? You may be starting to get a feel for it by now. Let sit for a good 1/2 hr, then check and stir AGAIN. We're going slow. Slow is good. Watch some TV or read a book. You have better things to do than watch ABS melt in super slow motion. At this point, you SHOULD be close to ready to go. If not, I recommend letting it sit overnight before checking it again. (in fact, that's not a bad idea in general, but it's not strictly necessary) Only add more Acetone if you still really think it's too thick and clumpy in the morning, after stirring it some more. Repeat until you reach that magic mayonnaise moment. Correct consistency is *roughly* mayo-like. I'd say somewhere between Elmer's glue (a little too runny?) and Toothpaste (perhaps a little too thick). Too runny = bad. Remember the "melting plastic" part? You don't want that running down your armor. Too thick and you may get air pockets. Shoot for the Goldilocks zone. ) When you're ready, apply with a stick. Let it dry (duration depends on thickness... maybe 20 min, maybe overnight?) and sand it down. Repeat until pretty. Relatively small amounts (read: the small patches that ABS paste is generally best for) should be relatively safe to use indoors, just be aware of the fumes. Larger projects (or sensitive spouses... not that it smells too different from the nail salon, in my mind) are probably best to work on outdoors. The beauty of using the same plastic your armor is made from, to make paste, is you get a dead-on 100% perfect color match. No painting needed! (note: The level of polish/sheen will not be the same, but the color itself will be a match. ABS paste isn't really good for large area applications... and trying to do that will likely end up causing warping from too much acetone anyway) (2nd note: ABS paste is not as strong as the original plastic. It's not actually a glue, even if it looks like one. For connections needing a very strong join, use CA glue, as usual.) (pre-sanding... but note that color match to the Anovos armor!) The paste doesn't really go bad, but eventually it'll harden and you'll need to add more Acetone. Keep it capped, and it'll last longer, of course... you can dry it out quite fast if you leave the cap off for more than a few hours. Future batches you can probably go faster (read: add more acetone, sooner), but I recommend the slow approach when you're starting out, until you have a good feel for it. Good luck!1 point
-
I would like to go for EIB once I pass basic. I may aim for Centurion in the future, but one step at a time. INFORMATION Name: Martyn Scully. Future garrison: UK Garrison. Armour maker: RS Propmasters. Helmet maker: RS Propmasters. Cloth belt maker: RS Propmasters. Neck seal maker: RS Propmasters. Boot maker: Imperial boots. Interior strapping: original (RS Propmasters) and snap method (own hybrid). Blaster maker: Doopydoos (own customisation). Height: 5 foot 11 inches. Weight: 14stone 13lbs. TK Type: ANH Stunt. Name of troopers who helped: Justjoseph63, Chemi, TKSpartan, Rob.T., gmrhodes13, but mostly CableGuy. Cheers, Mar2D2. Sent from my SM-G920F using Tapatalk1 point
-
Saludos Legionarios! Con el siguiente post, solicito el estado de EIB (980) para mi armadura, tras algo más de un año de misiones. Si es necesario aportar alguna foto más, por favor, hacédmelo saber. Gracias por vuestro tiempo. Saludos desde España. Hello Legionaries! With the following post, I request the EIB status (980) for my armor, after a little over a year of missions. If you need to provide any more photos, please let me know. Thanks for your time. Greetings from Spain. Name : Sergio Bescós 501st ID : 10650 FISD forun name : Keko Bescós Garrison : Spanish garrison Armor : Armour Factory Props (AFP) Helmet : Armour Factory Props (AFP) Blaster : Armour Factory Props (AFP) Height : 175cm Weight : 80kg Boots : Armour Factory Props (AFP) Canvas Belt : Armour Factory Props (AFP) Hand Plates : ArtNeo Neck Seal : Armour Factory Props (AFP) (Leather) Holster : Armour Factory Props (AFP) (Leather) Audio system: TRamp https://501st.com/members/displaymemberdetails.php?userID=29694 https://501st.com/members/displaymember.php?userID=29694&costumeID=124 Front action Front Back Left Right Casco - helmet Cinturón - belt Botas - boots Blaster E11 Detonador – Detonator Cuello - Neck seal Muslo derecho – Right leg Muslo Izquierdo - Left leg Pantorrilla derecha – right calf Pantorrilla izquierda - left calf Brazos - arms Brazo derecho - right arm Brazo izquierdo - left arm Cuerpo – Body armor Electrónica - Sistema de voz – Audio System Done!1 point
-
You will find sometimes that armor can only be sized so small before it looks a little odd, you may very well have to add some foam inside on some pieces, I have on my my armor due to being very skinny. Make sure you compare to reference material just to make sure you aren't trimming down too much, easy to trim off but hard to put back on1 point
-
Nice work, looking good, you could adjust your belt on the rear to sit straight, but should be good to go1 point
-
You can't really taper the forearms since there is a raised ridge that will show the taper. Padding is probably your best way to go. Also, I think the general rule is that you want to easily fit a finger under your arm armor when wearing it. This will give it enough room to breath. I'm a believer in making things a little larger than needed - if your body changes shape - it is easy to add padding, it is much harder to add plastic. Keep up the good work!1 point
-
I believe most people have somewhere around half an inch of space, but of course it varies. You could definitely do tapered cuts if there are no raised edges to worry about. Sent from my iPhone using Tapatalk1 point
-
Hola Sergio, excelente Armadura. Muchas gracias x actualizar tus fotos. Uno de nosotros estará contigo pronto. Saludos HI, Sergio, your armor looks great. Thanks for updating your photos. One of us will be with you shortly. Cheers1 point
-
The elastic loop at the shoe top is hidden by your shin pieces. (some TKs here add velcro to them to "pin" the shin down by connecting them1 point
-
Hola Sergio. Tu armadura se ve espectacular. Enhorabuena!!!. Suerte con tu solicitud!!! Hello Sergio. Your armor looks spectacular. Congratulations!!!. Good luck with your application!!!1 point
-
Awesome work Scott. As Tino said, I am getting the blaster build bug and feel the need to start a new one soon!1 point
-
This update makes me want to build a new blaster with Paul's BlastFX. Well, maybe someday...1 point
-
hi , thanks for your input, I'm just floating suggestions about regarding the boots, I have forwarded the the pics to my armourer & I'm currently awaiting a reply, personally I don't think I will have a problem with them popping out from under my shins as I'm only 5'7" ! lol ! cheers & thanks again1 point
-
Adding the BlastFX. Let me just say that Paul Withrow's BlastFX is an amazing product. I don't have any good pictures but I installed the barrel LED at the far end of my clear tube. Installed the LED strip inside of that tube and shortened the wires to both as there isn't a whole lot of spare room in the E-11 itself. I also switched out the power wire to a 4 wire 24GA telephone cord and incorporated the Shape Ways end cap switch and a USB charger for my battery. The battery will be located inside the magazine so that I can replace it if it dies. The wires for the two screens, Hengstler switch and speaker I switched to an old computer ribbon cable so that there would essentially be a single wire ribbon running to the scope and Hengstler. The biggest hurdle by far is trying to manipulate all of this into the barrel and I regret not having the presence of mind to photograph the subway train. Ultimately I ran the ribbon up and over the clear tube which was followed closely by the BlastFX and the wiring for the power switch with my bolt and spring. Once I got it all in there and was happy I began wiring the smaller screen into my Bulldog Props M38 sight. This thing is legit and comes with all the screws and doo dads. It is very detailed and there are various kit options so you can order the one that's right for your personal tastes. I opted for a electronics ready kit knowing I was placing the electronics into it. A screen holder was shaved down a bit to get the perfect magnification. I found that if the magnifier was too far from the screen it would get pretty big. Here you can see how I split off the section for the scope and fed it through the front foot. The power switch and charging port are concealed inside the end of the pipe. It may have been simpler to turn on and off if the switch was in a more accessible location but I like having it out of view. The two small holes were an attempt to be clever on my part and make passages for the wires to run through the resin and come out where I cut a hole for my trigger and selector wires. I borrowed some really long drill bits and all was working to plan until those bits grabbed that plastic insert and went that way. As mentioned above I used 4 wire telephone cord to run the charging line to the battery and power to the blast FX. There is a noth under my PVC/Marker bolt and the charging board is shrink wrapped. The wire comes out and goes under the spring a couple turns in and under the rest of the spring until clear of the bolt. The only visible portion is right there under the rear sight. I was even able to throw on my (non)fold-able stock tonight. A couple more paint touch ups and I think I'll be ready for the next project!1 point
-
Moved to build thread forum, as requested. I personally used pandatrooper's ATA helmet build thread to assemble my WTF helmet and I found it incredibly helpful. Re the teeth, it looks like you could trim them a touch more, but it could just be the photo angle. When you're trimming the teeth, focus on the shape of the teeth rather than the shape and size of the gaps in-between and it will become much clearer how much to trim.1 point
-
Hi Mario - please see the new pictures below. I sanded as much as I could but I was afraid of cutting a little too much and causing damage especially since the bump on the inside comes right up to the edge. Hopefully this is enough, but if not, let me know.1 point
-
Tom Görner TK 22443 EIB A4 Sha Sha http://www.whitearmor.net/eib/certificates/22443-eib.png 2941 point
-
And looking more critically, the cod shape isn't exactly the same as in TLJ. I think Chris @themaninthesuitcase mentioned something about it as well. I see the issue now that everything is coming together. The TLJ cod is narrower and more of a "French cut" style than what I currently have. I won't be cutting the cod on this suit to make it more narrow, nor will I be reprinting one. I think I'll be able to simply bring the cod up a bit more (there is still room to move it up), which will make it look a little more narrow overall.1 point
-
I didn't like how the paint ended up on the black circle on the back plate. Even though it's semi-gloss, it's too shiny for me. And I could see a massive amount of brush strokes in my work. Ugh. I bought a roll of matte black vinyl and cut myself a circle in the exact size (or at least as close as I could do with the circle stencils I have). Then just stuck it over my paint mess. It's not perfectly flat (I guess I could have sanded down some of the excess paint before applying the vinyl, but I am not up for it now), but it looks much better than before. Next, I added little white ABS tabs to the shoulder bridge tabs. Making a template with paper, I cut out the tab shape. Stuck it on with E6000 and taped it on to cure. Test fitting the upper half of the armor today! Woo! First we verified the ab, cod, and butt pieces all fit. Then I velcroed the chest plate to the back plate. This had me a little nervous, because placing the velcro bits is not an exact science. And I kept having to pull things apart to adjust- I was concerned that I would hear a "CRACK", but it never happened. Thankfully, the ABS plastic has some flex to it. The 2K Gloss also adds some flexibility to the parts, too. I added the thermal detonator in there as well. I'm still working on the belt, so that will not be making an appearance today. Then we took things over to a room with a full-length mirror so Cameron could see himself easily. This was the first time he's tried on so much of the armor, and he was really excited about it. I added the arms as well... and discovered that I still need to make fitting adjustments to the gaskets and strapping tweaks for the arms. But still, not a bad effort for the first big fitting, methinks! My little trooper!!!! <3 Taking the pose holding his air-blaster. Any feedback on fitting adjustments would be appreciated. Cameron reports that he feels comfortable in the suit at this stage, so for movement is good so far. I don't know this suit as well as the OTTK, but I'm guessing I'm on the right track? Now, it's time for me to get back to taking care of detail work and strapping those legs.1 point
-
Brett White Tk 9593 EIB A4 Shasha Thank you in advance. http://www.whitearmor.net/eib/certificates/9593-eib.png 2931 point
-
Working on the red lights. Made boxes out of scrap plastic, lined the inside with aluminum foil. The led is red and the foil helps diffuse the light. Had to buy a sheet of red plastic (12 X 12) as that was the smallest size. The counter box This is just a test fit, the led is too far in the center in this shot Next up is the trigger.1 point
-
Receiver, Pt 1 After printing out the stock and a few other parts, I was starting to run low on filament. It was too close to call, and I didn't want to leave a print running overnight if I wasn't there to pause the print and change filament, so I paused it overnight. Before I did, I made sure to pause the print right at a new Z-axes increment (horizontal slice) in case something happened. And something did happen. When I tried to resume the print the next morning, the printer went to the last point on the print... and simply did nothing. Not about to lose hours of printing and filament, I decided to alter the gcode directly until I found the z position at 14.8, and start the print from there. This almost worked. the rest if the print printed out, but 1) a bunch o f filament extruded at first due to a bit of gcode I forgot to to remove and 2) the print was offset lengthwise by about 2mm. STILL not about to lose hours of printing and filament, I came up with an idea that actually worked pretty well. Because of the big pause in the print combined with the glob of extruded filament, for better or worse the to pieces of the print were very easy to split from each other. After removing the supports (to ensure they didn't get cemented to the pieces, I sanded the edges smooth with a sanding block and used CA glue and clamps to cement them together. The final product is very usable, and should only need some plastic putty and sanding to finish before painting and installation. I was right to worry though as there wasn't much left on the spool once this part was printed. I printed out some monir items and then finally changed to new filament that ended up being matte black instead of gloss. It won't matter since everything is getting painted anyhow, but if the paint scratches off, I think I actually prefer the matte black. Look how nice this charging handle came out, for instance. I finished printing out all the smaller pieces of the receiver and started working on the main receiver pieces. There will be a lot of supports for these since they're hollow (so I can fit electronics in later. More to come once the receiver pieces are finished and I get into assembly.1 point
-
Stormtroopers have never had such good aim as they do right now. The countdown is well and truly on and I for one am getting pretty darn excited at the prospect of hitting the 1000 Bullseye in the next few months. Great work to all that have already submitted and to those building like crazy to get into the first 1000 group. DO team, you are all doing a wonderful job appraising and approving troopers, thank you for your efforts. I will reveal another piece of the merch item when we hit 20 which I suspect will be by next week at this rate.1 point
-
WOW! I find it fantastic to know that we are down to the last 23 before reaching the 1000 mark for Expert Infantry level! To those who have submitted and been approved for EI, know that on behalf of the entire Staff we salute each and every one of you for taking your armor to the next level of screen accuracy. BUT... time is running out, Troopers. At this rate we will be reaching our goal soon, and in order to be a part of the "Original 1000" (and get in on that sweet swag we promised) we encourage you to submit your armor as soon as you think it is ready. If you have ANY questions or concerns about this, please feel free to ask any member of the D.O Staff** and we will be more than happy to help! D.O. Staff contacts: (Just click on the name to PM) justjoseph63 Sha Sha Mario1 point
-
Thank you for your kind words T-Jay. I have loved every minute of this build but couldn't of managed it with out so many troopers, like yourself, Dracotrooper, CableGuy, Triumphmark's (to name a few), putting great builds out their to inspire us newbies to have a go. Such a rewarding feeling to complete such a great piece of Star Wars memorabilia. Thanks troopers. (Troopers helping troopers)! Cheers, Martyn. (Mar2D2). Sent from my SM-G920F using Tapatalk1 point
-
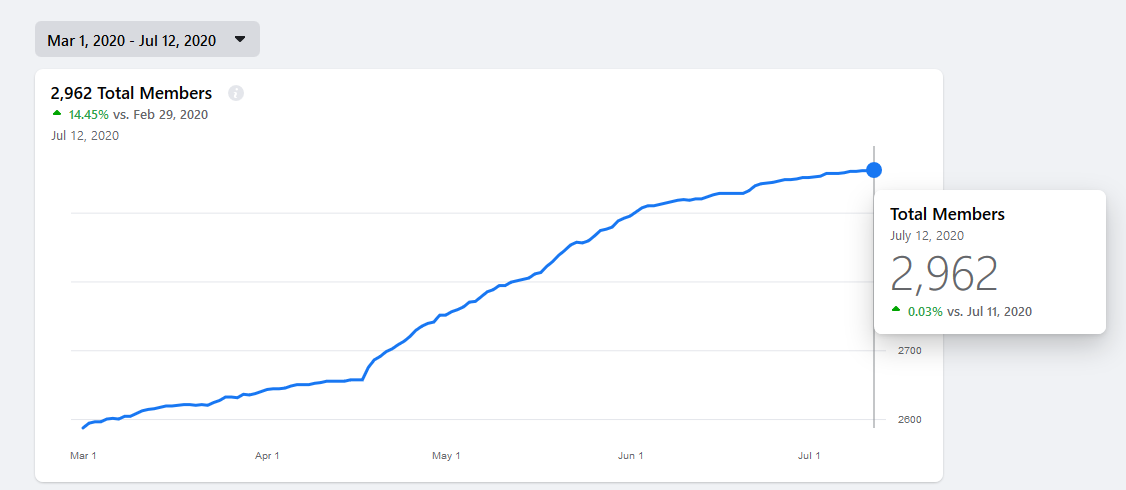
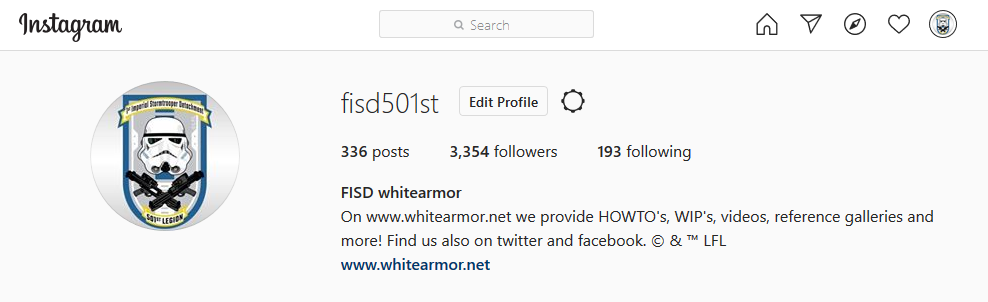
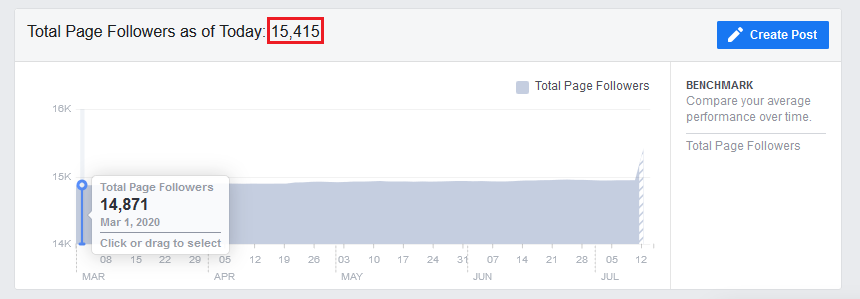
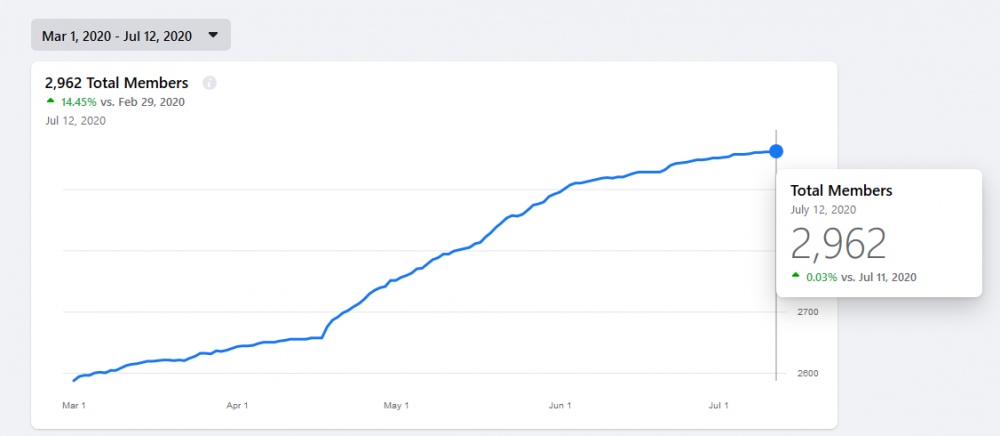
NEW In Memoriam Detachment Leader Executive Officer Public Relations - Social Media Merchandise Fire Teams Hall of Fame Just For Laughs INFORMATION & AWARD PROGRAMS Common FISD Acronyms and TK Glossary Pre Approval Forum 3D Section Field Exercise Award Master Armorer Program Imperial Attaché Program EIB & Centurion: What do these terms mean? Advanced Tactics Awards EIB - The March To 1000 Public Relations Staff List 2020 Follow FISD On 13th July 2020, Grant Imahara passed away. As a tinkerer, electrical engineer, and media personality best known for his stint in Mythbusters, Grant Imahara’s contribution to the Star Wars universe lives on through almost a decade of work at Lucasfilm. Moving to Industrial Light and Magic (ILM) from THX, he eventually became the chief model maker responsible for visual effects such as the animatronics used in the Prequel Trilogy, and lent his inventive and collaborative spirit to other movies such as Galaxy Quest, The Matrix, and Jurassic Park. Fellow Mythbuster and 501st honorary member Adam Savage paid tribute to Imahara, saying: “I’ve been part of two big families with Grant Imahara over the last 22 years. Grant was a truly brilliant engineer, artist and performer, but also just such a generous, easygoing, and gentle PERSON. Working with Grant was so much fun. I’ll miss my friend.” Our condolences go out to his family and friends. "Buckets Off" Greetings troopers, hope this newsletter finds you well. Wow, can you believe we are already 5 months into this term and what an interesting year it has been so far. First lets recap on the Detachment health and what we have achieved thus far, then move into what lies ahead. As far as command staff planning and election promises go we are in a great position. Some projects are long term others short to mid term but we are moving along smoothly and to the numbers. First order battle group continues to expand and will do into the future but we are glad there finally exists a good home and one stop resource outlet to support our First Order family. If you have anything to contribute to that section please do so. Visual checklists and guides are almost complete across all our CRL's for EI and Centurion with some big hours and outstanding drive from wignut65 (Jeff) DL's blog to keep you in the loop and behind the scenes with what's going on is alive and well, and I will continue to put these out on a regular basis. Forum refresh is in it's last stages with the colorful banners created by gmrhodes13 (Glen), personally I think they are all awesome, I hope you folks do to. New Vendors list completed, and it's great to see a FO specific list with so much content. I'd like to thank all our vendors for the outstanding products they produce and supply with consistency, you make becoming a highly screen accurate Stormtrooper that much easier. A few minor CRL amendments to make life easier for GML's and members alike. There are several larger updates to be started on where membership will have plenty of input so keep an eye out for those in the near future. March to 1000 special event merch is now designed and ready for the approval process. This will go on sale once we achieve the number and I will continue to leak teasers for this one off piece of merch as we get closer. CRL Translation team. This has just recently started with our first CRL being translated into Spanish. Many languages to follow but as we got through this process we are still finding a few errors in the CRL's themselves that need to be fixed. Stay tuned for updated progress on when they go live. Trading card issues now look to be resolved and moving forward again thanks to much help from Hoda (Eric) We now have a new spreadsheet and system with Tray finishing up the last few outstanding cards. While on the subject of Trading Cards, Tray has found it increasingly more difficult to continue fulfilling the print service he has so wonderfully offered over the years. The current Covid situation, work and real life has consumed his time so we will now revisit the topic of Print Your Own services for all trading cards moving forward. Thank you Tray for your long standing service, we hope things improve for you in the future. What's to come The DO's are working on a new guide to make it even easier to get your application for EI and centurion right the first go. They are focusing on the top items that applicants get wrong so this will hopefully all but eliminate the same mistakes being made by applicants in the future. CRL revamps for TLJ/TroS and Phasma TFA TLJ. these are rather large projects that will take time but we are aiming to fix any of the errors and update with new information and images. RotJ CRL, yep we are finally in discussion regarding a weathered Endor variant to add to this CRL. This cant be done without a CRL Model, so if this interests you please be sure to send the XO's or myself a Pm. Remnant Incinerator Trooper (The Mandalorian) CRL will be under construction later in the year as we currently have a new member Nicker (Nick) building the costume for the CRL to be created. Staff position compendium will start in a few months with the notion to make a job description for each staff role clear and understandable. This guide should make it easier for anyone wondering what is entailed in all roles from the top to the bottom. Continued forum clean up and image restoration. This is one of those ongoing processes that is quite time consuming but slow and steady wins the race. I just recently posted a thread explaining how any member can play a part in helping with the clean up process, it's easier than you may think. EI Gallery recovery. Monumental task that requires some back end manipulation to attempt to bring it back to it's former glory. Then it needs to be updated with over a years worth of EI submissions. This is going to take a lot of time but we will get a start on it if we can recover the old data. Future merch possibilities. We would love to get a coin run happening later in the year and are floating a few other ideas so stay tuned. That's it from me until next time, stay safe and see you all again for next months edition. With Unquestioned Loyalty Andrew Franke TK11469 "Sly11" Detachment Leader Greetings Stormtroopers and Stormtrooper enthusiasts! There is a great deal of work and activity that is always happening beneath the surface of the FISD, so that it can continue to be the fun and valuable asset that it is for each of you. The Newsletter is really just the proverbial tip of the iceberg that you see each month. At this very moment, there are a lot of moving pieces that we on the Staff are working to pull together. There is some really exciting stuff in the works at the moment, but I'm not going to spill the details just yet, as we never know if they will come together as we hope they will in the end. I am not at all kidding when I say that some of the things in the development phase right now are quite literally firsts for the Detachment - or they will be - if we are able to pull them off. Aside from that however, Happy Birthday to the FISD! Another year in the books, and membership continues to grow and serve as inspiration and support for each other. There is truly something beautiful in this community, and that is what keeps the work happening. It keeps happening in the forums, and out in the world. If you're recently approved, consider submitting for EIB. Maybe you will be #1,000! With Unquestioned Loyalty Tim Waychoff TK51878 “Dark CMF” Executive Officer Social Media To get you some insights on how everything on our social media platforms evolves, I present you several diagrams. These show the progress we make within our pages and groups! As of today our Facebook page has increased the number of followers by 544 compared to the beginning of this term. This means, we cracked the magic number of 15,000 followers, making the FISD the 501st detachment with the most followers on it's Facebook page. Our Facebook group gains more and more interest and we can look at a proud number of 2,962 members as of today. We gain 2-3 members a day. That being considered, we will probably reach the number of 3,000 members by the beginning of August. We hope to spread the word furthermore, to get the rich information of our detachments forums out to all newbies and current builders. Our Facebook DPRO @Rat is approving new members on a daily base for this useful and entertaining group. Also a huge Thank You! to our DCoGs for helping moderate any discussions on this communicative platform! The numbers of our much younger instagram page evolve great! We are now at 3,354 followers, more to come. Our DPRO Teresa @Soulart creates new content on a weekly basis to keep all our fans and member updated and entertained! Finally we have to admit, our team has been a bit lazy on Twitter lately. We haven't generated much content for the Twitter platform and also users didn't reach out to us via Twitter very often. Still our number of followers is pretty much constant, with a small tendency upwards. We plan to get more activity on our Twitter page and present more content to our Twitter using fans and followers. Stay tuned and be impressed! To get the full FISD Social Media experience, follow us on Twitter, Instagram & Facebook and join our group! Facebook: www.facebook.com/whitearmor Facebook Group: 1st Imperial Stormtrooper Detachment (FISD) Official Twitter: www.twitter.com/FISD501st or @FISD501st Instagram: www.instagram.com/fisd501st With Unquestioned Loyalty Daniel Lauber TK55550 "Ripper_L" PRO Editor at Large FISD Standard Shield Patches (closes 31st July) Patches cost $1.53 USD each + shipping How to order Order thread here MARCH TO 1000 Here is the first glimpses of the new piece of merchandise for the March to 1000 EIB campaign, each month there will be another section released. Approval has been given from the LMBO's and ordering will open up once we are closer to the magic 1,000, only 25 to go Welcome to our 59th Fire Team: Death Star Veterans!! They are also the first Austrian Fire Team. Region: West Texas Squad, Star Garrison Name: West Texas Sharpshooters Congrats Troopers!! For the full list of Fire Teams head here For more information on Fire Times follow the link here: http://www.whitearmor.net/forum/forum/130-fire-team-area/ (501st membership is needed to view this area) With Unquestioned Loyalty Mark Ryner TK4584 "captsafe66 " FISD/Fire Team Director Troopers please welcome TK - 16233 Eric to the Stormtrooper Hall of Fame! https://www.whitearmor.net/forum/topic/48497-tk-16233-troop-log/?do=findComment&comment=689921 Stay safe everyone! With Unquestioned Loyalty Aaron Gibson TK-99725 "Pyrates" Curator Hall of Fame Are you new to the FISD and wondering what the heck all those abbreviations and strange sounding terms mean? To help you @justjoseph63 has started a list of the most commonly used ones that will give you some insight. If you have ANY questions about a particular term that is not listed or suggestions for new ones please contact Joseph. You can find the list here Pre Approval Forum allows future Troopers the opportunity to submit photos of their completed build to be reviewed by the Staff, Imperial Attaches and others in preparation for forwarding it to their GML for approval. Any and all advice/suggestions given will be specific, constructive, helpful and respectful. Please note that this program will NOT take the place of your local GML, as Detachments are not chartered for costume approval and can not override a GMLs decision, but is instead a peer review program designed to help you look your best and offer guidance and positive feedback. You will have the opportunity to ask questions about your completed armor, weapons (if applicable), accessories, etc. and get accurate information from the experts here at the FISD.. the definitive home of TKs worldwide. For more information on this program, please visit the link here Contributor Awards Don't forget to visit our 3D section when next surfing the FISD forums, there is plenty of useful information to potentially help you on your next TK adventure. You may be a designer wishing to showcase your latest designs or prints, or maybe looking for a file to print your very own Blaster or Laser Axe. You might be feeling may generous and share with our community a new TK related 3D file and maybe win yourself a 3D contributors award so check out the details below and be part of the in house 3D community. Here is a link to the FISD 3D Contributor program. Don't forget to create a troop log here on FISD and get awarded for your adventures The list of accomplished troopers keeps growing, so get on board and register your troops today. Simply start (or update!) your troop log, keep the running total in the title, and post (at least!) a date and name for the official 501st event where you wore your TK! Once you've hit a milestone count, go over to the "Field Exercise Awards -- Post your milestones here" thread to request your profile be updated! Simple, right? Milestone post example: Milestone and Troop Log Title: [100] TK12345 My troop log Date and Event: 8/23/2019 -- Death Star Cooking Class Photo: Pictures are not required, but are highly encouraged! Your picture may end up in the Stormtrooper Hall of Fame Award Recipients June - July TK28046 "TK-28046" Leonardo - TK14057"JODOKAST" Marcus - TK17144 "Laura" Laura - - --- TK72179 "jamihal" Jim - --- --- TK62000 "scottdm62" Scott - --- --- Congratulations troopers The FISD Master Armorer program is an optional, detachment only incentive award to recognize individuals who have directly helped another 501st stormtrooper to achieve Expert Infantry status. Some people spend countless hours helping others, and want to reward their results as well as incentivizing new people to help as well. To register a “win” in the program, the assistance must have provided hands-on help trimming, building, and/or fitting of said armor for the person who was awarded Expert Infantry status. Other program notes: • Helping remotely, giving advice, or taking payment in exchange for help does not account, all work must be voluntary and without expectation of compensation. • The assistance must be for a period of 30 minutes or more. Spending 15 minutes tweaking someone’s fitting or taking photos does not count. • "wins" can be retroactive, e.g. if you helped 5 people in 2017 already, those can count as long as they are fully documented. Award Levels • 5+ “wins”: FISD Armorer Badge • 15+ “wins” FISD Senior Armorer Badge • 25+ “wins” FISD Master Armorer Badge The process • Person applying for the award will create an application thread to track the help they give. • For each “win”, they will list the person they helped achieve Expert Infantry status by copying their EI approval thread. • For each “win”, the person who was helped will validate that this person helped them. You can find the master award area here https://www.whitearmor.net/forum/forum/182-fisd-master-armorer-program Are you an approved TK that spends more time on the boards than the average Trooper? Do you enjoy using your knowledge to help out future and existing Troopers? If so, we would like to invite you to join the Imperial Attaché program! Members of the I.A. team are chosen to help out not only those here on the boards, but on a local level as well. Our aim is to have at least one in each and every Garrison, Squad and Outpost in the entire legion to be the eyes and ears of the FISD on a local level. A suggested level of EIB or above is preferred, as part of the duties include assisting those aiming for levels 2 and 3, but is not a requirement. Being active on the boards on a regular basis , welcoming new members and helping out where you can is, though. Some of the benefits: 1. Access to exclusive Attaché merch., including patches, etc. 2. Having the Imperial Attaché title under your name. 3. Being a part of the team that welcomes new and prospective members of the FISD. 4. Being the "go-to" person in your Garrison, Squad or Outpost. 5. Exclusive access to the Attaché HQ area, Imperial Propaganda Machine (newsletter) and merchandise discussions. For a complete list of Imperial Attaches, go here IMPERIAL ATTACHE AWARD Imperial Attaché Award for those attaché's who have gone above and beyond [minimum 1 year of service] You can find a list of prior recipients here Attaché Patch For those of you on the Imperial Attaché staff, the official I.A. patches are available Here are the details.. PLEASE READ CAREFULLY! Patches will be limited to TWO per person, and will only be sold to those who are currently serving FISD Imperial Attaches. You can find the thread here (Imperial Attaché's ONLY) ATTACHE ROCKER For those of you on the Imperial Attaché staff, the official I.A. rockers are now available. You can find the thread here Attaché Ambassador The detachment keeps getting better and better. This month we have TK-20846 and jsilvius stepping up to help their community as an attaché. @TK-20846 (Leonardo) will be helping us extend our TK nation in Quito, Equador And jsilvius (James) will be assisting fellow TKs right here in the states through Garrison Tyranus The staff thanks them for stepping up and helping others With Unquestioned Loyalty Frank Peranteau TK75139 "Frank75139" Attaché Ambassador So what exactly are EIB (Expert Infantry Badge) and Centurion levels? These programs were designed for those who choose to take their armor above and beyond the minimum requirements for basic 501st Legion approval. It gives you the chance to show a level of dedication and pride that takes your armor closer to being as "screen accurate" as possible, without as much extra work as you may realize! It also works on giving a better look to the Legion as an entity, and you can bet others will take notice of your hard work. The 501st has a list of detailed requirements for Basic approval, (level 1), EIB, (level 2) and Centurion, (level 3) which can be found here in the Costume Reference Library, (CRL) http://databank.501st.com/databank/Costuming:FISD_CRL Here are a few of the questions people may be wondering about: 1. "I am a (tall/short/heavy/thin) Trooper. Can I still apply? Of course! These programs are open and encouraged for all sizes of TKs, as long as the costume is correct and meets the guidelines. There are many specific build tutorials to every option, as well as a vast network of fellow TKs on the FISD to help you out and offer suggestions. 2. "How much extra will I have to pay for extra items"? The cost is actually quite reasonable, considering the few extra supplies you will need, which are listed in the requirements area. While it may run you a little more to implement these additions to your costume, they will go a long way to improving accuracy. All needed items can be found for sale on this thread: https://www.whitearmor.net/forum/forum/16-ongoing-sales-project-orders/ While blasters are not required for basic approval, for EIB and Centurion levels they are, and may need upgrades (also listed in the CRL). 3. "I haven't even got my kit yet, is it too early to start planning"? Actually, aiming for Centurion is easiest to do right out of the box. 4. "I have my basic TK approval, can I still get in these programs"? In a word... absolutely! 5. "Are there any "perks" to this extra work and cost"? Besides knowing that you have a great looking set of armor, the 501st and FISD believes you should be deservedly recognized for your achievement(s), and allows you to wear the appropriate embroidered "rocker" badge of rank (available for a very minimum cost) on your shirt, helmet bag, etc., as well as rank decals to put on your armor bin. You will also have access to select "challenge coin" runs, receive (free) a cool certificate for your new rank, and have your title posted below your name in your FISD signature. Plus, once you reach these levels, you will have the extra knowledge to help out those who are looking to apply as well. 6. "Is it hard to apply, and what happens then"? After basic approval, all you do is make sure your armor is up to the standards set forth in the CRL, post a thread with the required photos in the appropriate area (see below), and wait a bit for the D.O.s (Deployment Officers) to address it. (Hint: Studying other people's threads before you submit can be a GREAT help). These are also listed on the main page of the FISD site. While waiting for approval, you will get some comments from others who will offer suggestions and constructive advice to help you out. If you should need any changes, the DOs will let you know, so you can adjust accordingly. Don't be dismayed if you do need changes... it's all for your benefit! After you are approved for EIB, then you can submit for Centurion. EIB https://www.whitearmor.net/forum/forum/19-request-expert-infantryman-status/ Centurion https://www.whitearmor.net/forum/forum/72-request-centurion-status/ Just remember that the FISD is here to help you every step of the way with whatever other questions you may have, but if you can't seem to find what you are looking for in your research, just ask away here on the forum. This area lists all those who have gone above and beyond basic approval toward screen accuracy. FOR June - July the 1st Imperial Stormtrooper Detachment would like to congratulate: Expert Infantry Badge Award: Leonard "lmc3" TK50421 EIB 970 David "MrFlavaFlave" TK79008 EIB 971 Dani "chamu" TK19587 EIB 972 Laura "Laura" TK17144 EIB 973 Fernando "Fernando Baro" TK29415 EIB 974 Caleb "ticopowell" TK84095 EIB 975 GREAT job on your approval, now on to Level 3! Request your free EIB certificate here Centurion Badge Award: Eric "GoofTrooper" TK37423 Centurion 466 Dan "R2Dan" TK8527 Centurion 467 Peter "4Runner" TK33348 Centurion 468 Outstanding job on reaching Centurion, Troopers! Request your free Centurion certificate here If you see any of these Troopers around your Garrison or Squad, be sure to congratulate them! ONLY 25 SPOTS LEFT, TROOPERS, SO TIME TO STEP-UP! Now that many of us are unfortunately stuck at home and boredom is beginning to take it's toll, it's time to wipe the dust off of that armor bin and become a part of FISD history! Instead of binge-watching re-runs, we are suggesting that you put the D.O. Staff to the test and spend some time on that white armor you miss wearing so much by applying for your Expert Infantry badge! As you may be aware, we are aiming to have #1000 approved by the end of the year. We only have 25 to go, so in order to reach that goal we are asking that you read over the CRLs for your particular armor, (this thread will help) make any necessary adjustments and post up your submission! Photo Checklist- Link here Apply Here Questions: 1. Not sure if I have what it takes to get my EI badge- You don't know until you try, and you have not only the D.O. staff but an entire Detachment to help! 2. I need some repairs/fixes first- This is why we are here! We honestly want you to succeed and are here to help in any way we can. 3. I am happy with the way my armor looks, so why bother?- It not only makes you look more screen accurate, it instills a sense of pride and "esprit de corps"! 4. What if I don't make it? No worries, we will provide detailed suggestions on how to reach your goal! Benefits: 1 Bragging rights for being one of the "Original 1000" 2. You get a cool badge under your name here on the FISD. (Street cred). 3. Access to EI rocker badges (coming soon) to go above your FISD patch (also coming soon)! 4. Access to coin runs for EI awardees only. 5. Certificate for your accomplishment. 6. You'll be one step closer to Centurion! 7. Most importantly, having a more screen accurate looking set of armor!! Know that the entire Staff and those who have reached Levels 2 (and 3) are here to help in any way we can, and that you are more than welcome (and encouraged) to ask any and all questions you may have here on this thread, or contact myself or Sha Sha. You can do it, Troopers. Let's turn this "anno horribilis" into a banner year for the FISD! Newsletter If you have any interesting stories or photos or something you think newsworthy please send them to me via pm @gmrhodes13 With Unquestioned Loyalty Glen "Q" Rhodes TK-85421 "gmrhodes13" PRO Newsletter Staff List 2020 Detachment Leader (DL): Andrew Franke (Sly11) TK11469 Executive Officer (DXO): Tony Jobe (ukswrath) TK-10116 Executive Officer (DXO): Tim Waychoff (Dark CMF) Deployment Officer (DCA): Joseph Pedigo (justjoseph63) TK-10963 Deployment Officer: (DCA): ShaSHa (ShaSHaChu) TK-19233 Deputy Deployment Officer: (DCA): Mario (TKSpartan) TK-48117 Lead Provost Marshal (DCOG): Steven Sheades (starsaber25) TK-10466 Provost Marshal (DCOG): Chris Pearson (themaninthesuitcase) TK-10911 Provost Marshal (DCOG): Aaron (Bronx) Gibson (Pyrates) TK-99725 Fire Team Relations (PRO): Mark Ryner (Captsafe66) TK-4584 Personnel Officer (PER): AC (Novatie) TK-5597 Content Editor At Large (PRO): Christoph (Danny) Lauber (Ripper_L) TK-55550 Content Editor Awards (PRO): This will be handled by the XO’s Newsletter Publisher (PRO): Glen Rhodes (gmrhodes13) TK-85421 Attaché Ambassador (PRO) Frank Peranteau (Frank75139) TK-75139 Social Media Relations (PRO): Teresa Nuthall (Soulart) TK-41307 Social Media Relations (PRO): Jim Ferrell (Rat) TK-95970 Imperial Propaganda Machine: Brien Edick (Harbinger) TK 92802 Imperial Propaganda Machine: Eric Ho (Hoda) TK 77520 Systems Administrator (DWM): Eric Brager (Darth Aloha) TK-9674 Systems Administrator (DWM): Mathias (Locitus) TK-2959 Detachment Founder (DF): Paul (Daetrin) TK-8020 Replica Section Curators (PRO): Dan Branton (CableGuy) TK-42911 Replica Section Curators (PRO): Daniel Melin (The Swede) TK-99665 Don't Forget We're on Facebook, Twitter & Instagram Facebook: www.facebook.com/whitearmor Facebook Group: 1st Imperial Stormtrooper Detachment (FISD) Official Twitter: www.twitter.com/FISD501st or @FISD501st Instagram: www.instagram.com/fisd501st On behalf of the 1st Imperial Stormtrooper Detachment Command Staff and the Imperial Propaganda Department
 1 point
 -
Deeper into the weeds with the rotary switch tonight. I enlarged the hole a bit more inside the handle so that I could get the switch closer to the top of the opening after reviewing some more Sterling pictures from Aarons Blaster compendium. I also decided I would use some thicker ABS than I was. That decision was more based on the fact that I goofed it up and had no more that size. I am happy with what I have gotten so far. Realistically this part of the handle is all that's left to do besides wiring it all together during final assembly. I did change the wiring of several components to a 32 AWG ribbon cable so that it looks more clean when I run those wires to the Hengstler and scope but that will be a post for another day. Here are new pics of the handle and Rotary switch opening placement and the new ABS cover sheet.1 point
-
Worked on my end cap clip. Used another fine component from T-Jays kit along with a 3d printed part. I tried to free the clip from the single piece of resin that came with the Doopydoos but got overzealous and trimmed too much. I folded over a piece of an old baking sheet that's been chopped up to make the spring and pinned it with a touch of super glue. Sent from my sorrosuub C1 comm link device using Tapatalk1 point
-
Made some time to do some painting today. First I started with the scope. A coat of brass followed by some toothpaste to make weathered spots and then some satin canyon black. I didn't like that so much so I toned it down with some matte black. Still seems a little shiny so I may hit it with some plain old flat black in the morning. I also applied an aluminium finish to the entire body. I think I like that much better than the "silver metallic" paint I used previously. I think the softer color and less harsh metal flake is more appealing to the eye. Afterwards I attached my 3d printed magazine well and filled in the gaps with the green stuff.1 point