Leaderboard


Popular Content
Showing content with the highest reputation on 05/24/2020 in all areas
-
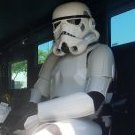
COSTUME INFORMATION Armour, Helmet and Neck Seal: Anovos TFA Gaskets: Imperial Gaskets (rubber) Belt: Belts of the First Order Hand plates and Holster: R2Dan Boots and Gloves: Imperial boots Undersuit: Stormtrooperundersuit F11D Blaster: Resin kit (Justinian) Name: Jasper Tan Height: 170cm Weight: 80kg TKID: 7867 Garrison: Singapore Garrison Level 1 approval: https://www.501st.com/members/displaymember.php?userID=13500&costumeID=326 APPLICATION PHOTOS FULL BODY HELMET ARMOUR DETAILS NECK SEAL CHEST, YOKE AND BACK THERMAL DETONATOR SHOULDER AND ELBOW GASKETS SHOULDER BELLS BICEPS FOREARMS GLOVES AND HAND PLATES ABDOMEN COD AND POSTERIOR BELT UNDERSUIT THIGHS KNEE GASKETS KNEE PLATES SHINS ANKLE SPATS BOOTS F11D HEAVY RIFLE ACTION SHOTS For the DO's kind considerations, and do feel free to ask me if you need any clarifications, thank you!5 points
-
Hi guys!, I’m Nora from Madrid, Spain. I’m quite happy to be here!, I’m a future Stormtrooper ANH Stunt, waiting for my RS armor in a few weeks. I am already receiving some of the accessories for my armor (the transport trunk, the aker ...) and every time I am more excited! Hope I can show you my armor soon!2 points
-
Just make sure your ears will cover any openings, also make sure you can fit your head inside, (fyi they don't go straight on, put on sideways then twist) Adjusting the angle on the sides makes the opening larger and smaller and also adjusts the brow trim height. A couple of test screws to hold together first then check all the alignments.2 points
-
Easy fix for the most part.2 points
-
And I'm approved! Gonna be submitted for EIB soon!2 points
-
Hi FISD staff, members and friends. I’d like to thank all the FISD staff for working tirelessly over the last week on this nightmare. I know it’s not a decision you and the other staff members have taken lightly. Believe me the last thing I wanted was to bring down a trusted vendor who I respected and trusted. But in his own admission of guilt has done this to himself. I’d also like to thank all members I have known on this forum for many happy years and members I hope to get to know, a heartfelt thanks for the overwhelming support I’ve had through this whole debacle. It really has been a humbling experience in more ways than one. THANK YOU ALL. Sent from my iPhone using Tapatalk2 points
-
Thanks, The ears do cover the seams, I could trim a little more if I wanted but I figure I can always trim more later. I'll take a picture with the current ear shape/location, that might help. I've tried it on like this, it fits fine as far as I can tell, but I wouldn't know if it didn't. I guess test screws won't hurt anything (that's what she said?) So I'll try that. As long as they aren't blocking the ear holes I guess it wouldn't matter much.1 point
-
Sanded the putty to 220. I saw a few more spots so I'll fill those in later today. Pulled the tape off, since I'll have to tape the outside for interior painting. Wanting to make some progress today, I decided to work on the lens. Outlined what I wanted to clamped a Dremel with cutoff wheel to a worktable to act as a tablesaw. Worked great! Taped it in to get an idea and it looks great! Tried it on to make sure I cut enough out of the bridge for my nose and it's perfect! With back light. Added some more putty. I'll sand it to 220 tomorrow and tape off the holes to prep for interior painting on Tuesday (hopefully). Then I'll tape the inside again and prime for the last time...1 point
-
The link is in the first post, somewhat hidden behind the title with the big letters I reveal it now without overlazing it with another text: https://github.com/Protonerd/FX-BlasterOS Let me know if you need any assistance or advice!1 point
-
looking sharp. good Luck.1 point
-
Hi all, I have an old Anovos kit that is collecting dust (have had it since the first run) so figured I would start building it since I have ALOT of time on my hands. I have a Tie Pilot, tie reserve, and a Boushh. Wanting something to go along with my husband's vader!!! I will start a build thread soon, just wanted to say Hi!1 point
-
I'm now 28 hrs into my build as I'm starting on the ROTS soundtrack for the third time (listening in order of release: 4,5,6,1,2,3,7,8,9). I'm enjoying this marathon, and I'm hoping to keep a sustained pace until I submit for basic approval sometime in June. Questions: Can I use Anovos shin velcro, or is it crap? If I should replace it, any recommended products? I saw Justin recommend some ultra thin velcro, but you have to buy 25 yds at a time For water bathing calves, if they don't fit in my sink and I don't have a large pot, is a bathtub my best bet? Recent Progress: I completed my last forearm cover strip, so all forearms and biceps are fully assembled. In the near future I'll be further trimming some of the cutouts that allow arm bending because motion is a little restricted right now. I only added inner cover strips to the joints with shims because I didn't want to lose any more internal space within the armor piece, but I'm realizing I might as well add inner strips behind the raised portions of the forearms. I want to water bath the biceps so I might still add inner strips to them after. I started trimming the backs of my shins. I found that when I measured the amount of material I wanted to cut and used a ruler to draw that line down the back of the shin, my joint seam became angled (not straight up and down like intended). I quickly realized that you want a cut a slightly rounded line to accommodate the curve of the piece, so I used a ruler to measure to the apex of the "calf bulge" to clean up my previous cut line. For the second calf, I ended up measuring my cut distance of 1/2" from the current edge all along the piece (you can see faint pencil dashed on the right side), since the initial trim edges lined up well. I followed this path with my straight lexan scissors and this turned out well when I taped the back of the calf together. A quick eval of the calves on my boots showed a mistake I made that was accentuated by the curvature of a piece. For my right calf, the front cover strip appears to angle out because the inner piece is much more convex than the outer piece. I don't remember trimming any of the outer piece, but this is a good reminder to assess whether you should take more off of one side than another and not just distribute your cut 50-50 between two pieces. I'm going to slightly trim around the ankle then water bath both calves, so I'm hoping that makes this issue less glaring. I remeasured my shin circumferences at the calf and ankle and found they're a little smaller than what I targeting, so I'm short on space for magnetic closures. I'll start with velcro this time. Next Up: Thighs: I need to slightly trim the circumference on one, then I'll glue inner cover strips for all pieces, then outer strips. I'm waiting to do any Torso pieces: gluing reinforcement strips around high stress pieces Painting buttons. Planning on tracing a dime on my painters tape and cutting out templates. I'll try two coats, unless only one is necessary TD: hacksawing to correct the length. Painting screws black. Applying velcro to both sides of metal clips Snaps snaps snaps Helmet modifications: trimming eyes, cutting out lenses and adhering with Sugru. Replacing incorrect ear screws. Saving repainting tube stripes and ear trimming for a later time haha.1 point
-
Reinforce some of the armor pieces and the helmet painted the inside white and the inside of the helmet black1 point
-
Congratulations Jasper!!! You will not have problems with EIB and CENTURION... Regards.1 point
-
That was using image shack. If you click on the photo does it take you to the hosting site and show the image full size? I noticed it was a bit small in the post, it may just be the image I uploaded was small. I will keep testing and may use another hostin site.1 point
-
Looking MUCH better, sir! I see two small issues that may come up, but these would depend on your GML. The gaps between your bicep/forearm could be evened out a bit, as the left is a bit lower than the right. Evening them out is a pretty easy fix and would give you a much better look. The other is the paint on the frown and top of the left ear bump. For some reason it looks to have bubbled a bit and is pretty rough. Overall, though, looking sharp! Nice job!!1 point
-
Outstanding news Jasper, can't wait to see those EI and Centurion banners under you avatar. Congratulations on your Garrison approval1 point
-
"( " Yeah, as others have said, a water bath is probably you best bet at getting it flat. And although that extra plastic isn't listed in the crl, the safest way to be sure would be to talk with your gml on what they need. You have two, so if they say you don't need it (and you are fine with it), then use the trimmed one. And you can always try and flatten the other untouched one if you do want it.1 point
-
When the plastic is heated for thermoforming, it takes any shape, but when it cools it shrinks and can curl...I think that you need a warm water bath, but when the button plate is still hot, you must bend it to the other side a little, because the plastic will try to return to the initial position...Now it's like this ")" , well, try to bend it like this "("... Regards.1 point
-
Been working hard on the bucket today. Lots of tweaks, a few holes drilled and then re-drilled... But want to get feedback on the placement of the Left ear. Think I got the angle correctly (screws aligned with the back side of the trapezoid) But not sure about the height? Does ear need to go down more? Personally I like the way it sits and looks. I'm unsure about gaps in the front and back. Should I try to remove material from the top of the ear, and bring them in closer? Do a bit of refinement on the cuts to the ear?1 point
-
Looking better1 point
-
Think I got brow fixed. Believe it was the magnet pressing on the cap. The brow trim is a little janky by the left ear. I may need to trim it a bit as I continue to refine the bucket.1 point
-
Thanks folks. Fun times ahead1 point
-
It was not my intention to remove the edges. The design of the ab plate is too curved and would not sit on the ab plate. I have a second ab plate from Walt so I can show you the problem with the design of the ab button: Initially i just started to sand the bottom of the ab plate and was hoping by the time the bottom was flat enough to attach to the ab plate there would be some rectangle left. It was not possible to achieve it.1 point
-
Well my son was born a few weeks ago and I was on nesting house projects prior to that. But as mom and baby sleep, I have started on my armor again. I have trimmed all of the armor and need to sand but have a question about the arms and bicep covers. I should be able to use 15mm but do y’all use 7.5mm per half? Or 8mm and 7mm?1 point
-
Nice work, may have to add a little more roundness to the curve to remove some of the lines but looks great.1 point
-
I just got the GML approval, Woo Hoo :) now to wait on the welcome package from the 501st1 point
-
Thanks, guys!! I'm going to start by gluing the frame parts together. Due to the size of my resin printer I had to print the frame in 4 pieces. So there's a left side A & B and a right side A & B. The seam on the right side will be hidden by a "plate" that the blaster has. The blaster was based on a very old Bergmann pistol from the late 1800's. In the actual "real world" weapon, this plate swings away and you would insert the ammo clip there. In this blaster it perfectly hides the seam on the right side. The left side is a different story, the seam goes right down the side of the blaster, so that will have to be hidden. I use regular CA glue to glue the parts together. Here are the left halves... And then the left and right parts glued together. It's hard to see the seam due to the semi-transparent resin, but that will change pretty quick.. Some of the glue came out of the crack on the top piece but I was able to sand it away leaving just a small seam visible between the parts. I use Rust-oleum Filler Primer on most of my 3D printed parts. You spray it on, give it 1/2 hour or an hour to dry, then sand with 400 grit and repeat. The tiny sanded particles fall into any cracks and begin to fill them. After 3 or 4 passes of spraying and sanding, it filled in the small gap between the parts. Then I went up to 600 grit. I think that's it for today. Mark1 point
-
I can't wait to see the build thread! The main difference that I can note between stunt and hero for basic approval is the number of teeth on the helmet, and the number of rivets or the like on the holster to belt connection (hero's have 4; stunts have 2). Then as Mario said, there are more slight differences in higher levels. Good luck!1 point
-
Thanks! I modified the OT file and came up with this.1 point
-
Oh! I am not approved yet! Just submitted my photos.. haha! Thanks, anyway. I'm using studio paper backdrop for my shoot.1 point
-
Official Statement TM recast CFO JoeR helmet. Fellow troopers, Thankfully it is not often we need to deal with situations such as what has unfolded over the last week, with the subject of recasting one the Detachment has always taking a strong stance against. Our members are our priority, having you all feel comfortable with buying various products from reputable vendors and honest vendors falls into that mandate. We supply a trusted vendors list that brings that confidence to purchase and is governed by several factors some of which are, quality, reliability, accessibility, integrity, honesty and trust. This recast thread, the above factors and content within have all formed part of the tough decision making the staff has had to make. We feel the integrity and trust has been broken between members, FISD command staff and other vendors with one of our long serving armour suppliers. This is not a subject that the staff or I have taken lightly as we have poured over this since the initial post was made. We have looked at the very compelling evidence and we have seen the response from the accused sent only to the accuser. TM (Paul) has been given equal opportunity to respond directly and state his case here in this thread but he has chosen not to do so. The evidence has been viewed as irrefutable, and Paul's response to CFO (Mark) a full admission that this was done with ill intent. This has led the command staff no choice but to make some decisions and take actions in the best interests of our FISD membership. First decision was to have TM removed from our vetted sellers list. This does not prevent anyone from making purchases from him, we simply wont feature TM any longer. The second discussion was in regards to a possible forum ban. A poll was set up for staff to vote anonymously with four options: No ban, 6 month ban, 12 month ban and Indefinite ban. The top poll placed was the indefinite ban, so from this point forward an indefinite forum ban period will be put in place against Paul. Paul is not a 501st member so there is no maximum period a ban can be in place. An indefinite ban period also gives flexibility that if this or future command teams decide to lift the ban, that option exist. We are not sorry for taking this hard stance as I have stated our membership is our first priority and we believe they should be able to procure their costuming needs from vendors that uphold honesty and integrity. Thank you for your time1 point
-
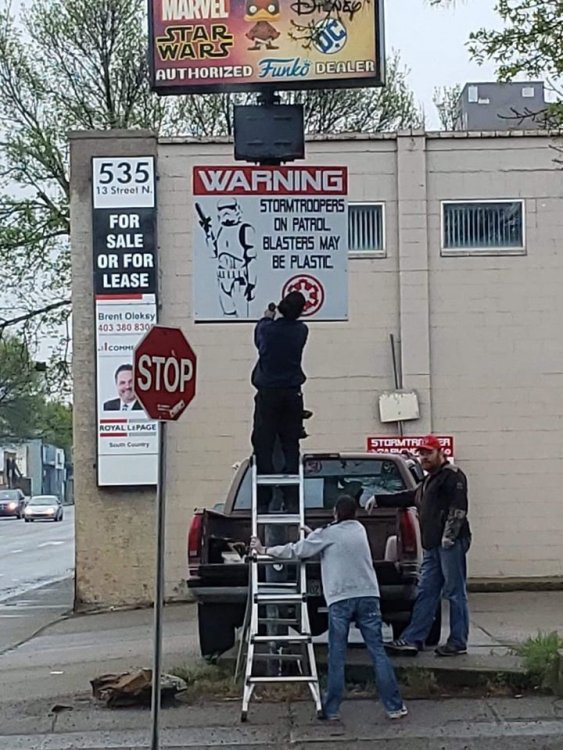
So in keeping up with what happened in Lethbridge Alberta on May 4th, updated signage from the pizza cantina.
 1 point
 -
Thank you for letting me know, I’ll be sending a PM. Yea I thought about whether that will be an issue. I’ll just have to wait and see once I begin the conversion. I think i also may have retained some fabric from my belt I had cut off. I also have a question regarding removing paint from my helmet if you guys can help me out. Do you guys know any alternatives to the testors enamel thinner to remove paint from helmet? I’ve heard that mineral spirits seem to work too although I’m not sure? Would it be the type you could probably get at Home Depot?1 point
-
Hi Charlie, you can definitely do much better than an SDS helmet. Some of the armour makers who do helmet kits are. CFO (cast from original) AP ATA TM RS prop. All of these can be found in our vetted armorers list in the getting started section of our forums.1 point
-
Hi Charlie, welcome to FISD. Both helmets are ok for basic approval and with minor adjustment in the Anovos one. For levels 2 (EIB) and 3 (Centurion) The crl states specifically for the Vocoder: The vocoder must be integrated into the helmet, and not a separate piece As I know, the Shepperton Battle Spec has the vocoder as a separate piece. (Can you confirm this with the vendor?) The Anovos Helmet will need a few adjustments for L2 and L3 too but they're easy fixes like change ear screws , modify the hovi tips mesh and some paint details. In my personal opinion, the Anovos one is easier to upgrade for high levels. Cheers.1 point
-
It's finally here got it on may the 4th! Went for a walk in yesterday but wasn't able to get any pictures of me in kit but here's a picture of the backpack. So happy it finally arrived! Has a compartment and a camel pack in the backpack. Got it from Dave's Darkside Depot.1 point
-
Another thing I do is when I am building the helmet I only apply adhesive above the eyes. As the adhesive dries it shrinks and cocks the lens up at the bottom of the eye that leaves about a quarter inch gab between the bottom of the lens and the eye sockets. You cant see the gap from the outside and having two "large" upward vents right above where you exhale goes a long way in preventing fogging.1 point