Leaderboard


Popular Content
Showing content with the highest reputation on 05/11/2020 in all areas
-
Update time! Been putting time in on the arms and the helmet lately - both are just about ready for final gloss, along with the rest of the kit. I may try to hang plastic and actually rig up some kind of makeshift paint booth on my patio for final gloss and clear... I'm tired of sanding tiny flies and dust out of my coats. Took several shots of the helmet in matte white: Forgot to take photos but I did a little more filling and sanding between matte and gloss coats. This thing is gonna be smooooooth, guys. I want to do a teeeeeny bit more cleanup after this first gloss cost, mostly around the teeth, traps, and ear bars. Switching from matte to clear can also illuminate flaws in the paint and while wet sanding, so I usually do that extra step when I want a really nice finish. Here it is in gloss: Here's the interior too. Debating a helmet liner from WhiteShadow (pics 2&3 as an example) but I'm unsure I'll have enough room for electronics... We'll see. The forearms are just about done as well. I'll probably actually start fitting the suit this week, while I let the paint offgass fully, then mask everything off for clear. While spraying an extra coat helped fill some of them, I did notice a pretty large number of pretty small pinholes in the barrel (I believe Jeff had the same issue)... After asking myself just how many tiny pinholes were acceptable and deciding LITTLE TO NONE - wouldn't you know it, my barrel broke out on some type of red chicken-pox-like rash... Seemed like the only cure for the itch was a little 1000grit scratch. I hate pinholes. You can see em better with the leftover filler... But not for long. The kids I high five in this thing one day will never know the depths of my madness... Anywho, I'm all done with radiation treatment now, so that's awesome! Apparently the next two weeks will be the worst of the side effects but it hasn't been tootoo bad. Then nothing exciting until I get a PET scan in 2-3 months to make sure this all did the trick. I really wanna get this suit done soon, and I know I'm in the home stretch, but that last 5-10% always feel like it's as hard as the first 90% of the project haha I'll get there.4 points
-
Nice work so far. If you are aiming for out and out accuracy, you could consider cutting the ends of the brow trim straight up and down (not angled like you have them presently). Here’s some nice examples. :-)3 points
-
Down to 35 now! Congrats to Dan Newman, (TK 62910) on his approval as EI # 965!3 points
-
*****Update***** Hey yall, just wanted to update everyone. I placed my order with Dave on a full commission build!3 points
-
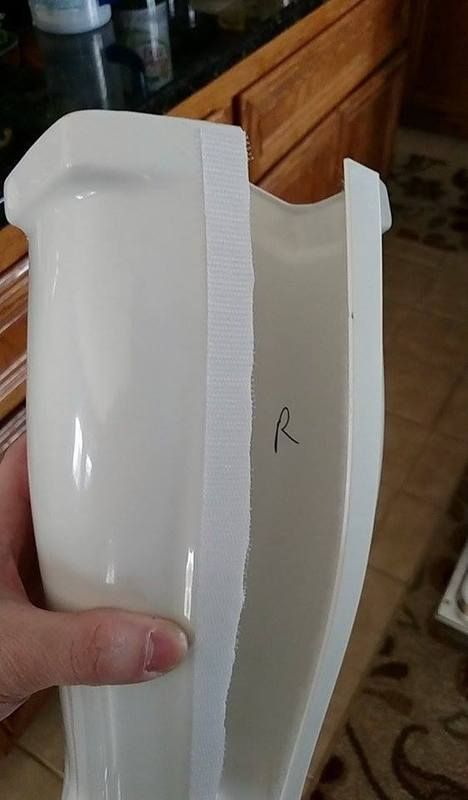
I been wearing mine out in public here in NY since March.... I was very popular in Lowes, Target, Hannafords I stopped using UKSWRATH Hovi Mic with the ICOMM hooked up for the tome being the Volume wheel go's to max and then I get loud feed back I have to move things around ...... but yes People love it2 points
-
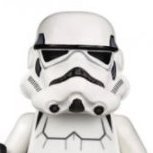
Forgive that these pictures are a bit out of order. I took a number of pictures that I failed to post updates for. Also! I realized recently that I bought gloss black, not satin black... I do not know how I managed to make that mistake because I did check out the paint references... So I will need to get some of that before I dig into the painting. After removing the masking from the plasti-dip spray, I found some of the spray had leaked out to the other side of the frown. I was able to remove this by gently rubbing / peeling / scraping the excess. On the inside, I removed the excess gently with an x-acto. The spray missed a couple spots. Just under the little ledge at both ends of the frown, and a little bit underneath one of the hovi-mix recesses. Easy enough to remedy with a brush, or can be left as is. Some parts of the helmet where the plastic is thinner show up darker now on the outside (will include a picture later). I’m not sure if pre-painting the inside with a white base before doing the plasti-dip would have remedied this, but the layer can easily be pulled off and redone. I may end up removing some for the lens mounting and potentially reinforcing the inside of the hovi-mix recesses (the plastic is especially thin there). Inside of the helmet. Bottom right underneath the hovi-mix recess shows a little spot where the spray missed. From where I stand, with the brow in place, I’ve got about 2.5cm from the top of the brow to the top trap line on the left side of the helmet. On the other side, I’ve got about 2.5cm on the front side, but closer to 3cm on the other. I’m going to do a little more looking about. I can either trim this side, or I can pull the brow down a bit across the board to make it even, or I could leave it a little lop-sided.. It seems some helmets do show this side’s trap being a little asymmetrical. Ok, ok, I'll put Mr. Hyde away, lol. That's why I only cut the one side at an angle. Flipping it around brings back that straight cut. Looks like that edge could use to have the edge straigtened up (though I know I will likely need to pull in the cut line).2 points
-
Hi Joseph, Thank you, Sha Sha and all else involved for there time, support and recommendations. I will be heading for Centurion shortly (maybe trying to get in the 500, lol). I am hoping that the removal of some return edges and possible re-strapping (for comfort and fit) will resolve the forearm and shoulder bell issues. Also looked into warm water bath info to widen bells to get closer. Alot of this work is new to me. I am on the large side being 5'11" and 240lbs. In regards to the shim on the kidney plate, I could use all the advice i can get (lol). Again, I would like to thank all those involved in this process. This would also include all the troopers that have achieved this before me. I have learned much through studying their posts/submissions and builds. Thank You All !!2 points
-
So whilst attempting to refine and work on the armour with a 6 month old is proving challenging, I've managed to work on my E11 Blaster abit more, with weathering and making it look abit more realistic than just a black blaster. This is a Doopey Doos, with a T-Jay finishing kit. A few bits left to finish, but nearly there. Matt and Satin sprays arriving soon, screws to go in the front of the sight and the clip on the back underside to be added soon.2 points
-
NOTICE- see my 10-1-2020 comments. This thread will not continue to update, you can follow Kyle's WIP thread to see how we are strapping his ROTK. Because I have been asked numerous questions about how I did my strapping, I am making this tutorial on how I strapped my ROTK. First, you need to decide on two things before you do anything with your kit. 1. Do you plan on lining the inside of the armor? I chose to line the inside of my armor with flex seal liquid white that was applied with a paint brush. The decision to line the inside of the armor was made for two reasons. One was that the armor is fiberglass and was very abrasive on the inside. The second reason was because I paid for the under-suit and wanted to prolong it wearing out. 2. How do you plan on attaching the strapping? In most places I adhered the straps to the armor with PC-7 putty. Normal TKs adhere their strapping with Velcro. I was not comfortable with how well this would work so I went with a permanent PC-7. The Velcro may work just fine; however, I cannot attest to this. So, if you plan on lining the inside of the armor, you will want to mask any area you plan on applying Velcro because the Velcro will not stick to the flex seal and removing the flex seal is damn hard. It embeds into the fiberglass and even after sanding and using chemicals, it still was not receptive to apply Velcro. This should also be considered when you are planning out the Velcro to hold the leg and arms pieces closed. While I am talking about this, I would like to suggest that you attempt to use Velcro on the front and back of the lower leg armor. I did not do this, instead I permanently closed the front side of the leg armor and used Velcro for the back and this has caused stress on the leg armor when putting it on and taking it off. This has led to cracks. If I get around to ordering another set of RO armor, I will try to close the legs on the front and back with Velcro, so just a suggestion. I digress… so once you know if you are lining the armor and what attachment method you will go with you will need the following: Note: everything is black unless noted and all Velcro is 3M industrial sticky back Velcro except the drop box Velcro, its 1” “sewn on” Velcro with no backing. Quantity Length Width Use 2 31” 1.5” Nylon Webbing Abdominal Shoulder Straps 2 #24 4 part snaps Abdominal Shoulder Straps 2 1.5” Plastic loop Abdominal Shoulder Straps 2 4” 1.5” Velcro (both sides) Abdominal Shoulder Straps 2 5” 1.5” Nylon Webbing Abdominal Shoulder Straps 2 7” 5/8” Nylon Webbing Abdominal Back Closure 2 5” 5/8” Nylon Webbing Abdominal Back Closure 2 5/8” Plastic side release buckles 2 6” 1” Nylon Webbing Abdominal connecting Posterior Armor 4 #24 4 part snaps Abdominal connecting Posterior Armor 2 5” 1” Nylon Webbing Abdominal connecting Posterior Armor 2 1.5” 1” Velcro both sides Abdominal connecting Posterior Armor 3 5” 1” Nylon Webbing Abdominal connecting Cod Armor 6 #24 4 part snaps Abdominal connecting Cod Armor 1 5” 1” Nylon Webbing Connecting Cod to Posterior 1 11” 1” Elastic Webbing Connecting Cod to Posterior 1 #24 4 part snaps Connecting Cod to Posterior 2 12” 1” Nylon Webbing Abdominal to Legs 2 6” 1” Nylon Webbing Abdominal to Legs 2 1” Plastic side release buckles Abdominal to Legs 2 2.5” 1” Elastic Webbing retention loops Abdominal to Legs 2 15” 2” Elastic Webbing Shoulder straps for chest to back armor 2 10” 2” Velcro hard side Shoulder straps for chest to back armor 4 #24 4 part snaps Shoulder straps for chest to back armor 2 3” 1” Elastic Webbing shoulder armor to shoulder straps 2 #24 4 part snaps shoulder armor to shoulder straps 2 5” 1” Elastic Webbing Shoulder Armor to Bicep Armor 4 #24 4 part snaps shoulder armor to bicep armor 2 6” 1” “Sewn on” soft Velcro drop boxes to box belt 2 6” 2” Velcro hard side drop boxes to box belt So all of these parts considered, this is your shopping list: Quantity Length Width Description 1 72” 1.5” Black Nylon Webbing 1 24” 5/8” Black Nylon Webbing 1 78” 1” Black Nylon Webbing 1 32” 1” Black Elastic Webbing 1 30” 2” Heavy Duty Black Elastic Webbing 23 #24 4 part snaps 2 5/8” Black plastic side release buckles 2 1” Black plastic side release buckles 2 1” Black plastic loops 1 box 15’ 2” Black Industrial Strength sticky back Velcro 1 12” 1” Sew on black Velcro In addition to these materials you will also need the following: Sewing machine (preferably an industrial machine but most of this stuff can be sewn with a standard sewing machine). Black bonded nylon thread, I use #69 bonded nylon thread, but I also have an industrial machine, if you are using a standard sewing machine just get some black nylon thread general purpose. Webbing hot knife/ cutter. You can just cut the webbing with a box cutter or scissors and the melt the end with a lighter but this can be tedious if you are cutting a lot of webbing. I use a hot cutter like this one for $74.99 https://www.ebay.com/itm/Electric-Rope-Cutter-For-Paracord-Cord-Webbing-Belting-and-Blade-/293128089661 Snap setting tool and a hammer. You will need the anvil and the punch set. The anvil should be double sided to accommodate the cap and the eyelet. I recommend this tool set found on Amazon. https://www.amazon.com/Snap-Setting-Snaps-Vaughan-Bros/dp/B074HKBBW1 Most of these materials can be found at Joann’s or a similar craft stores but I would suggest that you purchase these materials from Amazon or webbing supply stores. On amazon you can order smaller rolls of webbing like 10’ in length; however, most webbing supply stores will require you to purchase full rolls which are often 1,000 yards and quite costly. Additionally, you can use polypropylene webbing instead of nylon webbing which is often cheaper but does not have the abrasion and strength of nylon webbing. Ok so that is the list of materials and tools needed. In my next update, I will cut and assemble the straps and show where they go and what they do. Thanks for the interest.1 point
-
Hey all! While I'm still chugging away on my Jimmiroquai R1TK bucket, I still don't have everything I need. One thing that I'm hoping for some recommendations on is the blue mesh/fabric to back my tube vents. I had planned on going to Michael's so I could see and feel some options, but it doesn't seem like that will be a possibility for the foreseeable future. So, I'd like to see what other R1TKs used and vouch for, so I can do the same without worrying if it'll work or not. Online at Michael's, I found this Palace Blue Matte Netting Fabric, which looks like a great, vibrant blue. However, it's a very thin mesh that I would probably have to layer several times so it isn't see through. I guess that would make it breathable, but I'm not sure it will work and I can't physically see it before buying... Online at Joann, I found Symphony Broadcloth Polyester Blend Fabric Solids, both Jazz Blue and Dark Royal Blue, along with Sportswear Apparel Stretch Twill Fabric Solids in Dazzle Blue, but they either aren't available for shipping or there's a 2-yard minimum order! I don't think Joann has what I'm looking for. What did you use? Thanks for any help/suggestions!1 point
-
Hey all, I originally posted this on Spec Ops as I figured it'd fall over there based on the trooper description and weaponry, but I got referred to here because of the white armor. I'm pretty sure here is the right area to post this for research... Anyways, while playing Fallen Order, the Heavy Assault Stormtrooper caught my eye. Taken from the description: "The Heavy Assault Troopers are specialized infantry serving the Galactic Empire on the front lines of war. They are primarily trained to defend combat zones as support squads to Stormtroopers patrols. They are highly proficient with the Z-6 Rotary Blaster Cannon, which fires off steady rapid, long-range bursts capable of inflicting heavy damage, and shielded by a low emitter energy ray. " If anybody else has seen someone building one of these and can link me a build thread to look at it, please share it with me. But, I figured I'd get your opinions. I'm interested in building one as I already have all the soft goods for a TK and have a commissioned Z-6 being finished any day now. The armor looks to be ROTJ style, while the helmet MIGHT(?) be ESB style. Thanks for looking, hope to hear your opinions on this.1 point
-
That is a Pretty cool you guys do that in Spain1 point
-
When someone has built one and submitted it for approval, a CRL will also need to be made. Here is the process https://databank.501st.com/databank/Costuming:CRLGuide You can also reach out to the LMO's (legion membership officers) [email protected]1 point
-
Either method is acceptable for each level, some even use magnets. http://i5.photobucket.com/albums/y200/ukswrath1/Anovos%20classic%20TK/Strapping/Calves/gallery_12157_16_3668.jpg
 1 point
 -
In such case, I may suggest one foam option and for more confort and breathable options I may suggest to add some fan to your helmet. https://www.amazon.com/Time-Crafts-sheet-Pack-inches/dp/B0764LX5QF/ref=sr_1_4?dchild=1&keywords=blue+foam&qid=1589229475&sr=8-4 Cheers1 point
-
Mario, thanks for the notes and pics! I have noticed that as well, looking through others' R1TK builds. However, since I can't go to a store and try out the look and feel of different options, I was hoping for specific suggestions so I can comfortably order it without worrying if it'll work. Thanks!1 point
-
I used blue craft foam. Bought a pack like this at Walmart, used the dark blue, which looks darker in the picture vs what it actually is. Cut two rectangles and glued them in. Sent from my SM-N950U using Tapatalk1 point
-
I'm curious as well. I just got a HSP helmet and will need to do this too. Sent from my Pixel 2 XL using Tapatalk1 point
-
Congratulations Trooper, Welcome to EIB.!!! Just few steps and go for Centurion !!1 point
-
All ANH helmets are held together with 4 rivets. 1 on each side behind the ear caps and 1 on each side at the base of the ear caps, as in the photo posted above.1 point
-
Nice work Nada.1 point
-
Thanks @ticopowell! Very helpful indeed! On my faceplate, the teeth were already trimmed. I've seen sets where this was not the case. The hovi-mics in mine were already painted and mesh glued in. It's interesting to see how the RS sets seem to come differently for each person. As for the frown mesh, after more research I believe it wasn't provided because they were not used for the screen. A balaclava can be used to obscure the face and stay more screen accurate. I think I will make a removable mesh. I happen to have some extra window screen lying around, so I can repurpose that. I'm aiming somewhere between super screen accurate and super convenient for trooping. (I am reconsidering my internal strapping system for the body to go with the snap method.. but I'll cross that bridge when I come to it). I've seen a second rivet being placed at the base of the helmet. See this one from StarWarsHelmets.com1 point
-
1,78 mts height, sorry .1 point
-
Hi Steve, hopefully you can get some good reference images from various angles so we can see all the detail. Any close up you can gain as well will be advantageous.1 point
-
In my case, the total length for the elastic (blue line ), is about 11- cms , I'm 5.84 ' and middle body frame . I attached the split rivet with elastic first and then take de measure to place the male snaps.1 point
-
Hello @ticopowell! I just checked out your TK build thread and you're making great progress! I wonder if you could actually help me out a little. I was super cool and did _not_ take any close up pictures for the hardware that came with the helmet at the beginning and now I'm in a little pickle. The bag that I was keeping the hardware in was not sealed completely and it was in the RS strapping box which has holes on the sides. I think I have the correct number of rivets and screws based on zooming in very close to the couple overview pics that I have with the bag in the shot, but I don't know about the nuts and washers. Would you mind posting a pic or list of the hardware you have? The holes! Big enough for washers and maybe nuts to slip through. Small enough that hopefully nothing else was lost. Here's what I've got left. 5 pop rivets, one longer than the others, 4 long screws, 4 shorter screws, 9 nuts, & 15 washers. Screws are flat-headed & slotted. I have not figured out what this long boy is for considering it came with the helmet. The other rivets are to attach the faceplate to the cap, two on each side. In order to prevent any more wandering parts, I've put the washers on the screws and the nuts on after. As a note the washers do not fit over any of the rivets pictured. I may pick up some additional washers to assist with the faceplate rivets as I've heard it can do a better job of securing them. I have also not determined why there are so many washers to go with the screws since the only place I can think that they would be helpful is on the inside of the helmet between the plastic and the nut. The other side won't have any effect since the slotted sides of the screws are going to be countersunk and anywhere else I feel like the washers would just be loose and flopping around. I took a look at Trooperbay and their helmet hardware (https://trooperbay.com/trooper-helmet-fastener-kit) is 6 screws, nuts & matching washers, & 4 rivets & matching washers. I've got what I need for the helmet, but I'm still left confused. Did RS provide extras for these? Do they belong with another part of the build? What am I missing? To answer your question, I have gotten as far as rough trimming & using magnets to try to figure out the faceplate placement. I'll put that in a second post below in a lil bit when I get it written out. I've done enough for a full picture update. Might as well ask some more questions while I'm at it.1 point
-
Hi Caleb, as far as I know this is up to the builder for comfort and personal option.1 point
-
Another question I haven't really seen mentioned yet. What's the length you used on the cod to posterior strap? I'm assuming that longer isn't necessarily better for looks, but for comfort I'd rather have it longer for obvious reasons. Any tips on that?1 point
-
Oh man, look how clean those tube vents are!! Great work bud. Fingers crossed on your recovery.1 point
-
Sanded the tear vents today, made slow progress. Nothing worth pictures... So my kids and others in the neighborhood have been painting and hiding rocks for others to find and rehide. Here's my contribution! Not too bad, for 2 reasons: 1) I did this free-handed and I'm not much of an artist, and 2) I used no references (not the CRL or even Google!), only from memory! Hopefully my R1TK bucket turns out better lol!1 point
-
Speaking of drop boxes.... They are sanded down to size. Next Ill need the belt ready so I can attach them to the elastic straps at the right spot. I did start the forearm to bicep glueing. I decided to do one half of the elastic at once, I figure I will have a lesser chance of making mistakes if I do it one part at a time. I just used some good old E6000 to glue them, and the tube I opened when I started this is almost empty. Good thing I have extras on hand1 point
-
First photos in my HWT today have a lot of dress issues, shoulder bell, backpack & sniper knee are big ones was good to finally get some photos in it. Sent from my iPhone using Tapatalk1 point
-
You need 7 single cap/tubular rivets so they will have sent 1 spare. 3 for the plastic ammo belt to canvas, 2 for the thigh ammo strap and 2 for the drop boxes (1 each). No washers were used on the original armour.1 point
-
Should be getting some photos tomorrow but this is what I have got my shoulder pouch to sit. Sorry for shucksty mirror only one I have that was close Sent from my iPhone using Tapatalk1 point
-
Thank you, Yep....we Folks of the Empire don't mess around. Gotta..."Get-r-done"1 point
-
Welcome to the boards trooper. Good luck with your rogue one build. I’m sure you will do great. Good luck1 point
-
Welcome to FISD and Garrison Tyranus Paul. If you haven't joined us on our forum, please be sure to do so. We are always looking for more Troopers! http://garrisontyranus.com/forum/ Be safe! Looking forward to trooping with you.1 point
-
Little update! It's been warmer here in SoCal (actually TOO warm some days haha), so I've been able to lay more paint. Everything (save the helmet) is FULLY WHITE now! All the interiors are resin-ed, decently smoothed, and painted flat white. All the exteriors are fully primed and have had at least 1-2 coats of flat white base, then at least one of gloss white on top. Just need to sand them back to 1500 or so, then let them sit for a week to completely offgas, mask everything, then I'll spray clear, hopefully in the next week or two. Tried to do a front and back shot so you can see a few of the interiors that aren't masked yet. At this point, the helmet is the furthest behind and is sitting in its last coat of primer, sanded and waiting for a coat of flat white - just need to finish filing out the tube vents and teeth. What a pain. I caved and used my dremel to connect holes I drilled at the edges, and nicked a couple spots, so I'll need to fill them back in a bit. I wanted to make sure these were cut out before spraying white though, so that's my project for the next couple of days. Oh, and in other fun news, got my Heavy Weapons Trooper EIB-approved finally, so that's cool! Centurion next once I find more energy to make a couple changes... I'm now halfway done with radiation treatment (10 out of 20 down!), and have been SUPER tired and achy, so it's been hard getting motivated to finish, but I'll get there. Thanks for stopping by!1 point
-
During this scary time.. I had to get the ol' gear out and test it after some major repairs due to cracks and such... Was out entertaining the building while many are in lock down due to COVID-19. Stay safe all!!
 1 point