Leaderboard


Popular Content
Showing content with the highest reputation on 03/12/2020 in all areas
-
Here's my attempt. I couldn't decide on a few things so I'm providing some options. One has gradients and would need to be digitally printed but the other two are more or less patch-friendly (I may have to simplify the troopers a bit). I'll probably tinker some more and change things... knowing me. Ok, now I’m just playing around but this might look cool as a T-shirt or sticker. I have some extra time on my hands thanks to COVID 19 - and it is too cold in the garage for building. Lol.7 points
-
Hey, hi, hello I'm a recent cadet from the Southern Dewbacks and I've just recently started construction on a FOTK from KB props and I am excited to join the ranks! As I am attending uni, I may not be as active on this forum as I would like to be, so updates on my builds will be slow . However, I am very passionate about Star Wars and looking forward to meeting the members on this forum2 points
-
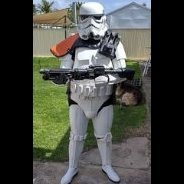
1. Name: James Beetham 2. Future garrison: Golden Gate 3. Armor maker: RS Prop 4. Helmet maker: RS Prop 5. Belt maker: RS Prop 6. Neck seal maker: RS Prop 7 Boot maker: RS Prop 8. Blaster maker: RS Prop 9. Height: 5'10 10. Weight: 195 Well after 8 long weeks it's finally here! This armor is a fully commissioned ANH Stunt. It is fitting pretty good. I'm still getting used to putting it on (which i can't do alone), moving and seeing. And feedback is greatly appreciated. Thanks! http://imgur.com/a/anz9MhV2 points
-
Over 5 years and still not finished, life and laziness have a habit of delaying things. https://www.whitearmor.net/forum/topic/31912-artshots-anh-stunt-build-am-20/ Im thinking.......7232 points
-
Great work, cant wait to see this painted up and ready to rock.2 points
-
Welcome from Melbourne!2 points
-
The saga continues. I really hope the day comes where everyone has a final resolution to this debacle. Surely we are in for some good news eventually.2 points
-
At the encouragement of @ukswrath, here is a post I originally made a year and a half ago on the Anovos FB build group, which is handy for all makes of armor, not just Anovos. ABS Paste?!?! WTF is THAT? I've seen variations of this question over and over. So perhaps this will be helpful. ABS paste is homemade glue for your ABS plastic. It literally melts and reforms the plastic into a solid piece, so it's more like welding than gluing. But as the warning phrase "it literally melts..." foreshadows, you should be careful. Making couldn't be easier. Get a GLASS jar. Don't be that person who makes it in a plastic cup. You know... the one that puts plastic melting stuff into a plastic cup. You've met that guy. Don't be that guy. All you need is a jar, some ABS scrap, and some construction grade acetone. Nail polish remover is NOT strong enough, even though it has "some" acetone in it. Pick up a bottle at Home Depot or the like. (For people in other countries, like the UK, where Acetone is not readily available... you have my sympathies) For containers, I feel a glass baby food jar is ideal. It's just the perfect size (unless you doing something epic!), stupid cheap (if you don't already have one somewhere), and easy to work with. I'm going to assume baby food jar, so if you choose a 2 quart mason jar, scale as needed. In general, ABS paste is practically free, other than the price of a tiny bit of Acetone and maybe a buck for a jar of baby food, if you don't have a suitable container already, since your source material is scrap from your own build. (never toss that armor scrap!) A NOTE ABOUT FUMES: Pure Acetone is nasty stuff. You really don't want to be breathing Acetone fumes. A whiff here and there likely won't cause lasting harm, unless you have existing pulmonary issues, but still, do your best to avoid breathing a lot of the stuff. At a minimum, you can end up with a NASTY headache. At worse, you can actually cause damage to your lungs. Use your own level of protection that feels best for you... some want to wear a full respirator (with a volatile organic cartridge), others, like myself, are content to work outdoors and minimize breathing it. (Once the jar is capped, it should be fine to bring indoors.) FILL the jar with the tiniest scraps if ABS you can get. I literally used the curly-que and powdered scrap from under my belt sander, after all my rough cuts, in addition to cutting up a few pieces of scrap into 1/4" square pieces, with scissors. And now the magic. Add approx 1 teaspoon of Acetone (and remember, I'm assuming a baby-food size jar... scale accordingly if you're trying to go big and make enough for your entire squad to build with!). Cap the jar, wait 15-20 min (or more, no worries) and then check on it. Poke it with a stir stick. (You can literally use a stick. Although IMO, a wooden coffee stir stick (free at Starbucks!) is ideal, and Popsicle sticks have their proponents, too, as does the toothpick crew, for detail work.) If you literally do not have a stick, a strong piece of scrap you don't care about will do, just be careful where you set it afterwards. But poke at it. Get an idea where it's going. Then add about 1 tsp more Acetone. Re-cap it again, wait 15-20 min, then check again, and this time, stir it a little more seriously. Note the consistency. You'll probably want to add some more, perhaps 1 more tsp, perhaps less? You may be starting to get a feel for it by now. Let sit for a good 1/2 hr, then check and stir AGAIN. We're going slow. Slow is good. Watch some TV or read a book. You have better things to do than watch ABS melt in super slow motion. At this point, you SHOULD be close to ready to go. If not, I recommend letting it sit overnight before checking it again. (in fact, that's not a bad idea in general, but it's not strictly necessary) Only add more Acetone if you still really think it's too thick and clumpy in the morning, after stirring it some more. Repeat until you reach that magic mayonnaise moment. Correct consistency is *roughly* mayo-like. I'd say somewhere between Elmer's glue (a little too runny?) and Toothpaste (perhaps a little too thick). Too runny = bad. Remember the "melting plastic" part? You don't want that running down your armor. Too thick and you may get air pockets. Shoot for the Goldilocks zone. ) When you're ready, apply with a stick. Let it dry (duration depends on thickness... maybe 20 min, maybe overnight?) and sand it down. Repeat until pretty. Relatively small amounts (read: the small patches that ABS paste is generally best for) should be relatively safe to use indoors, just be aware of the fumes. Larger projects (or sensitive spouses... not that it smells too different from the nail salon, in my mind) are probably best to work on outdoors. The beauty of using the same plastic your armor is made from, to make paste, is you get a dead-on 100% perfect color match. No painting needed! (note: The level of polish/sheen will not be the same, but the color itself will be a match. ABS paste isn't really good for large area applications... and trying to do that will likely end up causing warping from too much acetone anyway) (2nd note: ABS paste is not as strong as the original plastic. It's not actually a glue, even if it looks like one. For connections needing a very strong join, use CA glue, as usual.) (pre-sanding... but note that color match to the Anovos armor!) The paste doesn't really go bad, but eventually it'll harden and you'll need to add more Acetone. Keep it capped, and it'll last longer, of course... you can dry it out quite fast if you leave the cap off for more than a few hours. Future batches you can probably go faster (read: add more acetone, sooner), but I recommend the slow approach when you're starting out, until you have a good feel for it. Good luck!1 point
-
Hi guys! My name is Marchy and this will be my first time I will be making my stormtrooper armor. I am from Phoenix, AZ and hoping to join the legion someday once I complete the kit. Been a long time Star Wars fan and pretty stoke that I was able to finally get a hold of the kit that is from ATA works, though I am still waiting for the helmet kit to be delivered. Kinda nervous also since never worked on a project at this scale before. Still new to how things work around here, so please bear with me if there is some terminology I still have yet to learn. I am open Looking forward to any guidance or direction you can give me in helping join the legion and to be able to assemble the armor. Once again, thank you guys for having me here.1 point
-
Welcome Marchy! I too am from the Dune Sea Garrison but down in Tucson. Looks like us storm troopers can't even shoot straight in the forums . I would like to encourage you to go introduce yourself on the Garrison website as well. We're always looking for more TK's! Once your Big Brown Box arrives begin your build thread here on white armor and maybe even on the garrison page. I would also echo the comments to strive for centurion status. I am not there myself but I am working on my blaster which if I did it all correctly should be the only hold up. In fact if you have a bit of lead time on the armor you could be blaster building while you wait.1 point
-
Rivet on the cod is not to be painted, it should be brass (screen accurate) or silver and 8mm However a rivet is not needed for approval, it’s a L2 requriment. As for ab button paint, humbrol nr14, french blue is a popular choice.1 point
-
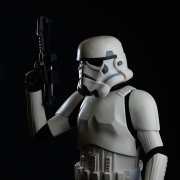
I just got approved! Here are my approval photos:1 point
-
Mics painted: NOW I guess I'm done with painting the helmet! Full helmet: Next up, installing frown mesh and visor. Is E6000 a good tool for that?1 point
-
Updated images as promised, after completing required changes based on your feedback: > Full Body - Post Changes > Helmet Details - Post Changes > Action Shot - Post Changes1 point
-
The rims don't have to be solid white, but some paint will be required.1 point
-
Hey there! Another future Dune Sea member! I live up in Flagstaff where despite not having my armor assembled, a local group of six members and their families took me took me out to dinner to get to know me. They are all great people! Be sure to sign up for the Dune Sea Garrison forums, and start getting to know the peeps there! I'm currently waiting on my big brown box (BBB for short) to arrive, but I've already been offered help/tools from a nearby member. Since the vast majority of the garrison are in the Phoenix area, you should have plenty of people there to help you out! Also, just because you don't have your kit ready doesn't mean you can't go on troops as a handler! I've been offered to join in on some of the local troops just to get better acquainted with our fellow troopers, but haven't actually gone to one yet. Supposed to have one this weekend but it got canceled sadly. But anyways, if you are working on your armor, be sure to look up TK 1636's videos on youtube. He is the best armorer in our garrison. He has tutorials on building armor that is very intuitive and you will learn a lot. https://www.youtube.com/channel/UCeDunMes3e0wQn8_ns-ma4g You got yourself some good armor. With the guidance from both the great members in the forums, and in the garrison proper, they'll make a trooper of you yet. Start a build thread both here and on the Dune Sea Garrison forums, and you will get constant and reliable feedback. I look forward to trooping with you someday! ~JR1 point
-
Wow, a Thumbs up just doesn't do these justice. Fantastic work Greg.1 point
-
Welcome aboard Brianna, Aussie,Aussie, Aussie! Check out the Build threads here on FISD we are the premier location for all things Stormtrooper. Plenty of very knowledgeable members are here to answer your every question. Good luck on your journey, and there is no rush to get your dream costume built. Take your time and enjoy every step.1 point
-
Great to see another FO build under way in Australia. We have an active FO trooper community here. Look forward to your progress [emoji1303] Sent from my iPhone using Tapatalk Pro1 point
-
These are really nice1 point
-
Welcome aboard sir1 point
-
Nope, even the Standard Line ones never shipped. Just to be clear Anovos hasn't shipped FOTK kits that I am aware of since Celebration 2019 which was 11 months ago. And yes, I too agree that the Corona Virus will be the next textbook Anovos excuse. But wait, weren't they already on a ship ready for delivery 12 months ago?1 point
-
Hope this helps Sendt fra min VOG-L29 med Tapatalk1 point
-
This is the only test I have at the moment.. Sendt fra min VOG-L29 med Tapatalk1 point
-
Hi! My name is Ana. I'm from the general Seattle area. I've been in love with Star Wars since I was 5 years old when I saw ANH for the first time. As a child I was not encouraged to be a full fledged nerd, because "girls don't like Star Wars". Thankfully I met some pretty amazing people in Garrison Titan, and I can confidently say I have found my tribe. I've volunteered with Garrison Titan at Emeral City Comic Con a few times, and I enjoy spotting for a good friend of mine who is an ROTS Vader. After seeing TROS, I've absolutely fallen in love with the Sith Trooper armor, and I am extremely excited to begin the journey becoming apart of the 501st. My friends suggested I start here, and do lots of research. Needless to say, I'm super stoked and cannot wait to troop!1 point
-
Ah! I see that now as well. The drop boxes angled in somehow while I was running back and forth between the backdrop and my camera. I should have noticed it when I was uploading the images to my application. I’m always good about checking their alignment when I kit up. They really shouldn’t move. They’re on a loop the goes around the belt and once attached to my ab, the loop can’t move left or right due to the hardware which in turn keeps them where they should be. Either way, I’m glad to fix it even if it means gluing it down so that it doesn’t happen again. I’ll complete the changes to the drop boxes and my helmet after work this evening. I’ll have updated photographs posted in the morning for your review - to show the work is complete. Thank you sir for your feedback and for keeping me in check! Please standby.1 point
-
So hey, I'm Art. I'm addicted to all things Star Wars. I've been building costumes and props for a while (I actually have a degree in it, but I do it for fun now) and am just getting started with the 501st. Looking to order a kit from Mark at AP. I am looking forward to assembling this with my daughter. Long story short, she developed cancer and we ran into a those trooping at a Cancer benefit from the Carolina Garrison and I was hooked! She's on her last chemo run and we are excited to get started!1 point
-
I LOVE the fact that Dan has latched onto this subject and has such a passion for it! (Makes life as a DO much easier)!! You 'da MAN, Dan!1 point
-
Amazing Trooper, you did an extraordinary change!! Congratulations, go ahead.1 point
-
I can't be the only one to join! That ruins the contest part! COME ON PEOPLE, JOIN!1 point
-
For snaps: Tandy Line 24 snaps I'd strongly recommend https://www.tandyleather.com/en/product/line-24-snaps For cap rivets (belt) I'd use these: https://www.tandyleather.com/en/product/steel-double-cap-rivets For chicago screws (holster): https://www.tandyleather.com/en/product/chicago-screws (seeing a theme here? ) For split rivets (ab/kidney/cod/knee) you can nab them from joseph or for slightly less cheap from me https://www.etsy.com/listing/600962011/stormtrooper-516-8mm-movie-accurate Or if you're in Connecticut give me a shout and I'll hook you up with everything but the snaps for free1 point
-
I used AP's method of using an ABS strip across all 3 rivets, per each side, to keep everything squared away nicely:1 point
-
Not sure if I would depend on a rivet alone to hold your elastic in place, Chris. Even though there is a washer, it's still a tiny one. You may want to think about doing snaps on the sides.1 point
-
Hmmm, I always remembered 20mm down and 10mm in from edge. From the arrows it looks like the left bottom would end up over your belt line and thats no good. What would it look like if you measured up from crease 22mm and centered middle one? And for your notch question it is no longer required. It's covered by belt anyway.1 point
-
THANK YOU, Tim, for this comprehensive list! I am certain this will be an invaluable resource for those of us on our way to joining the ranks, and your timing is perfect! (I am putting in my TK/HWT application this weekend). I really hope this gets pinned, as it puts everything in a precise order and will be a great reference guide.1 point