Leaderboard


Popular Content
Showing content with the highest reputation on 02/17/2020 in all areas
-
Hi Brien, the following link may help. cheers3 points
-
Front cover strip Close enough to 20mm Sent from my iPhone using Tapatalk3 points
-
To clarify, you have both outer parts on your right leg and both inner parts on your left leg as in this configuration below. This is how they should look below.3 points
-
Number 1 thing I wish before I started; A trooper's suit is never done. Never... Ne-ver... My tips next to all the above; Take your time, don't stress is. Measure twice (or more) and cut once. Check and re check reference at the CRL and books/websites. (Also be surprised how ugly the TK's actually were). You have a potential centurion in your brown boxes (highest level of accuracy) if possible; go for the closest to screen accurate as possible. It will be worth it. If you don't know what to do, can not find certain info; ask around! We've all been there and we all love to help. First time; use E6000. Very easy to apply and to correct mistakes in the first few minutes. Also if you really made a big error E6000 is easy to clean off. Also if you cut 90 degrees corners (leg armor, knee armor plate, some parts of kidney etc) always round it off. Maybe drill first and cut towards that, straight edges are easy to crack/will crack. But most of all; enjoy the build! After this it will only be sweating, not bending and kicking against things below your waist2 points
-
This is The Way.2 points
-
I would have gone with 25mm on the front strips to give you a bit of extra room. You look like you need it. You can spread the shins apart at the top and taper down towards your ankles to give you more room.2 points
-
Thanks, always good to check these things before cutting Sent from my iPhone using Tapatalk2 points
-
I definitely will be watching your build. The E11 is off etsy. 50 bucks free shipping. Lots of filling and sanding. Came with a busted and cracked trigger housing. Had to repair. Wasnt expecting to do so much but I will be more thorough with my next one. I think it will pass a three foot test but I know I could have done better. First one in my new collection =) I will keep it OT it was something to do while I waited for parts to start on my bucket. The CRLs shows a DLT-19 heavy blaster is allowed. I also like the T21 light repeater and have seen them with R1TKs so we will see. I will go for armor and induction to the 501 before deciding. Cheers2 points
-
Currently helping a trooper with the detail of their build and uncovered there is an error in the TFA CRL. TD description refers to no visible seams yet the picture contradicts this. This detail passed by all of us. Sent from my iPhone using Tapatalk Pro2 points
-
Thank you everyone for the help! I can't wait to get out there and Troop. My first troop will be a local Con in two week. My ID is my Father's birthday. He passed away 6 years ago. He was always my hero and my inspiration. He took me to all the Star Wars movies, starting with A New Hope when I was only about 4 years old. I don't remember it, but I do Empire and ROTJ. I took him to see all the prequels. And now I've been passing on my love for Star Wars to my son, who I'm helping build his TK as well (learning from my mistakes). If Only You Knew: Cutting the ABS would hurt my hand so bad. trim/sand slowing ears are hard Ask for help, there is lots of it out there. you will make mistakes, the armor is somewhat forgiving, and most mistakes can be fixed with E6000 and scraps Save your scraps Oops!: Life happens The build done right takes time Cost just starts with the kit, it adds up with the tools, and extras ASK FOR HELP! don't be so gun ho to think you can do it alone. Watch the videos, go to armor parties, take pictures. A funny thing happened on my way to the Death Star: I could not have done this without the help I received from the other members in Garrison Tyranus. I was terrified to cut my armor and they gave me the confidence to get the work done. E6000 doesn't cure well in the cold Always have a spare propane tank for your propane heater. Measure 600 times, cut once (very carefully, and a little at a time). Shout Outs: I could not have done this without the help of the former Garrison Tyranus CO, Stoagie Schwank TK-4863! He helped me from BBB day to Approval. many weekends in his garage, including several Armor parties. Also Reese Ensign (29992) and Tim Allen (10930) for helping guide me through the approval process.1 point
-
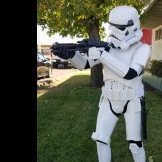
I'm looking forward to my first troop! I was fortunate enough to meet some fellow troopers at an armor party yesterday. Since I was approved on Valentine's day, I'll post this silly picture -1 point
-
While everyone was having the time of their lives at Celebration 7 last week, I decided to tackle something that I have been meaning to fix instead of hating on the fact that I wasn't in Anaheim. When I rushed to complete my suit to begin with (long story short had a birthday party to attend in a TK), I messed my thighs up and cut off too much. Not knowing about how to shim things properly, I did what I did and I was happy with it. What I ended up with was a 50mm cover strip at the back of both thighs. No one has ever pointed them out or noticed them so I never really gave it much thought. That was until I started fine tuning and looking at it more. Steve (Gazmosis) was kind enough to pass me for EIB standards, but after private discussions we agreed that 50mm was too much out of the buffer zone if I were to shoot for Centurion. So they had to be redone. After much procrastination it was time to get to it in between troop weekends.....so here it is. PS> I apologise for the 'smudges' you see in the pics. Its from some dirt on the back of my phone camera lens. Dunno how it got there. Here are my thighs before the mod. Experimented with ABS paste as I tried to make them 'prettier'... The dreaded jagged cuts. I refused to use E6000 for my build so most of the suit is put together with CA. It would have been easier to take apart and less messy had I used E6000, but no regrets. I hate that stuff. New shims on the very top. The old ones I cut out below it. Then glued the shims in... I can't remember where I saw this product being used, but it was on one of our troopers build thread. Whoever it was - Thank You! This stuff is the best putty i've used to far on plastic. I strongly recommend this for larger fixes. I got mine from eBay, but I'm sure you can find it at good hobby stores. This stuff is pretty easy to work with and you can shape it with some water on your fingers kinda like clay. Some trimming and then the sanding. I used a scraper thingy to get most of it off, a dremel for some hard to get chunks, and 3 grades of sandpaper to finish off. Also put the 25mm cover strip on. Lastly the paint. Wasn't sure what to use. Had some of this 'Satin Blossom White' and decided to use it. Now I'm thinking I should have used something a little more glossy... Here is a before and after photo... What do you think? The white actually matches very well, so I didn't paint the entire thigh. Just the backs where needed. I wanted to leave the wear and scratching I already have on the front and sides from trooping. A few more minor tweaks and hopefully I'll be ready to apply from my centurion badge. Thanks for tuning in troopers!1 point
-
Hey y'all, I'm manuel and I'm new here on this forum. I'm slowly trying to get a shocktrooper together from a vendor and hoping someone can help me out on getting it approved. I always wanted to become part of the 501st ever since I found out about this community several years ago and now I'm ready to be apart of it! Any help is welcome! Thank yall! Sent from my SM-N960U using Tapatalk1 point
-
Congratulations trooper and welcome to the ranks, what a nice way to remember your father.1 point
-
Great James !! remember we're here to help. Troopers Helping Troopers .1 point
-
Thanks everyone for all your help! Now on to helping my son build his TK. I hope to see you out there! TK 12953 Closing this build thread! Next up for me will hopefully be a Sandy.1 point
-
That will depend on if they are leather or a man-made material. Thomas. If they are leather, you will need to remove the finish with acetone (the stronger stuff, not like that found in nail polish remover) and lightly sanded so that the paint/dye will adhere. There are several companies that make these products, so it may take a bit of searching. If they are plastic, the finish will still have to be removed, but NOT with acetone, as it could melt them. This link may help. Whichever type you have, it is VERY important to let the dye dry completely between coats.1 point
-
Ok swapped right LHS with Left LHS so now have an outer and inner piece on each. Sent from my iPhone using Tapatalk1 point
-
Great Trooper!!! Welcome to the Legion.1 point
-
Yeah Trooper !! Congrats You got it mate1 point
-
Hi mate - have you joined the Mos Eisley Forums? - www.mepd.net Sandys are under their banner.1 point
-
Did a full armour put on with the shims this is how it looks. Strapping on one side of my chest plate needs to be replaced what is making one side go up more then the other. Sent from my iPhone using Tapatalk1 point
-
Congratulations trooper and welcome to the ranks1 point
-
Congratulations Ardeshir, welcome to the rank.1 point
-
Congratulations! Verstuurd vanaf mijn HRY-LX1 met Tapatalk1 point
-
Congratulations Trooper and welcome to the Legion Sent from my SM-G960F using Tapatalk1 point
-
Congratulations Trooper. Welcome to The Legion.1 point
-
With your thighs, make sure the bottoms align not the tops. The tops can be hidden with the cover strip and the top of the cover drop can be trimmed at an angle if needed. As per your thigh image you have aligned them at the tops. Trust me it will work fine Sent from my iPhone using Tapatalk1 point
-
Well done centurion that it one nice kit.1 point
-
Calves are measured up there is an overlap of about 12mm on each leg, so that will allow me to trim enough to get the 20mm cover strip positioned well. Going to save thighs to the armour party as may be able to taper back of thigh to narrow near knee. Sent from my iPhone using Tapatalk1 point
-
Hey Chris, I’m not aware of any ‘standard’ for the sniper knee. Depending on the make of kit, it appears to vary maker to maker. Here’s some nice examples. As you’ve marked with pencil, nice vertical lines are the way I’d go. Some really try to curve or contour them, however, the originals appeared to be cut straight up and down. I’d start with your outer mark to start - always better to cut too little and trim down if you need to. As RS don’t exactly have the correct shin parts, best to have a little more meat, just in case you need it. :-).1 point
-
Still not a lot of visible progress, but it's almost to the point where reassembly can start, after priming & a few other tweaks. The forward lens is about the same size as the plastic, but wouldn't fit inside, so I cut it off and made the hole big enough to clamp down on the lens. The rear lens involved removing a lot of material from the inside of the blaster, but I didn't get a pic of that. For the barrel I used a pipe that comes with fish tank filtration systems. I have a lot of spare parts / junk since I've had fish most of my life. I decided to keep the bosses that screw the two halves together in many areas. I also removed material under the scope, and decided to go for removing the ejection port and charging handle slot. For the bolt, I went stupid simple. TP roll! A little paint *should* give nice results. Charging handle will go on this. I don't think I'll keep that screw configuration. Also a tube from an aquarium filter.1 point
-
Shark has a broken tail. Actually, only thing around the house I could use to brace the inside of the greaves. The shims I added were pretty rigid and the closure left a gap that I don't believe velcro nor elastic + strap would be able to bridge, so I segmented the shim, added a second layer for rounded reinforcement. Hopefully the curve will be tight by tomorrow.1 point
-
Ukswrath, good question and I do not think they would. I am confident it is black. So, researching my next build over on Pathfinders and found this image: This looks like a screen used ROTK back with the corset closure; however, I can not confirm its origin. I am perplexed that another detachment would have information about the ROTK that we do not have here on FISD.I figure it most likely came to light based on a search for information about the Shore Trooper. Regardless, if this is in fact a ligament image of a how the actual back closure system works then The5thhorseman was correct about this particular part. Then there is this: Even on a Shore Trooper the elastic strap that connects the top of the shoulder bell to the shoulder strap looks to be black and not brown. The real danger of researching something is that you may uncover something that does not agree with your position. If you have integrity, you disclose it all regardless of the possible circumstances, Kind of a Jack Reacher approach. Anyway, I said that I have not seen any evidence of a bungie cored closure system for the biceps, forearms, thighs, and shins. I was wrong, we all have seen it and once you see it, it all makes sense. Look at these images: In this image notice the thin white line (red circle) in the gap. This is the suspected “bungie” closure system. And here is another bicep on a Shore Trooper. Also notice how the top ½ of the bicep is flush to the arm and the bottom ½ is skewed. This would suggest that the bungie is pulling the top part closed and the bottom is not under as much tension. So, what can be inferred by these images and whatever conversations Mr. Paul and others had with people who actually worked on Rogue One is that a bungie system was used to hold these parts closed. Here is a picture of Mr. Paul’s 3D file printed Bicep and notice the attachment points on the inside (Yellow Circle). I drew a green line where the bungie cord would be located. Although this is not completely confirmed that this is how it was done, I feel that there is enough evidence here to presume that Mr. Paul got this correct. It would also stand to reason that if this is the method used for the bicep, then it is probably the method used for the forearms, thighs, and shins as well. This is Mr. Paul’s interpretation of how the shoulder bell and bicep connect and it most likely is also correct. So, if all this stuff is correct, we get a better understanding of how these costumes come together. Keep in mind that only part of this information can be confirmed, and the rest is interpretation and we here in FISD need confirmation but it’s a good start. On a odd note, apparently the RO CRLs for the shore trooper identify the Rogue One version of the E-11 as the E-11B? I have no idea where they are getting that from. https://databank.501st.com/databank/Costuming:ST_captain Anyway, thanks for the interest.1 point
-
Just a quick post. Painted my TD tube, let it dry for a few hours and then removed the masking tape. That seemed to go well and the paint set up nice. I'll let it sit for a day or so to let the paint fully harden before mounting the caps and control panel. I think I'm going to prep the screws for black paint and then I'll move on to something else for a while. -Dana1 point
-
Such a clean and tidy build, looking fantastic Dana.1 point
-
Good to know, I didn't think so. I just know this hobby is a never ending quest to try and find accurate solutions and I thought this experiment could help the community in the future. I had everything on hand except Option 2 and Option 3. Small price to pay if it helps someone out down the road. -Dana1 point
-
Not too many dramas with the grey on TD as long as it's not too dark. I use grey primer and coat with clear as I have that handy1 point