Leaderboard


Popular Content
Showing content with the highest reputation on 02/04/2020 in all areas
-
Small Update: Ordered 2 tubes of E6000, they should be arriving on Thursday! Also Ordering my dads kit tomorrow night, along with all the other pieces we need, very exciting! In the meantime, I cut my frown pieces out for my helmet:2 points
-
Hi all! Although I'm fully aware that I still need to finish my first build (based on a DoopyDoo's kit), I finally managed to obtain some really cool parts for another build: the legendary Phoenix Props E11 kit with aluminum pipe a fully functional aluminum replica folding stock from Warmachine Paintball the excellent T-jay's completion kit, including aluminum scope rail and a real Hengstler 400 counter First of all a picture of the aluminum parts (including a self-made trigger guard): 20200203_223055 This is the unfolded folding stock: 20200203_223528 Here are all resin parts, drying after the initial washing: 20191223_145354 Note that some of these (folding stock, Hengstler counter, trigger guard, power cylinders, etc.) will be replaced by more accurate parts. My first more elaborate job on this build was adding details to the 3D printed power cylinders. Here I am cutting the "resistors": 20200202_162359 And here's the result after lots of fiddling (Obviously it still needs to be painted black) 20200202_232144 20200202_232205 That's it for now, cheers mates!2 points
-
Hi fellow 501st Legion members, After nearly 3 years of development and refinement of the hardware and the code, I'm happy to announce that the currently most advanced blaster firmware FX-BlasterOS (previously known as Proto Blaster Platform) goes open-source, freely downloadable for anyone. To get an impression of the features you can implement now for free, look at the Intro Video on YouTube. For Easter Eggs, make sure you watch it till the end : FX-BlasterOS Intro Video With the software going open-source, you have multiple choices too to build your blaster electronics: Tier1: if you want a high-quality, proven solution which optimally supports all features of FX-BlasterOS, follow the below link: You advantage: - proven, tested - small enough to fit into any blaster - you can charge your Li-Ion battery over USB - comes with extensive power saving options for a sleep mode which can sustain your prop for several months on the shelf - comes already pre-installed with full version of FX-BlasterOS Tier2: you can stick together your own electronics from cheap parts, look how easy it is using Arduino boards and breakouts (see also the Shoping list below for details): To ease programming for those who are not (yet) familier with Arduino, there are detailed working instructions how to do it on the Wiki Page of the Git. In case of anz trouble of technical support request, use the Issue tab of the Git. There is also the possibility to source a carrier board for the cheap components, hugely simplifying the task of soldering and making the electronics more reliable. You can use skyone's excellent rider board which can be used with components compatible with FX-BlasterOS. https://www.whitearmor.net/forum/topic/19322-arduino-a-cheap-board-for-e11-blaster-effects/?do=findComment&comment=646230 Shopping List Here is also a shopping list for you of components you will need: Arduino Board: Arduino Nano (actually any Atmega328P based board, wiring examples will be shown for the Nano): ebay search term: Arduino Nano v3 https://www.ebay.de/itm/Nano-V3-0-ATmega-328-Board-CH340-USB-Chip-Arduino-Kompatibel/252742123829?hash=item3ad89ac135:g:xCEAAOSwPGtb33e0:rk:1:pf:0 DFPlayer Mini: ebay search term: "DFPlayer mini". Please ask the seller if the module comes with the original manufacturer's YX5200-24SS or YX6300-24SS chipset. You will also want to have a 470 Ohm thru hole resistor to connect the D8 of the Nano to the RX of the DFPlayer. https://www.ebay.de/itm/TF-Card-U-Disk-Mini-MP3-Player-Audio-Voice-Modul-Arduino-DFPlayer-Tafel-AIP/153290978607?hash=item23b0dab52f:g:uewAAOSwP6pbtdXJ:rk:1:pf:0 Speaker: recommended are OD: 20mm or 28mm Impedance: 8Ohm Power: 1W to 2W ebay search term: "20mm 2W 8Ohm speaker" Examples: https://www.ebay.de/itm/2pc-Audio-Speaker-20mm-8Ohm-8-2W-Stereo-Woofer-Trumpet-Horn-Loudspeaker-Power/162171125788?hash=item25c227001c:g:WRgAAOSwMtxXsvaV:rk:1:pf:0 https://www.ebay.de/itm/28mm-8-Ohm-2W-Round-Speaker-For-DCC-Sound-Like-Loksound-Hornby-Bachmann-Zimo/263578226658?hash=item3d5e7c8fe2:g:BToAAOSwm-Zavo6p:rk:2:pf:0 Neopixel Sticks (for PLI/Status bar): ebay search term: "WS2812 stick" https://www.ebay.de/itm/Adafruit-NeoPixel-Stick-8-x-WS2812-5050-RGB-LED-Strip-Driver-for-Arduino-r3/272010992457?hash=item3f551e5b49:g:7YMAAOSw7aBVBxRo:rk:7:pf:0 Important: type shall be WS2812/WS2812B 5050 RGB (not RGBW!!!) or sk6218 3535 RGB (not RGBW!!!) Single neopixel on round PCB (for nozzle light): ebay search term: "neopixel flora" https://www.ebay.de/itm/Adafruit-Flora-RGB-Smart-NeoPixel-version-2-Pack-of-4-ADA1260/231237003534?epid=1028248696&hash=item35d6cca90e:g:LGoAAOSwNC5ZezSY:rk:6:pf:0 The original design is from Adafruit, please support the development by purchasing Adafruit products. You can also find similar offers on eBay from cheaper sources as well. Neopixel stripes (for barrel ligting): ebay search term: "WS2812 stripe" https://www.ebay.de/itm/5m-30-60-144-RGB-LED-Streifen-Stripe-mit-WS2812B-5050-SMD-LEDs-WS2812-Versand-DE/222192610445?hash=item33bbb62c8d:m:mR_Pz7NGzDUQhwH1s-6BFvg:rk:1:pf:0 Important: type shall be WS2812/WS2812B 5050 RGB (not RGBW!!!) or sk6218 3535 RGB (not RGBW!!!). As most blaster props are black it is recommended to buy a non-waterproof, 60LED/m type of pixel stripe. The striper are soldered together every 0.5m, but you can shorten the stripes easily to any lenght using scrissors, cutting the stripe at the copper landings. Momentary Switch: ebay search term: "momentary switch" or "tactile switch" You will need a single momentary (not latching!!!) swicth for the MK1, MK2 and MK3 builds, two for MK4 and MK5. For the trigger it is recommended to use a switch with a long arm like this one: https://www.ebay.de/itm/Mikroschalter-Mikrotaster-mit-langem-Hebel-250V-3A-125V-5A-S67/330793297018?epid=1154680769&hash=item4d04d1247a:g:8EgAAMXQlrxRcPJ9:rk:1:pf:0 For the mode select, aux. switch you can take the momentary switch of your choice, they come in an infinite variety, take the one which suits your needs. I myself like these small ones: https://www.ebay.de/itm/6mm-x-6mm-Tactile-Push-Button-Switch-Micro-Momentary-Tact-Assortment-Kit-TE948/283285172378?hash=item41f51cb09a:g:SjoAAOSwo-VcAmNI:rk:9:pf:0 OLED Display with 128x32 resolution with I2C interface: ebay search term: "OLED 128*32" I2C" https://www.ebay.de/itm/0-91-128x32-IIC-I2C-Blue-OLED-Display-DIY-Module-DC3-3V-5V-128-32-Arduino/322536659354?hash=item4b18aed99a:g:ag8AAOSwK6RZLbR9:rk:5:pf:0 or for the scope a smaller one of type "OLED 64x48 I2C" https://www.ebay.de/itm/4pin-White-0-66-Screen-IIC-I2C-0-66in-OLED-Display-Module-64x48-for-AVR-STM32/272861748083?ssPageName=STRK%3AMEBIDX%3AIT&_trksid=p2057872.m2749.l2649 Connectors for switches, speaker etc.: ebay search term: "micro JST 2-pin" For 2-wire connections like for switches, speaker, I recommend micro JST connectors with 1.25mm pitch: https://www.ebay.de/itm/5-Paar-2Pin-1-25-1-25mm-1-25mm-GH-Micro-JST-Stecker-Buchse-10cm-28AWG-Kabel-RC/172626910637?hash=item28315d9dad:g:XHsAAOSwux5YTaEB:rk:3:pf:0 2.1mm recharge port: https://www.ebay.de/itm/DC-Einbaubuchse-Stift-2-1-mm-geschlossene-Bauart-Lotanschlus-fur-Hohlstecker/141127499530?hash=item20dbdabf0a:g:4mIAAOSww~xZ1KXj:rk:9:pf:0 Micro- and/or Mini-USB breakout boards: ebay search term: "micro USB breakout" or "mini USB breakout" https://www.ebay.de/itm/Micro-USB-Platine-Adapter-fur-Breadboard-DIP-DIL-Breakout-Board-Arduino/183233499430?hash=item2aa9915126:g:kywAAOSwm8NbAIfU:rk:6:pf:0 https://www.ebay.de/itm/Adafruit-USB-Mini-B-Breakout-Board/272373312981?epid=1663565126&hash=item3f6ab6edd5:g:8BYAAOSwIIFbML51:rk:3:pf:01 point
-
Hello, Got a Black Series bucket for Christmas and I am hooked. Blaster on the way and will go after an 850 R1TK. Wish me luck!1 point
-
Hello everyone,, I am new to this site, I have joined the 501t Legion back in april of 2019. I am enjoying the company of the Dew Back Rigde group, I was unaware of this site. I do hope to be accepted and to continue to troop.1 point
-
Why do i think i should have known this befor? Anyway ... i will go on and try to make it wearable and look some kind of wright.1 point
-
You could try putting the biceps in the freezer for a while. That makes the superglue brittle.1 point
-
Hey trooper, Ears are always a little tricky but don’t panic. ;-) Is your helmet (faceplate and back/cap) attached with rivets yet? Do you have any photos of the helmet from front, back, left and right without the ears? Ideally, these photos will be taken from a few feet back to help us get good perspective from the photos. Examples below; Thanks in advance, Dan1 point
-
Oh yeah, I'm already on my way for a cert 3 build, and my dad is planning to also!1 point
-
If it’s your 1st build ever, I would highly encourage the bucket build as the LAST thing to build. The way I see it is , after building ur TK armor .... that will give you more more confidence and skill to tackle on the bucket. Just food for thought... Sent from my iPhone using Tapatalk1 point
-
1 point
-
Like Glen said, the left thigh could be dropped down a bit. Have you walked around while wearing the legs? They look pretty close to the posterior plate, and this can cause them to catch on each other and make it uncomfortable. If you hear a "clicking" sound, trimming the tops in the rear may be needed. There should be enough space between them to walk without them touching.1 point
-
I filled up the shoulder bridge spaces with glue again and making sure its fully dry then I'll try and re-glue them to the shoulder tabs. So starting with the right forearm, I had to trim down the width to make it proportioned to my forearm size. Unfortunately, this left the two ends meeting at a point where the cover strip goes versus the flat ridge that used to be there. Measured 8mm from the edge and made a line to reference where to try and recreate a flat ridge: Got a sealing iron and practiced using it on a piece of scrap plastic: Started to recreate the flat ridge: I think it came out okay (it is a little distorted, and lumpy) considering its my first time doing this. But for the other side of the forearm I decided to try something else that seemed to be faster and a little less dangerous to the plastic. I put a butt load of clamps where I wanted to bend the other side and put it in hot water: Here is the end result: Unfortunately that's all I had time to do. It looks like I am almost done with the forward flat ridge side. I am going to smooth out my new flat ridges by putting an inner cover strip then placing a row of magnets down the middle forcing the inner cover strip to put a flattening pressure on the sloppy flat ridge and then dip the flat ridge in hot water. This should at least flatten the flat ridge a bit better. Once that is good I can finish sizing and rear facing cover strip side.1 point
-
Attached is a reference pic from@ukswrath build thread. Hopefully should provide the measurements you are after. Sent from my SM-G960F using Tapatalk1 point
-
Hello and welcome there are some great builds around to follow, here are a couple that may be of help. https://www.whitearmor.net/forum/topic/47872-ear-troubles/ https://www.whitearmor.net/forum/topic/27375-howto-draw-an-approximate-ear-trim-line-with-no-gaps/ https://www.whitearmor.net/forum/topic/29238-my-helmet-ear-tutorial/1 point
-
BBB day was Nov 29 2018, approved on or around Dec 24 2018.1 point
-
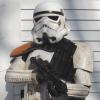
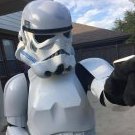
Testfit for the legs! Thoughts?1 point
-
Hey Jimmy welcome to FISD. A TK build is time consuming and expensive. There is no need to rush through things you can take your time the Empire will never fall so there is always time to join. Have you reached out to your local garrison? We can help here online but sometimes is nicer to have some hands on help. Sent from my iPhone using Tapatalk1 point
-
Trimming the return edges won't make the biceps any bigger, unfortunately. RS uses superglue to assemble their armour so I don't think you will have much luck taking them apart successfully and even if you did, the superglue will need major cleanup and work that shouldn't be necessary if you gave them your measurements to work from. Get in touch for replacements, making sure they are bigger than the ones you have.1 point
-
Looking SHARP, Jonathan! If I could suggest one thing, it would be to trim down the points at the top of the biceps. Not a deal breaker for Basic, but it would definitely help make them more comfortable.1 point
-
I have 2 squirrel cage fans blowing on my lenses. I've found the best trick is to keep the air a flow'in...1 point