Leaderboard


Popular Content
Showing content with the highest reputation on 01/09/2020 in Posts
-
I see this topic come up a lot and I have not seen a comparison so I thought I would do one. Please keep in mind that my knowledge on this subject is limited and I do not have any experience with OT TKs. So the obvious… Rogue One TKs are more detailed than OT. As far as I know, all the OT TKs were vacuum formed in High Impact Poly Styrene (HIPS). This process requires a buck (mold) that heated plastic is laid over then sucked to the buck by vacuum. This is a fast and efficient method of mass producing these costumes; however, the trade off is that all detail is minimalized and designed so that the formed plastic can be removed without damaging the buck. For this reason, parts like the helmet and forearms are formed in parts rather than one solid object. Consider an ANH forearm, the rectangle details are not very well defined. There are 2 parts to the forearm. One part has the rectangles and the other does not. The two parts are glued together and then cover strips of plastic are used to hide the seams. Rogue One TKs are were not vacuum formed. I have heard (although I do not know for sure) that the RO TKs were injection molded. This process requires a 2 or more-sided mold that is completely closed off then heated liquid plastic is injected into the mold. Once the plastic is cured, the mold is opened, and the parts removed. This process allows for thicker and more detailed parts. So both the OT and the RO stormtroopers armor are made from plastic but the RO version is thicker and more detailed. Yes there are differences between ANH, ESB, and ROTJ TK’s but for the most part, the process of making the armor was the same. RO, Solo, and some of The Mandalorian TKs were made to the RO standard. Another consideration in comparing the two types TKs is the methods of assembly and strapping. There is a ton of reference material on how the OT TKs were assembled. There are very specific requirements in the CRLs as to what type of snaps, straps, Velcro, and rivets are used and how they are used. Oddly enough we have less information about how the RO TK is assembled and strapped. One of the best sources I have found for RO TKs is the images from Celebration Europe 2016. In these images we can see Velcro in various places as well as some sort of plastic hook lines connecting the shoulder bells to the biceps. Regardless, the 501st CRLs for RO TKs does not specify how the TK is strapped as long as the strapping is not visible with the exception of the drop boxes and the thighs. It would be awesome if someone who has some contacts with LFL could get some more detailed information and pictures since there is no reason for this information to remain secret this long after RO, I digress. Additionally, there are significant differences in the soft parts of the costume. OT TKs have a neck seal and a black one or two-part undersuit. The undersuit has no detail and most of the people I know who have OT TKs wear under armor. The gloves were rubber military chemical gloves and the boots were slip on brown chelsea boots dyed white. RO TKs have a undersuit that has ribbed fabric at most of the joints and the neck seal. The top shirt has hex mesh in the armpits and the ribbed fabric runs from the top of the neck seal to mid chest. The ribbed fabric must be stitched between the ribs. The boots are the same as the FO boots with a flat sole and side zipper. The gloves are also the same as the FO; although they are all black with leather patches and gridded fabric similar to a mechanics brand glove. Lastly, the OT Tks had holsters and their E-11s are slightly different from the RO E-11. RO TKs did not have holsters. I suspect that it would be difficult to holster the E-11 with a tac-light on the side of it. So lets look at some comparison pictures. These were taking at the ROSW premier. On the left is a member of my Garrison (TK 41808) in his RS Prop Masters ANH Stunt. On the right is me (TK 20980) in my Jimmiroquai RO. Initially, we look very similar; however, closer inspection reveals the level of detail, shape, construction in each part. So, let’s start at the top and work out way down. The helmet: On the left is an OT TK from ANH, on the right is my ROTK helmet. One of the most talked about parts of the helmet is the infamous eye bump. Look at the right eye on the OT helmet, notice the bump along the bottom of the eye just left of the nose? That is the eye bump. All of the bucks for the OT helmets were hand sculpted and it is unclear if this bump was in the original buck or if it is a result of the vacuum forming process; however, what we do know is that the helmets are not symmetrical. RO helmets are symmetrical and although some people swear, they can see the eye bump, I do not see it on the RO helmet. Moving on, the frown is more pronounced on the OT helmet. The number of visible teeth is also an issue. There are images from ANH that show between 6 and 10 teeth. RO helmets have only 7 individual teeth backed by a dark grey mesh. Another difference is the height of the brow trim above the eyes. The brow trim on the OT helmet fits on the edge of the top dome and is adjustable. I believe the proper gap is about ¼” while the gap on the RO helmet is about 1/8”. It is unclear if the brow trim on the RO helmet is actually separate or painted on. On my helmet it is molded into the helmet and I painted it. I should note that is on of the things that must be modified on the Black Series helmet to make it CRL compliant. The gap on the black series is closer to an OT gap. Lastly, the V-coder on the OT helmet is a molded part that is painted. On the RO helmet, the V-coder is a separate part and there must be a visible gap at the bulbous part of the V-coder and the helmet. Looking at the sides of the helmets, the OT tear traps are a simple depression that is painted. The vent lines are painted as is the black outline. The same is true for the temple boxes, although there are no vent lines in the temple boxes. On the RO helmet, the tear traps are also depressed; however, there is a raised portion in the center that is painted grey and the vent lines are cut out (engraved) in this raised portion. I suspect on the screen used helmets the depression is painted black and the raised portion is a glued in part that has the vent lines cut out. On my helmet, I cut the vents out completely and backed them black breathable fabric. The temple boxes on the RO helmet also have a raised portion that is painted grey and just like the OT, there are no vent lines. I have seen a gap between the end of the brown trim and the top of the ear cap on some OT helmets. On the RO, the brow trim comes past the temple box and terminates at the center of the ear cap. There is no gap between the brow trim and the ear cap and the brow trim terminates at an angle. The OT ear caps have visible flat head pan screws (3 of them) and the CRLs require them. These screws actually hold the helmet together connecting the front and back halves and attaching the ear caps over the seams. On the RO ear caps, the screws (2 of them) are molded in and are non-functional. Additionally, the ear bumps on the OT helmets are different. The RO ear bumps are all the same and a very different design from the OT. The outer circle of the ear cap as well as the ear bumps are more detailed and defined on the RO helmet. Lastly, the blue tube stripes on the OT helmet is either a decal or painted on. On the RO helmet the tube stripes are completely cut out and for the screen used helmets, they were backed with blue painters’ tape. On my helmet I backed the stripes with a blue breathable fabric. The back of both helmets are very similar. On the OT helmet the rear boxes are more trapezoidal rounded in the corners, the box is a depression that is painted grey and again the vent lines are painted. On the RO helmet, the boxes are more rectangular and again they are depressed with a raised portion that is painted grey with vent lines cut out. Again, I believe the screen used helmets had a depression that was painted black and additional parts with the vent lines cut out was painted grey and glued in place. On my helmet, these vent lines are cut out and backed with a black fabric. On the black series helmet, there is a battery box and speaker that must be modified for approval. Although the shape of both helmets are very similar, there are some minor differences. The RO helmet looks thinner overall. On the black series I had to extend the jaw line about 1.5” to fit a proper RO V-coder. The Hovi mics on the RO are exactly the same as the ANH Hovi mics with white interiors and the proper mesh screen. The lenses on the RO are also the same as the ANH lenses, green. If you are considering a ROTK, there are several options for helmets available to you. The least amount of work would be a Jimmiroquai helmet and the largest about of work would be modifying a black series helmet. I have a tutorial for the modifications I recommend in the RO thread. I do not recommend attempting to convert an OT helmet to a RO helmet, but I guess anything is possible. Next, I will be comparing the upper torso and arms. Thanks for the interest.3 points
-
I agree. I think we all are that man in the armor. Love and passion has driven us to this point. Let us not laugh at someone who shares our love and passion, as we where in his shoes at one point or another in our lives. I think this thread should be removed. There is no point in it and it brought me sorrow to read it.3 points
-
Following up to my previous. Got my package yesterday afternoon. Not bad. On the ordering page for the jumpsuit, they quote a 10-to-14-business-day processing time prior to shipping, and for this it was five. And less than a week in transit via UPS Ground. On an initial once-over, it seems decently accurate. I'm going to be replacing the shoulder velcro, because no. And the left forearm pocket is requiring closer scrutiny. It's sewn to the sleeve all the way around -- no opening to slip the compad in. I need to check the measurement of the window in that pocket -- it seems a skosh small. And I have a recollection of there being a clear plastic pane in that window to cover the compad... Am I remembering old, bad data?2 points
-
White primer added. Really looking forward to the gloss and clear lacquer to bring this to life. :-)2 points
-
The shoulder covers have been glued and the E6000 had more than enough time to dry so this morning I removed all of the clamps and magnets. I then cleaned up all of the ooze and had enough time to fabricate the elastic retainers that keep them from floating too high off the back plate: I worked on the belt several nights in a row. Drop boxes were reinstalled with new elastic, and rivets/washers. I managed to get everything completed last night when I removed the Anovos glue from the back of the rivet cover caps and reinstalled them with E6000. You can see the final assembly just resting this morning with clamps and tape still in place. Here's a closeup showing the minimal gap between a drop box and the bottom edge of the ABS belt, as well as the alignment of the drop box to the edge of the ABS belt. I think everything meets Centurion here. Cross those off the list -Dana2 points
-
Armor is in!!! Woot.. So I now have everything and am super pumped. Mark did a fantastic job, everything looks awesome. My first attempt to wear it didn't go great tho. There is some strapping issues which I totally anticipated. The only thing really slowing me down now is the gauntlets, apparently my Popeye forearms are too big and I can get them all the way on. Mark and I spoke and I am in the process of reworking those a bit, I'm trying to take my time and do it well so I don't jeopardize Centurion status. I hope to post some pictures for comment by all you experts some time next week. I'll make a new thread as Joseph recommended. Thanks for the support everyone! Fox out
 2 points
 -
I’ve removed some posts that were a bit too far. If something no longer makes sense that may be why. If so let me know.2 points
-
Yes, the resin is white enough when it is new. But this material tends to yellowing as time goes by. My TM armor is 6 years old and since about 2 or 3 years I am watching this slow process. Bot a big issue at all, just mentioning. If you want the inside of the mic tips to stay white forever, they should be painted before the grid gets installed.2 points
-
Stunt has flat green lens. longer frown (grey mouth) with 8 holes cut out, two screws on ears + 1 at the bottom, 4 bumps on grey ear section, higher brow Hero Bubble grey lens, shorter frown with 6 holes, 1 screw on ears + one at the bottom, 3 bumps on grey ears section, low brow. I can spot ANOVOS helmets a mile away with its inaccuracies, wrong ears, wrong eye section, wrong frown ect... but thats another debate Mark2 points
-
Yup! I love the ESB frown, but am not a fan of the ESB hand guards. Plan is to build an ANH stunt, and then shortly after put together a ESB helmet, gloves, holster, etc. so I can do either as mood/situation may call for.2 points
-
Took a walk in my armour today with my HWT and took this pictures before hand Sent from my iPhone using Tapatalk2 points
-
Yes, we make a certain amount of sport of those with kits like this, but let's face it, not everyone can afford to spend $1000 + dollars on TK armor/accessories but still want to live the dream we all had of being a Stormtrooper. I bought my first kit from ebay to use as a Halloween costume. Did I make mistakes on my build? Good GOD yes! When I got it done I thought I was the coolest cat alive, but being an accuracy nut I did some research, found out about the 501st/FISD and it opened up a whole new world I never knew existed. I have seen many folks with ebay type kits while trooping (especially at SW movie premiers). I always hand them one of my trading cards and tell them a bit about the 501st in case they want more information. Some people are happy-as-clams to wear non "approved" armor and just want to get out, have fun, (I say more power to them) and don't care about being approved, then there are the rest of us, lol. To put it another way, what if a person with wonky looking armor decides to check out the FISD in hopes of joining and sees their photo(s) posted with deriding comments. Ouch. Just something to think about....2 points
-
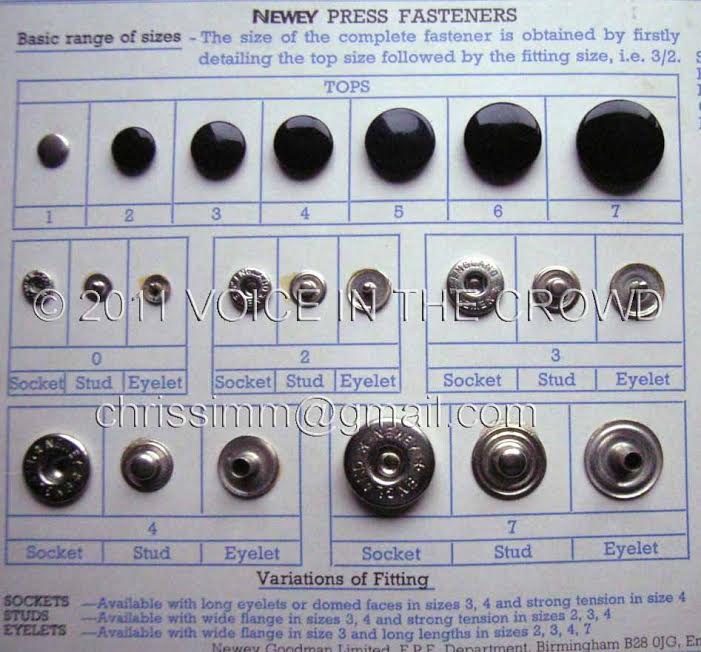
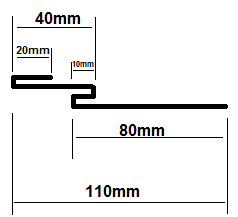
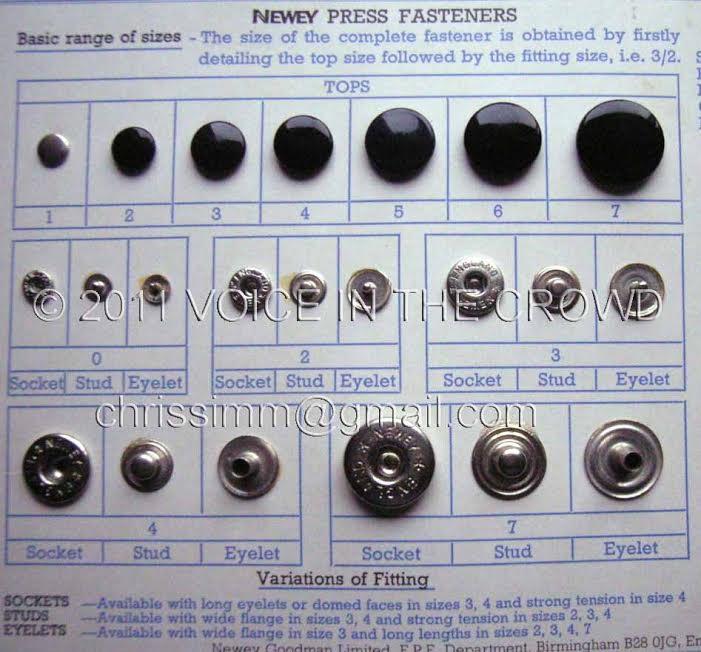
Here's a summary of what we know of what was used on the original suits, courtesy of the images and information provided by Voice In The Crowd: Snaps The shoulder strap snap fasteners (poppers) are Newey size 10. Gallery The other snaps all over the suit are Newey size 5 tops with size 4 studs. Known as a 5/4 configuration. The shin hooks are Newey size 4 Gallery Elastics Thigh elastic is 75mm wide and is 46 cord. Length 230mm total. 200mm long with a 30mm fold over. There is 65mm out of the leg the rest is inside. Of the elastic inside the leg 70mm of it is glued down. The arm elastic linking the forearm and biceps are 50mm 38 cord - one arm elastic total length was 230mm the other was 240mm. Gallery The shoulder strap elastics is 45-47 mm white. Has a squared pattern. Positive match: Ebay Gallery Gallery Drop box elastic is 25 mm white. Gallery Canvas belt is roughly 75 mm wide. Gallery Torso elastics are 25 mm black. The helmet elastics are 25mm black 14 cord elastic with one side having a size 5 nickel cap and size 4 nickel socket. The other strap has two size 4 stud / eyelet. The elastic on the shins with sewn hooks white 25mm wide it is 14 cord elastic, The elastic length is 75mm and has a 25mm fold over where it is sewn. The elastic that goes across the shoulder bells bottom is 25mm 14 cord black and it is 270mm long. 40mm of the 210mm is glued one side and 20mm glued on the other. The strap that goes from the top of the shoulder bell to the big Newey snap that is on the main shoulder elastic has a 3 folds in the 25mm black 14 cord elastic. The way it works is - if you look at the elastic side on like the photo going from right to left - make the first fold 80mm back to the right - then fold at 10mm back to the left - then after 40mm back to the right - leaving 20mm pointing to the right (the part the snap is sewn to. This makes total length of the elastic the 150mm. (see attached picture) Hardware The bracket screws are 5 mm flat head machine screws Gallery The split/bifurcated rivets have a head diameter of 8 mm, a shank diameter of 3.9 mm and a length of 9.2 mm - Positive match: Ebay - Gallery The cap rivet heads are 7.36 mm in diameter and 8.36 mm in the back Gallery Gallery Pop rivet washers are 12.61 mm in diameter Gallery Bracket wire gauge is 1.25mm The bolts that hold the brackets have 5mm wide heads - they are 7mm long and the nut on the other side measures 5.13mm across the flats. The spacing between the holes where the metal brackets are placed was 38mm for the centres of each hole. Thermal detonator Thermal detonator end caps are 20 mm deep Gallery Thermal detonator belt clips are 28.7 mm wide Gallery Thermal detonator belt clips are 68.89 mm tall from bend to tip Gallery Thermal detonator belt clip tip outward bend is 5.79 mm wide Gallery Misc Boots are black chelsea boots, produced by Stuarts Gallery Most likely glue used is Stelmax 1985 (information provided by TrooperMaster)
 1 point
 -
https://www.thingiverse.com/thing:4087124 Hi all, I just spent about 100 hours modeling an E-11 for 3D printing and giving it away for free. I made it as true to life as I could as well as adding in support for light and sound elements. It has: - Working trigger/selector with light and sound changes by mode - Light up scope - Addressable LED fire effects with focusing LED on front, range is about 10M with indoor light, not a laser so eye safe - 3D printed spring with cycling bolt - Removable magazine with battery inside - Removable rear cap with D ring mount - 3W speaker, as big as I could get to be heard in noisy areas - Plays the imperial march when you hold the selector for 3sec - discreet wiring guides, no wires are visible or in the way - Stock folds out and locks in place - All major parts are removable via snap lock or screws, so you can upgrade or replace anything without a full rebuild (and get at the electronics) I'm trying to improve the model as much as possible so feedback and suggestions would be appreciated. If anyone wants a custom TK number on the Hengstler let me know and I'll model one for you.1 point
-
Hey everyone. I thought it was high time I started a build thread over here as well as my Garrison. I couldn’t pass on the 40th anniversary deal that RS had going earlier in the year. After finance officer approval my BBB was on its way and I received it just in time to deploy overseas for six months. That’s a long time to do some research and make a bunch of online orders for parts and other bits and pieces during limited time off. I decided to go the HWT route via ANH Stunt with the aim of making the two interchangeable with belts, pauldron, cleanup etc. I’ve posted here rather than HWT, but will probably start a backpack build over there soon to seperate the two. ANH Stunt first then HWT. Anyway, I’m back now and have been making some progress between much needed family time. I pretty much came home to this. There are a few bits of merch in there in case anyone is trying to identify everything. Bucket partly assembled and painted here. Stepping back a bit, I should start with the bucket. I marked out the cut lines for the eyes and used a Dremel to carefully remove the material. The eyes was a combination of drill, Dremel and files. Being an RS kit there are many bumps and wrinkles but I love it. Did I mention this is a PVC kit yet? Once I was happy and had trimmed the parts a little I fitted the two together. You’ll probably notice that I’ve made them a little loose and there’s a gap between the faceplate and brow. That’s the issue with blinding using the hole marks in an RS kit, folks. I fixed this up later on after some good advice from the guys in the SCG (that’s the Southern Cross Garrison, not the other one I see around here a bit :P). Next up I began painting. The frown first followed by the tube stripes. I used some stencils from Trooperbay as I didn’t trust myself. A little bit of cleanup to do... ...followed by the traps and tears. Black first, then carefully laying down the gray. I really tried to take my time to get it right. You don’t realise how much your hands shake until you try to paint perfectly straight lines, and fail. More templates for the lines... again I have some clean up do to but I’ll do that later. Now its time to do the dreaded ears. I really didn’t want to do these as I was sure I’d mess them up. I went nice and slowly, trimming a little at a time, just the high points until I had a nice fit. Now I’m not entirely happy just yet but I’m leaving them for now. I think overall they should be thinner. I then fitted the lens. This was also from Trooperbay as I wasn’t at all happy with the film-like stuff that RS provides. (I know, I know, I haven’t finished the vocoder - waiting for a better brush to arrive because it’s nearly Christmas and going anywhere is crazy right now lol. Also, yes the brow is high, it works for me right now. I may alter it later but I know that will take some work at this point) And lastly, just last night in fact, I painted the black for the ears and fitted the mic tips - I forgot to take pics of that process sorry. And that’s where I’m up to. I’ll try to post things as they happen from now on, rather than playing catch-up. Having fun so far and that’s the main thing in my book.1 point
-
So I didn't know where to post this but introductions first. I am a 21 year old fan who grew up with the prequels. as a child I always wanted to wear trooper armor but I had my own personal insecurities. Nonetheless I collected everything Star Wars growing up until 12 and was obsessed with the Galactic Empire. I remember I always had them as my main characters when I would mess around with my toys as a child. More info though about why I joined... I am very short (5'00) and afflicted with moderate scoliosis and pigeon chest. I just wanted to know if it's possible if there is a class of trooper armor (like Scout/Storm/Cold/etc) that experienced troopers would recommend that I could fit in or I could modify it to fit. I will post pictures of my torso if the moderation approves. I do plan on joining my local garrison but only until I can know for certain that realistically it is possible to don those buckets.1 point
-
^^^This^^^ Rubber gloves with cotton inners, I use a couple of pairs during a long troop as they do get sweaty1 point
-
I always wear rubber gloves with cotton gloves and there’s no sweat pouring out, sure you get warm but that goes for the entire suit. I want to Troop as I was approved - A Centurion - This is the way, I have spoken. But...everyone do as they please of course And Justin, hoping all goes well tomorrow.1 point
-
I’ll give it a shot man, cheers! From memory I was hesitant to remove any more material off the bottom of the ears as there just didn’t seem to be enough of it! Of course I 100% admit to making many mistakes when I first trimmed this. So now (with what I feel is greater knowledge, and dare I say skill) I’m just trying to make things as right as I can1 point
-
This is something I have been thinking of doing myself as well. Good luck!1 point
-
I had the same issues with my forearms, added a V gap and was able to keep cover strips within centurion ranges. Also a hot bath with boiling water to reshape helped a lot, careful not to burn yourself or get armor too soft. If you have any questions you can ask them here or PM me. That sniper knee placement looks great, many hope Mark will make a post or video to help us with keeping it center and level.1 point
-
Congratulations Brian, your armor looks amazing. looking fordward to see your photos.1 point
-
Nothing ever makes sense to me so it’s all good. Thanks. Sent from my iPhone using Tapatalk1 point
-
Looking good Todd good luck on your application1 point
-
Mario - Thanks for these helpful insights! I think I'm on board with all four of your points—chemical gloves (at least for submission photos), the thicker holster, and a ready-made neck seal. Thanks, too, for mentioning Henry's Helmet Fans; that was new to me. Justin - Thanks for your pointers! I've seen the discussion about whether to always wear the rubber gloves, but I'm starting to lean towards trooping in alternatives such as the Amazon ones you posted, or nomex. I will definitely jump on the heavier 8oz holster, and will look again into ukswrath's cooling systems. I honestly think this will be the only armor build I every do, so interchangeability won't be important to me. Darman neck seal it is then, with the zipper. I believe I have an average neck height, and since his seal is already taller in the back anyway, should I even worry about ordering the taller version? What about the bib style—smaller stunt or larger premium? When I do my shins I'll definitely make sure to plan for the fact that they will be opened and closed repeatedly. I'm also already planning on inner cover strips. Finally, really no worries with the strapping kit. Definitely make sure mine is the last one of the run you finish since I am in no hurry, especially with my armor slated for a late February or early March delivery. I won't need them before then anyway, so take your time and heal up!1 point
-
I have both. My first build was the ANH TK then I realized it’s a pain in the butt to get around in and you can’t sit but it’s highly recognizable. The Scout it more fun, and you have more mobility but can be hotter in my opinion. The jumpsuit is not as breathable. The flip up mask is also easier when taking a break. I switch between both costumes depending on what the function is. If I know it’s going to be a lot of standing around I use the TK more walking and doing things I switch to the scout. Sooooooo the moral of the story is build both! Eventually, but not at the same time. Sent from my iPhone using Tapatalk1 point
-
Great job, Sherry! If I could make a few quick observations, They would be: 1. I realize that the first pic was a "dry fit", but eventually the top of the ABS belt should ideally be sitting at the line shown in the second photo (covering the bottom of the large ab-button panel). Looks like the belt will be wide enough to cover the seam at the bottom so you should be good to go! 2. If you want to remove some of the return edge on the top of the ab plate it should allow it to sit closer to you, which will help eliminate some of the ab/kidney gap. Screen used ab- Note lack of return edge. Keep up the fantastic work, and keep the photos coming!1 point
-
Hi Ian, Thanks for the question. There is certainly a yellow tint to the resin, however, in natural light I believe they are just white enough (hopefully). Once the helmet painting is finished I’ll check them against the white and see how things stand. :-) Dan1 point
-
Yeah Dan ! Great Build, thanks for sharing, .1 point
-
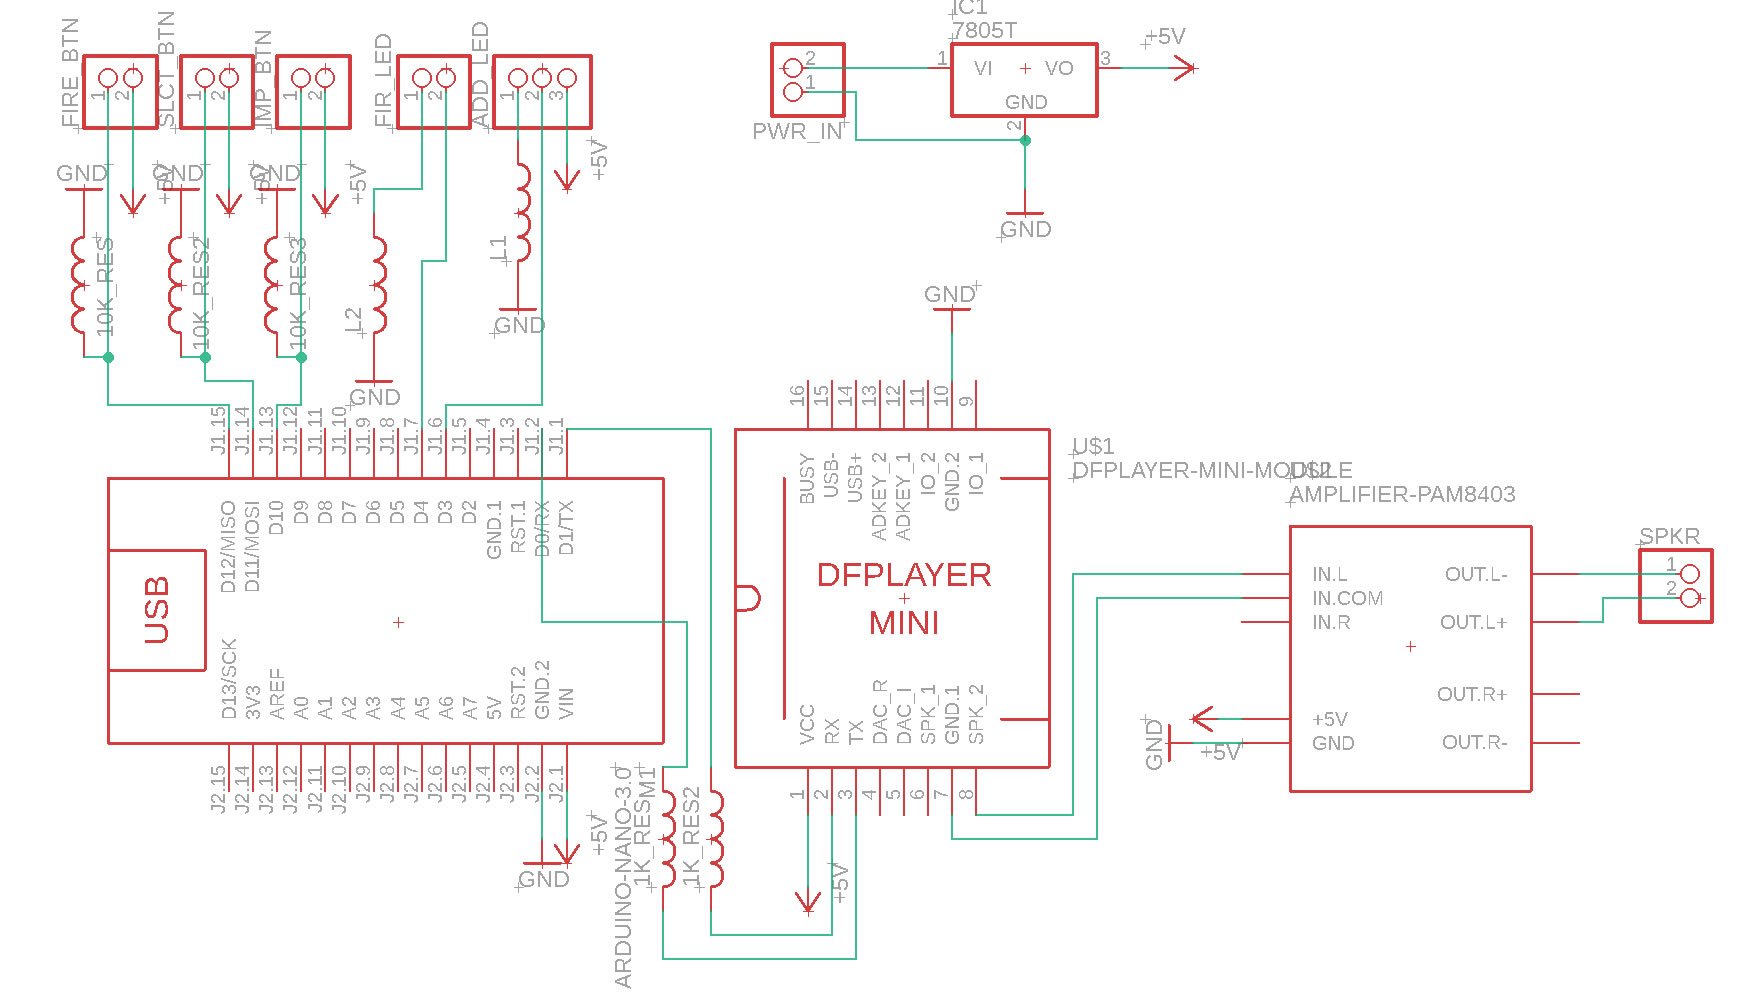
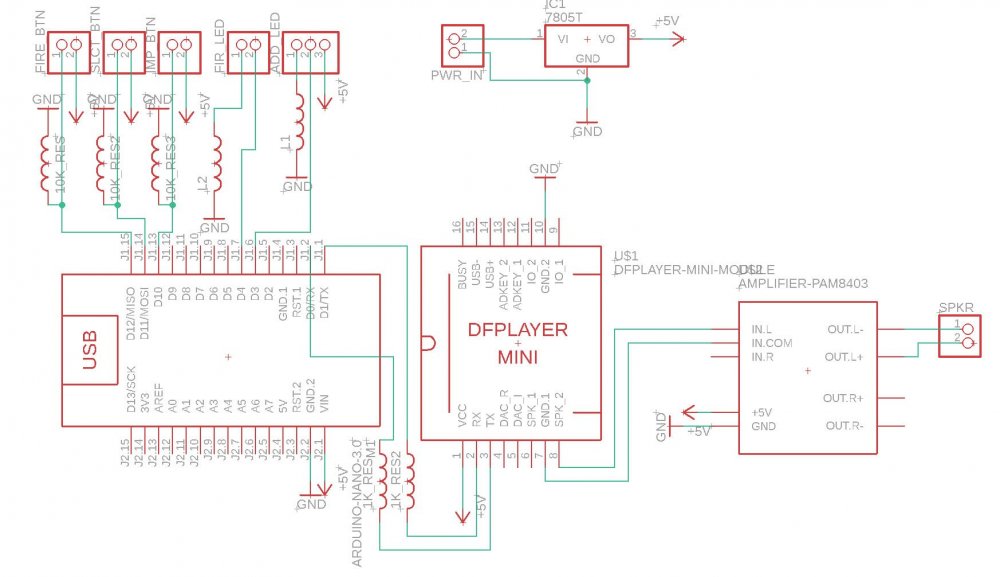
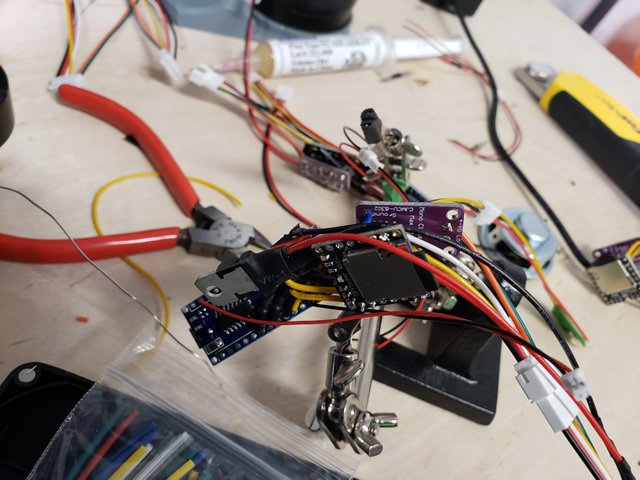
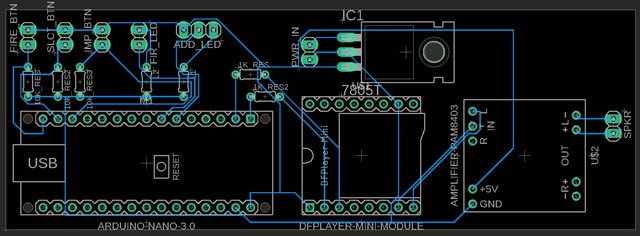
I'm going to do up a V3 one next week, it's already printed in a box. I'm considering doing a video on assembly and wiring depending on how busy work gets, but a 'how to' pic build guide is coming at least. Here's: - the vector image of the sight. To make it I printed this on some transparency and airbrushed one side red lightly - the Arduino code, it's a WIP but it does work. I have another direct drive version for the front emitter rather than the neo-pixel, I started off with a 3W LED, but I think neo-pixels are more ubiquitous. If you want the 3W version let me know. - The circuit diagram. I think I have everything labeled. Everything with gnd can be connected together as well as +5v. The 7805T is a step down from a 7.4Lipo, but you can just as easily step up from 3.7. V4 will have that as well as USB direct charging. edit: in the diagram ignore 'imp btn', that's from V1 where the imperial march had it's own button, it's now a long press of the fire select, and the fire LED is 3 pin now for the addressable light strip. I'll post a detailed parts list and guide next week. E11_Sight.svg E11blaster_V1a.ino
 1 point
 -
Not many out there making the R1 in ABS at this stage. The FISD does not go looking for vendors, either they post up works in progress or members who purchase armor from vendors post build threads, over time supply and quality from the vendors becomes known and they may be added to the approved vendors list, but no guarantee. Unfortunately over the last say 5 years there has been an influx of armor makers posting on Facebook their work and taking peoples money and not delivering, so there is a lot more scrutiny of new vendors I don't have the R1 armor but it does look like it is a little more constricting compared to OT armor.1 point
-
It's very obvious the Anovos stuff is going to Galaxy's edge since it has the Anovos tag right on it, the Kylo Helmet, FOTK helmet and armor kit despite them claiming it was from a different supply chain which is just a bunch of crap It is also obvious our FOTK kits were used on the Rise of the Resistance animatronics. So a very big YES, Anovos sent our pre-orders to the parks and left us hanging. One interesting thing though was that on Sunday I was at Disneyland and there was no price sign on the Kylo helmet like before but I did not ask if they had any or not but to my surprise when I got home on Monday I had a shipping notice for my Kylo helmet that had been on order for over a year. And yesterday it arrived.1 point
-
Thank you Sir for clarifying, then that is why I didn't see report about them here. The are good!!!!! I didn't want this new person to get burnt and just trying to protect them Sent from my SM-G965U using Tapatalk1 point
-
These type of threads are always a bad idea. Not sure why it hasn’t been removed as it always leads to the same thing - mocking. Bad taste. Move along.1 point
-
just a pic of how the suspenders support the ab/kidney armor put everything on and since my shins arent closed to ready yet i used my ANH STUNT TK shins just to see how everything looks the blue around my thighs is what i plan to cut since they are too long and wide need to cut the bottom of the crotch plate too side view (not wearing my R1 pants) the top of the under-suit sticks out the back a bit will prob have to be taken in a bit more my butt plate looks uneven still cut an inch off the top of the legs but the first thigh (on left) was rough cut compare to the other one the red mars is where i need to add more material to make it look (eyeball even) put Velcro on the thighs to close and added the snaps yesterday so i can wear the thighs with the armor and see how they fit1 point
-
Updated with new photos/requirements.1 point
-
Some photos and video of the build on RPF1 point
-
the rest of the world divides through ten...1 point