Leaderboard


Popular Content
Showing content with the highest reputation on 09/25/2019 in Posts
-
In case you may need it, yes, it is a S typed rubber Enviado desde mi SM-G955F mediante Tapatalk2 points
-
Thoughts had while trimming: Geeze, this was designed for a big boobed lady. *holds against chest* no wonder the Ladies of the Legion claim they can put water bottles here. ooooh I can put food. I think I have enough room for two pringles cans.... Omg the body is so huge, I'm going to be working my butt off slimming this down. Yay for being skinny, boo for more work. I think the corset is trying to impregnate me. *cuts off The Violater* Oh it looks the booty piece doesn't need to slimmed down...dammit. Does that mean I have a huge butt? Is this right or left? I think its left. No, it's right. No wait, I don't think there is a difference. Or is there? This bucket looks really big. *puts on bucket* oh dammit this is really small.2 points
-
Rodrigo, Thank you for all your patience with your application I really do appreciate it. After discussions with my fellow Deployment Officers the one fix I'm going to ask for before we finalize your application will be your neck seal. I know it seems like a small detail but we would like to see this in one piece. You've done a great job in quickly rectifying all the suggested fixes and I would hate to see something like your neck seal keep you from reaching Centurion.2 points
-
Would be great if you could do a mini-turtorial on how to properly mount the AP sniper knee - when you have the time2 points
-
Name: Josh Shelley TKID: 42250 Forum username: alotmorestuff Star Garrison, South Texas squad EIB link: https://www.whitearmor.net/forum/topic/46732-tk42250-requesting-anh-stunt-eib-status-anovos-903/ Armor: Anovos Helmet: Anovos Blaster: Hyperfirm Height: 5'6" Weight: 150 Boots: TK boots Canvas Belt: Robert Kittle Hand plates: Trooper bay Electronics: Ukswrath's hovi tip speakers, audio system and icomm Neck Seal: Geeky Pink Holster: by fellow trooper TK81018 Thank you for your consideration Sent from my Pixel 2 using Tapatalk1 point
-
Halloween rush it that time of year were I get pretty busy! Lately most of my customers opt for the fully built ready to wear out of box, never built so many in a small time frame! I prefer to build 3-4 at same time which speeds up process. Mark (AP)1 point
-
Nice work, you could also trim your smaller ab plate a little more and get rid of the rounded corners1 point
-
Hi, everybody! Hope you all are doing well. The time has come for me to stop procrastinating and submit for L3. I have been having so much fun trooping, I sort of forgot that my suit wasn't quite finished yet! Seriously, though, I am thirteen troops in and am having SO much fun. This whole journey from construction to costuming has been one of the greatest rides of my life so far. Without further ado, here is a compiled list of the feedback I got on my EIB application. General suggestions: Remove excess paint from one frown tooth Move right ear further back and correct screw alignment of ears Move tube stripes closer to cheeks Extend paint job on tears Make sure forearms aren't twisted in submission photos Remove excess paint from ab buttons Squeeze D-ring on E-11 to proper dimensions Raise Hengstler on E-11 Centurion-specific suggestions: Swap Ukswrath's hovi-mic speakers for AP-supplied mic tips Bring shoulder bells closer to chestplate/shoulder bridges Correctly align drop-boxes to the edges of the ammo belt Pretty manageable! A few have already been taken care of, even. However, there are a couple of items that I am going to remove from the "general suggestion" list for now and hope that I can still qualify for Centurion. The first is the placement of my ears. As detailed throughout my build, my ears were a real struggle-point. Because of this, my bucket isn't super pretty underneath them. Changing or moving my ears will be a pretty complicated endeavour, and I think I will save that for a last resort. If they are a hold-up from L3, then I'll get er done, but if they are acceptable as they are, I'd rather leave them be. The second is raising the Hengstler counter on my E-11. The whole blaster came as a resin-cast one-piece, so I am reluctant to start cutting it apart. If it qualifies for L3 already, I'd rather not compromise the integrity of the construction. If not, I will cross that bridge when I get to it. With two items set aside, I am ready to start tackling the remainder! Remove excess paint from one frown tooth Here is the tooth in question. Presto! Move tube stripes closer to cheeks Here we can see my previous tube stripes sitting too far away from the cheek (Shame! Shame! Shame! Ding ding ding). Washed them away with mineral spirits and Q-tips (they look like my tears). And boom! Quick wipe with paper towel and the tube is squeaky-clean once more. It looks so naked now. My new stencils, correctly spaced a No.2 pencil's width from the cheek, and with the "leaning" stripes near the chin. A coat of white paint to seal the edges (which I forgot last time—not a fatal mistake, but will save a ton of time cleaning them up!) and then some tastey Humbrol 14 Gloss Blue. I still have a couple of coats to do, I'll cross this one off once it's %100 done. Remove excess paint from ab buttons Donezo! Swap Ukswrath's hovi-mic speakers for AP-supplied mic tips Easy switch. I will re-install Ukswrath's speakers for trooping because they are awesome. AP's mic tips are great, but needed the white paint along the rim. Correctly align drop-boxes to the edges of the ammo belt This one I corrected a while ago, as seen here in this photo with my hero Weird Al. And that's where we are so far! More to come. TO-DO LIST BEFORE L3 SUBMISSION General suggestions: Remove excess paint from one frown tooth Move tube stripes closer to cheeks Extend paint job on tears Make sure forearms aren't twisted in submission photos Remove excess paint from ab buttons Squeeze D-ring on E-11 to proper dimensions Centurion-specific suggestions: Swap Ukswrath's hovi-mic speakers for AP-supplied mic tips Bring shoulder bells closer to chestplate/shoulder bridges Correctly align drop-boxes to the edges of the ammo belt1 point
-
Hi Matthew, Thanks for your application! You have a very clean build and you have clearly done your research. CRL and EIB Application Requirements All required photos are now in and, after review, we are pleased to welcome you to Expert Infantry rank. On behalf of the DO team and myself, many congratulations! Other-Armor Fit/Assembly In this area we review observations made by your fellow troopers and the DO team. Some observations may lead to suggestions to improve the overall look of your armor. Note that we consider both text (CRL) and pictures (screen caps/reference images) when reviewing submissions Starting from the top, a couple suggestions for your helmet. First, although there was a fair bit of variation on brow height, Stunt TKs tended to have a slightly higher brow than yours is, while Hero brows were lower. So we're suggesting you scoot up the brow just a touch to get that classic Stunt look. Reference Images: Next, as was pointed out by your fellow troopers, your vocoder could use some cleanup. We're not asking for perfection, but just a few minutes with some paint and mineral spirits could really improve the look. Next, it looks like your right side ab/kidney closure could be closed up more tightly. You could try tightening the strapping, or perhaps a little heat bending to help the kidney wrap around your body a bit better. Reference Image: Additionally, it looks like your canvas belt is a bit loose. Note that if you do tighten it, that may leave the end of your belt peeking out from behind the Thermal Detonator; if that's the case, we'd also recommend shortening the canvas belt. Reference Images: Finally, it looks like your shins are riding a bit high. I see that you're on the taller side, so you don't want to pull them down so low that you create a big gap between your thighs and shins, but if the problem is that they ride up as you walk around, you can consider adding a stirrup to the inside, or adding a bit of velcro to your boot. Reference Images: Centurion Requirements In this section we prepare you for Centurion. More photos may be requested in the future that allow us to make better decisions on possible adjustments. If there are any areas of concern they will be discussed here. Because Centurion photos show much more detail than EIB, items to pertaining to Centurion might be seen there and not here. We try to point out all that we can from what is seen, but the final accuracy is the responsibility of the trooper. Again starting from the top, the L3 CRL states for the helmet screws: Ear screws shall be slotted, flat topped, countersunk and painted white. Your upper screws look great, but your lower one is sticking out a bit. Maybe just a couple turns, or you can use a deburring tool or drill bit to countersink the screw hole so that the screw head sits more flush. Reference Image: Next, your shoulder bells. The L3 CRL states: There should be a minimal gap between the shoulder armor and the chest/back plates. From the front things look pretty good, but there's still a gap at the top of your left shoulder, and I also pointed out an area where your undersuit is peaking out, breaking up the clean lines of the armor. From the back there's a bigger gap, so you should do your best to minimize that. Finally, I noticed that you have quite a bit of lower return edge on your shoulder bells, so removing all of it will help your shoulder bells sit closer to the chest and back. Reference Images: Next, this is definitely just a dressing area, but the L3 CRL states: Abdominal and Kidney Plate align horizontally at top Yours are misaligned in most of the photos, so just be sure to get those straightened out when you take your Centurion photos. Next, your ab button plate is *super* clean, but unfortunately will need to be adjusted for Centurion. The L3 CRL states: Ab button paint shall not extend beyond the bottom of the actual raised button. Reference Image: If you take a look at the reference photo, the paint stops just short of the edge of the plastic button. Next, an issue with your belt. The L3 CRL states: Drop boxes are vertically aligned with the end of the ammo belt with minimal gap between belt and box. This may just be perspective in the photo, but it looks like your drop boxes are not quite aligned to the ends of the plastic part of the belt. Adding a drop of glue to the white elastic holding them on usually keeps them from wandering. Reference Image: Finally, we will need you to adjust your sniper knee position before applying for Centurion. The ridges are very well aligned, but unfortunately that's left the knee very far off center. Although this isn't something that's explicitly stated in the CRL text, we do consider images when doing our armor reviews. Looking back at other AP applications, it does seem like this kit is particularly difficult to get the sniper knee in place, but we do know it's possible to get closer overall alignment. Careful clamping and gluing should do the trick. Reference Images: And that's it! Although there are a few adjustments needed for Centurion, most of them are relatively minor, so we hope to see your application soon. In the meantime, get out there and make the Empire proud!1 point
-
Gorgeous work. Wish I was that proficient!1 point
-
I had to expand on the kidneys. I m a bit thicker than the standard trooper1 point
-
Impressive helmet build in a short time frame! Also, don’t forget to order your belt and neck seal. (Unless you plan on making them)1 point
-
Now that's a styling trooper!1 point
-
Here you have it one nice and clean cut and piece Enviado desde mi SM-G955F mediante Tapatalk1 point
-
Looks cool !!1 point
-
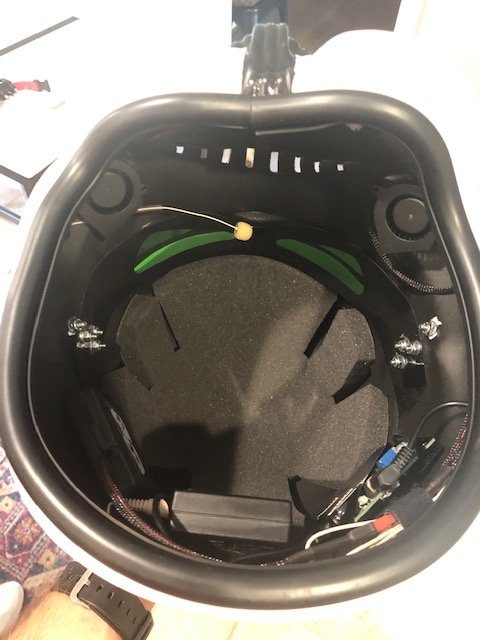
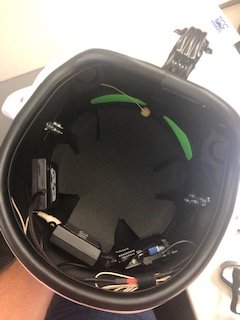
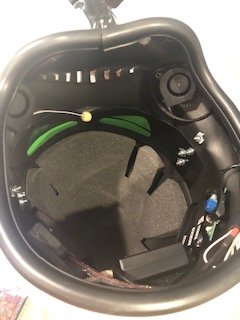
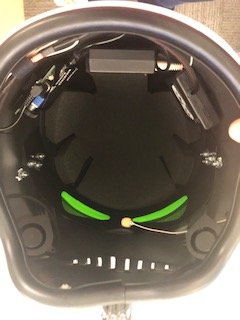
Higher res inside view- I had wanted to put some sump pump tubing in to hide wiring but my head is so big that its a tight enough fit to get this thing on. I don't think I could if I keep adding items. The UKSWRATH sound system is amazing. I cant turn it up all the way without feedback but half way is plenty loud. Not sure I will need an additional speaker or not yet. The fans work great (also from UKSWRATH) but when I turn them on I cant hear anyone unless they are 3 ft away. Not sure I want to go the assisted hearing kit route. I think I will leave the fans off unless I notice bad fog up.
 1 point
 -
Part 3
 1 point
 -
Looking great Trooper!! Good luck with your application.1 point
-
More progress. Bicep hooks: in trimming my cover strips I was left with two 7 inch 20mm strips with no discernible use, until last night. First I marked an inch down with a sharpie in order to mark the bicep hook bend and to mark where I’d cover the strip with my wood blocks. Next, I grabbed my heat resistant gloves and sandwiched the strip so as not to heat up the rest of the strip. One of the nice things about the internal bicep hooks is that only I’m going to see them. So I set my heat gun to high and got the plastic nice and hot (15 secs maybe less) before removing it and giving it a bend. Fits the strap! (I know that’s the wrong way, I took the photo for effect) With the hooks started the next step was to assemble the arms so that I can see how low I can drop the biceps. My plan is to hang the hook on the should bell elastic and pencil mark where I need to be on the bicep once its mocked up. In order to do that, I needed to start strapping the arms. I thought about just doing Tony’s elastic on ABS method but then thought snaps would be easier for storage. Honestly, its six of one, half dozen of the other. I just wanted additional flexibility in the arm assembly so I chose snaps. Looking at the left bicep I realized I still needed to reshape it a tad so it fit better. Here's an older photo of the left that shows the oval shape. So I grabbed a big ole pot, filled it with water and turned the knob to 11. Naturally, since I was going to do the water bath, I figured I might as well kill two birds with one stone so I also grabbed my shoulder bridges. While I let the water get to a rolling boil, I sanded the bridges down once more. Satisfied, in they went. I think I had them in there 10 seconds max, and re-dipped as necessary. The ABS for the bridges is spread thin so it doesn’t take a lot of time in the water to get them to bend. I just pinched/bent them between my middle finger and thumb, and dipped them into the the bath, checking them for pliability as I went. I've seen on other posts people indicate turning off the boil. I don't recommend that. Keep the fire hire and the pot boiling while you bathe the armor piece. It'll go quicker and you're able to make adjustments on the fly. I think the bridges turned out fine. I bathed the left bicep for longer than the bridges based on the size and strength of the ABS. I’ll edit this later to include an after photo, but the oval shape at the bottom has rounded out nicely and it fits much better now. It took 15-25 seconds, checking it periodically until I started to get pliability, even at high heat and a rolling boil. Heat resistant gloves are a must for these baths! I could feel the heat on the ABS even through my Milwaukee gloves. If I wasn't wearing gloves I would've burned all the skin off my fingers. With the biceps ready, I grabbed the elastic, nylon, and my ruler. Measuring 90mm as in Tony’s AM build I cut my elastic arm straps. Because I wanted to do snaps as well, I cut four 1” nylon squares to reinforce the strapping when I pop these off. I used my soldering iron to burn holes at the half inch mark at the ends of the elastic and centered in the nylon squares. In setting the snap covers, I put the nylon at the bottom (toward the armor) so that the pressure for removal was on the nylon and not the elastic. (Elastic is not great for pulling snaps on and off. Use nylon whenever possible.) Anyway, below are the pre and post photos of the elastic and nylon arm straps. As I mentioned in previous posts, I used dummy male snaps to "break-in" the female "cover" snaps so that they attached onto the male armor snaps without issue or too much pressure. Satisfied they worked, I made a blue painters' tape bracket around the male snap to help hold it in place while the glue set. I then re-attached the arm elastic bridge to the male snaps, and set the strapping and snaps in place. Please keep in mind I set the male snaps in 1" nylon, and glued the snap to my internal cover strip. I know there are threads about E6000 and metal snaps causing a reaction, but since this isn't on bare armor, I'm not worried. The end result: There's maybe 7mm in space where the straps are set, so I’m within EIB/Cent requirements. In the event I need longer straps, I can generate them for trooping. But I'm feeling pretty confident that won't be necessary (famous last words). The plan now is to finish the arm assembly in total. I'm going to mock up the biceps and bells tonight with the hook painter's taped on. Once I know where I need it to be, I'll mark it as I did above and start with the heat gun. Because I want the hook to mold to the inner bicep, I'm going to heat it up pretty good and then let it conform to the inner bicep. After the hooks are done, I'm going to glue the bridges onto the chest plate. Its the bridge front bump plus two more? Not sure how many bumps I'm supposed to have. If I have time, I'll move on bathing the kidney shims so that I can connect them to the ab plate. Gotta round them a bit so they wrap around. Onward!1 point
-
Thanks for sharing your thoughts1 point
-
All good now Paul, had to log in on a PC, couldn't update via the Tapatalk app. Hopefully the title now makes more sense. :)1 point
-
Added the other side of the shin with sniper knee plate. Also worked on that frown. Sent from my Pixel 2 using Tapatalk1 point
-
psh. I went to university in Indiana as a petite Asian female of some attractiveness. This is nothing. Not ok, but more amusing and sad than anything. But not gonna lie, part of the reason why I'm doing this is the solid-looking armor and helmet anonymity. I attended my first con in the USA at 13. My last con in the USA was at 14. There were reasons. Maybe with the armor and bucket, I might consider going to a con again.1 point
-
That's the internet for you, people can say what they want and get away with it and that's why detachment forums work, there is much that can't be said here which protects those who share their builds. Brush it off and think how awesome it is to open your boxes of crispy nice white1 point
-
Nice work, you may want to just clean up that extra paint on the gums in the corners You will also need side images of your shin/sniper plate1 point
-
For sure! Battle weathering to come for EIB and for trooping. I just had some help come to get pics for approval done while they were available. Couple more minor tweaks and It'll be ready for trooping! Thanks for everyones help!1 point
-
Love seeing BBB's, looking forward to the unboxing and build progression, when your arms aren't so sore1 point
-
Nice work, good luck with approval. Wouldn't hurt to add a little weathering to your armor and accessories since you weathered your pack the rest of you looks pretty clean May also want to reduce the large gap on your wrists, perhaps bring your biceps and forearms down a little.1 point
-
The right shin ( apparently they are greaves in the CRL ) should open to the inside of the leg. "The cover strip edge shall be facing the inside of the leg. " The small button plate on ab needs to be trimmed down to show edges of ab mounting point under it. The butt plate needs to be lined up with the kidney, looks like it is just floating there. Maybe clean up the fraid end of the belt, ideally it would not go too much past the TD edge. The elastics for your drop boxes needs to go behind the belt. Is there a snap or something metal on the belt in the back photo?1 point
-
Correct at the time of the CRL being made the then FISD DL decided that as there was no armor maker supplying the TLJ cod then the TFA cod could be used for base approval so the image shows a TFA cod, with the TLJ cod a requirement for L2. As others have mentioned the FO CRL's will be undergoing some rework hopefully soon so this issue and others will be revisited. Comparison I put together at the time1 point
-
If its in the plastic, its harder to remove. If I were you, I would try an odor absorber. After hurricane Katrina, everyone's refrigerators were foul smelling because food had been rotting inside for weeks or even months. The smells were thought impossible to remove. I had already replaced my old refrigerator, but I was determined to remove the smells so I could use it as a back up fridge in my garage. I bought these canisters of odor absorbers from Home Depot in the cleaner aisles. It took me a a couple of weeks of leaving an absorber in the unit and replacing it each week, but it really did the trick. I do not know if it will work with your ABS helmet, but I assure you, it took a most horrible smell imaginable and sucked it out of that full sized refrigerator. It was called OdoBan and they are about $3 a canister. Just something that might help you. Good luck trooper!1 point
-
Wow amazing mate !!!1 point
-
Looking great so far! May I suggest updating the title or we can tag it with the type of trooper you are building? I almost thought this was an electronics build ;-)1 point
-
sorry for the hijack Mark1 point
-
Oops lol, sorry Dan Would be great to see a post as The Swede mentioned regarding Sniper plate mounting. Sent from my iPhone using Tapatalk1 point
-
So at this point, I have finished the majority of the work. First the thighs. The shin armour. I added some foam to help keep them in one spot on my leg, real happy with how these came out. I added some foam on the inside of the bicep pieces to help them sit right. They were digging into my sides originally. Finished up the forearms for the most part, they are tight on one end, but I don't like how they fit right now. I also trimmed down the ab section so that it doesn't show per the CRL. Started working on the thermal detonator, the paint I used took like 4 days to finally dry. And then there is the helmet.... So, this is the HSP helmet and I have mixed feelings right now. For the most part it looks pretty good, but in the second picture you can see that the slits were messed up so I will have to fix that. The brow has some pits in it as well that will have to be patched. What really bothers me is that the frown is a separate piece and I will have to try and grind down a bunch of material to get it to fit right. I'm really not sure why HSP didn't just mold that into the helmet as well, but oh well. With some patience it should turn out okay. And finally some shots suited up. Edit: I forgot to ask if anyone has a template or a guide for the slits on the helmet that have to be cut out. I am a little nervous about trying to guess about the spacing.1 point
-
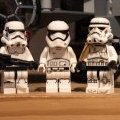
Thought I'd post this up just for fun. I was rummaging around hoping to find the blaster in my profile pic to see if it was the correct type to modify into something for my costume when I found the TD's I made for my kids. It struck me how adorably small they are. Ah- hem, so I thought I'd do a comparison shot with the helmets I built them. Then It became apparent that I didn't get the brackets right on them. [emoji2] Sent from my sorrosuub C1 comm link device using Tapatalk1 point
-
Reached EIB. Guess I won’t apply for Centurion. Shoulders are a constant struggle Thank you everybody for your support and constant advice. That‘s why it’s so awesome to be part of 501st1 point
-
Hi! I have both a KB and 850 kit and am doing the world's slowest FOTK build. I am planning on using the 850 back and chest/yoke, but KB everything else because the 850 kit is so much smaller in the chest and back. However, the pulls are very bad. There are large dents and warping in the back piece, and I will need to sand down and Bondo the whole thing smooth. 850 *should* be approvable, but in my opinion it's very much a 'you get what you pay for' situation, as the kit is MUCH cheaper than any alternative, but requires a lot of work. Please post pics - I'm really interested to see them.1 point
-
Pretty happy with the results with my first attempt at a weathered paint. Using the toothpaste method on a sample piece of ABS in readiness to start painting my Shock Trooper armor. Sent from my SM-G960F using Tapatalk1 point
-
As others have stated, sometimes a host will want the typically shiny TK, not a deployed trooper with a backpack, etc, so it's nice to be able to go back and forth. Sent from my Pixel 3 using Tapatalk1 point
-
I've only worn my HWT to a couple of events, standards for the pack changed plus I have back and neck problems so the extra weight is not helpful. Like Tony I used a charcoal dust which was easy to polish off. I think you'll find the public see a HWT as a clean Sandy and really don't notice it's a different costume. Most of the time event hosts want to see shinny whites but on the odd occasion they want to be dirty1 point
-
Straight out of the game into real life, awesome!1 point
-
And shes done1 point
-
That may be a bit much for a Heavy Weapons Trooper, but I admire your zeal! As they say, sometimes less is more... As per the CRL for level 2 (and Basic in my opinion) the armor and bucket should be .."lightly scuffed (battle worn) but not weathered like a Sandtrooper". Here are some examples: joshsurf TK 27726 Templar726 TK 72627 justjoseph63 (me) TK 109731 point