Leaderboard


Popular Content
Showing content with the highest reputation on 04/18/2019 in Posts
-
THAT’s what is bugging me about the knee. Just couldn’t put my finger on it. Thanks. i need to trim this off the inside… and this off the outside. That’s what I’m looking for. Much cleaner look now. Thank you gmrhodes13. Sometimes a detached eye sees clearer.2 points
-
I came up with these some time ago and they work great keeping the butt in place1 point
-
Having to go off center on a few to make up for the amount of material you have to work with on this kit?1 point
-
The birthing process of magnetic shins isn't always pretty... but it's progress!1 point
-
That's great, thanks! Two biceps, two shoulders and one forearm glued...getting closer to a full above-the-waist test!1 point
-
Had a fun couple of hours finally assembling the belt and hooking up the holster. Will glue on the rivet caps once I've double-checked it works with the torso and thermal det.1 point
-
Hey Eric, I know the frustration of a seemingly moving CRL target. The current CRL does have a few items changing, but do keep in mind there's precedent for grand fathering in builds started prior to CRL updates. If you have extra concerns or questions we're always happy to help guide1 point
-
Thank you very much Joseph and Christine for the compliments and the suggestions, there's always more to learn. T-TRACKS LEFT SIDE WITHOUT WEATHERING T-TRACKS RIGHT SIDE WITHOUT WEATHERING Thanks gmrhodes13 for the suggestions about the handle HANDLE LEFT SIDE WITOUTH WEATHERING HANDLE RIGHT SIDE WITOUTH WEATHERING1 point
-
Still wondering why no return edges? Yeah, that is something a lot of us asked when building our first suit. The simple answer is that the armor seen on screen had no return edge. Here are some examples: Link to gallery: https://www.whitearmor.net/forum/gallery/category/24-anh-tk-reference/ And I found that most things like this no one will notice besides other troopers. Whether you have an edge or not in the end is up to you. You can always come back later and trim it. With that said, I am a fan of no trim. Hope this helps.1 point
-
You can pick up a set of needle files at Lowe's for about 4 bucks. I found these things to be invaluable for detail work- https://www.lowes.com/pd/Project-Source-6-Piece-Needle-File-Set/47770671 point
-
Please note that those are prospective changes and not set in stone yet, Eric. It would be a good idea to use them as a reference, though, as you will not be "dinged" if you follow them.1 point
-
Awesome thank you!1 point
-
Thank you very much!!1 point
-
None here that I'm aware of, I've seen some online just doing a google search but I can't say whether they would be 501st approvable. http://do3d.com/product/3d-printable-model-stormtrooper-first-order/ https://www.etsy.com/au/listing/463962512/3d-model-of-stormtrooper-armor-first1 point
-
Congratulations once again. First request higher access here Then have a read through the EIB section (you must be approved as an EI before you can request Centurion) https://www.whitearmor.net/forum/forum/95-expert-infantryman-program/1 point
-
The CRL's are updated from time to time, if you have a look at the bottom of the ROTJ CRL you will notice it was last edited in August 2018 and I don't believe much was changed. Updates can happen to any costume when it's always best to check in with the CRL's from time to time. This is why checking back with them is important as well as checking the gallery seciton, build threads and researching. Top section of the CRL's says: This document is not intended to be a detailed how-to on costume construction; rather a visual guide to be used for 501st costume approval. Details on construction may be found on the respective costume detachment web forum. With that said there are a lot of what you have posted which will be addressed in the next round of CRL updates. Armor is indeed overlap constructed Boots do have white/tan soles Boot soles shall be white, off white or have the sides painted white. Shoulder rivet One pop style rivet shall be present on the front of each shoulder bridge. May be painted white. No large tab at back Shoulder straps must be curved to lay flat against the back plate, and may be affixed with Velcro of needed. No large rear tab is present. Belt Knee/shin rivets The thigh ammo pack may have an extra rivet on the front, located toward the top between the second and third boxes on the wearer's right. May be painted white. Hope those images help, you can find more in the ROTJ gallery section https://www.whitearmor.net/forum/gallery/category/26-rotj-tk-reference/ If you would like some further clarifications on the ROTJ CRL in regards to your present build you could contact our head DO Joseph @justjoseph63 or our DL Sarah @Alay1 point
-
I've got everyone's names & that's in the works.... ssshhhh1 point
-
You know, I have to say, I'm really glad I did these build logs. It's fun to go back through them years later. It's almost like I'm making this over again.1 point
-
I was there as well with the GGG, and I am wondering if there is a final count/list of names of people who were there. I think it would be fun to do a commemorative patch or something like that.1 point
-
Now cleared and have my TK number. What do I need to do to apply for EIB or Centurian level? Thanks Sent from my iPhone using Tapatalk1 point
-
Exciting stuff!! Post lots of pictures. We’ll be here! Have fun! Sent from my iPhone using Tapatalk1 point
-
Hey Cricket! Thanks for your advice. And you are not late to the party at all. This is my first build so I am taking it slow and my job loves taking up most of my time. Your RS build thread was one of the first threads I ran into and I implemented a couple of things your thread when I resized the torso of my RS (I think it might be good enough for expert infantry). Anyways, I might try the forearm thing this weekend ( if I'm feeling cowardly, I might work on the helmet instead ). I guess I will trim it the way it is supposed to be, put my forearm in......if my forearm is swimming in the armor then try and do what you suggested. And thank you! my wife is super excited. She posted a thread on the Sandtrooper forum asking for opinions on making the TD better sized to her body but there were no responses. Fortunately, TK-44678 lives near me and is pretty good with building. We came over and he helped adjust her kit. As soon as she gets some MP-40 pouches she submitting for approval. Once that's done I will have a bit more time to attack my WTF.1 point
-
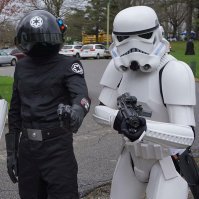
The best thing from this is how nice everyone was from the bottom to the top. Jon Favreau hit the nail on the head at the Mandalorian panel when he said he didn't know we knew nothing about why we were there and that we worked so hard. The first morning they jumped immediately into filming and most of us had no clue what to do and the crew seemed a little surprised. I think that it was Dave Filoni that told everyone we were 501st not extras then the crew realized we needed a little more direction than normal. From that point on I think our group nailed it and that we knew how to hold a blaster and move like a stormtrooper should as Jon said. The union extras kept having to be told by the crew to hold their blasters like the 501st. Towards the end of the first day we were doing some pretty involved work and one of the production assistants started to get a little frustrated with us since we were not catching her cues. Myself and a few other 501st said, "we have fans running and we can't hear you". She was surprised and asked, "what fans?", so we explained we had bucket fans so we can see. So from there she used hand signals for us and away we went. In the end I think we were in armor for well over 12 hours at a time, to the union extras it was just another paying job and no big deal to us it was a once in a lifetime experience. And yes, some of us now know how to use the restroom in full armor without making a mess.1 point
-
Hi Eric, I believe that there is usually consideration for how the CRL was when you started and we’re completing your build. Do you have a WIP thread running? Do you know which elements have changed? Best wishes Dan1 point
-
Looking forward to the progress, when in doubt check with the gallery section or asks questions, good luck.1 point
-
Holy cow, are we mid-way through April already?! Progress on this kit has been slower than I'd like it to be. I take full responsibility for it, though! I have a serious case of "Ooh-look-a-project-itis" lately. I'm still not done with my Hero TK build (although it's coming along, I haven't documented it, though!), and my T-21 foam build is still mid-way through, and I still have to convert my stunt TK to a TD (and build the backpack for it), and then there's this TK I'm working on... and most recently I got the itch to start looking into 3D printing a shoretrooper. Oh boy. Since my last post, I was able to acquire some TK Boots for my hubby (thanks to @Commander Gree!). And today I finally made some flippin' progress on this kit, which has me thrilled! I present to you... LEGS! Trimming for width is always the most challenging part for me. Not only do you have to trim to make the parts fit properly, but you have to make sure that the front and back seams line up. Which is no easy task with the RS shins! One half of the shins (the left halves, the RS kit comes with two identical shins) has a lot less material at the bottom of it than the other. This isn't an issue if you plan on shrinking the shins down a lot (as I've had to do to my own shins in the past). However, I hardly have to trim anything off the backs of the RS shins on my hubby, so I don't have much room to adjust for wonkiness. In the pic below, you can see how the shins line up in the back. There is barely 1cm of material overlapping at the top, and nothing at the bottom. (This was taken before I finished trimming right thigh for size, so please ignore that!) The shins fit my husband perfectly as taped, so I'm going to have to do some serious coverstrip magic to straighten things out. *For the record ALL RS shins are made like this; it isn't some lame overtrimming from the studio.* I will be assembling his shins with magnetic closures (like I've done with my other 3 sets of shins), and all the hardware for that part of the project has already been created and acquired (I really am not a fan of making magnetic buttons out of ABS. I had the foresight to create those last October- yay!). The other bit of progress made has been with the torso (no pics for this part). I've reinforced all the returns and installed the brackets for strapping the torso parts together. I've also been successful with installing the split rivets and strapping on the right side kidney/ab, and installing the Han snap. These are all little things that seem to take a lot of time to get done for me. But when it's done- WHEW! I'm off to get stuff glued now.1 point
-
Been cleared. Just awaiting confirmation on TK number and find event to join. Thanks everyone for your help, advice and support, really appreciate it Sent from my iPhone using Tapatalk1 point
-
As to screws, fortunately for us, others have already done the legwork. The correct screw types are A and E, on this little chart: Here's the simplest way to handle the screw changes needed: 1) Take the flat slotted panhead screws out of your helmet, and paint the heads black. They're practically a perfect match for the screws that SHOULD be used on the TD. (There has been some speculation about that, actually) Use them instead of the asinine wood screws Anovos provided for the TD. DONE! (sort of like this, but slotted instead of Phillips, and with a flatter top like the first graphic showed): https://www.boltdepot.com/Machine_screws_Phillips_pan_head.aspx) 2) Then, go to a Home Depot (or other hardware source) and get some #6/32 slotted flat head screws (they only carry 1.5" and 2", at my local HD, so my plan is just to cut them to length, otherwise, if you find the right ones, just buy the same length as the ones you just removed) to replace the screws you just stole from the helmet. (Note: You may need to buy the matching #6 nuts as well if you don't have any already). Paint the heads white, like the old ones were. (like this: https://www.boltdepot.com/Machine_screws_Slotted_flat_head.aspx) DONE!1 point
-
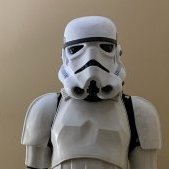
Alright, I think I'm just about done. A few tweaks here and there maybe, but other than that, nothing serious. Please, look through these shots I took on the weekend and let me know what you think. Let me know of any improvements I need to make. Also, I'm leaving out the blaster in my photos until I can get a hyperfirm or something like it, because I doubt the conversion I'm doing now is going to fly: Action Shot: Without helmet: Please let me know what you all think. Your feedback is much appreciated. Sent from my iPad using Tapatalk1 point
-
I made my own clips from 1" flat aluminium bar.Very simple to make,just bend a piece around you canister and leave a 3" flat spot to clip onto you belt.1 point