Leaderboard


Popular Content
Showing content with the highest reputation on 01/06/2019 in Posts
-
Thanks to all for the feedback!! And yes, I had Centurion in the back of my mind all the way thru my build. I'll be looking to move up so your suggestions will help me out for sure. And good news - took less than two days for approval! TK-14430 reporting for duty! Looking forward to my first troop and fine tuning my build. Thanks again.3 points
-
I’m trimming the return edges to about 1/8” later, maybe a little more depending on how they fit or if they bite.2 points
-
Good work so far! My tip for the inner cylinders: I mixed some fine sand into the paint to imitate the ceramic look.2 points
-
Hi again, Tonight I try to replicate the color of my ceramic tubes as revealed in Andy's history and analysis pdf. He had created a replica which I am using as reference. Having cut my 1/4" OD tube to length, 37mm, I filled it with green stuff and recessed it a bit then applied grey primer. I then proceeded to mix three colors to get the orangey, oxidated color as revealed on the pdf, check it out! [emoji1] It's coming across quite bright, but better for it so the color will pop against the flat black of the final color of the cylinders. Sent from my SM-G390W using Tapatalk2 points
-
Never did post photos of my completed holster! Stitching detail: Snap detail: Blaster strap riveted on back: All done by hand! It was a super gratifying project and surprisingly quick. And I got to make it to my blaster's exact specs.2 points
-
Just a couple of things Dan and it's all dependant on how you read, we are all different, but we can agree to disagree so disregard if I'm wrong. Just to be a real a knob and of course I am from down under, (we drive on the right side of the road, well right being left) are the ears tilted back or tilted forward, depends how you interpret and describe, when looking at which side of the helmet , (this is known as a forward slash / )to me they appear tilting forward (greater fall from top than bottom) but no doubt I read this differently to others, but if it's confusing me would it confuse others? 1. Ideally, the ears shall be tilted back at an angle to where the screws align closely with the rear angle of the trap located above the rear of the brow. 1. Ideally, the ears shall be tilting forward at an angle to where the screws align closely with the rear angle of the trap located above the rear of the brow. Do we need the accurate measurement, wouldn't a pencil do? I suppose it depends on where from the cheek you measure, as it has a curve, a pencil would sit in there easier you would think than actually measuring, but again that's just me. 2. Tube stripes are positioned no more than approximately 7/16ths (1 cm) from the cheek, (a standard pencil width). 2. Tube stripes are positioned no more than a standard pencil width from the side of the cheek. Again it's all about how you read it, this sounded a little more straight forward. 5. Ideally, a minimal (or no) gap is permitted between the top of the shoulder bell and the shoulder bridge. 5. Ideally there should be minimum to no gap between the top of the shoulder bell and should bridge. I agree with the brow, I've always quoted the difference in appearances between the Hero and Stunt with mentioning the brow position, Stunts should have a small amount of the faceplate (white) showing in between, where the majority of Hero helmets seen have the lower brow (although one does appear higher in pic below) but many judge the look of Hero from the iconic Promo Hero which also had the lower brow appearance. Joseph looks to have ROTJ in hand so I won't interfere. TKC photos need adding of correct option TD's (currently it's an ANH) ROTJ Game TKC wording of the ammo strip placement: "It was brought to my attention in the recent TKC L3 approval of Daphne that ROTJ armor will not allow the thigh ammo strip to sit on top of the lower ridge and cover the front of the ridge V (as seen in screen images). Looking at other makes of armor it appears it won't allow the strip to sit there either" OPTIONAL Level two certification (if applicable): OPTIONAL Level three certification (if applicable): The thigh ammo belt shall be positioned on top of the lower ridge as seen in official references and is not rounded off like ANH. The thigh ammo is glued and has no rivets. TO The thigh ammo belt may be positioned on or above the lower ridge as seen in official references and is not rounded off like ANH. The thigh ammo is glued and has no rivets. ESB biceps do not appear to have hooks references can be found here: OPTIONAL Level two certification (if applicable): OPTIONAL Level three certification (if applicable): Biceps must be constructed using the butt joint and cover strip method. Overlap construction is not allowed. No bicep hooks are present.2 points
-
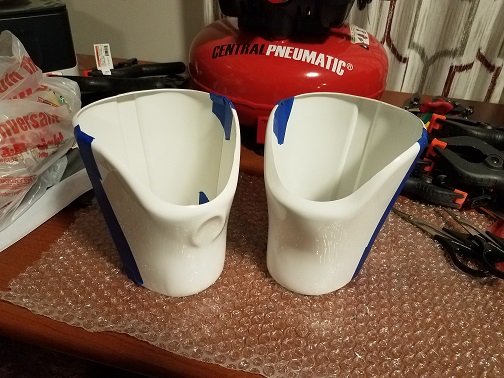
So today I worked on the right bicep. I tried it on with my under suit top on. The Anovos cut lines seemed to be pretty darn close to my size. The upper end was a little snug and the bottom end seemed fine and included an approximately 1/2 inch space between body and armor as suggested by Uswrath. I decided to keep some return edge and trim it or remove it from key areas for sizing and areas where "bite" is a problem. As mentioned earlier I don't have room for a belt sander so I fashioned some sanding sticks from sandpaper sheets and paint stirrers. A trick I learned from a foam armor tutorial a few years back. I trimmed the return edges using a dremel tool and by hand. Starting with 150 grit then finishing with 400 to smooth the edges. I sanded a little and tried on several times until I had a fit that was comfortable and provided me with full range of motion without any "armor bite". I removed the entire return edge from the upper end of the right inner and rounded the return edge on the descending angle. This removed any "bite' and made it easier to remove the upper end of the right inner that extends past the upper end of the right outer. Next i'll work the left bicep in a similar manner.2 points
-
I get what you’re saying, however, we still seem to have a huge misunderstanding about this. I’ve mentioned quite a few times that there should be NO exact brow height. The reference material shows that the majority of the stunt TKs seen in ANH had “a gap” between the eyes and the brow. If we point people to the reference material when they start there build, this should be quite obviously a defining characteristic of the Stunt. At this stage, the measurements argument keeps coming up which is clouding the issue. :-(2 points
-
Goodluck with your EIB application !1 point
-
Thanks again Q.1 point
-
Or even sashachu who is also a deputy deployment officer1 point
-
Hi Corey, Thank you for your EIB application. To allow us to move forward, could we kindly request a couple of addition photos from the check list?; •Close up of hovi tips •close up of ab buttons •Holster to belt attachment •Inside of thigh ammo pack fixings •side-on photos of your sniper knee (for alignment) Thank you in advance. Dan1 point
-
Thank you and thank you everyone for the advice. I am almost done with my helmet from all the advice that was given. I just need to buy new screws so I can put my ears back on. I feel like it will look a lot better. Going to fix my TD tonight and lower my biceps a bit tonight. Sent from my SM-N950U using Tapatalk1 point
-
Rivets - yeah, as long as you’re aware of the requirement going forward. For the bicep - I’m referring to the coverstrip appearing really thin compared to the ridge below.1 point
-
Good luck with approval! Do you have rivets on your left ab to kidney connection? Also, there is a lot of ridge surface showing under you bicep coverstrips- any chance you can size those down?1 point
-
Again good luck and I can't see anything more to add that what the others have pointed out. Though you may need to add some more photos. Sent from my 5054N using Tapatalk1 point
-
Wow! You put together the scope already. Hope it was fun and easy. Toyr trigger guard is top notch! I ended up making my own as well as the doopy one I received was badly casted and did not fit correctly. You can even add a bit of tapering contour to the guard. Not sure it[f it’s 100% accurate but when I did mine I used the Dday trigger guard as my reference and it was thicker down the middle and tapered on both sides along the edges. This bulld is heating up! Awesome work!1 point
-
Thank you I trimmed my extra material and shaved my ears a bit to help with the gap. (I ordered my kit with helmet prebuilt. My first kit.) Qnd the boxes on my ammo belt are not fixed but instead on a loop around my belt so I can easily slide them into right position and remove them easily. When I put them on they do not move but I guess I didnt align them quite right this time. Also my lady took the photos and doesn't quite have the eye to look for such details haha. Sent from my SM-N950U using Tapatalk1 point
-
Yeah, I think there are more than a few quality armorers that would like to well, let's just say "Have a few words" with Mr. MOT in person. Could be a Pay Per View event, lol.1 point
-
Thank you for your submission, Corey! One of us will be with you soon.1 point
-
I’m trying to achieve EIB I was going to fix the overspray on my frown using mineral spirits. Any recommendations on doing this? I am using a Q-Tip and rubbing the overspray, but it doesn’t seem to be coming off. Sent from my iPhone using Tapatalk1 point
-
Thanks! that was very helpful!1 point
-
Nice job on everything. I’m sending over some orders for holsters I need about 20 by tomorrow to get the business started. Sent from my iPhone using Tapatalk1 point
-
Why thank you! I must admit I am quite proud of it, haha. It wasn't too difficult, but patience was required, yes.1 point
-
Thank you, I will have to get to work soon.1 point
-
Star Wars was on TV today and I took that as a sign that it was time to make my first cut. Started with the biceps. How do they look? I had to make 3 cuts before I got the fit I wanted. I am so glad I'm finally on my way.
 1 point
 -
Well yesterday I got a few things done, almost all of which unearthed more things to be done/fixed. Delightful. ;p But I got a new camera for my phone! Yay! I cleaned up the paint job on my ab buttons and set those a-gluing so I can position my belt today and put those snaps in. I hot water bathed, trimmed, and installed my thigh ammo pack Show of hands for who hates it as much as I do? (I see what you're saying now, Frank!) But really, is the left side mounted way too far back? I can take it off and trim it down and mount it further forward if need be. And LOOK at the cover strips on the side visible in the right picture - *cringe* - worth taking off and regluing, yes? The front one is close to fine, though. I dunno. I also worked on lens and frown mesh mounts The lens mounts are made of plumber's epoxy putty and will be carved and sanded into much nicer shapes. The frown mesh mount is made of some HDPE from a black 5gal bucket. I also tried to reinstall the snap mounts for my buttplate to kidney connection. While doing so, I realized my buttplate is no longer curved properly. (Also seen in this pic is the kidney splice, still being smoothed, and the 22mm notch being reshaped.) I'm willing to admit the wide curve may contribute to the problem below. But I don't think reshaping will solve everything - the butt and kidney just don't want to stay together. Tony mentioned having the snap plates right on either side of the seam to help combat sliding and overlapping, but I don't think that'll be enough for the sides. Things - me things - just aren't straight enough, so the side straps get slid at an angle and the back pops out and up over the kidney. Ideally I'd have enough room in the torso to pad out my mid and lower back so the buttplate could hang straight down from the kidney but alas, I don't have the space. (Getting a new ab and kidney has crossed my mind.) I'd like a more stable connection method than snap plates and elastic - something more like the ab to kidney connection would be ideal, how the slot+tab remove all possibility of misalignment. I think that's too rigid for this application though. At the very least I'd like to install an elastic "hinge" (also as seen on kidney-ab) in the flat middle portion where this snap set is now. So! Progress progresses. Anyone seen any innovative butt to kidney connections?1 point
-
Yeah, the hipstertrooper, His utility belt dispenses flavoured craft beer and he can vape through the hovi mics.1 point
-
Hi Marko, did you already check this power cylinders thread? E11 power cylinders research thread Or Tino's Lucky#Eleven thread? Lucky#11 update 22 - the power cylinders Best regards, Patrick1 point
-
I think we have our list thanks everyone. As Joseph mentioned we still haven't completed the ROTJ from last year. One step at a time. Unless there's something so important it can't wait this thread has run its course for now.1 point
-
Fair point, Steve. As my only suggestion was to discuss the brow height for ANH Stunt, I'll Kindly invite [mention=22112]justjoseph63[/mention] to help and edit this post to reflect the suggested ANH changes for L3; Level 3 - 1. Ideally, the ears shall be tilted back at an angle to where the screws align closely with the rear angle of the trap located above the rear of the brow. 2. Tube stripes are positioned no more than approximately 7/16ths (1 cm) from the cheek, (a standard pencil width). 3. Top section of posterior armor shall be in line with the bottom portion of the kidney plate. 4. Posterior snaps/cod rivet shall not be painted. 5. Ideally, a minimal (or no) gap is permitted between the top of the shoulder bell and the shoulder bridge. 6. All abdomen buttons are integrated onto the ab-button panels/plates. directly on the armor No separate/added buttons are permitted. 7. D-ring on end cap shall be of a similar shape/size to the original Sterling type. 8. 3D printed weapons must be free of noticeable print lines. I would also invite [mention=22112]justjoseph63[/mention] to summarise the below; I would invite [mention=16782]gmrhodes13[/mention] to edit and refine the below; ***Regarding ANH Stunt Brow height, to start, I would simply ask that anyone reading this look at the photos and explanation on post #1 of this thread; (https://www.whitearmor.net/forum/topic/46285-early-2019-crl-update-change-requests/ If we agree that the majority of ANH Stunt Troopers seen on screen display a gap between the eye sockets and the brow (much like the majority have tube stripes, the majority have a holster, the majority have 8 teeth drilled, etc.), then I put forward that ANH Stunt was "intended", based purely on the many screen shots and footage from ANH, to have a gap between the eyes and the brow. If the majority agree on this, then perhaps we could discuss if we, as a community, think that this should be a suggestion to new troopers. As the majority of seen on screen ANH Stunt troopers display this gap, I personally feel that this is a defining feature of the stunt. As such, I cannot see any reason why this could not be "suggested" from day one (basic), and perhaps requested at the higher levels. For example, "A gap is present between the eyes and the brow, as per the CRL photo." (NO EXACT MEASUREMENTS!!!)1 point
-
I think you have your answer right there, not unrealist to achieve (with the exception of the "ideal" ears and shoulder bridges/bells in some cases). If there is an exception and may be too hard for some to achieve due to either size, shape, armor or experience then shouldn’t these be worded as preferred/ideally/suggested. Really easy for us to debate what’s easy for someone to achieve when we have already reached higher1 point
-
I highlighted on the first page some of the outstanding CRL’s, also been adding them as a reminder in the last few newsletter drafts, but nobody bit. Ongoing CRL To Be Updated: ROTJ text updates TKC detonator photos to be added also wording changed for thigh ammo strip here ESB no bicep hooks L3, info here Perhaps these can be finalised before additional work on CRL’s be continued.1 point
-
I get what you’re saying, however, basic is still very achievable. This should easily cater for those that ‘just’ want to get into costuming. I think this also ensures that we’re not elitist. It’s clear from the passion and skill across the community that this is more than costuming to some - this is a hobby. Building a top notch suit of armour with all the bells whistles deserves recognition for those that want to go the extra mile. However, we also do not look down upon those that simply want to pass basic and troop. As with many things in life, we all have personal goals. Many of the ideas above have been listed as “suggested” changes. We’re not going to bully people into them - we can use this as recommendations for those that want to build in more detail. I feel that if some of these were listed as “ideally” this and “suggested” that, we are simply adding to the knowledge bank available to new members.1 point
-
OK... Don't hate me, but since we are on the subject there are other dogs in this race. I know this is going to cause a clusterfudge, but what about these previous discussions? ROTJ https://www.whitearmor.net/forum/topic/45204-july-2018-request-for-crl-updates-thread/ 1) Shoulder cover pop rivets. L2 2) Thigh ammo belt secured with 3 pop rivets L2 3) Sniper knee secured with pop rivets? 4) Overlap construction L2 5) Forearm with return edge? 6) Removal of the need for elastic strap around rear of shoulder bridge? TKC https://www.whitearmor.net/forum/topic/45523-tkc-request-for-crl-updates-thread/?page=3&tab=comments#comment-634403 From The thigh ammo belt shall be positioned on top of the lower ridge as seen in official references and is not rounded off like ANH. To The thigh ammo belt may be positioned on or above the lower ridge as seen in official references and is not rounded off like ANH. Lastly, I think it might be wise to do some updating on the CRL photos themselves. I realize that many may have been used just to have an example, but some need serious updating to reflect up to date changes, and some just look plain awful and are riddled with issues. There are a lot of incredible L3s now who's armor better reflects a more ideal look. Example: giskard8 (Arthur) from the HKG attains the very definition of a CRL model in all his builds. I know a while back that we changed the policy where weapons were no longer permitted to be shown with models (which I thought at first was strange but now I understand it completely) as they can cover up certain key areas, etc. (as in the present ANH-S pic) and are not a requirement for L1. These are the some that could use the updates, and if this is decided to be something we should pursue I am willing to spearhead the project. ANH-S, ANH-H, ESB, R-1, TKC, ROTJ. Thoughts?1 point
-
Guys, NOT RPF, please remember, we are a costuming club first and foremost. Yep everyone is going to have some pet hates when it comes to CRL, and variation among costume builds, I know I do but!! ask yourselves, do many of these small items really matter in the grand scheme of things. I would hope that everyone here can look at and discuss what a CRL from basic and up, in the spirit of costuming should contain, because if we entertain every little item that every member doesn't like, the entire CRL will not resemble anything that looks like it was on screen. I would also like to add, as I have earlier in these discussion that the DO's bring up anything that looks too far out of the box as a suggest to fix or even a must fix. That being said, most of those that get the feedback from their application "DO" make those changes, without it having to reside in a CRL. The DO's are also the guys in the firing line when it comes to back lash from CRL changes when they become too lets say, nit picky. (I used to be a DO, so I have seen this first hand. Maybe concentrate on one item at a time before adding more and more things peeps dont like, and lets make sure we frame that item into the correct language as it would look in the CRL and please make sure it is a change for the better. Obviously this is all just my opinion and I'm happy to be proven wrong and my mind can always be changed1 point
-
Looking good Dave1 point
-
Great job! Basic should be a given! I'd pull the thighs up just slightly, so there's a little less gap between the cod and the top of the thighs- this will also help with the back of your knee. I also spy some EIB and Centurion details! I'm sure there's some tiny little thing to mod there, but you're definitely close!1 point
-
hi ! clean build for sure ! basic approval will be easy pas , i hope you aim for centurion bro . i would also try to pull up your thighs to close the gap on the cod piece , but that's just a detail. goodluck !!!!1 point
-
Easy Basic Approval Pass in my opinion. Well Done.1 point
-
This forum is designed for and works at is best when using a computer but it’s available on all plattforms but with limitations, although how you post is not, many use tapatalk which to my understanding lets you upload straight from your phone or iPad given you installed the app. Imgur is used either by browser or as an app. If you want to move anything then @Ripper_L is your man1 point
-
Good job, looks great trooper1 point
-
Yeah basic is an easy given. The only things that stood out to me are the ear screws would need to be replaced and the kidney seems to be flared out on the right and for higher levels the left side should be tightened up a bit. As per the level 3 or Centurion CRL "ideally no gap is present between ab and kidney". Sent from my VK815 using Tapatalk1 point
-
Nice work Garry should be an easy pass for basic, as Joseph said just a couple of things you will need to fix for the higher levels. Good luck hope to see good news soon.1 point
-
Great job getting that Anovos armor to fit your frame so well, Garry! A few small issues to work on for levels 2 and 3 (which I hope you will be aiming for), but looks like a shoe-in for basic. Keep us informed of your status!1 point
-
Hey Garry As stated basic is a given You look well on the way for the higher levels as well with some minor tweeking, vocoder could be a bit more defined (not a requriment as such though, just would look better) and the ears screws look as they might be the wrong kind, early Anovos used pan head instead of flat head V screws, they could however be used to replace the incorrect screws for the TD unless you already have pan head1 point
-
Looking super, Garry. I’m sure this will be a straight forward one for your GML. Once you get your clearance, don’t hesitate to aim for EIB and Centurion. Looks like you have to potential to go all the way. :-)1 point
-
It’s not as hard as you think, it’s all a head game. Measure where you need to cut and cut well before that point. That way it leaves you some room for adjustments and you get the feel of the cut. This isn’t a race you can cut the same piece 10 times to get it down to the exact measurement you need. Just make sure to keep both sides even so it sits nicely. Sent from my iPhone using Tapatalk1 point
-
After seeing some other cool videos today, I thought I’d stick this on here. I mentioned on another platform that I’d managed to get kitting up, solo, to under 10 minutes. Well, this prompted a challenge to make a video of kit up, kit down and box up. Although the GoPro didn’t like the artificial light, so apologies for the poor video quality, I did it and here is the result.... Sent from my iPhone using Tapatalk1 point
-
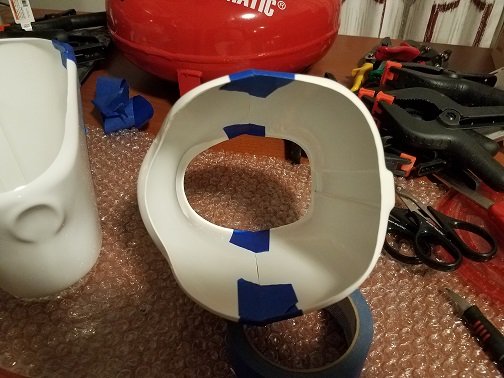
Helmet Interior Upgrade The Anovos Standard Line helmet, as you can see above, comes with a pre-installed hard hat liner but is otherwise unfinished. To get a nice, clean look, I used Plasti-dip and acrylic black paint as I've done with most other helmets. 1) Remove the hard hat liner. It's held in with a pair of screws - once you remove those you can simply pull the liner off the tabs. 60150F4D-0D5B-48CC-8312-8472AE64AB61 by Taylor Goodson, on Flickr 2) Cover the areas we don't want touched with the Plasti-dip with painter's tape. The tabs, lenses, and black plastic interior pieces were all covered as well as the bottom lip to protect from spraying the dip. BA32FC57-ACDD-4537-9470-4F5DC63D6E40 by Taylor Goodson, on Flickr 3) Spray the interior. I do a couple light coats followed with a heavy coat to finish it off. CB2A6C97-B2C5-4DE8-83A2-B7C94B89DBBC by Taylor Goodson, on Flickr 4) Before the Plasti-dip dries, carefully remove the painter's tape. If you wait too long, the plastic dip can harden over the tape and pull up with it. CD9B58A4-37B3-4F2A-953B-982C40EE643F by Taylor Goodson, on Flickr 5) Clean up hard to reach areas and taped-off edges with black paint. You could also follow-up with the brush-on Plasti-dip, but I find just a touch of black paint to be easy and effective. Here's a shot of the chin vent detail that was taped off before being touched up. 92D71121-39F0-45E2-8D72-B48F7E86B5AB by Taylor Goodson, on Flickr And here's what it looks like after: 5A1F89E4-399E-49DC-B614-A187D87595FB by Taylor Goodson, on Flickr 6) Finally, re-install the helmet liner (if you choose to use that over padding). C705B5B6-D374-4C4F-9740-33A0F5DFD542 by Taylor Goodson, on Flickr Now it's ready to go!1 point