Leaderboard


Popular Content
Showing content with the highest reputation on 12/03/2018 in Posts
-
I have actually decided to go with an AP build. I am now researching undersuits and neck seals.3 points
-
Ok, I figured if I didn’t to it tonight then it might drag on so made the following adjustments: Fixed wonky brow Put proper screws in TD Put on the proper belt for Hero Made ab / kidney plate adjustments Made adjustments with bicep & forearm Appreciate the guidance and please let me know if you need anything else!2 points
-
Thanks for helping me avoid a costly mistake everyone. I decided to go with AP for my first set of armor.2 points
-
I'd originally put some pads inside the helmet but they listed the eye holes high enough that I couldn't really see out of them. I knew I wanted to use a hard hat liner harness but wanted it to be adjustable, which the tutorial on making hard hat Clips wouldn't allow. And as I'm most comfortable crafting with my sewing machine I figured I'd see if I could come up with some sort of soft costume inspired fix. Here's my tutorial. You want 2" hook side Velcro and some stiffer fabric. I used green velcro because I had it handy and figured it'd be easier to show for a tutorial, as would the bright red orange cordura. You rebels out there might recognize it from a resistance pilot flight suit[emoji23]. Each piece was about 2" x 2.5". Trace one of the clips. Keep in mind that the clip is not entirely flat, so you'll need to add a little more room. I suggest sewing one side first and then holding the other side to see where the line needs to be before you make your template. My original one, where I sewed on the tracing lines, ended up being too small. This was taken on a background piece of eight and a half by 11 paper, but by turning it into a PDF it added margin. You'll have to adjust the size if you want to use it. https://drive.google.com/file/d/1UF_FxgJlK0qpfNpbSflw-rKtkAeuDPhX/view?usp=drivesdk Keep the bottom open and sew a straight line down the left side. Then sew the rest of the right side as close to the line as you can. I use white friend because it was really visible for the tutorial /that's what I currently have loaded in my machine and I'll be working on my belt next and don't feel like changing the thread multiple times. Slide the anchor bit in there. The Velcro faces away from the band. You may want to use a pin to hold the straps inside parallel so you don't accidentally so over them. Not that I did that at all. Using a zipper foot you're going to sew parallel to the strap and try to get the stitches as close to the inside of that little cut out notch area as possible. It doesn't have to be pretty-it just needs to hold up the notches. All four installed - I had enough of the little velcro stickers from the helmet padding leftover to add new stickers in the appropriate places. You can see where my old ones were, along with the lines where I thought the clips/anchors would end up. And... Success! The big adjuster not at the back of the harness might end up making it a little tight but I want to see how it works out when I troop in it before I mess with it. On to the neck seal and belt.... Sent from my iPhone using Tapatalk2 points
-
This is something I need to address as it comes up in almost all the build threads. The original armour limbs are OVAL! Everyone seems to think the parts should be rounded but they are in fact oval shaped, just as your limbs are if you care to check. The problem with most other kits are they are oval shaped the wrong way, so if the wrist opening is wider from joint to joint on ANH armour, they are wider top to bottom making them look odd. Maybe that's why people think they need to reshape but whatever the reason the rounded myth started, it's just a myth Apologies for the slight diversion but I feel this myth needs to nipped in the bud.2 points
-
I'm not really building yet, but since I'm starting to order pieces I thought I'd start a build thread. A little intro- I am a total n00b to armor. I'm an intermediate seamstress, earning my stripes through drafting and sewing my staff officer and Rey costumes. I'm 5'2" petite build so I know I'm in for a lot of trimming... but yes, I have seen the threads from the ladies who have been here before me I will be leveraging heavily. I've been eying a TK build for years, but honestly have been scared due to my height and inexperience with armor. But last weekend while shopping for TIE armor for my husband I (drinking wine) also asked for a quote for TK armor, and pulled the trigger on both. So, status: Costume Armor: WTF ordered Undersuit: ordered from Academy, hoping it works- but it's like $20 total so if not, no giant loss https://www.academy.com/shop/pdp/bcg-womens-turbo-long-sleeve-shirt#repChildCatSku=111076921 https://www.academy.com/shop/pdp/bcg-womens-cold-weather-training-legging#repChildCatSku=111460350 Other stuff Cut-resistant gloves ordered, because I'm a walking disaster https://www.amazon.com/gp/product/B00MXUHHGK/ref=oh_aui_detailpage_o00_s00?ie=UTF8&psc=1 Scissors ordered https://www.amazon.com/gp/product/B007KN0RQM/ref=oh_aui_detailpage_o00_s01?ie=UTF8&psc= Up next: Lots of stuff saved in Evernote notes! Gloves, neck seals, etc. go measure my feet for good TK boots size Other tools Wait... worry that I won't be able to pull it off... remember that it took me 2 years to sew an officer uniform... worry that I am too short, etc. etc.1 point
-
So I bought this kit through the Armory Shop; they made it custom to my measurements and painted it for me. I appreciate the paint job they did, since I was too worried I'd mess it up. The custom fit isn't totally up to par as parts of the kit are way too big for my slim frame, but hopefully I can trim it a bit without ruining the kit. I've started connecting the yoke to the back piece and I've already ran into a bit of a snag. The two yoke pieces don't fit quite right side by side and I will have to sand down the other piece a bit to have it sit correctly. This will probably be an ongoing problem through out the project as there's a few pieces that don't fit where they should due to the paint job and will need sanding. After I get this connected properly I'll start putting together the strapping system. I've already bought the 1 inch nylon webbing straps, heavy duty snap kit and parachute buckles that I'll be needing for it. I'll keep posting updates in this thread as I go through the process of this build.1 point
-
Yes,yes, photos or it never happened1 point
-
Oh those are so helpful! Thank you! Sent from my iPhone using Tapatalk1 point
-
Perfect Same for both thighs.1 point
-
Rey is getting a TK!!1 point
-
I definitely second using nice padded shoulder straps. When I did mine a neighbor gave me one of his boy's old backpack to sacrifice. It was a nice LL Bean one with curved(banana) shaped straps. Also look for one that has the small strap and parachute clip that holds them together in the middle. When I get dressed the straps sneak nicely behind chest and I clip them together with small parachute clip and pull adjuster till snug. I accidentally fell into the perfect setup prebuilt. I lined the back of pack with some nice soft black fleece material covering the hole and to protect the backplate. You crossed off much of your list now! You're almost there!1 point
-
And holster placement1 point
-
Here´s a rough guide for the belt incase you haven´t trimed it yet.1 point
-
It dosen´t need to be exact and it´s easier to "line up" the center buttoncover as seen on the pics, for screen accuracy it´s roughly in line with the upper straight line This pic show the offset of that top line I was refering to and that it´s more often the center button is lined up to that. You could also check some Centurion applications for a more clear pic if you´d like1 point
-
Thigh cover strip should end at the ridge The end is to be hidden behind the TD. Basicly to have both of the clips on the overlap , keeps the TD more secure. Overall great work - almost there1 point
-
1 point
-
There are a lot of manufacturers of compression shirts/pants out there, and you can pay up to 90 bucks per per piece. I suggest going to eBay. Much cheaper! Just make sure there are no visible logos, stripes, etc. Shirt:---------- Pants: ----------- (These have a logo around the waistband, but the shirt can cover that). It doesn't have to be those sellers in particular, those are just examples. For the neck seal you can't go wrong with one of Darman's. They are custom made to order in any neck size and available with either a zipper or Velcro closure. I prefer the Velcro... much easier (for me at least) to secure. https://www.whitearmor.net/forum/topic/21385-darmans-neck-seals/1 point
-
As for how to hold them in I would suggest Velcro. Trooping can will make you sweat (even with fans) and being able to remove them for cleaning is a must. Before permanently attaching any to the top, make sure you don't have a "bobblehead" look, and can see clearly below you (to a degree). In my first bucket I added padding to the top, and realized that my helmet sat too high and I was constantly tilting it forward just to see. I removed the padding in the top and voila. Having it on the sides is a given, as it hugs your head and allows the bucket to move when you turn your head. You don't really need a chinstrap, as you won't be able to bend over far enough for it to fall off!1 point
-
Holy crow! I didn't realize that that second reference existed... COOL, and thanks for the link!1 point
-
Glad to help, Jim! I'm sure you will do a great job, and if we can be of any help just ask!1 point
-
I used a dab of E6000 on the ends and it has never come loose so far.1 point
-
Sincerely appreciate the feedback! I will make those photo adjustments and resubmit the photos. It might be a couple of days with the work schedule but will have them up this week. Thanks again!1 point
-
A nice set of armor, you won't be unhappy there. Looking forward to seeing the BBB photos and a build thread in the not too distant future, good luck.1 point
-
This... Sent from my LG-M322 using Tapatalk1 point
-
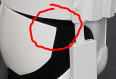
this kinda bugs me: they should line up and be a flat line not a bump. also this, simply for security that the butt plate doesnt wing out and snap. connect it on each side to the kidney plate. as do these: id take some return edge off the chest piece, the edges of front to back should be flush-er, and someones mentionned the drop boxes i think already. these few things just distract my eye.
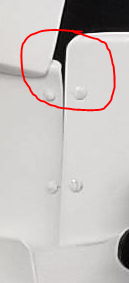
 1 point
 -
I did buy the Imperial Boots. They are really nice, good leather and instantly comfortable. I’d rather pay a little more for Boots I don’t have to break in, personally. I’m a women’s 10 and I purchased a men’s 9 and they fit perfectly. They are about. Half size bigger (9) but fit like an 8 1/2 , approximately. I’m very pleased. They also fit the Thorsson foot armor like a glove, for anyone curious about that.1 point
-
AP also offers full build to your specs actually its one of the few armor on the market that can fit most waist size without shimming for a movie like seamless finish, check our current discount offer. https://www.whitearmor.net/forum/topic/45623-ap-trooper-kits-discount-offer/ Mark (AP)1 point
-
Good news - got all my money refunded thru PayPal for my Hyperfirm order. More good news - just ordered my E-11 thru Praetorian Blasters. Anyone have experiences with Praetorian blasters products and/or shipping?1 point
-
my quoted shipping date is supposed to be the week before Christmas, so we will see.1 point
-
don't ....try tkuk1 point
-
I use FogTech Anti-Fog solution on my TK lenses and have never seen fogging show up! I even used it in my plague doctor mask at DragonCon this year and my lenses stayed clear for the entire 5 hours in it (no fans in there). The stuff works and works well.1 point
-
Yeah what Daniel said. Also if you want to be more personal with your build look up your local Garrison and see if one of the approved members would be willing to assist you with your build. Sent from my 5054N using Tapatalk1 point
-
Hi Peter. I can’t see your location on your profile but many armours can be shipped anyway. RS Prop Masters and Troopermaster are two of the best armours available and both do commissions, built to your measurements. They might be a good place to start. :-)1 point
-
When matching up the front of the thighs, you really want to have the lower ridges meet to an apex and not offset. I took the liberty of flipping your photo and correcting using the red lines and your blue line. Here's the inside of the RS original thigh.1 point
-
Glad you're liking it! The film will be premiering on YouTube in one week. We've released a final trailer in the meantime: Luckily the main actor was my exact height and fit my own AP kit perfectly. Most of the featured TKs wore APs actually. Some ATAs are in there as well.1 point
-
This is really looking nice Kalani1 point
-
Hahaha - good to know I'm in good company!! Yeah, I ended up doing that. But also in my hot water bathing I straightened out the backs of the calves too much, they were rather flat, so I ended up pushing them back into curves which a) gives my calves more room and b) gave me more to trim at the top than the middle. It was weird and I can sketch it out if future readers need clarification. Thanks! Gotcha. The shin bottoms have been trimmed to match - I followed the original curves with a protractor so they stayed ATA-accurate. In re: tape, they stayed together by themselves when left alone; they didn't stay closed when around my boots. CONGRATULATIONS on your elevated status! Go show those tall people how it's done! Haha. But yes, I look forward to submitting. Eventually. Thanks! Not gonna lie, the left one touches my calf muscle. It's definitely not so tight I can't walk, but I think it might prefer to flex open when I flex my calf. I will likely put the halves together with a few mm gap to account for this, unless the rest of y'all's armor touches your calves, too. Thanks! Yeah, I can see the perks to a heat gun... and hey, check out what happened when I boiled that crack I repaired with ABS paste: Maybe I didn't let it cure(?) for long enough? It's still hard, just foamy looking. Annoying to re-clean it up but at least I didn't polish it before. Anyway there's my word of warning about boiling ABS paste repairs. This weekend, I'm not letting the >50°F weather catch me by surprise. I plan on getting almost all the remaining glueables glued tomorrow (minus outer forearm cover strips on the undersides, hand plates on gloves, belt rivet covers, and shoulder straps), and am prepping like nuts today. Here's my list: -make 4 double snap base plates and 14 singles -cut magnetic closure mount holes in shins and glue holders in -outer front shin cover strips -evaluate outer thigh cover strips - redo if necessary -outer bicep cover strips -mount snap plates in thighs -finish sanding drop boxes, glue in elastic, glue shut -mount snap plates on chest to back connection at shoulders -evaluate chest to ab connection, move snap plate/remake elastic if necessary trim ab and kidney to proper size, mount closure slidey bits and glued snaps (visible snaps later) -figure out snap placements in bicep, forearm, and shoulder bell and place those (hopefully doable while outer cover strips are clamped) SO. Off I go!1 point
-
Wow Carl! This looks great. Seems you had some fun with the latex masking.1 point
-
I’m gonna second Joseph on the chest plate arm holes. I left mine on and have some issues with cracking there. Unfortunately I was afraid to take it off after the fact due to possible further damage so I reenforced it all. It would have been so much easier to remove it from the start. Sent from my iPhone using Tapatalk1 point
-
Hi Jim, in case you aim for the next level of accuracy (EIB) after the corrections above are done, I would suggest to double check your Thermal Detonator again. Here is what the CRL says: Thermal detonator belt clips are positioned with little to no gap between the clips and the end caps. Good luck.1 point
-
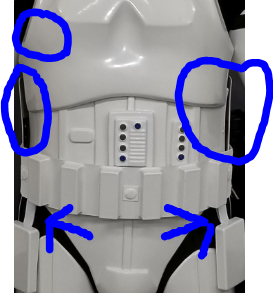
Nice job on that build, Jim, and congrats on your approval! If I could make a few suggestions in addition to the ones that have already been mentioned, they would be the following: 1. You can/should lose quite a bit of the return edge on the arm opening of the chest plate. Some armor sets are prone to cracking in that area and doing this would help stop that before it happens. Reference image 2. The side of the posterior (butt) plate could come up a bit. Tightening up the strapping would take care of this easily. Reference image 3. The cover strip should end right above the ridge line on the bottom, and there should be no gap at the join of the ridge. If there is one after trimming the cover strip, some ABS paste will cover it. Reference image 4. The cover strips in the rear should end at the ridge line here as well. Reference image As Ben mentioned, the drop boxes should actually touch (or be VERY close to) the bottom of the ABS belt. Don't forget that the outside edges of the boxes should align with the outside edge of the ammo belt (see reference image photo on # 2). To get your shoulder bells to sit a bit closer, I suggest removing all the return edges from the bottoms. This is screen accurate and acceptable at all levels; Reference image Some fairly easy fixes for you, Jim, and hopefully we will be be seeing your EI submission soon!1 point
-
Nice work trooper, I think your GML has you all sorted, I have nothing to add, good luck applying for higher clearance trooper1 point
-
Forearms look a little low, you could probably adjust the strapping so those sit higher and even out the gaps between pieces.1 point
-
I say looking good! Only change I would make is bringing those drop boxes up. We shouldnt see any of their strapping. Welcome trooper! Sent from my LG-H872 using Tapatalk1 point
-
As well as shoulder elastic and the bigger rear bump on the shoulder bridges (for screen accuracy) and gap between bells and chest/back1 point