Leaderboard


Popular Content
Showing content with the highest reputation on 06/04/2018 in all areas
-
Did my first troop on Sunday and it was so unbelievably awesome!! I can't wait for my next one! Overall my armour was super comfortable and I had no real issues with it - EXCEPT for my stupid left thigh and shin. The thigh keeps rotating inward (see pic, I'm the one making Vadar look nice and tall). You can see how the thigh "V" has rotated almost 45 degrees. I have that darn shin secured with a big piece of velcro on the boot front and a stirrup, but it still shifted a bit. Not a huge amount and I suppose I can live with it. That thigh is another matter though.The thighs are snapped to a belt/garter so I'm really surprised at how much it twisted. This thigh is the one that I over trimmed and it fits super super snug. Righty stayed exactly where it was supposed to.3 points
-
Wow. I have been asleep missing all this cool blaster build action. Job well done. That grip is a beauty . Gotta see this blaster finished.2 points
-
Buoyed by the 501st approval of @willeywonka I have been spurred to action. The last few weeks have seen some popper building and placement. After some touch-ups the vocoder looks ok. Tackling this detail stressed me out. The abdomen has been fastened to the kidney plate. It took a while, but I finally managed to figure out how to flatten the split rivets, using a screwdriver to wedge them open a touch, and then a large chisel to lever and press them down. The paint will need to be touched up. I found a suitable piece of leather to replace the holster stra And the holster is attached Completed the right side ab slot: Sanded down my small button plate to straighten out the edges. @CableGuy is this better?2 points
-
Wow!! And WOW again!! That aluminium work looks SUPERB!! The gloss grip against the Matt black and the ali looks brilliant! Excellent work on that trigger guard, too. Looking forward to more updates. This is a lovely build. Dan2 points
-
Name = Carl H.TK ID = 10171Legion Profile = http://www.501st.com/members/displaymemberdetails.php?userID=19744Garrison/Squad = Southern California Garrison, Los Angeles SquadForum Name = cjdesignArmor = AM2 / TM=ArmsHelmet = AM2Blaster= Hyperfirm E-11 (ESB)OptionalHeight = 6ftWeight = 200lbBoots = Imperial BootsAmmo belt = AM2Canvas belt = TKittelHolster = DarmanHand Plates = AM2Neck Seal = Veedox Front - Arms at side: Back - Arms at side: Left - Arm raised: Right - Arm Raised Right - side Detail Left - side Detail Ab - Detail Belt - Back Dropboxes Glued to the back of belt and rivets reinforced with e6000. Shoulder Snaps Update: All shoulder snaps reinforced with e6000 to keep snaps from pulling out of the elastic and retain the overall shape. Action - Shot Cod Cod #2 Interior Strapping Side Rivets (Painted white): side notch: Ammo Pack - Split Rivet Knee Plate: Shins Back (trimmed Coverstrip): Shins (Inside): Forearms (inside): Helmet Front: Helmet left: Helmet right: Helmet back: Hovi Detail: Helmet inside S-trim: Len color (gray) Blaster - Left: Blaster - right: Blaster d-ring: Neck Seal: Thermo Det: Holster: Handplates (AM2): satin with stitching1 point
-
I've been a Star Wars fan since I was little. My first love when I saw the movies (especially "A New Hope", my favorite from the oldies) was everything Empire. Specifically the Stormtroopers. Obviously I wanted to do a TK kit for me, but I wasn't sure how to do it, where to get it, when to get it, or who to get to help me with it. Long story short, I discovered my local Garrison (Puerto Rico) through now a good friend that I met at a local con. He also became my mentor and started guiding me though. At the moment I didn't have the money to buy a kit, or anything near it. So I just patiently "waited" (several years) for the moment to come. While this happened, I met my Garrison CO (Comanding Officer) at the moment (2017) and we eventually became good friends. One day I spoke to him about my interest in entering the Garrison but also explained to him my "monetary" issue. He understood perfectly. Then I also told him about my interest in entering the group (in the meantime) as a handler. He gave me the oportunity to enter as a handler. He also had told me that before me there was a member that entered first as a handler and eventually got his kit. That brought a certain peace and joy to me because that meant that I could be part of the group in the meantime and learn anyway from others, while being around Star Wars characters (50% of my dream come true). When "The Force Awakens" came out, I saw the movie and fell in love with (Kylo) the First Order Stormtroopers. That is the kit that I wanted! That's the one that I wanted as my first kit! I had told my CO that I wanted that kit (he's the only one in PR that has it, for now) and he told me the expenses that it was going to pull to get/make. It was a slight let down for me. But I didn't loose hope. I still want that kit. I kept searching for other possible kits to make. My moment came and I finally got my first kit... A "Rogue One" TK kit. The first one in my Garrison. I bought it with my student loan leftovers (had to start getting it for my last years of college). TA-DAAAAA!!!! Didn't expect that, huh. Yeah me either. But hey! WORTH IT. Granted that my loan leftovers from that year weren't going to be enough to get a FOTK kit. But were enough to get a R1TK kit. My CO helped me build it and paint it (always grateful for that). Take my word that I will do a FOTK kit soon. Most likely also with my last student loan leftovers, but I will do it. My dream finally came true. I finally became TK-24333 at my local Garrison. I would have loved for it to be with a FOTK but it was meant to be with a R1TK. After aaaaaallllll of this being said, I will post here more of my R1TK build. I will write about what I have learned thanks to my Garrison CO and hopefully this will help new recruits. Keep in mind that the TK and Mimban troopers in "Solo A Star Wars Story" are the same as the ones in "Rogue One". So these posts will help for those too. The Mimban troopers are the same kit as the R1 troopers, except a wee bit dirty (just a little). Hopefully I'll be able to share what I have learned and be of help with future R1TK builds.
 1 point
 -
Will definitely help you where I can Sent from my Pixel XL using Tapatalk1 point
-
One final look over, we'll be with you momentarily.1 point
-
1 point
-
Good to hear you`re still on it but no rush, take the time you need and enjoy the build meaning build when you want to - we`ll be here supporting when you need help/advise1 point
-
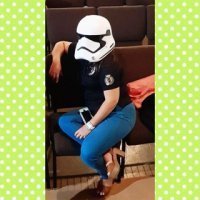
It was so much fun! Few tweaks to make to my armour, but it was WAY more comfortable and easy to wear than I expected. I absolutely love how grown ups love us just as much as kids. "does this armour make me look short?" LOL1 point
-
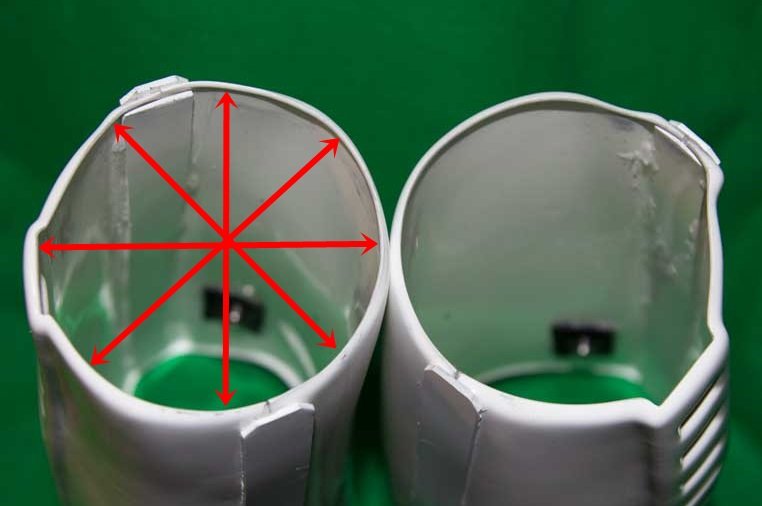
Hey Carl welcome back. Before we get started you'll need to remove the return edge from the wrist side of the forearms. This is a L3 requirement as stated in the CRL: "Level three certification (if applicable): No return edge on the inside of the front of the forearm is allowed." Take a look at the reference photo below that's been provided. Reference photo Thank you.
 1 point
 -
Yeah, have patience.1 point
-
Superb! My goodness. Some parts shiny, some parts looking really smooth! Not to far from the real deal I'm sure1 point
-
Something done each day... Eye guards are complete, two coats of plasti-dip and ready to have teeth cut out. Then to assemble the helmet.1 point
-
Action shot taken 2 days ago, with the new smaller bell straps... Summer Reading Kick-Off Arcadia Public Library, June 2nd, 20181 point
-
Nice neat and tidy job there trooper! Good luck on your clearance! Sent from my SM-G925F using Tapatalk1 point
-
Well..... the shin is already together. Like forever together. My right shin is screwed too, that's a whole different story. I had a buddy come over and help. I cut the strip had everything lined up, showed him exactly how to do it and he did it alright. With the wrong strip. Again, it's on there forever. So I'll have to order another right shin from Mark and if I can't figure a way to get this sniper plate on there I'll have to order both shins. I build cars from the ground up, I build 1000+ hp motors but I can't put plastic together. smh1 point
-
Oh that's a good thought! I'll take a better pic of it by itself tonight since you can't really see much here. Because I had to take sooooo much off it was pretty near impossible to maintain the original swoop and curve, but I think you're definitely on to something. I would really love to not have to dismantle, shim, ABS paste bla bla bla this one.1 point
-
Hey congrats! Definitely go to the Carolina Garrison forums (I assume there are forums) and they should have a listing of events you can go to!1 point
-
Thank you for asking. Well, it has been a periode of NO movement. I have to admit - i have been mentaly occupide elsewhere. Life gets in the way. Still kinda is, but I have just started working again. So a few days ago I actually worked on the shins and got the front of them glued. Allways insecure about the fit, but the way they are i think they will be ok. I dont have a chance to cut much off, coz I am a man of a certain size, just hope I don't have to add. I think I'm ok. Today the plan is to add the Sniper knee to the left shin and then attacth the back strips. I have bought white industrial strength velcro to attatch. After this I will get to work on my thigh armor. A bit less woried about the size there. So if the shins fit I am very happy. I'll see if i can post some photos later today.1 point
-
The rear should use an "inner" drop box, not a flat piece. The CRLs are a living document so change occasionally, where that image is now 6 years old!1 point
-
Hi again, Peter! Almost there, sir... almost there. I saw the photo in your EI submission where you had the clamps on your drop box attachment, but it looks as if the glue(?) didn't work too well as the drop box is still out of alignment a bit. Please add a bit more glue to keep them in place and post a new photo for me. Thanks!!1 point
-
Hi Patrick, Looks like you’re getting there. As it stands, it looks like some dressing issues and perhaps a few trimming fixes that could make things a little neater. Here’s some bits that I’d be tempted to look at: The green circles are areas where you could try to reduce the black gaps. Shoulders - shortening the shoulder bell straps/elastics would help to bring those shoulder bells in. Shoulder bridges - for better accuracy, the plastic bridges that go from the chest plate over your shoulder to the back plate should be permanently fixed to the chest plate. Forearm/bicep gap - I would suggest lowering your biceps to bring them much closer to your forearms. Forearms - possibly a little girthy? These usually taper down towards the wrist. Thighs - it looks like your thighs could come up a bit, closer to the cod area. Leg allignment - this is just a dressing issue, however, lining up the cover strips on the thighs and shins (blue lines) will improve the overal look. Coverstrips - the coverstrips on your arms look a little bigger than normal. These are usually (not set in stone) around 15mm. Legs approx 20mm and calves around 25mm. These do not have to be exactly as above, these are just closer to screen accurate. Belt - it looks like you might have quite a bit of excess plastic above and below the ammo packs on the belt. It might also be a little long. Once you have those higher quality photos we can have a closer look. Also, if you can get close up photos of parts, such as belt, helmet, blaster, fixings etc and we can guide you a little further. Sorry its it’s a long list, however most parts are just adjustong where things sit so shouldn’t be to daunting. Best wishes Dan1 point
-
I totally second what Dan said. This trigger group absolutely rocks! - just like your paintjob. The result looks like factory-new spare parts. The slotted screw in your grip (LOCK/FREE) should be in the LOCK position.1 point
-
If you go with imgur, wich works great, after you uploaded the pics use the "direct link" and then just right-click and paste in your thread1 point
-
Can you do a test fit (using blue tape etc) to get a better idea of how close the back sits to the kidney? If they're not right up against each other, you probably don't have to worry about the slight overlap. Or maybe you can trim a bit of the back return edge right at the corner.1 point
-
Check out Walt's Trooper Factory. That is where I got my TK from. I'm about your size 6' 175 lbs and his armor fits me just fine.1 point
-
Thanks, it feels like it’s all starting to come together.1 point
-
Home stretch! You got this!1 point
-
There is a limit to photo size BUT you can reduce the size a few ways, if you are using a phone there are plenty of phone apps out there for photo resize. If on a computer you can use Windows Paint, just Google image resizing for instructions . There are also some online pages for image reduction, here's just one Most post links to their images which have been uploaded to an online host Imgur is what I use and it is free, just make sure once uploaded you use the Direct Image link option.1 point
-
Very cool, thanks for sharing. I should show off my other costumes, oh wait that could take a while1 point
-
Hi again, back with some more updates! Kept working on the inner bolt first. First layer of metallic paint was too bright so I started adding a quick shade from Armypainter I had lying around. Pretty happy with the metal/rust effect. Started working on the grip and trigger group again. I wanted to make the trigger group almost completely out of aluminium. Did not know how... So I just began with cutting some aluminum Had to try some different techniques and tools to get there. Some more successful then others Bending the aluminum in al kinds of angles. Finally after a few hours of work it started to look like something. Almost a perfect fit from the first try! And right on after the second try! Test fitting with the new cut trigger (made from forex/sintra 5mm) and a previous bent trigger guard. Did not like the old trigger guard so I decided to make a new one. Made a wooden dummy to bend the aluminum into shape. Some more aluminum bending was done that day and several meters of aluminum were wasted. Much better! After trying every DIY store nearby went to a specialized screw store. Finally found that screw I was looking for! Different angel of the trigger group. Decided to sand out the resin nut and replace it with a real one for extra detail. The selection screw broke a while back. I tried to fix it with some steel pins but did not really like the shape and was afraid the crack would still be visible after painting. So with some stuff I had lying around I tried to recreate a better one. Forex 5mm was too thick so had to be sawn in half. Used a spare nut for the screw part of the switch. The result after several attempts. Almost drove me nuts! Side by side comparison of the end result. Picture of the self made selection screw. Time to get some primer on this baby. Nice detail! Damn you little bubbles/holes! After sanding and priming the bubbles again, I added a black base layer. Finished result of my grip and trigger group // Part 1 // Finished result of my grip and trigger group // Part 2 // Finished result of my grip and trigger group // Part 3 // Finished result of my grip and trigger group // Part 4 // Started on the magazine tonight but will be posting that in my next update! To be continued1 point
-
I'm proud to report that TK 87109 is reporting for duty! https://www.501st.com/members/displaymemberdetails.php?userID=28013 Thanks EVERYONE for your help. Any advice on the best way to get connected for future troops?1 point
-
Have not put the pin in it yet to get the flipper positioned correctly but everything looks like it is going to fit1 point
-
1 point
-
Helmet and ab button paint done... I think. Glad that’s over!1 point
-
Hey Tino, I adjusted the clearing strip. This better? I know it's a little high up but I like it this way. Made the strip 6mm. Dennis Blue Snaggletooth send me a reference picture and I took measurements from that picture. Will be adjusting the LED tomorrow and continue to work on my trigger group. Again thanks for the tips and info!1 point
-
I’m with you on the look of the site through a browser, Mathias. I like to check on new posts via a browser. I think the reason for Tapatalk’s popularity on here is due to the ease of uploading images for build threads - much easier than uploading to an image host, then posting links etc. As such, it’s a brilliant way of keeping people posting regularly. :-)1 point
-
Hey Fredrik, how is the build going? The Nordic Garrison need more Troopers1 point