Leaderboard


Popular Content
Showing content with the highest reputation on 05/21/2018 in all areas
-
Forearms were a challenge to trim. Got some great advice (thanks Sean) and tried to keep the cover strips at a 90 angle. I took off an inch on the inside pieces and 1/2 inch on the left outside and 1/8th inch on the right. Then I tapered by taking off 1/8th at the wrist on both sides, all while constantly checking fit at each cut. Will do any final tweaks, but good enough for now.3 points
-
You can definitely trim the tops of the biceps, Chad. In the photo below, it shows where you can cut down the forearms at the tops (but be sure to keep the same shape) to allow a better range of movement. It looks as if your shoulder bells may need the return edges trimmed off the bottom as well, which will allow them to not only sit closer to the biceps but also reduce the gap shown with the blue arrows. For more screen accuracy you can also shorten the elastic between your shoulder bells and shoulder bridges, as seen with the red arrows. These are really easy fixes that will add to the overall look of your armor.2 points
-
No cussing allowed!2 points
-
Dan & Brien are correct in saying return edges are not needed for approval. But, it definitely helps in making your armor give the illusion of thickness, and might protect you against some blaster fire. Post up some photos for us. We are more useful when we see photos.2 points
-
Agreed. Maybe some fine tuning with a file for the eyes. Sent from my iPhone using Tapatalk2 points
-
Yeee haaawwww!!! I opened the door this morning and discovered my replacement parts have arrived!!!! So much happy happy joy joy!!! I can finally recommence with the build. The clock is ticking for me because I'm scheduled for hernia surgery in June and I won't be able to do much of anything for a while after that. I had two c-sections with my kids, and built a patio set in less than a week (all by myself!)... Building and moving the furniture caused the hernia on my c-section scar. The patio set is pretty nice, though... and I now call it, "The Hernia Collection": Time to cut some plastic now!2 points
-
And today: Birthday of my Trooper! Here are the very first pictures of it, I'm so curious what you say and I'm glad about your criticism. So much cutting, glueing, crying, bleeding and redoing, I can not believe that it is actually finished now!!! At least it's done so far that I can now put all the pieces together and show you how it looks (the background of the pictures is not optimal, it`s just to give you an impression of my work). It`s not perfect but I made it2 points
-
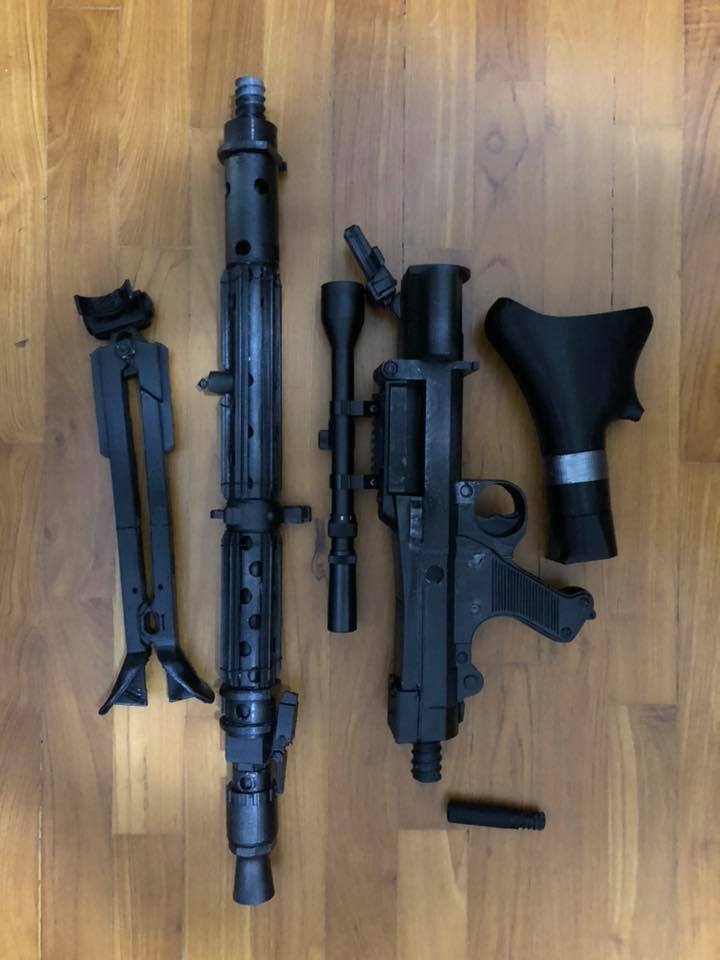
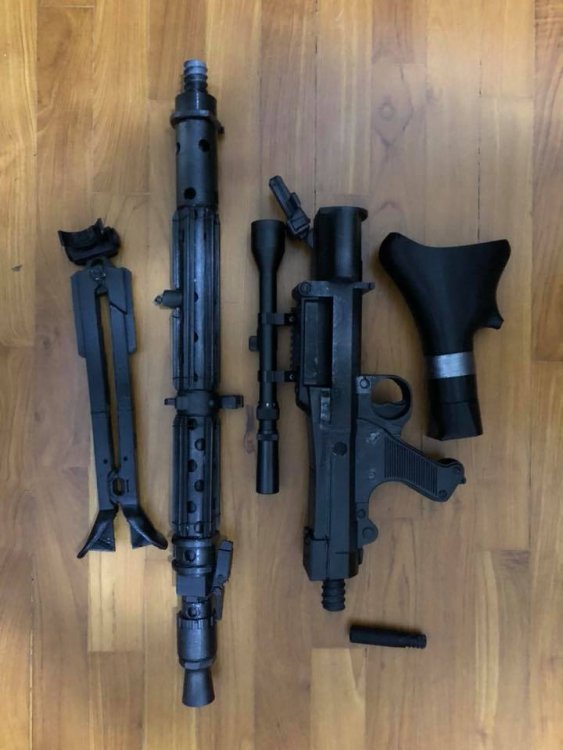
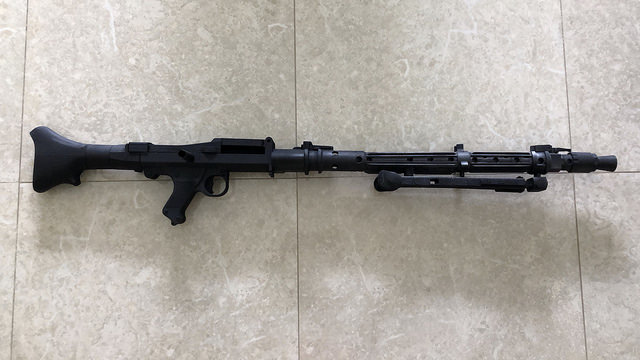
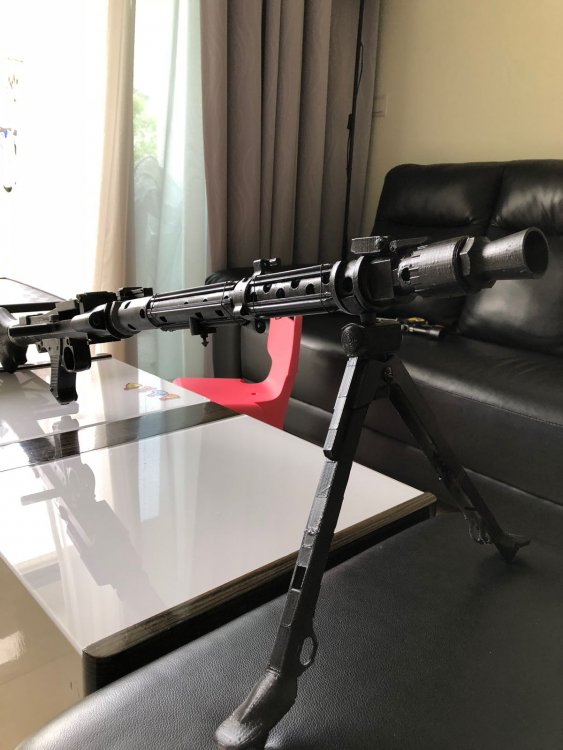
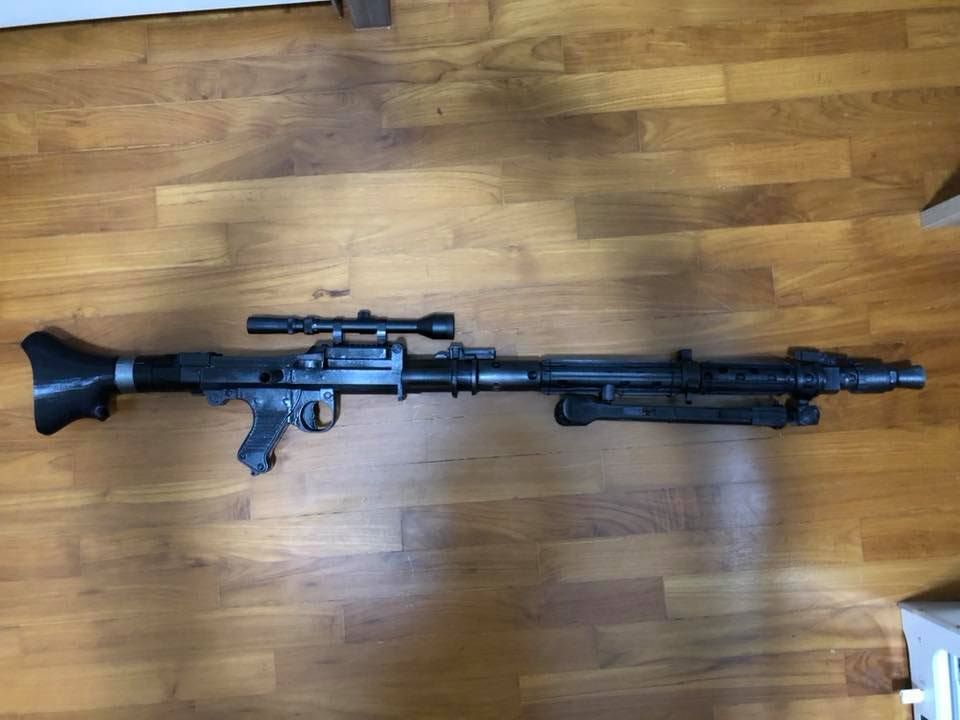
file bought from CG Trader, did some minor adjustment to have workable bipod real scope is detachable total weight about 2.3kg (with scope) / 2kg (without scope) so easy to carry for long trooping, hopefully can troop with it soon print settings : print speed : 7000mm / min main blaster body / barrels : Perimeter : 3 / top&bottom solid layer : 3 / 15% infill / rectilinear infill screw part setting : Perimeter : 7 / top&bottom solid layer : 3 / 20% infill (higher does not help) / full honeycomb infill raft : yes
 1 point
 -
Problem: You cut your thighs too short Did you get ahead of yourself? Did you try fitting your thighs for movement and then discover there's waaaaayyyyy too much black between where the top of your thigh stops and where your belt and ab plate start? Oops. You could buy new thigh pieces and try all over again. But if you have some scraps (including the pieces you just cut off, or even some larger cut-off sections), some ABS paste (for ABS kits, mode from other ABS scraps dissolved in acetone), or filler putty for non-ABS kits, you might be able to correct this issue - although it won't be fast or easy. Like you often hear when building things, it's easier to remove material than to put it back, and you're going to have to put back some material, ergo, not easy. My experience is with the Anovos ABS kit, so if you're using PVC, HIPS, etc. your filling method might be different, and you will probably have to paint afterwards, but the theory is still the same. First, start by fastening some spare scrap to the inside top of your thighs (using ABS paste or CA glue) to act as a backing to the pieces you'll need to re-add. Add a copious amount of ABS paste or filler to the top of the thigh pieces, and then glue to cut-off portions back onto the thigh as close as possible, sandwiching as much of the filer in between as possible. You can also use CA glue for faster set-up, but you'll have to work more quickly. Plus, this will leave a seam of CA glue between the visible joint of the two pieces, so if you don't want to paint afterwards, this method may not be as desirable. You'll want to ensure the facing portions are as flush as possible. You can do this by using clamps (and perhaps a flexible straight edge), clamping one side to the main thigh and the other to the re-added portion. This is necessary to not only avoid unnecessary sanding, but to ensure that the pieces were as continuous as possible for a good look. Make sure to give the filler plenty of time to dry so you can move directly towards sanding and re-filling. If you no longer have the cut-off piece, and you're good at shaping, you can create a new piece to re-add if you have enough stock or scrap. You can begin by taking a a piece of scrap large enough for the missing portion. clamp it to the top of the thigh piece and trace a line on the scrap as a rough outline to cut out the bottom so it will be flush to the top of the existing thigh. Then, before doing any more cutting or shaping, attach the piece to the top of the thigh using the aforementioned steps. Once the initial butt joint is set, get a general idea of the shape you need for the top of the thigh and trace a lin e for cutting. I was fortunate enough to be able to use some cuttings to help create this shape, but there are plenty of pictorial references on FISD, like the CRL and reference shots on these forums, to help convey the shape at the top of each thigh. As discussed earlier, the top pieces are shimmed back on using backing supports, glued to the thighs and shimmed pieces using CA glue, as they'll be permanently attached and require added strength, since the tops of the thighs take extra stress as they often get crammed into a trooper's hip when the leg is flexed. Other strips are also added to the sides to help retain the shape of the thigh in those areas. Once the butt joint is sufficiently set, you can cut along the top cut line to finish creating the new top of the thigh piece. To be honest, the easiest way to apply ABS paste in these situations is to just use your (clean, unsoiled) fingers. This way, you can press it into the cracks, smear the more liquid paste like finger paint, or sculpt more solid paste like soft clay. When you do this, make sure your hands are clean or use silicone gloves. Remember to wash your hands when you're done. The rough ABS paste is then sanded down. Then, more paste is added in divots, pock marks, and other depressions in the armor, and then sanded down. This process is repeated several times with 100 and 150 grit sand paper until the seams are smooth for the most part. ABS paste is also added at certain parts on the top of the thigh near the edges of the added pieces, to help better secure the pieces and to maintain the shape of the top of the thighs. Use a new batch of unadulterated ABS paste and very clean thigh pieces for the last coat, to color match the thighs as best as possible, as a final coat that can be lightly sanded and polished to make a natural-looking thigh piece. Before you do this, though, you'll probably need to fix your cover strips too. You might be able to source ABS or plastic from the hardware store that matches your armor color close enough, cut to the correct width (20mm); otherwise, you might need to repaint once you finish repairs. I Was lucky enough to have some scrap strip left over that I was able to butt joint cement using regular CA glue, with minimal seaming. In my case, the scrap strips were butt joined to the existing strips using a carefully-cut matching joint and CA glue which, despite the small cross-section for adhesion, worked extremely well. Afterwards, I coated the seam with ABS paste and sanded down. When I put the final ABS paste coat on the rest of the thighs, I'll do the same here to even better hide the seam to give the appearance of one continuations piece of strip. Before moving on to the final paste layer and sanding, you may need some build-up on the edge of any fabricated pieces to function as edge return. Use filler or ABS paste, and a putty knife; build-up by scraping the paste off of the knife on the back edge of the piece. The considerable layering and build-up may require some time to harden to sand and shape the build-up to match the desired edge shape and thickness. Fill in any air bubbles in order to avoid edge return cracks in the future. Finally, if you're painting the pieces, you should be able to rough them up at this point to prime and paint. For ABS kits where you don't want to paint, in order to get the best color match to the rest of the pieces, make some some new, pristine ABS paste, making sure to use only fresh scraps in a new glass jar. This mixture should be more liquid than paste to help ensure the coating is more uniform and less thick to, reduce the amount of sanding required, since it is only being applied superficially and not structurally. Once this paste is ready for application, apply it using your fingers (using clean, washed hands) like one would do when finger painting. Dab a bit onto the seam area and spread it until the paste starts to set; repeat until the seam or work entire work area is covered. After coating the entire work area of one thigh, move to the other of working both thighs. When that thigh is done, as the paste sets up fast due to its thin coat, start sanding the first thigh with 150 grit paper to remove streaks, and repeat on the second thigh. Then repeat this entire process to add a second coat. Overall, this should help minimize the seams between the pieces significantly. With that process done, it's now time for final sanding and polishing. This is accomplished using the following sandpaper grits and processes: 350 grit 600 grit 600 grit wet 1500 grit wet 2000 grit wet (optional) For the wet sanding, for those unfamiliar with the process, simply dip the sandpaper in a bowl of water to get the paper wet, and then sand with the wet paper and water. This method is used in automotive finishes and helps to polish the area before final polishing. While sanding, take care to look for deeper scratches (drying off wet areas with a paper towel to inspect work areas). If need be, drop to a rougher sandpaper or start over on certain sections to help remove deep scratches. Once you're satisfied, apply your favorite polish, like Novus 3 and then Novus 2 plastic polish, until the thighs are nice and shiny. Better! Original blog references: https://obsidiustk.blogspot.com/2016/05/the-thigh-re-re-master-ctrl-z-ctrl-z.html https://obsidiustk.blogspot.com/2016/05/the-thigh-re-re-master-pt-2-mr-sandman.html1 point
-
Great that you still aim to complete it - really looking forward seeing a suit-up, you`ve done really great so far oh...I also got an RS now1 point
-
Hehehe... Just nu ligger det väldigt på is. Kan liksom aldrig hitta tiden och friden för att sätta mig och bygga. Men jag har inte gett upp iaf. Den hänger i klädkammaren och bara väntar på rätt tillfälle [emoji6] Aaand the translation: It's very much on hold right now. I can never just find the time, or the peace of mind to sit down and build. But I haven't given up! It hangs in my closet, just waiting for the right moment. Skickat från min SM-G930F via Tapatalk1 point
-
Sounds like you are aiming for EI and then Centurion, brother! Always great to see someone who is eager to reach toward screen accuracy. By the way, fantastic job on your ABS belt placement! I do have a question about the width of your front bicep cover strips, though... (they look a bit wide).1 point
-
Yep, the first three pics are from his shop, that is where we do Thursday night Armor Parties. The rest are in my basement.1 point
-
Hej kompis, hur går det med byggandet? Translation: Hey buddy, how is the build going?1 point
-
I appreciate all of your assistance and replys. Thanks.1 point
-
Perfect! Thanks!1 point
-
Do you have any pics? Brien is correct that they are not required for clearance, however a few millimetres can help add to illusion of depth to the armour. Could you consider losing a little from the top where it is covered by the shoulder bell? Sent from my iPhone using Tapatalk1 point
-
Return edges aren't required for approval.1 point
-
After looking at mutiple photo's of Carlos' armor and conferring with a group of FISD admin/leaders/guru's it appears that Carlo's armor is an Anovos recast. I hope he can share some information/evidence to the contrary but that is what the images provided point to. That said, my Vermont group is now on the Backstage Props FOTK preorder. They say they are pulling them in June, but I believe noone when it comes to timelines anymore. I'll get it when I get it.1 point
-
Hello everyone, Updates… I got a respectable amount of work accomplish over the weekend. First, I attended an armor party on Thursday and had some help positioning some of the plates to get a feel for what needed to be trimmed. So, I learned that the abdominal plate will need to be trimmed about 1” along the top and 1.5” on the sides. This should also help in allowing the chest and back plate to sit more flush to my body. This will also mean that I will lose the top ¾” side release buckle on the abdominal plate but that is not a real problem. Also noticed that the undersuit from Jim will need some adjustments (it’s a little baggy) and the mesh area along the back neck and sides of the back plate will need to be backed with some black material. Ok so trimming… I needed to take 1” off the top of each thigh and about ¾” off each side along the back of the thigh. So I cut off the cover strip and re-attached it with PC-7 ¾” to the outside, side of the thigh. I cut off ¼” of inch to the inside side and presto. For the CRLs they will need to be closed with Velcro. I think some trimming will need to happen with the side hard plates but that will come once I get a better feel for how they fit. So after some cutting, sanding and fitting, I used PC-7 to seal up all the front seams and add strapping to some strategic parts. I also wanted to reinforce areas where snaps would be used lake the large black area on the inside of the abdominal plate in this picture. Note the abdominal plate is upside down and the top 1” has not been cut off yet. Once all the PC-7 was cured, I sanded all the seams down and added some bondo in areas that needed it. Next, I tried on the arm plates and decided how they would all fit together. I had planned on doing the same “J” cutout on the bicep armor that was used for the movie but decided against it. I opted for snaps and elastic so I made up some snap stud strips on styrene and adhered them to the inside of the armor with PC-7. I also attached the side plated to the back plate with PC-7, they will attach to the front plate with velcro or snaps then get cut down similar to what Yosh did with his side plates. Lastly, I decided to hard mount the shoulder straps to the back plate. I drilled and glued in some nuts in the underside of the shoulder straps. These will be attached with small bolts from inside the back plate and will be removable. The straps will attach to the chest plate with some other method (possibly magnets). So that is what I have accomplished. What I am planning to do is add an elastic suspender system to the abdominal armor that the chest plate, back plate, and shoulder bells all connect to. The bicep will attach to the shoulder bell with elastic. The groin and posterior plates will attach with the straps from the abdominal plate. The thighs will attach with straps and side release buckles from the abdominal plate like the screen used armor. I do not know if I will need some strapping for the forearms and shins at this time. I am holding off on adding any Velcro until the painting is done. I think the armor is coming along nicely and I hope I am staying on schedule. Thanks for the interest.1 point
-
I concur with my friend Frank. Correct on your markings. Remember, be conservative with your cutting. You can always cut more if you need to, but can never trim less1 point
-
I glued my webbing with snaps directly to the plastic. If you want to give it some extra grip rough up the Abs with some sandpaper and glue the webbing directly to that.1 point
-
I think Yosh has the dimensions in his build thread.1 point
-
@Frank75139 I am planning on coating it, yes, but I thought this is the last step.. Is there any reason why you'd recommend coating already? @CableGuy Thank you very much for this great tutorial video! I do feel a little bit more secure now I don't really have any reference pictures, I mainly looked at videos and other builds (like yours ). If you have a helpful link, hit me up! I finally have a good workbench set up and am currently waiting for my lexan scissors to arrive, and then I can finally carry on!1 point
-
And here we are: since I couldn't reach the forum on Saturday and since I was busy yesterday, finally this will be the last update of this blaster build. Kinda sad, but there's still so much more to come, I certainly won't get bored Right, let's speak RESULTS: Gotta teach my dog some manners apparently, he's not too amused Anyway, I am pretty happy with how the E-11 turned out - it is definitely not the nicest or most accurate build, but it does look pretty damn realistic and for my very first blaster (or even cosplay-like project), I am quite satisfied! Again, thanks to everyone who contributed to this thread and helped me out when I got stuck, and hopefully we'll read from each other in other threads (maybe even my TK build thread or the E-11 Blaster Display I have planned and want to start in the next couple of days And again, thanks for reading, and feel free to leave some feedback so I won't get into trouble in my next E-11 build Freddy out, see ya out there trooping some day!1 point
-
Yeah, this sounds like a last-ditch effort. Even though the images are all “fixed” on the forums, I strongly encourage everyone to make your backups now... they make not be around much longer as and I and Danny learned fixing a lot of the threads on FISD, it is MUCH harder to do so without access.1 point
-
Nice Cricket. Looking forward to it. I also wanted to say how amazing this build thread is. Maybe it will inspire my fiance' to get herself in some white armor1 point
-
Lord of the Rings The Fellowship of the Ring Sent from my iPhone using Tapatalk1 point
-
lol just following sorry brother1 point
-
Look forward to seeing you in the EIB ranks and beyond!1 point
-
I like the separate lenses and the different look to the inside of the helmet. Using water-weld putty and blind nuts to hold in the lens. Just grabbed some that I have from other projects. First step is to rough up the plastic so the putty has positive contact. Create a roll with the putty and place around the opening. Then place the nuts in the putty and fill in around each post. Make sure you have the screw all the way in so that no putty fills up the opening (this would make the screw not go in all the way). Then back out each one and using a finger that has been wet with water, smooth out as much as you can. In this application, you do not want the putty at a 90 degree angle, you want it to go slightly away from the opening. This way the lens will push against the eye opening and not be pushed away by putty that is sitting too high. If that happens, you will have gaps. Don't worry about being totally smooth, the plasti-dip and the lens itself will be covering up the putty.1 point
-
4-5 light coats and it will be fine.1 point
-
1 point
-
And this how far I managed today (tape is just there for checking fit) and left bicep needs coverstrips but didn’t have time for that - but there’s always tomorrow1 point
-
Thought I'd add a quick summary of my build approach. Lemme qualifying this by saying I'm a total newbie, have not built a single shiny white plastic thing yet and these are merely my opinions arrived at after (merely?) three exhausting yet exciting months of research. I've read quite a bit on the topic of what I'm calling build approach and there is a lot of passion and opinions around what type of build 'philosophy' people have ranging from what they reference, what they like personally or who or what they're modelling after example or build-thread wise. I'll just try to summarize based on two aspects; references and (personal) preference. References: This is a simple one for me but I realize it leaks into philosophy and preferences. First and foremost, ANH - Movie Pics and Armor reference pictures (Lucas Film Archives JoeR and TKCaleb) to the actual - original armor. This is the state we hope to arrive at, a visual source of the armor we strive for and while there are countless other sources, I maintain that these are my base source in my attempt to stay true if for no other reason than I don't want to get too lost in translation. I emphasize "too" lost because there is so much great information and versions of information available, it's easy to fall down a rabbit hole or go squirrel so to speak which I've done many times. Picture references that refer to the actual - original armor and add dimensions, specifications, criteria, etc. (CRL's, Billgrams...) While I list this as second, I only do so because these include translation and criteria added after the fact by the all the fine folks that came along after the movie and turned this into something closely resembling a science! Preferences: This gets into the more subjective and debatable aspects but I'll throw my preference in by stating the following in hopes of staying true or 'on course' as I progress. While I admire those that take this approach and will likely tread down this path in due time as I expand on builds, I'm not (initially) attempting a perfect rendition of Movie (specific set of armor in a specific movie scene) armor. Rather, I'm shooting for an "idealized" copy that looks like a set that just came off the assembly line and admittedly omits a few of the visual elements that make it truly movie accurate (examples; calf closure using hooks and helmet-mold impurities). Idealized as in Splinter of the Minds Eye is a clean, shiny and as perfect (as in unblemished by use) as this newb can manage, set of armor that fits as well as the armor (size and my ability) allows. That's one of the reasons I chose TM armor because, while it does not contain the (accurate) blemishes and exacting scale that a number of derived armor sources do, it meets the visual model that I envision as idealized. One other aspect of my build preference is to take advantage of the modernized techniques that a number of FISD have pioneered. I hope to limit this to internal (non external) - visual aspects such as strapping, snapping, velcro, reinforced areas and other improvements that do not effect the outward, screen or CRL accuracy. OK, that wasn't much of a "quick' summary but captures what I've been thinking about. Both aspects of my build approach are where I'll try to stay attuned but please, by all means, keep me honest Lotsa good stuff trickling in over the last few weeks as I gather my tools, materials and accessories. In my next post I'll be shooting for a visual reference, cost break-down and link-source for everything I acquired in preparation for the build.1 point
-
And...my team won yet another important game (1-0) derby against the team in the lead of the league an hour ago (my team is second - early in the season but still) so that’s also a plus here’s were I am right now - torso is complete and going to start working on the arms I think the belt is a pretty good match for ”my” Trooper1 point
-
Molds done! Sent from my SM-G925F using Tapatalk1 point
-
Spats Pt 3: I glued the painted greeblie to the spats and lined up the proper placement of the accompanying snap on the greeblie for proper closure. I used the Devcon glue for the male snap. After test fitting the spats around the base of the shin, they slid below the shin a little too easily after walking around so I applied some velcro on the front of the shin to hold them in place better.1 point
-
Dude! Your build is looking great! And that DLT-19 and E-11 are sick!! Sent from my iPhone using Tapatalk1 point
-
One suggestion is to wear your undersuit when test fitting your kit. Your kit will fit you differently when you're all compressed into the black gear! You'll be able to make the most accurate sizing this way. Whenever sizing a kit down, remember that you need to keep things in proportion if you want the overall armor to look balanced. If you're bringing the cod up, you'll also need to reduce the size of the kidney (cut from the bottom only!), and the back plate (also cut from bottom only!). After making these trims, you will find that you'll need to trim the chest down to keep things in visual balance. Try to keep the ab buttons in the center of your chest- somewhere just below your sternum and just above your belly button. Once you've got that locked in, you can then see where the chest plate would naturally line up. You want the ridge detail on the chest to fall somewhere in the middle of your breast. For me, I needed to trim the neck line (because the chest ridge line needed to come up, and the neck was cutting into my throat), the bottom of the chest (because it was sitting on top of the ab button boxes), and the sides of the chest plate (because it was too wide and my shoulder bells kept hooking on to them). As always, trim conservatively, and test fit, test fit, test fit!1 point
-
Hey Lindsey, good to see you back on the build! I've always seem to have understood that you should line up your forearms at the tops, not the bottoms. You're going to be cutting off or trimming the bottoms anyhow. And there's detail at the top that you want to retain whenever possible. Regarding the tapering of the forearms, it won't affect approval if you have cylinder-forearms. I tapered mine in so they don't rattle around on my wrists. If you decide to make them fit better, you would make any tapering adjustments at the back of the forearm, not the front. It shouldn't affect the front cover strip at all. About that return you outlined in the green square, a Dremel should be able to get in there. I used a large sanding barrel in there, and it worked great. Just take your time on it, and you should be fine. Keep up the good work!1 point
-
So much information! Thank you for providing such a detailed overview of the process, with pictures too! I'm a costume newbie looking to build a lv3 Captain Phasma for 501st approval as my first ever build, so any highly detailed information about the actual building process is MUCH appreciated. Definitely worthy of a bookmark!1 point
-
Hand guards glued to gloves and T-nuts glued in for lens mount. Sent from my iPhone using Tapatalk1 point
-
Doing sum busy work... Strapping is coming soon... Why not be prepared!1 point
-
Nice job on shortening those shoulder straps, Ilan! I am working on your application now, brother.1 point
-
So much to post and so little time. I've been plugging along with strapping and plan to provide details of all of that soon. In the meantime however I have a troop next weekend that I'm cramming to finish this by so you only get a couple of teaser photos from my test fitting earlier today. Upper half is mostly done and I'm working on the bottom half now. The little Yoke discrepancy has already been corrected. See you folks on the other side!1 point
-
Progress of the day was to complete the thighs namely adding the ammobelt, elastic and sand it smooth also did a fit-check, pretty happy with the look and that I could manage stairs quite easily this time so that was good And I coulden`t resist taping it up for a full body - I have a good feeling about this1 point
-
On a sidenote: my team won 2-0 woop woop Anyways.....finished the shins and here is were I deviate from RS as I´m not a fan of the two "outer" pairs (2 outer right and 2 outer left) one gets with the kit, so I bought some TM Shins. Sniperplate is RS though so one can safely say the plastics match1 point